With a busy week on the parent carer front coming up with meetings etc, I thought I'd try and get a quick game in beforehand to have a bit of 'fun'. Nothing fancy mind, just a simple game using Black Powder II and my ImagiNations forces that had a recent outing at the Cotswold Wargames Day.
The Fluff.
The Banat of Bolsonaro had been illegally logging trees along the Ruthenian border. A couple of Infantry Brigades with a small cavalry contingent were dispatched to suppress this activity and to bring the Banat back under Ruthenian control.
The Game Plans
The Banat forces had forewarning of the Ruthenian approach, so set up a defensive position in advance of the sawmill, with an attempt at defence in depth with their right flank covered by some cavalry. For the Ruthenians, their plan was to pin the Banat troops in place and use their right wing to push round and turn the flank, thus opening the way to the sawmill.
Rather than a detailed AAR, hopefully the annotated photos will tell the story of how the action unfolded.
 |
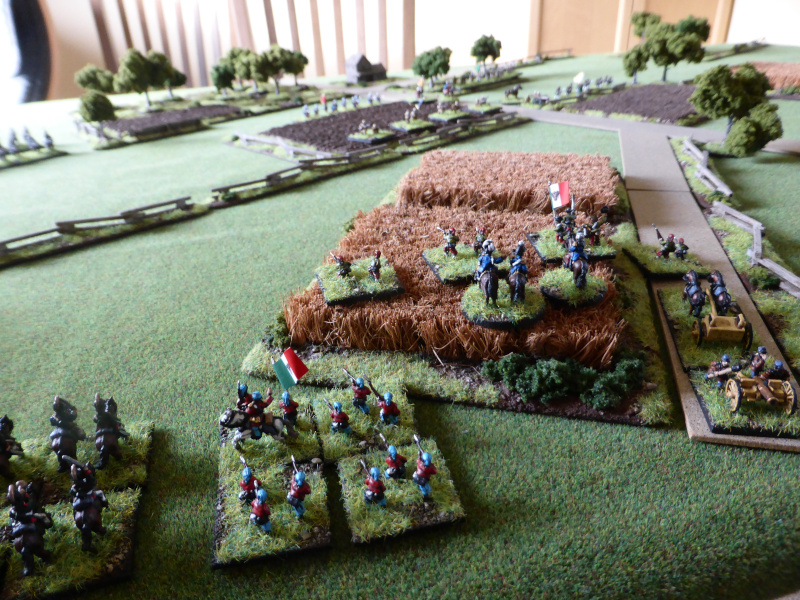
| An overview of the table, with the Banat troops along the fence line in the middle of the table, with the sawmill at the bottom by the road. The Ruthenian's would arrive via the top table edge using mobile deployment. |
 |
| The objective with Banat troops to the front. |
 |
| The Banat cavalry, with Hussars and Mounted Infantry in front. |
 |
| The defence in depth cum mobile reserve. |
 |
| Likewise. |
 |
| A view from the Ruthenian side. |
 |
| The Ruthenian centre. |
 |
| Infantry and cavalry to the left flank to attack as opportunities arise. |
 |
| The flanking force. |
 |
| The end of Turn 1. The Ruthenian centre and left moved smartly forward and started to engage the enemy where possible. Unfortunately the flanking force failed to arrive. In response the Mounted Infantry dismounted and were covered by the Hussars. The reserve moved forward to the ploughed field to take the fight to the enemy. Neither sides shooting was very effective, but some Disorder was caused to both sides. |
 |
| The dismounted infantry covered by the Hussars. |
 |
| The Reserve has moved forward to help the Banat skirmishers. |
 |
| The Banat at least disorder the enemy. |
 |
| The Ruthenian artillery come under fire from the off. |
 |
| The end of Turn 2. The Ruthenian centre and left flank held position and managed to cause hits and disorder across the Banat frontline. Their right flank arrived and moved swiftly forward to begin to try and flank the Banat positions. In response the dismounted infantry moved forward to add firepower to the Banat frontline, but the shooting was pretty poor and had little effect upon the Ruthenian troops. |
 |
| The Ruthenian flanking force arrives on the right. |
 |
| The dismounted infantry move forward to bring added firepower to bear. |
 |
| At the start of Turn 3 the Ruthenian Heavy Dragoons charge forward and are met by the Banat Hussars who... |
 |
| ... are unsurpisingly beaten and driven back but... |
 |
| ... then the dismounted infantry mount up and charge the Heavy Dragoons in the rear, destroying them in the process! |
 |
| The end of Turn 3. The Ruthenian left had an Infantry Regiment make a disorderly retreat to avoid the chance of it routing under further fire. Once again the flanking force moved quickly on the right, but poor shooting across the board meant that they gained little advantage. Yet again the Banat troops couldn't hit a barn door nad so remained under some pressure! |
 |
| The reserve in the woods moves to meet the threat on their left flank. |
 |
| The Banat centre comes under pressure. |
 |
| A Banat infantry regiment makes a disorderly retreat to try and preserve itself to prolong the fight. |
 |
| Early on in Turn 4 the Banat forces loses its artillery piece and has an infantry regiment Shaken as well. |
 |
| The end of Turn 4. The Ruthenians pushed forward on all fronts and really brought pressure to bear on the Banat troops, who were now without their artillery. When they really needed some good shooting, yet again they failed to make any real impact on the Ruthenian troops. |
 |
| The Ruthenian flanking force enfilades the infantry regiment along the fenceline whilst the troops in the woods come under fire too. |
 |
| The mounted infantry once again dismount in the ploughed field to try and anchor the right flank. |
 |
| The Ruthenians close in all along the Banat line. |
 |
| The end of Turn 5. The general advance continued and in some conbined infantry and artillery fire, a Banat infantry regiment was KO'd, that has the Brigadier and General attached, this KO'ing them too! With this sudden turn of events, the Banat troops began to withdraw or surrender as they were without most of their commanders. |
 |
| The end of a regiment and the commanders. |
End of Game
So with the loss of the Banat command, the game was effectively over. Some intiative moves could have been made to try and continue the fight, but they were outnumbered, out gunned and could be out manouevred. C'est la guerre!
Post Game Thoughts
A fun and pretty quick game which was what I needed to keep off my busy week and nice to get back into some solo gaming at home after quite a break. As always some thoughts on the game etc:
- With the big moves you can get in BPII, you do need a big table really, as suddenly you can be right in the thick of the action from the off. I prefer a bit more manouevring in my games so in future may play on a 6' x 4' table to help achieve this. It is worth noting that this game equates to a 7' x 5' table if played with normal distances, so a bigger table would be the same as 12' x 8'.
- Having said this, I can see why for a mid-week or club night game when you only have limited time to get a resolution in a game, this speedy movement has its advantages.
- I'm still not sure if I'm playing skirmishers correctly when behind a fence line. Currently there is a -1 to hit for the fence and another -1 for them being a dispersed target. Thus they can only be hit on a 6, yet when in a BUA, you don't count the dispersed target modifier. I need to re-read the relevant sections carefully as they seem to hand around too long compared to their actual fighting strength and efficacy.
- I liked having the Mounted Infantry in the game, but for European based games I would use them sparingly. Cavalry did fight dismounted, but mostly in skirmish actions etc and not main battles from what I've read.
- The rules are beginning to flow but naturally I need more games to get completely au fait with them again. At least each game I feel I'm learning something 'new', which is of course good.
- The loss of the commanders brought the game to an unexpected and sudden end. I much prefer the Honours of War system where a new commander arrives the next Turn, promoted from the ranks as it were, either with a lower command rating or a random one. This I think I will adopt for future games as it works better for me and adds more fun to the game.
- Both sides shooting was less than effective, but at least there was enough Disorder going round to spice things up. I did find after the CWD game that the artillery was concentrating on counter-battery fire for most of the game and this felt right to me.
- This game I did get to use those Rally rolls that did help keep some units in the game when they might have borken due to a failed morale check. This is especially true of artillery as they only have a stamina of 2, so are unlikely to hang around too long.
- I did use Disorderly Retreats too which like the above, helped keep units in the game. I didn't use the 'Whipped' rule, as the table felt too crowded for it and would probably work better on the 6' x 4' table for the reasons given above.
- The final cavalry action with the dragoons being charged in the rear, I'm not sure if I played this correctly or not. The outcome felt OK but I think the Hussars might have been broken too. Again something to check in the rulebook when I have some time to read it through without the pressure of a game at the same time.
I'm happy that I got my game in although it was a sudden last minute spur of the moment decision, as this week I doubt I will get much time for painting, but you never know. I am certainly keen to keep up the momentum on this front and this game has certainly helped with this. A few additional units have been ordered from Pendraken and I look forward to receiving them soon.
So until next time dear reader, stay safe and keep healthy!


Steve, I Love your game presentations. Your scenery and table layouts are quite distinctive. I could easily pick your table out of a line-up and attribute it to you. With some of your reservations with BPII, have you considered amending HoW (which you enjoy and know very well) to this period? I do not see why it would not work for you. The basic game engine ought to be transportable to this period with little difficulty.
ReplyDeleteOn leader loss, I am OK with the loss of high-ranking leaders bringing the command structure and game to an early conclusion.
Great stuff!
Thanks Jon and high praise indeed:). I have pondered porting some of the HoW mechanisms over for my solo games, but want to give the RAW a chance. The only change really would be some of the weapon ranges, but that's something for another day.
DeleteI think I would be a bit miffed if in say Turn 2, my Brigadier popped his clogs, thus leaving a whole flank without a leader. But then there is a challenge in having to carry on with the fight. Both options have their merits for sure.
Lovely table and of course with ‘Sawmill’ in the title, you had my immediate nostalgic attention :-)
ReplyDeleteThe Hussars look splendid and the dragoons full deserved to be charged to their rear for trying to spoil the Hussar’s day! :-)
I’m not sure whether I got your skirmisher point correctly, but as I read it there will be a -1 on the to hit for skirmishers, but the cover is giving a +1 on the morale test against hits (for the light cover). I am never sure whether fencing is enough to give cover, but tend to use it anyway, just to add an extra bit of dimension to the battlefield.
There was a deliberate nod to the classic scenario purely as it was easy to come up with given the buildings I still had to hand from the CWD. The Dragoons paid the price for their impetuosity, that's for sure!
DeleteIn the GH! supplement, fences can give a -1 to the hit roll, so combined with the dispersed target, this creates the 6 required to hit. The morale save of +1 is an option in the supplement IIRC. Again, I need to have a good read of the relevant sections in the cold light of day.
A benefit against hit and then one to help morale would seem to be double jeopardy for any attacker. I suppose one would be forced to make contact and ‘flush’ the skirmishers out as a straight up firefight would consume too many turns.
DeleteYou only count one modifier to the to hit roll as per the table on p49 of the main rulebook. So the Skirmishers would not benefit from the -1 to hit provided by the fence, ditto artillery. This works better it seems to me, but the proof of the pudding and all that...
DeleteThat looks like it was a good way to spend a day Steve. 😉
ReplyDeleteYour imagi-nations forces are certainly colourful. As Jonathan F says, your table/terrain has a very pleasant distinctive look about it. 👏👏
Have you thought about adding further troops to give the armies more differences? You could, for example, give one army a sizeable force of militia-type troops (plenty of them, but not as well disciplined/trained/equipped as regular, professional soldiers) whilst their opponents might have an “elite” force of volunteers (such as the historical Papal zouaves or Spanish Civil War “International Brigades”). Or maybe add force of irregular “warriors” perhaps from a “disputed” region that both sides claim so, in large games, you could add the warriors either to one side or the other - yet ensure that you can never be entirely sure of their reliability.
Cheers,
Geoff
Thanks Geoff! At the moment, I'm keeping things pretty generic for both sides, so that I can focus on the core game mechanics. Once I'm comfortable with those, then I will start adding in more detail to the units, which in turn will give more interest and flexibility to the scenarios.
DeleteLove the entire set up mate but the troops themselves are delightful! Are they 6 or 10mm ?
ReplyDeleteGlad you really liked everything, especially the troops. They are all Pendraken 10mm, mainly from the 1st Schleswig-Holstein War range, with some ACW and NWF thrown into the mix for fun. They paint up really well due to the detail in the sculpting. At this smaller 'scale', you need brighter colours and a more basic approach to make them pop when on the table.
DeleteA great table Steve, as Jon has already alluded to, and seems like the scenario privided you with an interesting game. I have only played BP and HC a few times but I didn't really warm to them...in one game, the British cavalry got a triple move result in the second turn, charged the full width of the table, and caught the French in column (I think) wiping out half the force there and then....game effectively over after about twenty minutes play...not very satisfying!
ReplyDeleteThanks Keith and for a simple game it provided me with enough entertainment as well as answering some questions on the rules. Slowly but surely on this front.
DeleteThe whole sweeping movement and charge thing I don't think is right and it can certainly spoil any game balance very quickly, as you point out. In our games we tend to take a more pragmatic approach and think what realistically would a unit do, even though it could advance to a hill, spot the enemy and then charge, which just doesn't sit right with us.
HC I want to give another go, but I'm in no hurry just yet as I have plenty of other projects in the pipeline as it is.
Nice looking game Steve , I have BP and HC but never seem to play them at the moment. Perhaps I should change that ?
ReplyDeleteThanks Matt. I feel that if you've got some sets of rules that just work for you, then why change? Maybe 5 years ago I wouldn't have taken this view, but these days a more focussed approach is working for me. At least I can focus on my games more, rather than the rules, famous last words of course.
DeleteFantastic looking game Steve with a iconic name, thaks for sharing.
ReplyDeleteWillz.
Many thanks Willz and there are some more classic scenarios I keep meaning to try and get onto the table. Maybe something to aim for this Autumn?
DeleteNice looking game and a fun solo effort. I haven’t played BP so can’t help with the rules. More plays will of course bring more familiarity. 😀
ReplyDeleteThanks Stew! Some more games planned, but some unusually warm and sunny weather delayed these for a few days.
Delete