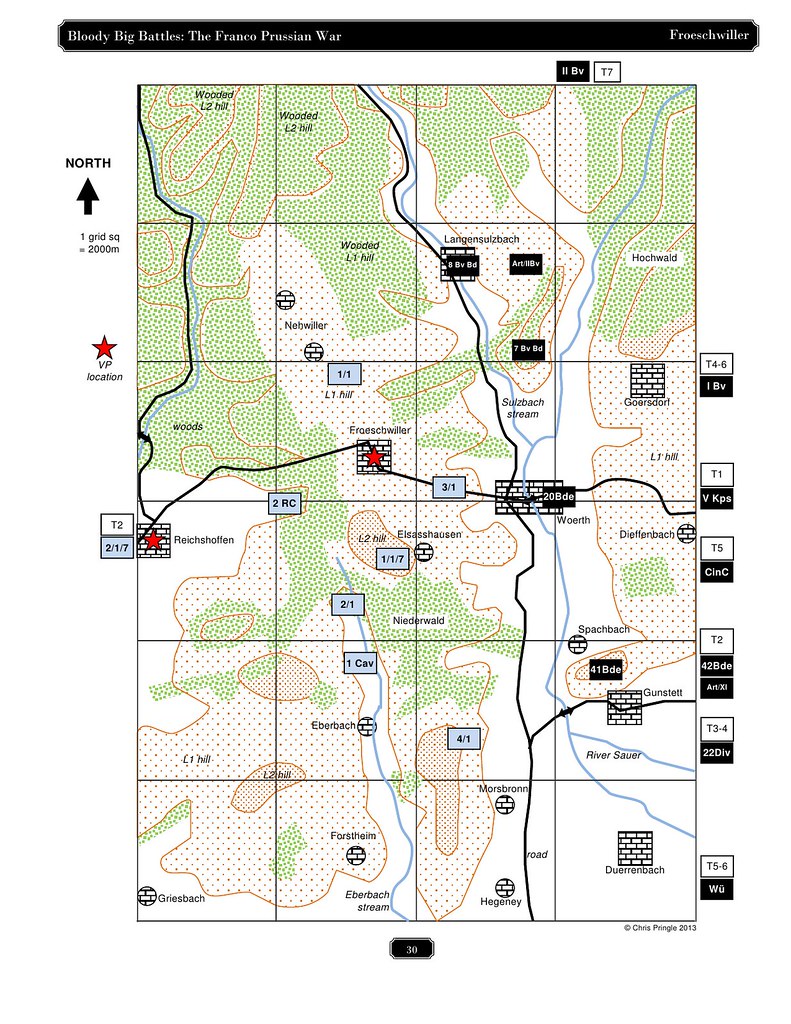
As planned Dave and I were able to play out the Spicheren scenario as planned this week, the last of the Frontier Battles of the Franco-Prussian War. Once again we used the Spicheren scenario as contained in Bruce Weigle's '1870' rules as our guideline for Orders of Battle, table layout, victory conditions etc, details of which can be found below:
Orders of Battle
Orders of Battle
German Army
|
|
27th Bde/14th Div [6] Trnd NG
28th Bde/14th Div [6] Trnd NG
Cav [1] Trnd
14th Div BLA [1]
|
27th Bde just outside Saarbrucken
28th Bde on 27th Bde right flank
Cav in front of 27th Bde
Supporting both Bdes at German discretion
|
Gen GOEBEN VIII Korps
16th Div [3] Trnd NG
Cav [1] Trnd
16th Div BLA [1]
6th Cav Div [1] (NOT part of VIII Korps)
|
Arrives 1500 in footsteps of VII Korps
Arrives 1500 in footsteps of VII Korps
Arrives 1500 in footsteps of VII Korps
Arrives 1600 in footsteps of VII Korps
Arrives 1600 in footsteps of VII Korps
|
Gen ALVENSLEBEN III Korps
9th Bde/5th Div [6] Trnd NG
10th Bde/5th Div [6] Trnd NG
Cav [1] Trnd
5th Div BLA [1]
Gen ZASTROW VII Korps (14th
Div)
VII Korps BLA [1]
5th Cav Div [1] (NOT part of III Korps)
|
Arrives 1600 in footsteps of VIII Korps
Arrives 1600 in footsteps of VIII Korps
Arrives 1600 in footsteps of VIII Korps
Arrives 1600 in footsteps of
VIII Korps
Arrives 1600 in footsteps of VIII Korps
Arrives 1600 in footsteps of VIII Korps
Arrives 1600 in footsteps of VIII Korps
Arrives 1600 in footsteps of VIII Korps
|
STEINMETZ
|
Arrives 1900 Saarbrucken
|
French 2nd Corps
FROSSARD
|
|
2nd Corps FROSSARD
|
Deployed in 1800 turn at Forbach
|
1st Div (Verge)
Valaze (1st Bde) [4] Trnd, LB
Jolivet (2nd Bde) [5] S Trnd, LB
RA [0.5]
|
Valaze deployed between Forbach and Stirling
Jolivet deployed Stirling Wendel
Choose either with 1st or 2nd Bde,
|
2nd Div (Bataille)
Pouget (1st Bde) [5] S Trnd, LB
Bastoul (2nd Bde) [4] Trnd, LB
RA [0.5]
|
2nd Div in and around Forbach area
|
3rd Div (Laveaucoupet)
Doens (1st Bde) [4] Trnd, LB
Micheler (2nd Bde) [5] S Trnd, LB
RA [0.5]
|
Doens deployed in St Arnaul Wald
In and around Spicheren
Choose either with 1st or 2nd Bde
|
Cav Div [2] Vet
|
Supporting Jolivet behind Stirling Wendel
|
2nd Corps Arty RA [2]
|
Supporting Jolivet behind Stirling Wendel
|
2nd Corps MG [1]
|
Choose either with 1st, 2nd or 3rd
Div.
|
Scenario Details
All hills are classed as Steep.
All French units are Passive.
Forbach, Stirling Wendel and Saarbrucken are all classed as Towns.
The action starts at 12.00 hrs.
The French deploy first as per the options outlined above.
The Germans move first.
Victory Conditions
The French have to protect their supply base at Forbach until 18.00 hrs, when they can start to withdraw off the table as they fear an attack by the German 13th Division on their left flank. They have to withdraw in good order.
For the Germans, they need to secure Forbach and the Spicheren Plateau as quickly as possible, to allow their units to push forward into France.
The Game
Having broadly deployed my French markers in the morning, it was just a case of getting the troops out of the case and we were ready for the off. So without further ado...
Having broadly deployed my French markers in the morning, it was just a case of getting the troops out of the case and we were ready for the off. So without further ado...
 |
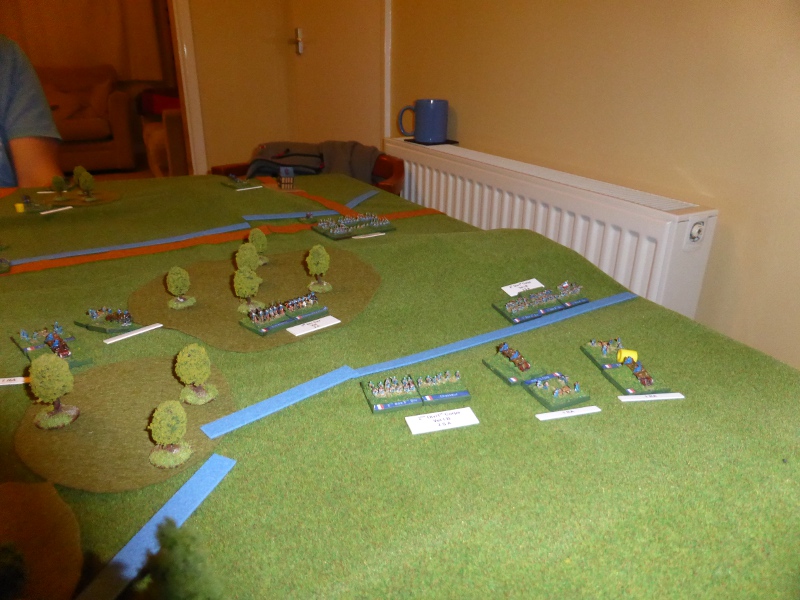
| A broad overview of the table with the units in their positions at 12.00 hrs. |
 |
| Taken in the morning from Saarbrucken to get a better idea of the different elevations on the table. |
 |
| As above. |
 |
| The main French force deployed between Forbach and Stirling Wendel, with the rest on the spicheren Plateau and in St Arnaul Wald. |
 |
| A slow start by both sides, with the terrain and lack of commanders slowing down movement. The Germans move towards the St Arnaul Wald to try and clear the roads for their re-inforcements that will arrive later. |
 |
| The advance guard of the German army, the 27th & 28th Bde, form into line in front of the St Arnaul Wald, whilst the French 1st Division moves along the valley towards them. The French 2nd Division attempt to occupy Stirling wendel, but are rather tardy in their movement. |
 |
| The French 1st Division move into the Spicheren Wald, supported by artillery. |
 |
| The main French force stalls somewhat as the Germans and French come to blows in the St Arnaul Wald. |
 |
| Attempting to march to the sound of gunfire... |
 |
| Battle is joined with the French holding their own for the moment. |
 |
| Frustratingly slow movement by the French 1st & 2nd Division leaves the French 3rd Division to do battle with the Boche. |
 |
| The French force seem reluctant to leave the valley. |
 |
| The Germans are pushed back by the weight of French fire as they attempt to assualt. |
 |
| 15.00 hrs and suddenly more German troops appear on the hills outside of Saarbrucken. This comes as a bit of a shock to the French who move back, glad that they didn't advance too far down the valley. |
 |
| The French are wary of the sudden appearance of German troops from Saarbrucken. |
 |
| Once again French firepower keeps the Germans at bay. |
 |
| As more German troops appear, their 16th Division moves towards the St Arnaul Wald to support the 27 & 28th Bdes. Fearing their supply base at Forbach being overrun, the French begin to withdraw towards it in an orderly fashion. |
 |
| The French, for once, withdrawing in good order. |
 |
| The firefight intensifies, leaving the French Low on Ammo but one German unit Spent. |
 |
| 'Too Little, Too Late'. The Germans manage to force the French back off the spicheren Plateau and out of the St Arnauld Woods, but the main force has withdrawn in good order. |
 |
| Having performed a very successful defence, the French 2nd Bde, 2nd Division withdraws with the Germans too exhaused to persue. |
Finally a French victory, all be it a minor one, but a victory nevertheless. Viv la France! Vive l'Empereur Napoleon III!
Post Game Thoughts
Once again a great game and as ever, a very enjoyable one. So why did the French manage a win this time? As ever a few thoughts below:
- The terrain had a big impact on the game as the steep hills and woods slowed both sides down, making progress slow and at times very difficult.
- The terrain gave the French a very good natural defensive position. Advancing up the valley was not a real option for the Germans, so they are forced up the steep hills and through the woods, giving the French time to use their longer range fire to its best effect. Deploying the 3rd Division in the St Arnaul Wald was a good option as it helped protect them from incoming German fire until battle was joined.
- The lack of German commanders early on slowed their units down. This coupled with the terrain issues mentioned above made it quite a hard task for the Germans from the start.
- The mixed German deployment meant that their units arrived piecemeal and not in an ideal order. A lack of guns (for once) blunted their offensive edge.
- The Germans had lots of cavalry that basically just got in the way and were of no use in the battle.
- For once the French did well on their commands rolls (generally speaking) and some poor command rolls and silenced artillery helped them when they needed to start withdrawing.
After the game we chatted about a few options of scenario tweaks that could be made to explore a few 'what ifs?'. They were:
Having played out the Frontier Battles part of the campaign, I'm not sure what the next plan is. With Easter imminent and work and family commitments over the next few weeks, it may be a while before we meet up again. If Dave has got his Austrians painted, we may even move to the 1859 or 1866 campaigns...
- The French have their left flank secured and are pushing on towards Saarbrucken. Move the action back to earlier in the morning when Frossard's 2nd Corps had advanced nearly to Saarbrucken. Their objective is to enter German territory and take the fight to the damned Boche! This would have given them a great morale boost and probably dented the Germans morale before the campaign had really got going.
- Keep the scenario as is but widen to the table and allow the German 13th Division to arrive from the West. do the French stand and fight or wirhdraw in the face of this threat. Given how hard it is for the Germans (famous last words) to advance on Forbach, this could make for a very interesting scenario.
Having played out the Frontier Battles part of the campaign, I'm not sure what the next plan is. With Easter imminent and work and family commitments over the next few weeks, it may be a while before we meet up again. If Dave has got his Austrians painted, we may even move to the 1859 or 1866 campaigns...