A month or so ago Keith mooted the idea of putting on one of his 'Big Games' at his local village hall. Fortunately he had enough interest from his gaming chums and so yesterday we all descended upon Northleach for the game. Things were more or less ready when we arrived due to Keith's sterling efforts and so after the usual chatting and catching up, we were ready to go.
Details of the historical battle can be found on the brilliant Obscure Battles Blog and Keith had given each side some scenario specific information. Paul and I took on the part of the Austrian commanders with Adam and Jon their Prussian opponents. Keith would be the umpire and help out with any rules queries, given that we were using his 'Post of Honour' rules.
Looking at the deployment of our troops and the fact that Frederick the Great would be arriving later on in the battle, we decided upon demonstrating against Chotusitz, with our main effort going into pushing back the Prussian right flank and dominating the centre ground. Once this was achieved we would then attempt to take Chotusitz from two sides. Well that was our plan, but how did it work out? A brief summation will have to suffice as I didn't take any notes, but did grab some photos during the game which should help aid the following narrative.
Paul took command of the left flank, myself the right and we sort of shared the centre. The Austrian cavalry moved aggressively forward on the left and in a few Turns had driven off the Prussian cavalry leaving them in near total control. In the centre some Austrian Hussars overran a deployed cannon, leaving the Austrian infantry with an advantage in firepower, which they made the most of. On the right both sides cavalry were hesitant, not wanting to commit themselves too early. The Prussian cavalry on their left flank moved through the town of Chotusitz towards their centre, given that the Austrian cavalry were in the process of taking control. As this was happening, the troops in and around Chotusitz were exchanging fire, with the Austrians certainly getting the better of it. Then suddenly the Prussian troops in Chotusitz broke to a man due to a wave of 'failed morale' as most were already close to breaking.
Suddenly the game took on a whole new complexion, as this loss of troops forced the Prussians to begin pulling back until they could make contact with Frederick the Great who had only just appeared on the table. However the Austrian cavalry on the left flank forced the Prussian columns to form line so as not to be caught out by a sudden charge. This slowed the Prussian troops arrival to a crawl, allowing the Austrians to take control of Chotusitz unopposed as well as the centre of the table. With no realistic prospect of the Prussians being able to meet up and with the Austrians moving into position astride a low range of hills in two lines, Frederick wisely decided to call it a day and move back to where he had come from.
Some photos of the action with captions as appropriate:
 |
| The Austrian right flank in front of Chotusitz. Prinz Leopold and the Prussians have been surprised as the whole Austrian army hove's into view. |
 |
| A view from the Austrian left flank, where they have a slight advantage in cavalry. |
 |
| A view from the Prussian right flank, with their cavalry just in front of a marsh, which counted as impassable terrain. You really can see how few troops there are facing the might of Austria. |
 |
| A close up of the Prussian cavalry. It was good to see Keith's figures out again en masse. |
 |
| The Austrian artillery and infantry ready to attack. |
 |
| The Prussians having suddenly been caught out have deployed in front of Chotusitz. You can see the Prussian cavalry reserves at the top right, that would move through the town towards the centre. The Prussian Hussars top left failed to move much all game despite Adam's best efforts. |
 |
| Adam ponders the Prussian's options as the cavalry battle on the Austrian left is in full swing. The Austrian infantry are moving towards the centre too as the Prussian cavalry move through Chotusitz. |
 |
| Keith is checking some move distances as Jon looks on pensively as the Prussians are under pressure. |
 |
| The Austrian cavalry has been pushed back but the second line holds, but elsewhere they are getting the better of the Prussian cavalry. |
 |
| Another close up of Keith's lovely figures and the useful markers each side had. |
 |
| A view from the Prussian right flank. You can see how open their centre is and the Austrians are doing their level best to take it. |
 |
| The Austrian right begins to move forward. |
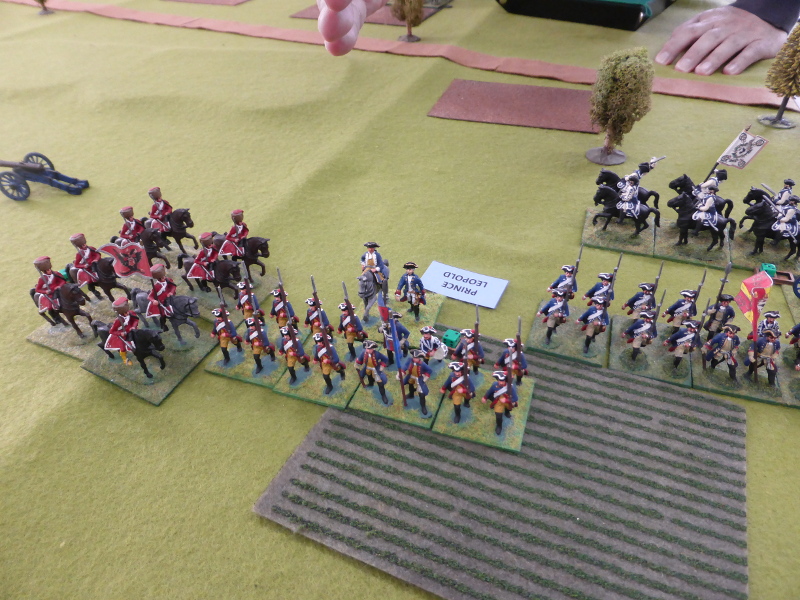 |
| The Austrian Hussars, having just overran the Prussian gun (top left), charge into the Prussian infantry, who do manage to change facing to receive the charge, driving off the Hussars in the process. |
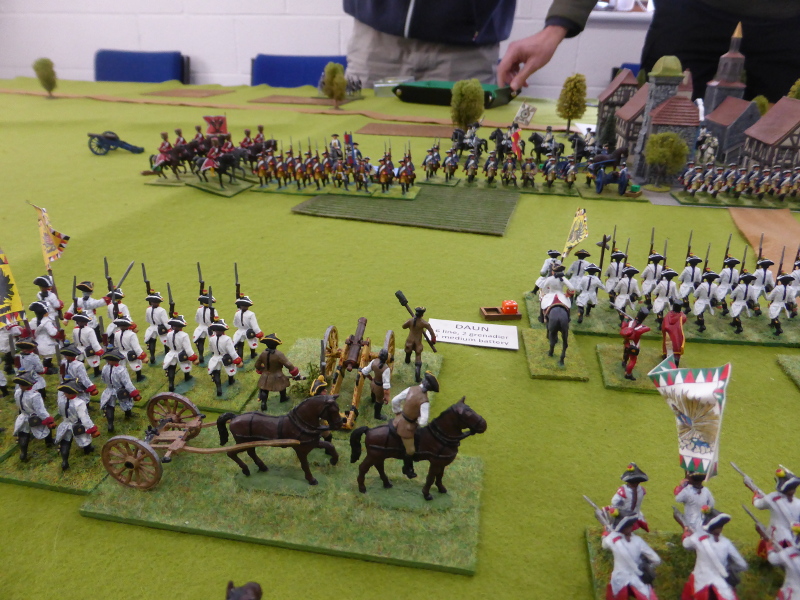 |
| The Austrian 'target rich environment' as Keith succinctly put it! |
 |
| Suddenly the situation changes as the Prussians flee from Chotusitz and the Prussian cavalry on the Austrian left wing has been driven off. Frederick the Great arrives not a moment too soon (top right table edge). |
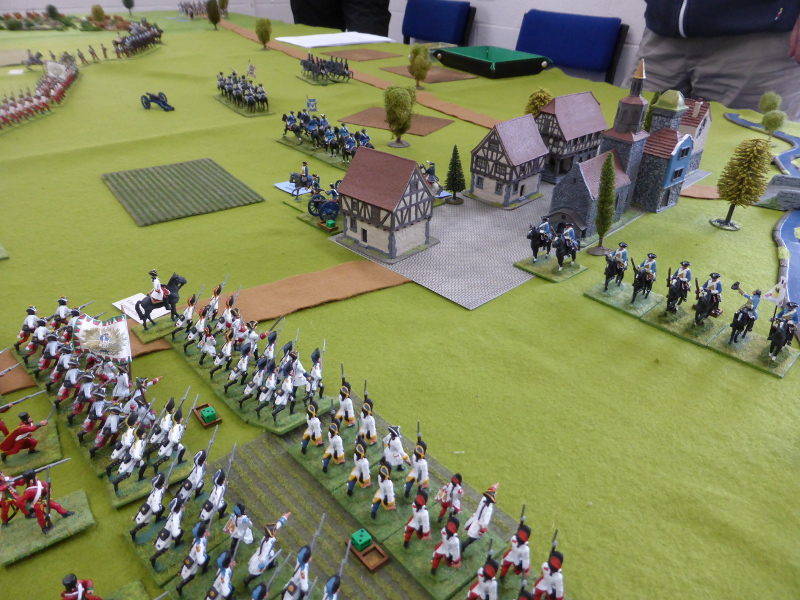 |
| The Austrians can't believe their eyes! |
 |
| Jon ponders the dire Prussian position, as the Austrian cavalry by the marsh and road force the arriving Prussian troops into line. |
 |
| As the Prussians pull back from Chotusitz, the Austrians move in to take control and the troops move towards the centre to face the new threat from frederick the Great. |
 |
| The Grenadiers lead the advance. |
 |
| The Austrians move onto the low hills and begin to form two lines. The Austrian artillery follows. |
 |
| Prinz Leopold is captured by the Austrian Pandours! |
 |
| The Prussian's arrive but are unable to alter the course of the battle. |
 |
| A view from the Prussian right. With no space to deploy and Austrian cavalry ready to pounce, they have little option but to turn around and go back home. |
 |
| Frederick the 'Might Have Been Great' captured by Austrian cavalry! |
Post Game Thoughts
First and foremost we had such a great game and it was good to be playing against and with friends again. It's only when you get back to some FtF games that you realise how much you've missed it and also how much part of the whole wargaming experience it is. Thanks to Keith for sorting everything out and naturally to Adam, Paul and Jon for being such great chaps to play with. So as always, some thoughts from our post game wash-up as we packed things away:
- I'd forgotten how visually superb a large battle is. The table was 10' x 6' and so gave ample space with room on the flanks for both sides to be deployed. This is not something that most UK gamers can do in their own homes, so it's good that Keith has a very good and modern village hall a stone's throw away with rooms that can be rented for a very reasonable rate.
- I must admit that I do love the SYW and Linear Warfare in general. There's something about two lines of infantry with cavalry on the flanks that just appeals to me. Add in Keith's lovely figures and I was pretty much in gaming seventh heaven!
- The Dice Gods were certainly on the Austrian side on our game, which is not normally the case for me, so it made a nice and rather unusual change. When I say on our side, pretty much every set of shooting I was causing 2-3 hits and receiving 1-2 in return. This happened all game! Of course weighted dice had a small part to play in this...😉.
- Paul did a sterling job with the Austrian cavalry that pretty much single handedly stopped Frederick and the Prussians from being able to enter the table quickly enough to alter the outcome of the game. Poor Adam tried his best to halt the Austrian juggernaut but 'twas not to be.
- Keith came up with some nice scenario details, such as Prinz Leopold having to retreat and try and make contact with Frederick once he had lost a certain number of points, whether that be troops or objectives. This was a nice touch as as he said, otherwise there's not much incentive for the Austrians to attack. The fact that the retreat happened out of the blue really hampered the Prussian cause.
- We agreed that Prinz Leopold would probably have been wiser to have moved some of his infantry back into Chotusitz and conducted a defence in depth as it were. Of course hindsight is a wonderful thing and normally, the Prussians deployed as they were would have given as good as they got and held up the Austrians for sometime and inflicted casualties too.
- Frederick's narrow deployment area would normally have been OK, but with the Austrian cavalry having been so dominant, they could not debouche from the road, being hemmed in by the marsh and the board edge. another option might be to allow some troops to come on via the long table edge to replicate the fact that Frederick knew battle had been joined and so had started to deploy 'off table'.
- We all agreed it was a great scenario and one that would bear repeated playing, given how one sided it suddenly turned out to be. Maybe something for another game?
- Having Keith as the umpire and 'living rulebook' allowed all of us to concentrate on the game, our tactics and objectives. The QRS was more than adequate for 90% of the time and having played 'Shadow of the Eagles' the mechanics were very familiar.
- With the 'capture' of Freddy and Leo, we pondered on how differently history might have turned out and how as wargamers we would have been denied the SYW, The Austro-Prussian and the Franco-Prussian Wars!
So there we have it. A fun game played in the right spirit with plenty of friendly banter going to and fro all day, what more could you ask for, other than a Prussian win if you were Adam and Jon!
This game has given me the incentive to get some small SYW games onto the table, either with my mdf figures or wooden blocks. Not perfect but they fill a gap until such time that I'm able to get two sides painted. They're sitting in boxes in the attic, so the onus is on me to pull my fingers out! So until next time stay safe and keep healthy.


