Christian and I had been trying to get together for sometime to have a follow on battle from our last outing, 'The Battle of San Serotonin'. Given that his armoured battlegroup had not been ideally suited to winkling out dug-in and resolute Italian defenders, I suggested that we try the Pursuit scenario from the rulebook. This would be much more suited to said battlegroup as well as reflecting the continual flanking attacks made towards the end of the Sicilian campaign by the American forces.
Scenario Details
Despite
the successful defense of San Serotonin by elements of the 28th Aosta
Infantry Division, Allied attacks on other units on their flanks
have been successful. As a result, the Axis forces are now having to
perform a fighting withdrawl along the Via Dolorosa to try and avoid
becoming encircled by the advancing Allies.
Scenario 7: Pursuit
Scenario 7: Pursuit
Attacker:
3,000 pts
Defender:
2,000 pts
Scenario
Details:
- All rivers are fordable at any
point to troops on foot, but count the edges as linear terrain.
Table Set Up
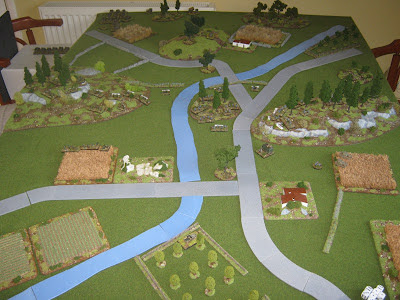
The Northern end of the table featured hilly and wooded country, representing the foothills of a mountainous area. In the middle were a couple of rocky spurs with a river flowing past towards the fertile areas at the Southern end of the table.
Having played this scenario before, I decided that we would play it down the length of the table rather than across the width. From experience the latter way can make it too easy for the Defender to get off the table and consequently harder for the Attacker to gain a victory. Hopefully this way wold give both sides an even chance, but only time would tell.
The Americans decided to deploy their main force at the Northern end of the table, with a flanking force coming in from the Eastern edge. The Italians deployed two battalions of infantry with support, one on each rocky spur, with a reserve of Semovente assault guns near to the Eastern spur.
 |
| The view of the Via Dolorosa road and battlefield. |
 |
| The Eastern spur with dug-in troops. |
 |
| The Western spur with American forces to the North. |
Turn 1
The main American forces deployed into two groups, on their right flank and in the centre. Both advanced cautiously towards the Italians on the Western spur. The Flanking force chose not to deploy on this turn.
For the Italians, some mortar fire caused a few hits on the US half-tracks, whilst some troops started to retire Southwards on the left flank and in the centre. On the right, some troops re-deployed to face the threat to this flank from the Americans.
 |
| The Italian withdrawl begins. |
 |
| The Americans start their advance. |
Turn 1 1/2
As my gaming chums know, our Son Thomas likes to put in an appearance with his Daleks to help brew up a few tanks. In typical Dalek fashion he doesn't take sides, but happily exterminates anything in his way. This game we had some new arrivals in the form of the Judoon and their spaceships. So a few pics to show the forces arrayed against both the Americans and Italians.
Turn 2
 | ||
| If only the Italians had troops like these. |
 |
| A new Italian wonder weapon? |
Turn 2
The American flanking force fails to show up on time, but the amoured infantry in their half-tracks carry on their advance towards the Western spur. The US FAO calls in artillery firein support of the advance from offboard Priests, only to see the Italians make their saves from being dug-in. Possibly a little disheartened by this, the CO fails his command roll.
Maybe taking their cue from the US Co, the Italian commands were less than satisfactory. The one highlight was a mortar hitting a half-track, brewing it up with its infantry still on board. Was this to be a sign of things to come and a repeat of San Serotonin?
Maybe taking their cue from the US Co, the Italian commands were less than satisfactory. The one highlight was a mortar hitting a half-track, brewing it up with its infantry still on board. Was this to be a sign of things to come and a repeat of San Serotonin?
 |
| The US forces advance as the Italians try to escape. |
The Americans started with their FAO calling in an artillery strike on the Western spur, which for the Italians was rather inconvenient in that it suppressed their FAO. Following the strike the armoured infantry continued their slow but steady advance. The Shermans in the centre opened up on a dug-in 45mm ATG after opportunity fire had failed to have any effect. The flanking force arrived and quickly brewed up a Semovente after their own opportunity fire had been ineffective.
For the Italians, another rather poor turn of failed command rolls and blunders. Considering the position they were in, it could have been better.
For the Italians, another rather poor turn of failed command rolls and blunders. Considering the position they were in, it could have been better.
 |
| The American flanking force make their presence felt. |
With the American FAO failing, the right flank force blunders, yet manages to move towards the foot of the Western spur. The duel between the Shermans and the dug-in ATG continued, with the latter getting the better of the Shermans, managing to suppress one. Shades of San Serotonin again? Despite the solid resistance of the Italian centre, the right flank is comprehensively attacked by Shermans and Stuarts, with the former seeing of the last Semovente and the latter engaging the retreating infantry, cutting off their escape route.
The Italians seem a bit confused as to what to do, as the left flank continues in its attempt at an orderely withdrawl, albeit at a rather leisurely pace. The dug-in AT guns maintain their fire on the American Shermans, with the suppressed one falling back into the other two, thereby supppressing them. A small glimmer of light in the gathering storm that is threatening to engulf them, no more so than on the right flank.
The Italians seem a bit confused as to what to do, as the left flank continues in its attempt at an orderely withdrawl, albeit at a rather leisurely pace. The dug-in AT guns maintain their fire on the American Shermans, with the suppressed one falling back into the other two, thereby supppressing them. A small glimmer of light in the gathering storm that is threatening to engulf them, no more so than on the right flank.
 |
| The American armour sweeps round the rear of the Italians. |
The American Stuarts and Shermans of the flank force flex their muscles and destroy 3 infantry units, then take up commanding positions to threaten the line of retreat. On the right flank, the armoured infantry dismount in preperation to assault the Western spur.
Finally the Italian FAO comes good, calling down a barrage on the armoured infantry, destroying 1 stand and suppressing loads of others. The ATGs continue their sterling work, destroying one Sherman and forcing another back. At least a brief respite from the inevitable attacks that are bound to come.
Finally the Italian FAO comes good, calling down a barrage on the armoured infantry, destroying 1 stand and suppressing loads of others. The ATGs continue their sterling work, destroying one Sherman and forcing another back. At least a brief respite from the inevitable attacks that are bound to come.
 |
| The left flank holds whilst the right is turned. |
The expected attack on the Western spur materialises, with the Italian FAO somehow surviving being overrun. With the top of the spur in American hands, the Italian positions on the left flank look untenable. With the centre suppressed, the flanking force moved to better positions to further cut off the line of retreat.
With the Italians being threatened on all sides, there was little else to do but seek shelter.
With the Italians being threatened on all sides, there was little else to do but seek shelter.
 |
| Things look bleak for the Italians. |
The Western spur falls further under American control as assaults fire from the dominating heights whittle down the Italian defenders. In the centre the remaining Shermans advance, only to blunder into a hidden minefield, leaving them suppressed, despite the ATGs adding their fire to the stricken tanks.
Things go from bad to worse for the Italians as all their HQs fail their command rolls. In a last desperate act, the CO attempts to get the ATGs to fire on the Shermans, only to roll a double 1! (At this point Chris kindly applauded my efforts after a few rounds of below par die rolling). Unfortunately this was a case of too little too late to affect the final outcome, despite destroying one Sherman.
Things go from bad to worse for the Italians as all their HQs fail their command rolls. In a last desperate act, the CO attempts to get the ATGs to fire on the Shermans, only to roll a double 1! (At this point Chris kindly applauded my efforts after a few rounds of below par die rolling). Unfortunately this was a case of too little too late to affect the final outcome, despite destroying one Sherman.
 |
| The final act. |
With the American troops in such commanding positions, I conceded the game, as Chris had already achieved a minor victory and would certainly achieve a major one with two turns to go.
Afterthoughts
Once again another enjoyable game of BKCII, despite the drubbing my Italians received this time. Chris and his Americans certainly got their revenge after San Serotonin! This time Chris stuck to his plan and it certainly paid off. His Pattonesque flanking force was the real battle winner, as my Italians simply had no answer to this show of armoured force. As Chris said, it was unusual to see his Shermans and Stuarts as the 'big boys' on the battlefield, something that is certainly rare in most games. So well done to Chris for a well thought out and executed plan and a good game as always.


