Friday 30 November 2018

The Pikemen's Lament - Dawn Patrol AAR

I managed to kick off my narrative campaign as planned a few days ago, with it still set in the New World in the 17thC. As yet I'm not sure whether to have it in and around the time of King William's War, or the early part of the century. The former is more tempting as I can include some Salem style witch trials should they take my fancy which could then include some Dragon Rampant 'magic'. Anyway, that's in the future. 

The background fluff has not been fully fledged out, but broadly speaking we have the following to get things going:

Nikolaus Vermuyden. An Ensign in the employ of the Dutch West Indies Company, he is an experienced, but at times brutal officer, who suffers from a wound gained in previous battles in Europe.

Sir Richard Grenville. An Ensign in the employ of the Royal Virginia Company of London, he is relatively inexperienced in battle, but is a strong and patient officer. 

Dawn Patrol.
There have been some minor skirmishes and raids along the borders of the two Companies territories. As such, the powers that be have seen fit to make a show of force, so at to both reassure their folk as well as to intimidate the opposition. Both sides have been patrolling in the early morning and are on their way back to their encampments when they stumble across each other as the morning mist clears.


The English are at the top left, the Dutch the bottom left. Both sides have to try and exit the board in the opposite cornet to their deployment.

The Dutch have 1 x Pike, 1 x Shotte, 1 x Commanded Shotte and 1 x Forlorn Hope.

The English have 1 x Pike, 1 x Shotte, 2 x Commanded Shotte, 1 x Clansmen and 1 x Clubmen.

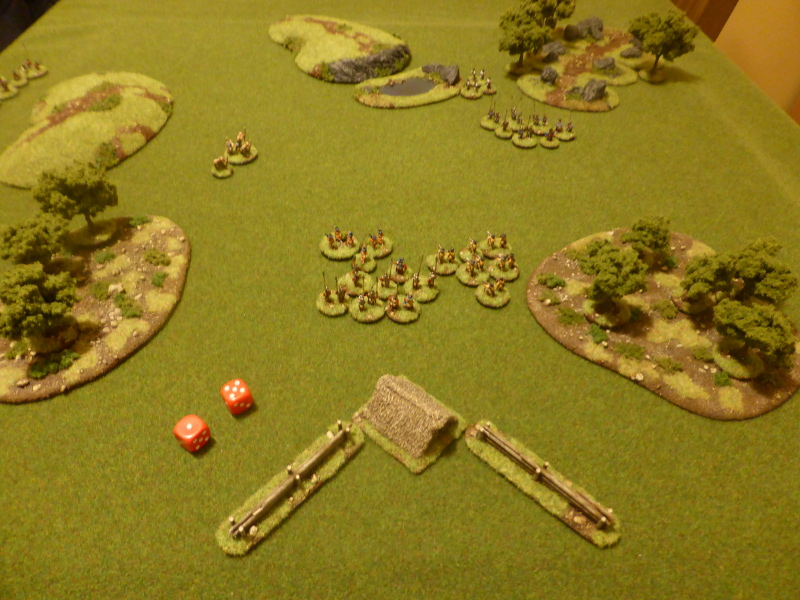
The Dutch view of the open field in front of them.

The English view.
 
The Dutch get off to a slow start, but not the English, who are able to move all of their units.

The Dutch throw out a screen of Commanded Shotte into the wood to protect their flank.

The Dutch Shotte to the fore.

The English moving forward with the Commanded Shotte providing a skirmish screen.

The Clansmen on the hill, spoiling for a fight.

The Dutch being outnumbered are finding it hard to pin down the English to slow their escape.

The English trying to find an escape route.

The English continue to edge past the Dutch troops.

The Dutch manoeuvre to try and bring weight of fire to slow down the English.

The Dutch Commanded Shotte being whittled away be English fire.

Despite the English managing to get two units off the board, the Dutch fire is taking a toll on the English.

The three Dutch casualties at the bottom compared to those of the English at the top.

The English bunch together for safety.

The escaping English units.

The Dutch have fire superiority and it shows.

The English casualties continue to rise.

The Dutch mass for the attack.

Sir Richard Grenville with the English Shotte attempts to evade the Dutch...
 
... but to no avail as the weight of Dutch fire sees the remaining English units rout off the table.


Post Game Thoughts
In the end a rather convincing Dutch victory, but it didn't look like that early on as the English we able to out manoeuvre the Dutch. A fun game and one that lasted about an hour or so all told. So some thoughts on the rules, the game etc:
  • The rules in themselves are incredibly easy to remember, with only occasional reference to the QRS. They might be a tad too simple for some, but as I've said before, I enjoy them and completely get where Dan and Michael are coming from.
  • The scenario was OK, but one that I'm not overtly fond of. I've played similar ones before with other rulesets and they haven't worked for me either. So this is not a criticism of this one, but of this type in general. However it did work as a good start for my campaign.
  • In theory, the English should have won as they got two units off the table, but at the cost of losing the rest of their force. So I decided to call it honours even and award both sides 3 points of Honour. This led to a promotion for Vermuyden, who is now a Lieutenant, gaining another Trait, this time of Strong.
  • This campaign has kick started my painting again, with a unit of Dragoons finished last night and more cavalry to come. Some Native Americans are ready for priming, once the weather warms up a bit.
  • I picked up a model of the Mary Rose for some background interest a week or so ago and so need to paint that up, as well as some coastline. Alongside this I think some Native Americans in canoes could lead to a nice scenario or two.
  • When I have enough units I will have to come up with some names for the, which is rather nicer than calling them Commanded Shotte etc. I also need to add some flags to a few units.
  • I need to either scratch build a few more buildings, or buy some for other scenarios, I'm not sure which yet. Maybe my Leven Miniatures one will make suitable stand in until then.

So plenty to be getting on with and to come up with the next logical scenario. I also need to plan a BKCII game for a weeks time as Adam is coming around for a game, as well as paint up a few units. So until next time...

Thursday 22 November 2018

The Pikemen's Lament - A New World Adventure

One of my plans for this year was to finish off my English Civil War figures and run a narrative campaign using the excellent 'The Pikemen's Lament' rules. Like many of my plans, it never really got off the ground. Given my current enforced rest as I recover from major surgery, I thought it high time I revisited this idea, given that I wanted something different from BKCII to tickle my wargaming buds.

So this afternoon I dug out my figures and knocked up a really quick game, based upon a rough premise of some action in the New World of the Americas, between some English and Dutch Colonists supported by some Native American Indians. As simple as that but I find it nice to have a bit of 'fluff' to go with my games. I plan to expand upon this over the next few days for my campaign.

Anyway, the game was great fun and even though I hadn't played for ages, it all came back to me with only occasional glances at the rulebook. I took a few 'photos for those that might be interested in another 2' x 2' game format. All the figures are from Pendraken's excellent 10mm range and I simply halved all the distances in the rulebook.


The Dutch are on the right, the English the left, as they advance to clash near Friedermann's farm.

Some Goblins standing in for Native American Indian's, until I can get some painted up.

The Dutch battle line.

The English throw forward their Clansmen and Forlorn Hope's.

Some Swedish Commanded Shot mercenaries just before they were dispatched in short order by the Clansmen.

The Dutch Shotte formed line ready to give a good volley of lead if required.


So my next challenge is to paint up some extra units, which should hopefully start this weekend, as they are all based and prepped and are just awaiting my attention. I would like to add some Dragoons, but doubt they were much used in the New World at this point in time. I hate painting horses but will have to bite the bullet at some point though.

On a related note Michael Leck has received his advanced copies of the new 'Rebels and Patriots' rules from Osprey. I was involved in the playtesting of these, which I really enjoyed and think they are a great set of rules. But  to misquote Mandy Rice-Davies; "Well he would say that, wouldn't he?"

Until next time.

Tuesday 20 November 2018

The Battle for Buron - a BKCII AAR

A post on Norm's excellent Blog got me thinking about whether BKCII could be played on a 2' x 2' table. So I decided to give it a go and, given that I'm currently reading about the Canadians in Normandy, set the scenario as a fictional encounter on D-day +2. 

Objective
Broadly speaking the Canadians are still advancing from the bridgehead and have been tasked with seizing control of the village of Buron. A German Fallschirmjager Kampfgruppe is making a reconnaissance in force, with the objective of forming a good defensive position in Buron from where they will be able to launch further attacks.

Canadian OOB
2 x HQ (8)
1 x Recce Daimler unit
 9 x Regular Infantry units (3 x PIAT upgrade)
1 x MG unit
3 x Shermans
1 x Sherman Firefly

German OOB
2 x HQ (9)
6 x Fallschirmjager units (2 x Panzerschreck upgrade)
2 x MG units
1 x Stug III
2 x PzVIs

Set Up
The table was set up with the village in the centre and the important road network coming in from several directions.


The Germans deployed on the left, the Canadians on the right.


The view from the German starting point.

The view from the Canadian starting point.


Turn 1
I randomly rolled to see who went first and it was the Germans. The German right flank advanced well, almost reaching the outskirts of the village, but the left flank failed to arrive. All of the Canadians appeared and cautiously advanced forward.


An overview at the end of the Turn.

A PzIV has taken up a good position, but cannot see the Sherman advancing forward due to the hedgerow.

The Stug III controlling the crossroads, but the Canadian armour hasn't quite come into view.

The Canadian right flank has pushed carefully forward, not knowing what lies ahead. 

On the left flank, the supporting armour advances down the road as well as to the left of the village.


Turn 2
The Germans continue to advance as best they can, whilst both Canadian HQs fail their command rolls.


The end of Turn 2.

The Germans are in a strong position in the village.

The German left flank arrives and another PzIV takes up a good position to cover the road.


Turn 3
With no targets, the Germans advance as best the can. In contrast to the last Turn, the Canadians really take it to the enemy. The right flank gets a Double 1, then a command followed by another Double 1. This the Stug III, a PzIV and some Fallschirmjager units destroyed for just two suppressed tanks. The left flank is not quite so effective, but still destroys an MG unit.


The action really hots up in turn 3.

The sheer weight of Canadian firepower leads to the loss of so many units, including the Stug III.

The PzIV and supporting Pak 35/36 cannot make any dents into the Canadian attack.

The Canadian right flank from where the main attack came.


Turn 4
Stunned by the attack, the Germans mount some Initiative moves and firing, but to little effect, with both their HQ units then failing their command rolls. Once again the die Gods favour the Canadian right flank, who once again roll a Double 1 followed by two more successful commands. More Fallschirmjagers are destroyed and an HQ overrun. The right flank advance but can only suppress some German units.


The Canadians in complete control at the end of Turn 4

The final PzIV brews up.

The Canadians have been shot into the village, flanking the Fallschirmjagers.

The Fallschirmjagers are very isolated.

The dominant Canadian right flank.

The left flank ready for the final assault


Unsurprisingly the Fallschirmjager wisely decided to withdraw, given their losses and that they were out flanked, even though they passed their Break test, leaving the Canadians to occupy Buron.

Post Game Thoughts
Well that was over more quickly than I thought, but was nevertheless and enjoyable game and one that worked well, even though it was played out on a 2' x 2' table. So what did I think of the game?:


  • It was certainly fun and one where you very quickly closed to contact, which gave a very different feel to the game. It could certainly work for a Stalingrad or Arnhem type game, which I might try at some point in the future.
  • Aside from the Canadian command rolls, the German shooting was poor whereas the Canadians seemed to hit everything. It didn't help that I forgot the extras die that the Fallschirmjager get, but I doubt it would have altered things much. Once the German armour was gone, it was going to be a tough ask for them.
  • The sheer amount of firepower that the Canadians were able to bring in Turn 3 really swung the game in their favour. This allowed them to successfully attack the BUAs without having to resort to Close Assault. You can see why flamethrowers would be useful here and I was tempted to take a Wasp Carrier, but thought better of it.
  • For once it was nice to be able to use PIAT and Panzerfaust or Panzerschreck upgrades. I honestly can't remember when I actually used them.
  • It did feel like a Platoon sized game, rather than a reinforced Company one. Given that I bought Bolt Action II earlier in the year, I really must try and give this a go, as it looks fun and not too complicated.

So what next game wise? I think I've had enough of WWII for now. I'm tempted to have a go at Dragon Rampant just for fun and again can play it quickly and easily on a 2' x 2' table. First I need to knock up some lists so that I'm not constantly referring to the book. So until next time.