Thursday 31 December 2015

Poland 1939 - a force list for BKCII

With Pendraken due to release their Polish range hopefully sometime in the New Year, I thought I'd spend an hour or so trying to figure out what I would need to make a flexible force for use with BKCII. So after a bit of research this evening using the excellent The Polish Campaign 1939 by Zaloga & Madej as a guide, along with Polish Armour of the Blitzkreig from Osprey and the BKCII rulebook, I came up with the following:

1 x CO

2 Battalions each with:
2 x HQs
1 x Recce (armoured car, cavalry, tankette or m/c infantry)
9 x Infantry
4 x MG
1 x 37mm ATG + draught horse tow
1 x 81mm Mortar

Possible Support Units:
1 x 75mm Artillery Support Unit + tow per Battalion
1 x 40mm Air Defence Unit (really a Divisional asset but nice to have in larger games)

Possible Armoured Support:
2 x TKS with MG & 1 TKS with 20mm per Battalion (these were the main armoured units for the infantry).

7TP or FT-17 tanks attached from the High Command or Reserves. (The R35 tanks were in reserve but were never used, but still remain a possibility).

Vickers E tanks were only used by the Warsaw & 10th Mechanised Brigades, so although a possibility, will most likely be used in 'what if? scenarios.

Air & Artillery Units
As these are largely 'off table', I'm not worrying about these at present.

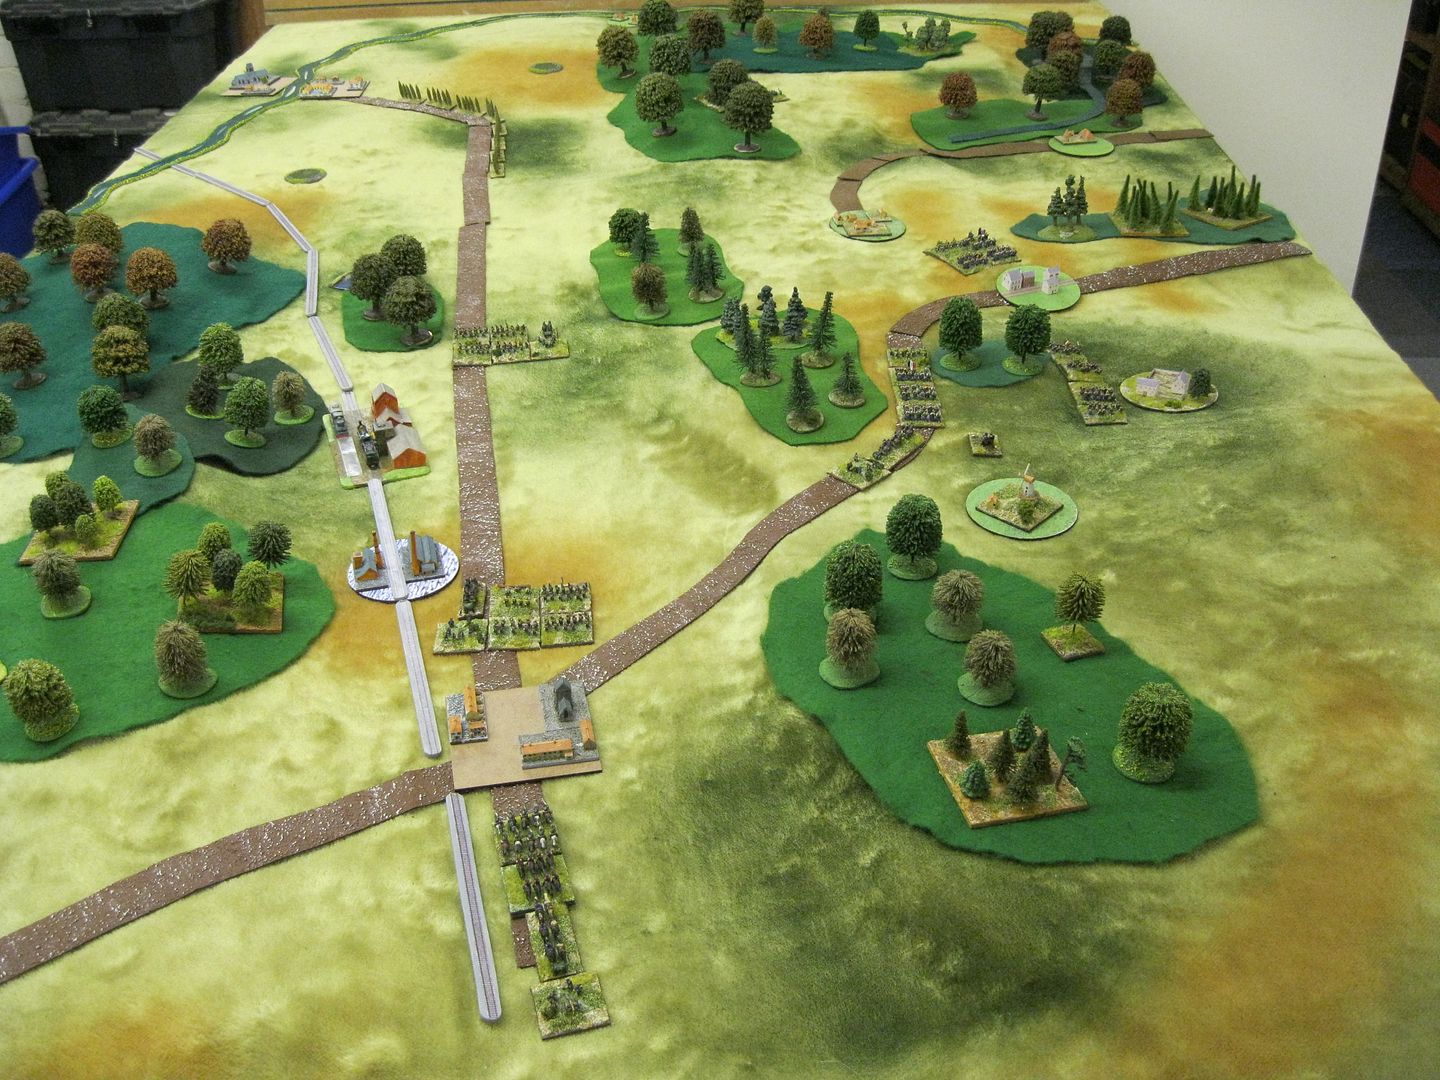
In most games I will only be fielding a Battalion, or one that is slightly re-inforced. However being able to field 2 full strength Battalions allows me game scenarios such as the historical 'Counteroffensive on the Bzura' where the Polish Army successfully attacked the German Army in the flank. 

Alongside the historical campaign, I'm keen to explore certain 'what ifs?' based upon plausible historical opportunities missed by the Allies. One such is the Saar Offensive that if it had been continued, would have caused the German High Command all sorts of headaches as the German border was lightly defended with minimal heavy weapons, armoured and air support. Or how about the Soviet Union invading Germany whilst she was weak? As you can see plenty of possibilities.

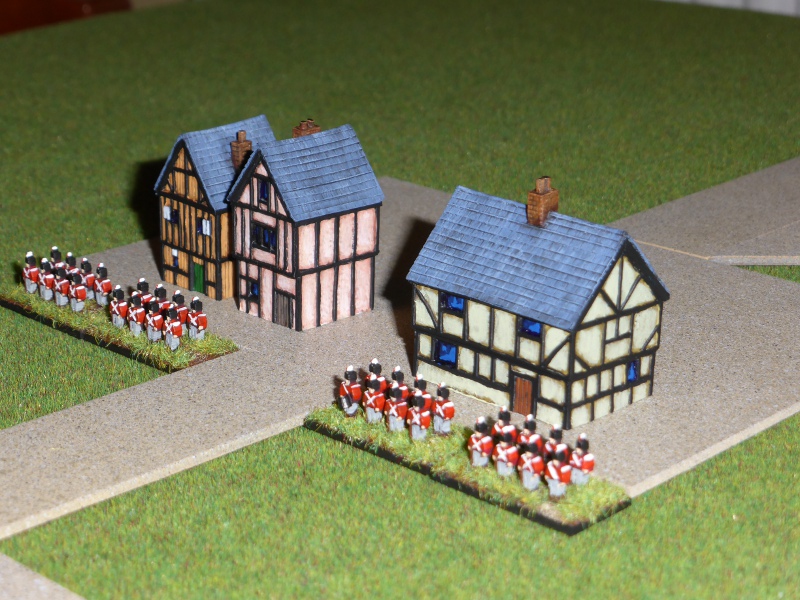
Given that I have a British force already painted and French based and undercoated, I have plenty if 'toys' ready to go to play out my hypothetical scenarios and campaigns. Rather importantly I need to sort out my lead mountain to find my Germans and get some lists sorted so that I know what I need to base up. So no chance of the grey cells atrophying at the moment, so all I have to do is maintain a bit of focus...

End of Year Review 2015

Well as another year draws to a close, it's time for some reflection on what worked, what didn't and some plans for next year.....

Rules Bought
1870 Grand Tactical Wargames Rules
Spectre:Operation (free download)
Spec Ops modules for Gruntz!
Open Combat (present) 
Skirmish Sangin (free) 
Bloody Big Battles 
Honours of War (free)
Dragon Rampant 

A funny old year on the rules front for me. I've lost my enthusiasm for WWII and Modern skirmish type games and have really bought into rules that cover large scale engagements. 'Honours of War', which I helped playtest, has become a firm favourite for 18thC battles and I doubt it will be supplanted by anything else. 'Bloody Big Battles', a relatively recent purchase, looks to be a very good set of rules and ones that will get a lot of play next year. '1870' was bought mainly as a reference book and is superb on that account. I've never had a go at the rules and doubt I will, given that 'BBB' works for me.

'Dragon Rampant' was a belated Xmas present and I'm yet to receive the rules, but given that I love 'Lion Rampant', which I also helped playtest, I doubt I will be disappointed. 

Wargaming Books Bought
History of the Franco-Prussian War by Michael Howard
Osprey Essential Histories The Russian Civil War 
3 books on the 1st Schleswig-Holstein War 
The Devil's Playground supplement for Pike & Shotte 
The Last Argument of Kings supplement for Black Powder
Rebellion! supplement for Black Powder 
The War of the Triple Alliance Osprey book 
Osprey Essential History of the Seven Years War
The Military Experience in the Age of Reason by Duffy
Blandfords SYW Army Uniforms
Blandfords Peninsular War Armies 
ECW  by P Haythornthwaite
Osprey Polish Armour of the Blitzkreig 
The '45 Rebellion, a Military Perspective by Stuart Reid 
Blandford Napoleonic Uniforms Guide 
'Moving the Guns: Mechanisation of the Royal Artillery, 1854 - 1939' 
Napoleonic Wargames Rules - CS Grant
Napoleon's Campaigns in Miniature: War Gamers' Guide to the Napoleonic Wars, 1796-1815 - Bruce quarrie
Osprey Italian Light Tanks 1919 - 1945 
'Too Little, Too Late' by Mike Embree 
'Radtesky's March' by Mike Embree 

Well I am suprised at how many reference books that I've bought over the past year. Quite an ecletic mix and one that shows my attempt to get to grips with some new periods. The standout books for me are by Duffy, Howard, Reid and Quarrie. Great reads and ones that I will return to again and again.

Figures Bought
Armies Army RUSK Militia for Gruntz
Armies Army White Russians for Gruntz
Zvezda Modern AFVs for Gruntz
Empress Miniatures Modern British, USMC & Insurgents
Pendraken 1st Schleswig-Holstein Germans and Danes
Leven Miniatures 6mm Buildings 
Pendraken ECW for 'The Pikeman's Lament'
6mm sample MDF figures from Commission Figurines 
Pendraken additions for my Imagi-Nations forces

A relatively quiet year on the figures front, but given my lead mountain, not too suprising. Most purchases were at the start of the year, with little happening post Salute.

Warbands, Battlegroups or Armies Painted
Extra units for Dux Bellorum Welsh and Sea Raiders
Carrier Platoon for BKCII
Sherman Squadron for BKCII 
Churchill Squadron for BKCII
Kreigspeil style blocks 
28mm SAS unit for modern skirmish games 
Gruntz RUSK Militia Platoon and Support Units 
Extra units for my AVBCW forces 

A very quiet year on the painting front. My painting mojo has been lacking, with work getting in the way a lot so that the last thing I want to do is paint come the evenings or weekends. Being a complete wargames butterfly and the lack of gaming 'deadlines' hasn't helped at all. Next year will hopefully be more focused...

Projects
Dux Bellorum Campaign
KR-16 Campaign
Two forces for Gruntz! and/or NEIS
Kreigspiel style blocks for Hail Caeser, Pike & Shotte and Black Powder
Baltic Crusades 
1st Schleswig-Holstein War 

Pretty much a complete failure on the projects front! My two campaigns fizzled out for a variety of reasons, with the Baltic Crusades and 1st Schleswig-Holstein War failing even to get off the ground at all. At least I did complete my Kreigspeil style blocks and finish one force for Gruntz. The lesson learnt is that I'm terrible at finishing or even starting projects. 
 
Games Played
Dux Bellorum - 9
KR-16 - 2 
Spectre: Operations - 1 
BKCII - 2
Black Powder - 7
Lion Rampant - 5
Honours of War - 13
Hail Caeser - 2
Skirmish Sangin - 2
The Pikemen's Lament (playtesting) - 7
Volley & Bayonet - 1 
Bloody Big Battles - 2

Quite simply the best year for games that I've ever had. This is largely down to Dave Fielder being able to come over pretty much each week for a game. Not only has this meant that I've had a game nearly once a week, but it has also resulted in the broadening my gaming interests. I've fallen in love with 18thC battles, especially the SYW and have even learnt that Napoleonics can be fun! With 'BBB' I'm really getting into mid 19thC gaming, with the Austro-Prussian  War and Franco-Prussian War of particular interest. Dave promises me that I will also learn to enjoy ACW games as well... 

End of Year Thoughts 
So looking back at the above, quite a funny old year wargaming wise. One that has certainly had a few suprises. So what are the salient points that sum up this year?

  • Currently I simply am not enjoying skirmish games like I used to. For them to work I feel you need to play them as part of a campaign to get the best out of them. Mordheim was the perfect example for me. However I do enjoy 'Lion Rampant' as I like the way Dan Mersey approaches his games, the rules work well for solo play and there is the ability to play them easily as part of a campaign. I'm looking forward to receiving 'Dragon Rampant' so that I can dig out some of my favourite 1970's miniatures.
  • I've completely gone off WWII skirmish games. 'Chain of Command' promised much but in the end the rules just didn't click with me. I found that he who controlled the BUA generally won the game. I will stick with BKCII to give me my WWII gaming 'fix' as I find the Battalion level and above style game gives me more satisfaction.
  • Plenty of games played, mainly during the week, has led to a steep decline in my painting. I need to try and focus more on getting some painting done during the week and try and stick to one project. Well at least that's the aim.
  • A couple of my regular gaming chums have no decamped to the Cotswolds (was it something that I said?) so it is pretty hard for us to meet up these days. Fortunately Dave Fielder has more than filled the gap left by their departure. 
  • I've gone off 28mm miniatures, even for skirmish games. I much prefer 10mm and 6mm for my games, even skirmish ones. I will keep a few sets for those one off games, but most will be off-loaded in the New Year.
 
Plans for 2016
Well given my complete inability to achieve pretty much anything that I had planned this year, maybe I should set some realistic goals for 2016. 

  • Paint more. Simples. 
  • Pendraken are due to release some WWII Polish troops in the New Year so I hope to be able to get my act together and make 2 forces for use with BKCII. The '39 campaign is one that I've wanted to game for ages, especially having played it with my good friend Keith Flint. Lots of nice kit, no uber powerful tanks, cavalry, nice camo schemes etc. so what's not to like?
  • Play more games of Honours of War and Bloody Big Battles. Given that Dave is still around on his contract this should be quite easy to achieve.
  • Sort out two units and a games board for KR-16, given that I have commited to demo-ing the game at Blast-Tastic.

I think that's it for next year. It will be interesting to see what happens and how my 'plans' worked, or not, as the case may be. Whatever happens I'm sure I'll have fun, which afterall is what it's all about.

Wednesday 16 December 2015

Langensalza Take 2 - a Bloody Big Battles AAR

As planned this week we were re-fighting Langensalza. Last weeks game was very much about getting to know the rules and testing various different things, such as close assaults etc. We both learnt a lot from that game and were able to pick up on things we had missed out on when reading the rules again in the cold light of day.

So with a bit more time, I was able to do some research on the battle, mainly in regard of the terrain. Using the map from the BBB Yahoo Group, the one in Bruce Weigle's 1866 rules and the following from 1867, I had a pretty good idea of how to lay the table out.


My plan was two fold:
  • If attacked de Vaux's Brigade would defend Merxleben and the Kirchberg, whilst von Bothmer and von Bulow would come in from the flanks and mass their fire in the centre in and around the bridge over the Unstrut.
  • If the Prussians held back and defended from the mills and spa back towards Langensalza, von Bothmer's Brigade, supported by the cavalry, would advance from Nagelstadt and swing around to threaten the Prussian right flank. Von Bulow would move from Thamsbruck towards the bridge at Merxleben to support de Vaux's Brigade in their attacks, with the aim of pinning the Prussians in and around the bridge.
   
So with my plan laid, the table set, we were ready to commence battle. 
 

Both sides deployed as per the BBB scenario. Hills were added under the gaming mat, using some small books that fitted the bill rather nicely. In fact it reminded me of being a kid again with stacks of books under any old cloth to help create the required terrain.
Fabeck and his Prussian advanced gaurd chose to hold their positions and formed up in the mill and spa by the bridge.The Landwehr moved rather smartly to the right flank by Langensalza, whilst supporting artillery moved or deployed as best as possible. So with the Prussian plan revealed, the Hanoverians moved somewhat piecemeal from Nagelstadt, whilst poor old von Bulow didn't understand the plan and stayed put at Thamsbruck.
Knesebecks's Brigade moves up to support de Vaux at Merxleben. Both sides exchange fire, with the Prussian advanced gaurd becoming disrupted.
The Landwehr shake out into line to meet the threat to their flank, whilst artillery deploys on the Judenhugel. Von Bulow still hasn't got a clue at to what he is supposed to do, but at least the cavalry and supporting artillery move across the Unstrut to support von Bothmer.
Von Bothmer comes under fire from the Prussian artillery, that shoots too enthusiastically, leaving itself short on ammo.
Fabeck's advanced gaurd starts to smart under the weight of Hanoverian fire, losing their skirmishers as a result.
Von Bulow finally gets moving after Arentschildt moves over to 'have a chat' with him. As the attacks continue in the centre, the Landwehr advance to cover the guns on the hill. Some cracking shooting sees the demise of one Prussian artillery unit, but at the expense of themselves becoming low on ammo.
The 25th Regiment, seeing Fabeck's units under pressure, moves through to take over at the mill.
The massed fire of the Hanoverians sees the 25th pushed back out of the mills, with them poised to cross the Unstrut if required.
The way to Langensalza is nearly open...
As the Landwehr and von Bothmer's Brigade exhange fire, the Hanoverian cavalry moves round to try and cut of the Prussian lines-of-communication.
The Hanoverians continue to fire into the mills and Fabeck's advanced gaurd, wary of getting too close, too soon.
Despite the Hanoverian pressure, the Prussians still hold Langensalza, which would be a tough nut to crack.
Von Bothmer's Brigade form 'in depth' to assault the Landwehr, only to be repulsed and to lose their skirmishers. At least the cavalry have now cut the Prussian line-of-communication.
Under pressure now on their right flank, the Landwehr wisely withdraws into Langensalza, as does the supporting artillery.
After a brave fight, Fabeck's advanced gaurd succumbs to the weight of Hanoverian fire, but they have done their job in delaying the Hanoverian advance.


At this point we called it a day. With 2 Turns to go, we knew that it would be impossible for the Hanoverians to close quickly enough on Langensalza and to bring enough firepower to bear to remove the Prussians.

Post Game Thoughts
Well this was a great game that was closely fought right to the end. So how did it compare to last week? A few thoughts on the game and BBB in general:
  • Despite having played only one game, we hardly had recourse to use the rulebook. The QRS was enough, which speaks volumes about the rules IMHO. This allowed us to concentrate upon our tactics, which is just what you want in a game.
  • The addition of the hills, although not clearly visible in the photos, did make a difference to the game. Not only do the look nice visually, the way they blocked line-of-sight did come into play at several points during the game.
  • Think carefully about how and where you want to deploy your artillery.
  • Having a plan in advance did help as I knew exactly what I wanted to do. Executing it is another matter entirely...
  • The 'Low Ammo' rules have caused comment on several Blogs and not everyone likes them. Personally I liked the effect they had on the game.
  • At one point Dave was able to regain a unit of Fabeck's Advanced Gaurd, which really helped prolong the defence of the mill and spa. This is a nice little touch to the C&C in the game.
  • To help make the game run more smoothly, I made some simple labels of each unit, givings its name, its training etc. This meant that we knew what each unit had when we came to firing, whether they were spent or not etc. I will definitely use this in all future games.
  • Terrain. To help me fulfil the varied requirements for terrain in BBB, I have ordered some 1mm felt in a variety of colours. This will allow me to have roads going over hills, rivers and streams as required etc. More on this when it arrives, hopefully before Xmas. 
  • Hills. The books under the cloth worked well, so now that has solved my 'problem' of how to respresent them. Now it is a case of making a variety, approximately 10mm thick for each level to give a nice feel of 'height' to the game.
  • The Langensalza scenario, although a training one in essence, actually provides quite a few nice tactical challenges and as a result can be played many times, yet not feel the same.
 
I must say that I really enjoyed this game and these rules do promise great things. We are now on a Xmas break from gaming, so I can't wait until we resume in early January, all being well. We plan on fighting Montebello next which looks to be an interesting game. Plenty of time to plan, organise the terrain and get more au fait with the rules. 

Friday 11 December 2015

Bloody Big Battles Terrain

Further to my recent post on our first game of BBB, Chris Pringle kindly sent me a link to his  Bloody Big Battles Blog , which contains some ideas on how to tackle the potentially tricky subject of terrain for the game. Now being a professional modelmaker I want my wargames table to look coherent visually, yet at the same time fit the battlefield being represented as closely as possible. 

The following pictures, courtesy of the Pendraken forum, show a pretty good way of overcoming the issues raised above. Forum member Leman used cardboard cutouts of the contours for Spicheren to create the hills and simply lay them under table cloth. This to my mind is a nice way to do this and very easy too. Also the woods etc work nicely with felt to delineate the area. 

So my plan is to take a trip to my local Fabricland in Bristol to get some felt cloth for woods, roads and rivers and spray them a bit to break up the uniform look. Fingers crossed problem solved...


Leman's Spicheren table looks pretty damned good to me.
 
To my mind simple yet effective terrain.


Langensalza - A Bloody Big Battles intro game

Having become very comfortable and happy with 'Honours of War' over the past few months, we decided to give 'Bloody Big Battles' a go to see how they compare as a ruleset. Dave had had the good fortune to play a game with the author, Chris Pringle, at Warfare, so had a basic grasp of the game mechanics. I was a complete newbie to these, despite having had a cursory glance at the rulebook.

For an intro game we chose Langensalza off the Yahoo Group, one that works perfectly for our purposes and fits on a 4'x4' table. Dave also happened to have the correct figures for this scenario in 15mm, with a few 'counts as' which as usual didn't bother us one jot. 

As this was very much a learning game, there is no AAR as such, just a few photos of the game showing the action


The battlefield with the Prussians on the left, whose aim is to keep attacking across the small river, thus preventing the Hannoverians from crossing over and threatening Langensalza.
De Vaux's 2nd Brigade at Merxleben deployed to halt the Prussian troops advancing in depth.
Fabecks' advance guard of the Saxe-Coburg-Gotha Regiment come to blows with De Vaux's Brigade.
The Hannoverians mass their troops to overwhelm the Prussians by sheer weight of fire...
..Except that 3 Turns in a row I rolled some shocking die, with the last being a Double 1. The Minion looks on speechless...


Post Game Thoughts
Well for a first of game, things flowed really easily and I picked up the broad mechanics after a Turn or two. Naturally we were checking stuff a lot, but most of this was answered by using the excellent QRS of the Yahoo Group. Re-reading the rules in the clear light of day, we missed a few things, but then this is to be expected for a first game. So for a first off game, very happy with how things went. So as usual a few observations:

  • Using the recommend basing system would certainly make the game easier to manage in terms of unit losses, who could fire etc. This is certainly the plan for games next year when Dave has re-based some of his 6mm figures.
  • Concentration of fire is very important to allow you to really degrade your opponents troops. Unless you roll badly as I did in this game...
  • Knowing when to put units in column, in depth or in line is quite an important part of the game. Each has its own advantages etc.
  • Plan ahead. As units can move very quickly and can get into action, you need to think ahead maybe a Turn or two to account for this. This is true in most games but it seems that things can turn for or against you very quickly.
  • Terrain is rather important in these rules, with roads certainly confering large movement bonuses to troops on them if deployed correctly. For games on a 6'x4' table I know that I certainly don't have enough of them. So one option is to go down the rather 'classic' route of using felt roads to give you maximum flexibility when laying a table out. Hills are another issue but one that I haven't quite figured out yet.
  • These games are obviously for big battles and for 6'x4' tables with 4 or more players. Now for an evenings gaming we could never put on one of these, but could easily take a part of a battle and recreate that. In the future the plan will be to play a larger battle, but that will have to wait until next year.
  • The scenarios are very well written, with plenty of detail and advice. It is nice with each side having their own objectives etc, which makes for a very different game. I will certainly be delving into Bruce Weigle's rulebooks and the scenarios contained therein for use with BBB.
 
So all-in-all I'm very happy to have bought these rules. Next week all being well we plan to refight this scenario, now that we are more familair with the rules and to possibly tweak it a bit to allow the Hannoverians to cross the river earlier on to threaten Langensalza and the Prussian flanks.
a

Thursday 10 December 2015

Leven Miniatures

With my foray into 'Black Powder' wargaming this year, courtesy of Dave Fielder, it soon became obvious that I needed to increase the amount of buildings that I put on the table. Normally I have kept the same size buildings as figures, which has worked well for my WWII games for many years. However I realised that this wouldn't work for 18thC - 19thC games. I had seen on the Pendraken forum that many members used one scale smaller, so in my case, 6mm buildings to go with 10mm miniautres. The pics posted looked great and so it was time for some research.

After have a good trawl through the options on offer, I settled upon the ranges from  Leven Miniatures. I was impressed by the ranges on offer, the details on the buildings as well as the extremely competitive prices. In the end I chose from a mix of ranges to give me buildings that would work in both the UK and Europe and cover from Pike&Shotte, through 'Black Powder' and into the 20thC.

I was extremely impressed by the buildings when I received them, having more detail that I initially thought. Scale wise they looked absolutely fine with my 10mm Pendraken figures and would allow me to give a nice feel of a BUA but on a relatively small footprint. Having had them for several months, I finally got around to painting some over the past few weeks. The first three buildings can be seen below. I added in some Commission Figurines 6mm mdf figures just to give a sense of scale. These are lovely miniatures but more on these in a future post.


So for anyone considering a range of buildings, I would wholeheartedly recommend that they check Leven Miniatures out. Mick is a very approachable chap with extremely good customer service. I aim to get some more buildings painted soon for use with both 'Honours of War' and 'Bloody Big Battles'.

Wednesday 2 December 2015

The Suprise at Spittelwitz - An Honours of War AAR

After a brief foray into 'Ancients' gaming last week, we returned to the Seven Years War this week and the 'Honours of War' ruleset. We decided to try one of the scenarios out of the rulebook, with Lobositz too big for an evenings game in our humble estimation, we settled upon Spittelwitz.

Now there was a bit of confusion as to the day we were playing, with Dave (the Prussians) turning up a day early, truly catching me (the Austrians) unprepared. This caused immense amusement to my wife and the Prussians had certainly managed an oblique attack, catching the Austrians well and truly with their trousers down, metaphorically speaking. 

So after a bit of good natured banter, we managed to get the table set up in double quick time. The layout and forces were as per the scenario in the rulebook, so I will not bother repeating them here. Due to the rushed circumstances, I failed to make any notes, but with the game still fresh in my mind, a few annotated notes will hopefully give an idea of how the game played out. So without further ado...


Having set the forces up, we rolled to see how our commanders were rated, with the Prussians getting a 'Dashing' General and sadly the Austrians a 'Dithering' one. Both sides had a 'Dashing' commander each, with the Austrian cavalry commander being somewhat 'Dithering'. So not an auspicious start for my troops...
With the Austrians unable to move for the first 2 Turns, the Prussians advanced as quickly as they could towards the entrenched Austrian Light Infantry and the town of Spittelwitz. The Prussian mixed Legion (commanded by a Minion!) moved over the river to threaten the Austrian rear.
The Prussians struggled to advance in the face of the well entrenched Light Infantry, ably supported by the Austrian guns on the Spittelberg.
The Austrian Independent Battalion in Spittelwitz plays a waiting game for as long as possible, to try and hold up the advance of the Prussian left flank.
The Prussians finally cross the river, forcing the Austrian Light Infantry from their entrenchments, but they managed to retreat to the safety of the main Austrian line on the Spittelberg. A rash attack by the Austrians in Spittelwitz seems them come off worse, being forced back from the town. More Prussian cavalry arrive to the rear of the Spittelberg, but the Austrian cavalry form a strong defensive line, supported by infantry, knowing that a Prussian charge could be a costly mistake.
Despite losing the frontline positions, the Austrians are still in a strong position, entrenched on the heights of the Spittelberg.
The Prussian cavalry, whilst threatening the Austrian rear, know that a frontal attack could be suicidal.

Post Game Thoughts
In the end we played around 9 Turns, with the Prussians in a position to start mounting attacks, but 2-3 Turns away from being able to press them home. After one frontal assault, which was bloodily repulsed, we knew that they would have to manouevre into a position on the flanks to have a chance of taking the Spittelberg. So we agreed that the Austrians won the engagement, but with their lines-of-communication threatend by the Prussian cavalry, would withdraw in good order during the night.

So once again another great game of HoW and one that was quite different from previous ones we had played, due to the historical nature of the engagement. The scenario was certainly interesting and one that would be worth playing again, with different forces or for a '45 Rebellion game. As always a few post game thoughts:

  • The entrenched Austrian Light Infantry were damned tough nuts to crack. For most of the opening Turns, they could only be hit on a natural 5, due to a raft of negative modifiers to the Prussian die roll. Both of us had expected them to be rolled up in short order. It goes to show that Light Infantry in the right cover etc are extremely useful troops to have.
  • The Austrians in Spittelwitz were in a great blocking position, as the Prussians could not see them unless they advanced to the edge of the BUA. I made the mistake on moving them so to try and get some shots off to degrade the Prussians before the expected assault. Predictably I lost the Fire Initiative roll and took hits that forced me back. I should have held my position and waited for the Prussians to come to me.
  • The Austrian Superior artillery was able to keep whittling down the Prussians, who could do little in return to the dug in troops on the Spittelberg.
  • With Entrenched units so hard to hit, it would be worth giving the attacking force either a Heavy gun or Howitzer, to allow them a better chance of inflicting hits upon the dug-in troops. Maybe if we replay this scenario we will give this a go.
  • Even with the Prussians at the peak of their powers, this was a hard scenario for them to win. Despite having a 'Dashing' general, they struggled to get over the river and past the entrenched Light Infantry. Then they had to face the entrenched units on the Spittelberg. I would suggest that you only use the Prussians pre-1760 as the attackers for this scenario.
  • For an evenings gaming, we have found that a 4'x4' table, with units on a frontage of 8cm, provides a good game and certainly gives the feeling of large numbers of troops being involved. As a result I will be basing my AWI/Imagi-Nations forces in this way. 
Hindsight is a wonderful thing, but given the above, I will go away and read how the historical battle played out to compare it to our game. As always it proved to be a fun evenings gaming with 'Honours of War'.

Next week we plan to play 'Langesalza' using Bloody Big Battles by Chris Pringle. Dave has played them at Warfare and I've read plenty of good reviews. I look forward to seeing how they play. So until next time...