I've been trying to get a game in of something or other for quite a few months now. But as seems to be the case these days, work or real life conspired against me each time I planned a game. A tad frustrating to say the least, but something I suppose many of us gamers have to live with. Finally the Gods smiled upon me and a window of opportunity appeared earlier in the week. The question was what game to play?
After some thought and reading through several planned scenarios from the previous months, I settled upon BKCII, a favourite ruleset of mine and my recently finished Fallschirmjager. Initially I thought of some form of Normandy scenario, but then for some reason or other plumped for Belgium or Holland in 1944. This immediately evolved into some form of action based upon Operation Market-Garden.
As I child I can remember reading a 'Bridge Too Far' by Cornelius Ryan whilst on holiday and being utterly absorb by the account of the operation. I was completely gripped and pretty much finished the book in a week or so. When the film came out, it was just the icing on the cake. Also at this time I always wanted the Tamiya Stug III model that came with some Fallschirmjager. Sadly I never got the kit, but my love of both the Stug III and Fallschirmjager never changed.

Again, looking back at my scenario notes, I modified an earlier one to broadly replicate the opening drive of XXX Corps on the first day of the operation, which can be found below:
Scenario Details
8 Turns with the objective for the British troops to exit off the opposite table edge of to break the German Kampfgruppe.
British use Mobile Deployment.
The Germans start with 1/3 of their Kampfgruppe on the table, deployed up to the half way line of the table.
From Turn 3 the rest of the German Kampfgruppe can arrive using Mobile Deployment from their table edge.
Tanks and Assault Guns can only use the road or 5cm either side of it, to replicate the soft ground which was impassable to tanks. Carriers and Light Tanks ignore this rule.
The British Infantry start the game dismounted, as they are expecting possible action from the woods ahead, based upon earlier encounters.
The British Honey Recce unit starts the game on the road, but 30cm away from any German unit.
My usual house rules of 'hits stay on' and mortars and artillery fire automatically cause suppression where in use.
After some thought and reading through several planned scenarios from the previous months, I settled upon BKCII, a favourite ruleset of mine and my recently finished Fallschirmjager. Initially I thought of some form of Normandy scenario, but then for some reason or other plumped for Belgium or Holland in 1944. This immediately evolved into some form of action based upon Operation Market-Garden.
As I child I can remember reading a 'Bridge Too Far' by Cornelius Ryan whilst on holiday and being utterly absorb by the account of the operation. I was completely gripped and pretty much finished the book in a week or so. When the film came out, it was just the icing on the cake. Also at this time I always wanted the Tamiya Stug III model that came with some Fallschirmjager. Sadly I never got the kit, but my love of both the Stug III and Fallschirmjager never changed.
Again, looking back at my scenario notes, I modified an earlier one to broadly replicate the opening drive of XXX Corps on the first day of the operation, which can be found below:
Scenario Details
8 Turns with the objective for the British troops to exit off the opposite table edge of to break the German Kampfgruppe.
British use Mobile Deployment.
The Germans start with 1/3 of their Kampfgruppe on the table, deployed up to the half way line of the table.
From Turn 3 the rest of the German Kampfgruppe can arrive using Mobile Deployment from their table edge.
Tanks and Assault Guns can only use the road or 5cm either side of it, to replicate the soft ground which was impassable to tanks. Carriers and Light Tanks ignore this rule.
The British Infantry start the game dismounted, as they are expecting possible action from the woods ahead, based upon earlier encounters.
The British Honey Recce unit starts the game on the road, but 30cm away from any German unit.
My usual house rules of 'hits stay on' and mortars and artillery fire automatically cause suppression where in use.
British OOB
1x CO (CV9)
3 x HQ (CV8)
1 x FAO
1 x FAC
1 x Honey Recce
12 x Regular Infantry
2 x MGs
1 x 3" Mortar
2 x 6pdr A/T Guns plus tows
6 x Shermans
2 x Sherman Fireflys
3 x 25pdr off table artillery support
1 x Typhoon with bombs
Fallschirmjager OOB
1 x CO (CV9)
2 x HQ (CV8)
9 x Fallschirmjager
3 x MGs
3 x Mortars
1 x Pak 36
1 x Pak 38
1 x Pak 40
3 x Stug III
3 x Gun Pits
Deployment
The Fallschirmjager decided to dig their guns in either side of the road, with one by the farmhouse with a line of fire right down the road. The infantry were in the woods, ably supported by 2 MG units and 2 Mortars, all of which had good lines of sight along and either side of the road.
The British split their infantry onto either side of the road, with the tanks lining up on the road as was their only option. The FAO and FAC would only be able to come onto the table at the end of their Turn 1.
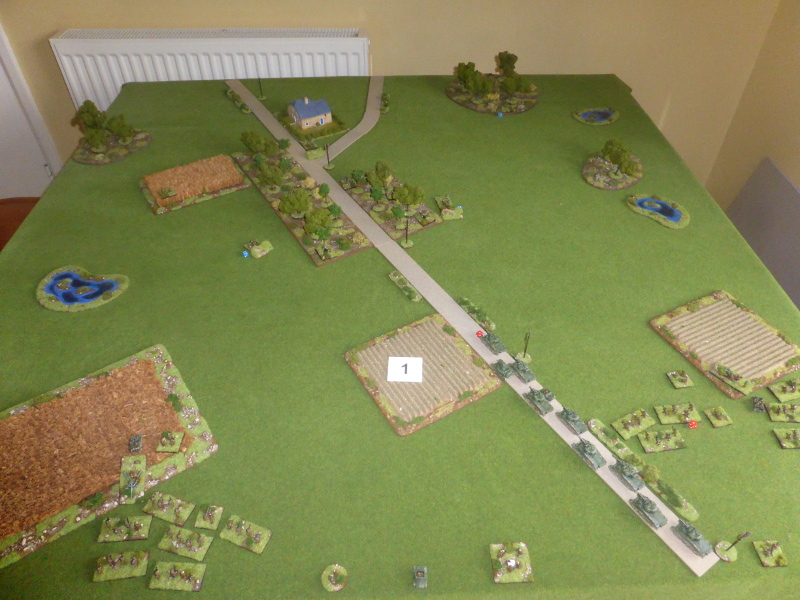
 |
| A view from the British table edge, with the farmhouse in the distance and Valkenswaard road leading off into the distance. |
 |
| The Germans dug-in either side of the road. |
 |
| A view from the British jumping off point and the lone Recce unit on the road. |
 |
| The Pak 40 dug-in at the farmhouse and in a position that afforded it a great view down the road. |
Turn 1
The British got off to a good start, with their right flank advancing and deploying their ATG and Mortar as they went. Opportunity fire from the German mortar saw one infantry unit suppressed. On the left flank the infantry advanced towards the cornfield, but attracted no fire. As the tanks advanced along the road, the German ATGs opened, suppressing the lead Sherman.
In response the Germans let rip with pretty much everything they had, suppressing another Sherman, an ATG as well as infantry and MG units. A bit peeved by this, the British tanks fired back, suppressing the Pak 36 and nearly destroying the Pak 38.
 |
| The end of the British Turn, with their units advancing along a broad front. |
 |
| The tank 'traffic jam'. |
 |
| The end of the German Turn. |
 |
| The British left flank, with some units suppressed (red die). |
 |
| A view form the right flank, again with suppressed unit clearly visible. |
Turn 2
Things didn't get off to a great start, as the Honey recce unit failed to get through to any command units and the FAO's comms were also down. However, luckily the FAC called in an airstrike, only for it to fall short of its intended target. Both flanks moved forward, with both sides exchanging fire and suppressing further units. The tanks once again blazed away, seeing the destruction of the Pak 38 and once again suppressing the Pak 36 and a mortar. The CO managed to get through to the FAO, who this time did get through, calling in an artillery strike on the German infantry, causing the loss of one unit and suppressing another.
The Germans failed their command roll, which wasn't exactly what they needed at this point.
 |
| The Typhoon flies in at low level... |
 |
| ... and promptly misses its target, probably due to the fact I was using a Hurricane in its place! |
 |
| The British advance slows as they come to grips with the Germans. |
 |
| The Tanks continue to pour fire into the German positions that they can see. |
Turn 3
Once again the FAO comms went down and the FAC, although getting through, blundered leaving him with a -2CV next Turn. Obviously the shame of the Hurricane proxy was too much.
Both flanks advanced, leading to the Pak36, both MG units and a Mortar destroyed. As the tanks advanced, the Pak40 opened up, suppressing yet another Sherman. In response, the tanks fired back, but failed to suppress it as it was too well dug-in, but managed to finish off the remaining mortar unit.
Not a moment too soon the German reinforcements arrived and quickly moved along the roads towards the farmhouse.
 |
| The British flanks are advancing, whilst the tanks are slowly edging forward, but at some cost. |
 |
| The British left flank pushed forward quickly, in the absence of any opposition. |
 |
| The Shermans struggle to advance as quickly as they would wish. |
 |
| The German reinforcements arrive and not a moment too soon. |
Turn 4
Yet again the British FAO and FAC (who was at -2CV) failed to get through to their respective assets. Not a great start to the Turn. At least the right flank advanced, but the left one failed, just when they were ready to move into the woods. The tanks at least engaged the Pak40 and the Stug IIIs, missing the Pak40, but destroying the lead Stug and suppressing the one behind. In response, the Pak40 brewed up yet another Sherman.
The German turn started with two initiative assaults from the infantry in the woods, leading to the loss of one Sherman, but both infantry units being destroyed.Despite this setback, the remaining Stug III in the farmhouse caused mayhem on the British right flank, suppressing two units that fell back into other infantry, suppressing them in the process.
 |
| The end of the British Turn. |
 |
| With Shermans brewing up on the road, the other Shermans move off into the woods for added protection. |
 |
| The Stug IIIs succumb to the Sherman Fireflys guns. |
 |
| The Fallschirmjager assault the Sherman, despite being suppressed by the weigh of fire as they come in. |
 |
| The assault sees the Sherman destroyed, but at the cost of the Fallschirmjager unit. |
 |
| The end of the Turn. |
 |
| The results of the Stug III shooting are clearly visible with 4 units of infantry suppressed. |
 |
| The Germans are in a strong, but rather isolated position. |
Turn 5
It came as no surprise that the FAO and FAC yet again failed their command rolls. What are the chances...? As the infantry pushed forward on both flanks, the Shermans finished off the Stug III on the road as well as the dug-in Pak40. This was enough to take the Germans over their breakpoint. Even if this hadn't been the case, their position was pretty untenable.
It came as no surprise that the FAO and FAC yet again failed their command rolls. What are the chances...? As the infantry pushed forward on both flanks, the Shermans finished off the Stug III on the road as well as the dug-in Pak40. This was enough to take the Germans over their breakpoint. Even if this hadn't been the case, their position was pretty untenable.
 |
| The British right flank reaches the edge of the wood, but still in view of the remaining Stug III. |
 |
| An overall view of the battlefield at the end. |
 |
| The left flank advances unhindered. |
 |
| The road is open but at what cost in the long run? |
 |
| The untenable German position, bereft of most of its armoured support. |
Post Game Thoughts
Well after so long it was great to be playing a game again. As ever BKCII failed to disappoint as a ruleset and broadly speaking the scenario worked well. It was always going to be a tough ask for the Germans, but it's not an easy one for the British either. So as always, some reflections upon the game:
Well after so long it was great to be playing a game again. As ever BKCII failed to disappoint as a ruleset and broadly speaking the scenario worked well. It was always going to be a tough ask for the Germans, but it's not an easy one for the British either. So as always, some reflections upon the game:
- The British pretty much need their FAO and FAC functioning right from the very start. Without them it is damned tough to shift dug-in troops, especially in a scenario such as this one. The fact that they didn't in this game did hamper the British, as the tanks had to do a lot of the donkey work, which slowed them down.
- Having just one, straight and exposed road makes tanks very tempting and exposed targets, but then this was the case historically. And I didn't even have an '88 for the Germans to use. Add in woods either side of the road or nearby and you can see why it was a tough task right from the off for the British. It is worth having a look on Google maps and street view to really get an appreciation of how open the terrain is. Coming from East Anglia I'm used to it and wouldn't want to fight over this sort of terrain.
- I reckon I need to paint another Squadron of tanks, as 6 doesn't seem quite enough. If the Germans had had better die rolls, then the British could have lost more than the 50% that they did in this game.
- I'm not sure whether infantry in half-tracks would be a useful addition for this sort of scenario. Reading 'A Bridge Too Far' after the game, it appears that the infantry road on the tanks to allow them to provide quick support as required. However later on the British are berated by the Dutch for not having infantry support at the start. Time for some more reading on this.
- I think that this scenario would work better on a 6'x4' table, as it would give the Germans greater opportunity for a defence in depth. If this were the case, I would give the British assets for some pre-planned artillery barrages to reflect the historical rolling barrage they used at the start of the operation. Some side roads might be useful as well for some flank attacks or to allow the British to find roads 'off-table' to allow them to outflank the Germans, as happened on occasion.
- As a one off game, it works well enough, but this really cries out for a linked series of scenarios. For the German player they would have to husband their meagre resources carefully, but also be unsure at to whether they would receive any reinforcements and, if so, what they might be. For the British player they too cannot be profligate with their materiel, but also have to bear in mind that this is a race against the clock. I think is something for some future games and one that requires careful planning in advance. The other option is to play it as a board game, with the broad moves played out their, then dropping down to the wargames table for more detailed actions. Again, something to have a think about.
So there we have it. I've got some more BKCII games planned, but really need to finish off some more units before I can get back to the table. Until next time.