Sunday 29 December 2013

The Battle of Heavenfield

Xmas is usually a quiet time on the gaming front for obvious reasons, but this year with the family away in Los Angeles (a long story) I was able to meet up with my friend Keith for a game or two of Dux Bellorum (he fancied something a bit different for once). I got everything set for when he arrived and so after the usual chat about wargaming etc, we sat down to play the 'River Battle' scenario straight from the book.

This turned into a bit of a slugging match over the ford as I had only made it wide enough for one unit to cross at a time, so wasn't a very challenging game to be honest. We both agreed that the ford needed to be wider in future and also that having the odd cavalry unit would help due to their greater mobility. Time was still on our side so we proceeded to play a straight 'Annals Battle' which was much more fun and challenging. Again we both agreed that the odd cavalry unit here and there would add another level to the game, so my partially painted cavalry for my Saxons have been bumped up the painting ladder as it were.

The following day I went to WH Smiths and bought the latest issue of Miniature Wargames magazine, which I thoroughly enjoy reading. By chance it had a scenario from Dux Bellorum author Dan Mersey in it based upon the historical 'Battle for Heavenfield', between Cadwallon and Oswald. I had left the table out from the previous night with the intention of playing a solo game or two from the book, but decided there and then to game the Heavenfield scenario as I had enough units for both forces from my collection of Pendraken figures.

Dan had also come up with a nice little pre-game idea where both players can bid secretly for certain terrain, re-inforcements etc. As I was playing solo I ignored this but am keen to try it out in future games. To my mind it looks a lot of fun and will add something extra to the game which is always a bonus in my book. 

I won't go into the detail of the background of the battle here, but recommend that you buy the magazine instead. However I will give the forces for both sides to help understand the units on the table.

Oswald's Army - Repeller
1 x Saxon Shieldwall Companions (with Oswald)
3 x Saxon Noble Shieldwall
2 x Ordinary Irish Warriors
2 x Saxon Foot Skirmishers (I opted to equip them with bows)
2 Extra Leadership Points

Cadwallon's Army - Agressor
1 x Welsh Shieldwall Companions (with Cadwallon)
7 x Ordinary Welsh Shieldwall
2 x Saxon Ordinary Warriors

Deployment
 
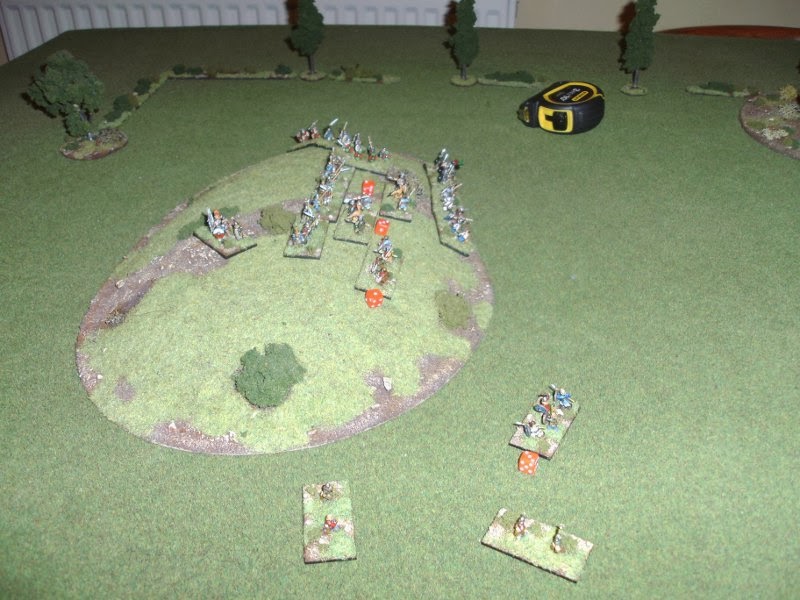
Oswald's forces deployed on the hill as per the historical battle, in a strong defensive position, facing the numerically larger force of Cadwallon.
The shieldwall units deployed in the centre with the Irish Warriors and skirmishers on the right flank.
Cadwallon deployed his Shieldwall units into two blocks, with the aim of the centre tying down Oswald's forces on the hill while the right flank attempted to move round and attack the left flank of Oswald. The Saxon Warriors deployed on the left flank facing the Irish Warriors of Oswald.

How the game played out.

Cadwallon's line advanced en masse whilst the Irish Warriors and Saxon skirmishers of Oswald's army advanced to threaten Cadwallon's left flank.
Cadwallon's army continues to advance, but the central Shieldwall units fail to move. The Saxon skirmishers shoot into the Saxon Warriors, causing a hit, before combat is joined. The Irish push back one Saxon unit and elect to follow up.
Cadwallon's army advance in unison this turn whilst the Warriors and Skirmishers continue to battle it out, with the Irish gaining the upper hand.
Only Oswald's centre manages to advance with the Warriors continuing to fight it out.
Cadwallon's right flank fails again leaving the centre to charge uphill into Oswald's Noble Shieldwall, who unsuprisingly come off worse. The Saxon skirmishers shoot and charge into support on the right flank with the Saxon Warriors under severe pressure from the Irish.
With the loss of a Saxon Warrior unit, Cadwallon's left flank is starting to look vulnerable. The centre gamely continues to attack Oswald's Nobles, but to no effect. Finally Cadwallon's right flank starts to move up into support.
The remaining Saxon warrior unit is assailed from all sides, but somehow manages to draw the combat! Cadwallon's units start to really threaten Oswald's left flank, forcing him to move back slightly. The centre continues to slug it out with Oswald's Nobles, who show the mettle.
The Irish Warriors see off the last Saxon Warrior unit, leaving Cadwallon's left flank rather exposed. On the hill Oswald's left flank comes under attack but grimly holds on depsite being assailed on two sides.
Cadwallon's Army attempts to envelope Oswald's Nobles, but is attacked in the rear by Irish Warriors.
Multiple attacks from front and rear see the loss of two off Cadwallon's sheidwall units, which he can't afford to lose. To add insult to injury his right flank fails to move into the attack. Cadwallon is now down to 2 LP's and 1 off his break point. Oswald still has 7 LP's tp play with.
The battle descends into a confused melee, but Cadwallon's forces are under severe pressure, but crucially do not lose any units this turn.
The inevitable happens and Cadwallon loses enough units to force a break test, which results in other units fleeing the battle, thereby taking him over 75% and thus 'losing' the game.

As this was essentially an 'End of Reign' battle, it was a draw as neither side had succeeded in killing their opposite number. However Cadwallon's forces had lost 6 units to Oswald's 2, even before rolling for break tests. So in my mind a victory to Oswald and the death of Cadwallon, cut down near the stream as happened at the end of the real battle.

Post Game Thoughts
I found this a thoroughly entertaining game, made all the better by the background detail provided by Dan in his article. So here are a few thoughts on the game:
  • Shieldwall units on a hill are damned hard to shift.
  • The lack of skirmishers for Cadwallon told in the end as they helped Oswald's Irish Warriors win the flank battle. Also they are very useful at attacking shieldwall units with their hit on 5+.
  •  With the loss of the left flank, Cadwallon's army was always going to be in a tricky situation.
  • If Cadwallon's force had made a unified attack on Oswald's Noble shieldwall from the front and side, this would have helped. In the end I was too hasty and commited the troops to soon and in a piecemeal fashion. Lesson hopefully learnt!
  • Cavalry would have helped Cadwallon's army as their mobility might have been enough to un-lock Oswald's shieldwall. Dan does mention the option of this in his article.
So having had a few games in quick succession, I'm going to order a few more units from Pendraken to flesh out my existing armies. Broadly speaking these will be a mix of cavalry and foot, to allow me to field a Late Roman army as well as Irish and Pict allies. With Pendraken due to release some new Ancients ranges next year, these should be ideal for the latter.

Sunday 15 December 2013

General Musings on AARs

Some General Background Information
Craig and I visited Warfare in November for our first proper chance to walk a wargames show. Normally we are putting on demo games and so have little chance to really have a good look around. Sadly the demo games were not up to much, but this was more than offset by the traders, and both of us picked up some goodies from Pendraken. Craig ended up with a decent amount of kit to put together a nicely balanced battlegroup for BKCII. We resolved there and then to try and get a game in with our new toys before Xmas. There is nothing like a deadline to focus the mind on the painting and modelling front.

We agreed to do a fairly mobile scenario to reflect the early days of Operation Overlord and the fluid nature of the front and the battles that took place in early June. We decided upon a straight forward 'Encounter' scenario from the book, with each side having 2,000 pts. It was nice to be playing something a bit different from the, for us, fairly standard attacker versus dug-in defender scenarios that we have played of late. 

For my Brits I decided upon the following:

4th Battalion Somerset Light Infantry, 129th Infantry Brigade, 43rd 'Wessex' Division.
Support from 'A' Company, 8th Battalion, The Middlesex Regiment.
1 Troop, 43rd Recce Regiment.
477th Battery, 112th 'Wessex' Field Regiment Royal Artillery.

As always, I really enjoyed researching the units I was to field. For the scenario, it was to be based upon the figthing that took place on the second day of Operation Epsom, in and around the villages of St Mauvieu and Marcelet, with the crossroads located between the villages as the objective. The Germans were a Kampfgruppe from the units of 12th SS 'Hitlerjugend' and 21st Panzer Division.

So after some research I came up with the following layout for the table:

The outskirts of St Mauvieu are on the right (British deployment), with Marcelet on the left (German deployment). The objective of the scenario was control of the crossroads in the centre of the table.
The view from Marcelet towards St Mauvieu.
The view from St Mauvieu, with Marcelet in the distance.
Departure From the Norm
Now those of you that follow my Blog know that generally speaking I like to do fairly detailed AARs to show how the game went. Afterall this is something I like to see on other Blogs. But on the day I just was not in the mood to take copious notes and photos to put together my normal AAR. And do you know what? I enjoyed the game much more! 

So this got me thinking about why do we bother with putting up AARs on our Blogs? After all as I've mentioned before, they can take up an inordinate amount of time, generally a lot longer than the game itself. So with a couple of weeks to mull over this issue, I thought I'd jot down some musings from my perspective with regards the above:


Good Points
  • I like to show how I came up with a scenario, the table layout, the forces involved etc. After all that is something I enjoy on other Blogs as it can inspire me to try something a bit different.
  • A good description of how the game went accompanied by some nice photos showing progress of the units makes for enjoyable reading IMHO. You do not need to be Tolstoy, but a clear and coherent narrative with appropriate pictures and captions normally suffices. Whitty and dry comments are a bonus, one that my friend Keith excels at.
  • The background 'fluff' to a game I always find interesting, even if it is not from a period I normally game.

Bad Points
  • Writing AARs take time; an awful lot of time in my case. Maybe I ramble on too long and should try a case  "of less is more".
  • Taking notes during the game disrupts the flow as well as ones concentration. It also takes time to write them, increasing the length of the game. I was pleasantly suprised at how much more I enjoyed the game when I was able to give it my undivided attention.
  • Taking the pictures during the game, then editing them and sorting the good from the shocking (too much of the latter I'm afraid) takes time. Then you have to remember which pictures fit in which part of the game notes and then try and add appropriate captions to help with the narrative.

Conclusions
In future I still want to post useful and hopefully interesting AARs on my Blog, but I will try during the game to be less distracted by the whole taking notes business, and maybe rely more upon the pictures to job my addled memory. Hopefully this will work but only time will tell.

For those that are interested, the British won the game around the 6th Turn, when their Churchill tanks saw off the last of the German Pz IVs, leaving them with no viable anti-tank units to contest the crossroads.

Until next time...

Friday 8 November 2013

The Battle for Sene Golf Course Club House

A week or so ago the opportunity arose for a solo game of BKCII, a rare occassion these days. I remembered in "Invasion!" by Kenneth Macksey, the fictionalised account of Operation Sealion, an account of an attack over a golf course in the South of England. I thought this would make for an interesting scenario and certainly a different looking table. So I read up on the 'battle' and with a look at Google maps, I was able to come up with the layout of the table.

My next decision was whether to go with the battle based around Operation Sealion or one set in the AVBCW. In the end I decided with the latter purely as I wanted to field my armoured canal boat as well as some cavalry units that hadn't seen 'action' for some time.

Scenario
I felt that the Deliberate Attack scenario best fitted in with the forces at my disposal as well as the feel of the battle as described. The BUF were to be dug-in around the clubhouse as well as defending the bridge crossing the military canal. Their Italian Allies would be off table and held in reserve to come onto the table via mobile deployment at a time of their choosing. The BUF also had three pre-registered defensive fire areas, with the clubhouse acting as their command post.

The Loyal Army of the South deployed as per the scenario in the rulebook, with one battalion of infantry South of the canal, with the remainder to the North on the golf course. Their objectives were to be the control of both the bridge and the clubhouse by the end of the game.

British Union of Fascists & Italian Expeditionary Force
1 x CO
3 x HQ
1 x FAO
1 x Infantry Recce
12 x Infantry (Regulars) with 3 x ATR upgrade
5 x MG
2 x Mortars
1 x 45mm ATG
1 x IG
1 x MKIV Male Tank
3 x L3/35 Tankettes
3 x Cavalry Horses
3 x Motorcycles
3 x 75mm Artillery (off-board) with 3 x HE Assets

1 x Command Post
2 x Barbed Wire
9 x Trench
2 x Gun-pit

Loyal Army of the South
1 x CO
5 x HQ
1 x FAO
2 x Infantry Recce
23 x Infantry (Regular)
6 x MG
2 x Mortar
1 x 45mm ATG
5 x Armoured Cars (non-Recce)
3 x T-26
5 x Cavalry Horses
1 x Truck
3 x 3" Artillery (off-board) with 6 x HE & 3 x Smoke Assets
1 x Bomber with 1 x Air Asset
1 x Armoured Canal Boat

Armoured Canal Boat
After some thought I came up with the following stats for the canal boat:

Move   Weapon      AT       AP       CA Hits Save Cost
  10       (MG)               -        2/40       2     3      6       100
             (Mortar)      3/120  3/120

Hit on 5+ due to being in the water. If attacker on the river bank hit on 4+ as 'in the open'.

Starting Positions

A view of the battlefield from the East. The BUF are dug-in in and around the clubhouse and by the bridge, behind a defensive screen of barbed wire. The LAotS are at their jump off points on the Southern end of the table.
A view from the South and the LAotS starting positions. Their plan was to pin the forces down at the bridge, and force a crossing if the battle went well for them on this flank. Meanwhile th main part of the battlegroup would swing around the woods in the centre of the golf course to try and flank the BUF positions. Speed would be the key to victory.
The main BUF force dug-in by the clubhouse.
The BUF force guarding the bridge.
The LAotS force tasked with capturing the bridge if at all possible.
The armoured canal boat that would add its fire to the bridge attackers.
The main LAotS force ready to attempt to force the BUF flank.
The tanks and cavalry that would spearhead the attack.
The BUF command and reserve awaiting to see where the 'schwerpunkt' would develop.

Turn 1
A patchy start by the left flank of the LAotS saw some of the units advance towards the bridge, supported by the armoured canal boat. The cavalry on the right flank advanced towards the hedgeline, but the centre failed to move in support as planned.

With the slow start by the enemy, the BUF commander kept his powder dry and watched to see where the schwerpunkt would develop.

Both flanks advance but sadly the centre fails to move up in support.
On the left flank troops advance towards the bridge, supported by armoured cars and canal boat.

Turn2
The cavalry on the right flank made a gallant dash from the hedgeline towards the wooded ridge and halted awaiting further orders. Once again the centre was less than supportive but at least made an effort to move to aid the cavalry, who were somewhat exposed on their own. On the left flank the troops and armoured cars once more advanced, this time to contact with the enemy, with their recce unit spotting for the mortar on the canal boat. The FAO tried to get through to his battery of guns but once again failed.

With contact joined at the bridge, the BUF concnetrated fire towards the LAotS centre, causing hits from off-table artillery and dug-in infantry gun and mortar. The CO moved the 'Beast of Bodmin' and his reserves towards the wooded ridge to counter the threat from the cavalry and T-26s. The Italians were still held in reserve with the aim to take the LAotS forces in the flank as planned.

The cavalry have swept around the flank as planned, but are somewhat isolated as their nearest support is still behind the hedgeline.
The left flank gathers for the attack.
The 'Beast of Bodmin' and support moves up to protect their left flank.

Turn 3
The LAotS unleashed its scheduled bombardment of the bridge with HE, shortly after followed by a light bomber flight. Sadly for the LAotS troops preparing to attack the bridge, the bombardment was less than effective, only suppressing the dug-in ATG on the road. 

Under cover of the bombarment, the troops advance towards the bridge ready to assault over it, but communications break down at the critical point, leaving them rather exposed on the road...

Once again the centre is on the slow side of tardy and the cavalry fail to do anything, despite the earnest attempts by the CO to get through to them. A poor turn for the LAotS.

The BUF troops on the bridge, hardly able to believe their luck, call down a registered barrage on the LAotS troops in the open. Rather unsuprisingly they are badly mauled as a result, with many units being suppressed. The CO moves up the 'Beast' and his reserves to the fence line behind the clubhouse to take up a strong defensive postion on the left flank. 

Sensing the time is right to attack the beleagued cavalry, the Italians launch their assault, but a somewhat less than effective, only causing one hit on the cavalry.

The light bomber follows on after the preliminary bombardment of the bridge, but to little effect.
The LAotS left flank caught in the open by the registered concentration of fire from the BUF artillery. The effect is all too clear to see.
The Italians launch their suprise attack.
The LAotS attack is stalling.
Despite their suprise assault, the effectiveness of the Italian attack is plain to see.
The 'Beast' and supporting troops take up position along the fence line behind the clubhouse.

Turn 4
Fortuitously for the LAotS left flank, a smoke barrage arrives to cover their attempts to reform after the BUF bombardment, which is all they are really able to do. The centre once again is a few shots off the pace and the cavalry dismount in the face of the Italian assault. The CO and his tanks advance in support of the cavalry, with the combined fire disrupting the Italian units.

With most of the BUF force blinded by the smoke, the CO opts to stay put along the fence and the Italians fail their command roll, obvioulsy shaken by the strength of the counter-attack.

The LAotS attack is spread out and so the effectiveness is dissipated.
The LAotS counter-attacks.
The smoke screen brings relief to the LAotS left flank.

Turn 5
As the smoke screen lifted, the LAotS left flank launched a piece meal attack towards the bridge, achieving the destruction of the dug-in ATG. With the way open, other troops in support fail their command roll! Finally the centre gets going and combined movement and fire from all units sees the demise of the dug-in IG in front of the clubhouse. The way is starting to open up for an attack towards the clubhouse. Things are looking up for the LAotS.

On the right flank, the Italians continue to takea lot of fire, losing units and a L3/35 tankette with the other 2 suppressed. The dismounted cavalry take up positions along the wooded ridge, effectvely sealing off the Italian attack.

With the bridge looking vulnerable, the BUF FAO calls in his artillery, which even thought it deviated, still supresses LAotS infantry on and around the bridge. The dug-in infantry add to the woes caused by the artillery, finishing off 2 infantry units and supressing more. The ability of the LAotS troops to prosecute their attack on the bridge has been severely reduced.

The Italians do their level best to hold their own against the T-26s, but there is only so much a mortar can do. Their lack of AT weapons leaves them extremely vulnerable to the T-26s and armoured cars of the LAotS.

The attack begins to make headway in the centre and the right flank is more than holding its own.
The Italians are hard pressed by fire from the T-26s.
Having forced the bridge with armoured cars, the infantry are still some way back, held off by the combined fire of the dug-in BUF troops.
The BUF centre is weakend by the loss of the dug-in IG.


Conclusion 
At this point time was against me and I called an end to the game. Even thought the LAotS had lost more troops than the BUF, the latter had no AT weapons left and only 1 tank. This was not much to face 3 T-26s and 5 armoured cars. I think it would have been only a matter of time before the BUF were overwhelmed by the LAotS troops, supported by their tanks and ACs, as they still has another 7 Turns to go. It would most likely have been a pyhrric victory though, so in my mind the battle was a draw.

After the game I made some notes on my observations of the game in particular, and gaming in general:
  •  In the cold light of day, I simply had too many units on the table for a solo game. I kept forgetting things like mortars and auto-suppression, mainly due to the fact that I had som much 'stuff' to command. The forces would have been fine for a normal or even multi-player game, but not solo. In future I will try and resist the temptation of getting all of my toys on the table.  Sometimes it's definitely a case of "less is more".
  • The scenario, although fun to research from the book, didn't work that well as a game. The wide open space of the golf course and the limit of the canal, made it rather hard for the attackers. Maybe it would have worked better for a game centred around 1944 and the forces available to both sides. Maybe I can try this another day. At least the attackers did suffer as they did in the book, so maybe I got something right.
  •  Don't play when you're tired. This didn't help the first point above.
  • The BUF need more armoured support, or consequently the LAotS less. Personally I like having armour on the table, so it will be a case of the former I'm sure.
  • Once again dug-in troops proved they are hard to shift. Unfortunately I didn't remember auto-suppression from artillery  until Turn 3, which didn't help. For my next game I want a very different feel from attacking dug-in troops, so I will have to have a think on this with regards to scenario choice.
  • The canal boat was fun to have on the table, but I don't think this scenario suited it that well. Again I will have to have a think about this.
  • Uping the command value of the CO and HQs to 9 and 8 respectively worked well. It certainly gave for a more fluid agame, despite the LAotS trying to prove otherwise.
  • Post match I thought that the LAotS might have been better off making a dircet assault with all of their forces either side of the canal. The cavalry could have provided an effective screen to the right flank along the hedgeline and the central wood, allowing the rest of the force to conctrate on attacking the dug-in troops in front of the clubhouse.
  • I enjoyed the adhoc mobile Italian force but they were of limited use, due to their lack of AT capability. However in other scenarios they will be rather useful.
  • The cavalry on both sides as well as the motorcycle riders proved to be very mobile and as above, rather useful for future games.
  • The clubhouse command post was very beneficial to the BUF and their FAO especially. From his elevated position combined with the +1 to his CV, the artillery fire he was able to call in was most effective.
  • Registered targets work very well when in defence, especially combined with the point above.
So there we have it. Not the best game I've had by a long way, due to the points listed above, but at least it was a game nontheless and one that I've hopefully learned from.

Tuesday 5 November 2013

Junkers Freedom Fighters for KR-16

Well I finally got around to finishing off my Junkers Freedom Fighters for use with the KR-16 rules from Michael at Angel Barracks. I've had these a few years now and it feels good to finally have got one faction finished. The figures are exceptionally well sculpted for 6mm and the detail only really becomes apparent when you start to paint them

The figures were based on 1mm black styrene sheet, 13mm in diameter, that I had made for me at work. A wipe of finesurface polyfilla blended the figures to the base, and when dry, pva glue was applied and a very fine sand applied. The figures were then sprayed with a black undercoat and the bases drybrushed in my normal manner. To help me see the detail of the figures before applying any colour, I drybrushed the figures with a medium brown paint to show up the detailed sculpting. This helped an awful lot and this is a technique I will be using in future.

The figures were then grouped into units of 5, and a basic pallet of greys, greens and browns applied to them. For example the first figure would have grey trousers, the next a grey shirt, the third a grey hat etc. This way all the units had a random look yet the basic pallet of colours tied them all together. I had planned on added some form of flock to the bases, but I couldn't find anything that looked right, so in the end decided to leave them plain 'dirt'. This will certainly fit in with Michael's terrain. As usual for me the bases had their edges painted black.

Now I'm certainly no David Bailey, but hopefully the following pictures give you an idea of how the Junkers look en masse. Hopefully when I next meet Michael I might be able to persuade him to take some better pics for me.
The Junkers in the fields and hedgerows of their settlement.
A Junker section guarding their crops.
The other three Junkers sections in the open.
A junker rocket launcher on the right. These I have a yellow tail to denote the rear and therefore the danger end, with a red tip indicating the rocket ready to launch. These should be easy to see when on the table.
A sniper takes up position in the hedgerow. Both the sniper and the rocket launcher have silver sights painted on their weapons.