Sunday 6 November 2022

Action In The Plattville Valley 24th July 1864

After a comment on a recent game about some classic 'Old School' scenarios, I dug out my Featherstone and Grant books to peruse for some ideas for a future battle. I was immediately struck by the following one from Featherstone. 

A wonderful book and I love the lovely 1960's graphic dust cover.

The map for the scenario.

Scenario
Very little was required in terms of tweaks to the original to make it suitable use with BPII, the intended ruleset I wanted to use to play this out. The game was limited to 8 Turns and both sides had an advanced guard of 2 Regiment's of Infantry, with 2 Infantry Brigades and supporting Artillery, plus 2 Regiments of Cavalry for the main force. 

The only tweak I made was to randomly roll for command ratings on a D6:
1 - CV 7
2 - 5 CV 8
6 - CV 9

The Game
I set out the table as closely as possible to the original, as can be seen below. The game was played on a 2 1/2' x 3 1/2' table, which equates to a 5' x 7' one if using 28mm figures. So without further ado onto the action.

The end of Turn 1. The Ruthenian troops (bottom table edge) moved slowly along the Lower Pike Road, whilst the Prusskian troops began to cross Bull Bridge on the Upper Pike Road.

The end of Turn 2. The Prusskian advance slowed as they sighted the enemy, with one Regiment heading towards the Wheatfiled whilst the other moved over Bull Bridge. The Ruthenians deployed one Regiment into Line across the Lower Pike Road whilst the other reached the edge of Green Ridge.

The Ruthenians deploy.

The Prusskians move towards the edge of the Wheatfield.

The end of Turn 3. Both sides Main Forces began to arrive and they quickly deployed to support their respective Advanced Guards. Some firing broke out on Green Ridge and at the Wheatfield.

Both sides push troops onto Green Ridge, with the Prusskians taking some Hits & Disorder on the Ridge and in the Wheatfield

The Ruthenians occupy Church Hill and close in on Roger's House, with the Cavalry waiting on the flank.

The Ruthenian Artillery deploy to cover the Ploughed Field, where Prusskian troops can be seen advancing.

The Ploughed Field, with the Prusskian Brigade led by their Light Infantry.

The Prusskain Cavalry reach Mole Hill and an Infantry Brigade are on Rabbit Ridge, with their Light Infantry fording Bull Creek.

The end of Turn 4. The Prusskians pushed for with all speed, whilst the Ruthenians were somewhat slower and were reacting to the Prusskians moves. Both sides shooting caused Hits & Disorder, but nothing major to worry either side just yet.

The Ruthenian Light Infantry engage the enemy in the Wheatfield, despite coming under intense fire from their front and left flank (a recurring theme in this battle). 

The Prusskian troops are slightly bottlenecked at the road as it runs past the Wheatfield and Green Ridge. There are two CV 9 Commanders there (Dashing markers), but both have required the assistance of the General at times to keep their troops moving.

The Prusskian Light Infantry are taking heavy fire from the Ruthenian troops on Green Ridge. 

The Ruthenian Cavalry failed to charge as the Prusskian Cavalry crossed Bull Creek.

Both sides are taking casaulties, but the Prusskians are suffering slightly more at present. thankfully the Church and Roger's Farm are providing some useful cover for the Ruthenian troops.

A view from the East along the battle lines.

The end of Turn 5. The Prusskian troops began to try and push along Green Ridge to create space for their troops, so as to bring their numbers to bear. Again the Ruthenians reacted as best they could to these moves. Both sides shooting was largely ineffective, due to poor die rolls and good morale save. However the Prusskian Light Infantry on Green Ridge were broken.

The action hots up along the Lower Pike Road, Green Ridge and the Wheatfiled.

The Ruthenian Light Infantry break and flee towards Bull Creek.

The Prusskian Infantry in and around the Ploughed Field come under increasing pressure.

The end of Turn 6. Another turn of careful manouevreing and response by both sides, with the major move being a Ruthenian Infantry Regiment leaving Church Hill to press their slight advantage by Platt's wood and the Ploughed Field. Yet again a combination of poor die rolls and good morale saves prevent either side gaining the upper hand.

The fighting increases in intensity as both sides close, but neither can find a breakthrough.

Roger's Farm comes under intense fire and the Artillery to the left just hangs on.

The Ruthenians try to press their advantage as the Prusskian troops are Shaken & Disordered.

The end of Turn 7. Things are moving towards a climax and with time running out, who will break first? The Prusskians increase pressure on Green Ridge and a Ruthenian Infantry Regiment makes a Disorderly Retreat to allow fresh troops to take their place. The Ruthenian Infantry Regiment in Roger's House is broken by combined fire, but at least they force the Prusskian Light Infantry back into the Ploughed Field due to a failed morale check. No big break throughs but the Prusskians have a slight advantage at present.

A Ruthenian Infantry Regiment makes a disorderly retreat to give it a chance of reforming and rejoining the fight.

Another view along the battle lines.

Roger's House is empty.

At least the Ruthenian Infantry have the advantage by Platt's Wood and the Ploughed Field.

The end of Turn 8. With the final Turn both sides made concerted efforts to gain a victory. The Prusskians got off to a poor start with a failed Rally roll (Blunder) leading to an Infantry Regiment blocking another, thus reducing the amount of firepower available on Green Ridge. The Prusskian Cavalry decided to charge to try and break the Ruthenian Cavalry, but lost a Regiment in the process and another one to a Sweeping Advance, but the Ruthenians lost one cavalry Regiment too. There was little movement by the Ruthenians, but they managed to break an Infantry Regiment and force another back Shaken & Disordered.

The Ruthenians finally gain the upper hand by the Wheat Field and Green Ridge, forcing the Prusskian Artillery to make a Disorderly Retreat to survive, as leaving units Shaken & Disordered.

The Prusskian Infantry Regiment that Blundered are broken on Green Ridge.

The Ruthenian Cavalry only just survive but are victorious.

The Broken Prusskian Cavalry.

The Prusskian Infantry are pushed back in the Ploughed Field and the Ruthenian Infantry are in a strong position.


End of Game
A sudden flurry of activity at the end of the game saw the Ruthenian troops emerge victorious, but only just. The Butcher's Bill was similar for both sides, but the Prusskians had lost one Light Infantry Regiment more and had more Regiments close to breaking than the Ruthenians. It could easily have gone the other way.

Post Game Thoughts
A fun game that played really well and it could not have been closer at the end. So as always some post-game thoughts in no particular order:

  • Despite the Prusskians having two CV9 commanders, they had to rely upon the General's re-roll ability a few times during the game and at crucial moments too. Both times this led from a failed command roll to one that allowed them up to 3 moves!
  • Both sides shooting was really poor through out the game, compared to previous ones I've played that have been rather bloody. A combination of some shocking To Hit die rolls combined with some superb Morale Saves was the reason for this.
  • As a result of the above, this allowed the Ruthenian Light Infantry by the Wheat Field to survive repeated Turns of intense musket and artillery fire and somehow still survive. this prevented the Prusskians from breaking through at that bottle neck of the Wheat Field and Green Ridge. Heroic stuff indeed!
  • The scenario worked a treat with BPII and the Glory Hallelujah! supplement rules that we've been using for quite some time now. It would be interesting to play this again but using the 'Shoot and then Move' play that is in the Valour & Fortitude rules that have recently been released. Something to try out for another day maybe.
  • I enjoyed having the bits of terrain named on the map which made it easier and possibly more interesting when writing up the AAR. Something to consider for future games for sure.

What Next?
What indeed you might well ask! Well after quite a few games of late, I feel a pause is in order for a week or so as I fancy doing a bit of painting, subject to the weather of course, as I still need to do a few things on the garden. I'm spoilt for choice on the painting front but want to finish of some German WWII AFV's that have sat on their sticks for far too long, when they only need a few highlights and details painting and then they are done. At least they will be useful for the next planned scenario, which is based upon another 'Old School' one and sadly no prizes for guseeing that that might be! 

So until next time stay safe and keep healthy.

Wednesday 2 November 2022

The Battle For Heimsdorf 1744

The final game of my 2' x 2' series was played out this afternoon, using Honours of War as planned, with my Commission Figurines mdf miniatures. I decided to keep things fairly 'vanilla', mainly for my benefit, going with the Austrian stats which over the years I've found give a pretty good balanced game. Both sides rolled randomly for their Brigadiers, with the Ruthenians all being Dependable, but the Prusskians had a bit of a nightmare, with theirs all being Dithering! The objective was quite simply to control the village of Heimsdorf, within 8 Turns. So onto the action.

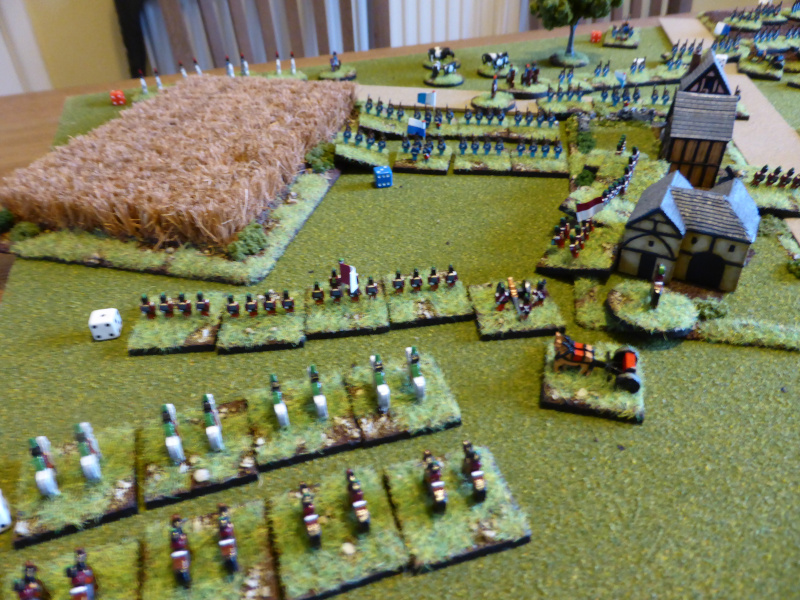
An overview of the table, with the Ruthenians at the bottom, the Prusskians at the top.

The Ruthenian right flank led of by their Light Infantry.

The centre all in line due to being close to the village, with their flank covered by the Cavalry.

The Prusskain centre and right also in line and covered by Cavalry.

The Prusskian left in column for speedy moves early on, led by their Light Infantry.

The end of Turn 1. The Prusskian moved first, with their centre and right moving forward, but their left stayed firmly put. The Ruthenian right flank in contrast made a double move and the rest moving steadily forward.

The Ruthenian troops advance towards the Prusskian Light Infantry screen.

The Ruthenian Light Infantry advance towards the wood, followed by the Line Infantry.

The Prusskian Line Infantry close in on the village.

The end of Turn 2. The Prusskian Line Infantry in the centre rolled a Poor move so failed to enter the village. Boths sides advanced elsewhere and the flanks became engaged in some light firing.

The Prusskian Cavalry take some fire from the Ruthenian Line Infantry by the village.

The Prusskian Light Infantry get the upper hand against the Ruthenian Line Infantry.

Ruthenian troops move through the wood.

The end of Turn 3. Once again the Prusskian centre failed to move (another Poor command roll) and the left flank rolled Poor as well and so could only deploy into line. Their Cavalry charged and took some fire on the way, leaving them shaken, which helped their demise in the ensuing melee, but the Ruthenian Cavalry had to retreat to reform. The Prusskian Light Infantry came off worst in the firing phase, having to retreat too to reform, causing some disruption to the Line Infantry behind them.

The Ruthenian right flank take control of the woods and drive off the Prusskian Light Infantry.

The Prusskian Light Infantry reform in the rear (red die).

The Prusskian Cavalry are KO'd (red die top left).

The Ruthenian Cavalry have had to retreat to reform in the rear.

The end of Turn 4. A poor Turn for the Prusskians, with the centre and left flank both rolling Poor once again! This really hampered their ability to take the fight to the Ruthenians and to take the village. At least they were able to drive off the Ruthenian Light Infantry from the wood with a whiff of grapeshot.

The Ruthenian Light Infantry are forced to retreat to reform.

Hits build up on both sides.

The Ruthenian Line Infantry begin to occupy the village.

The Ruthenian Line Infantry and Artillery dominate their flank at present.

The end of Turn 5. Both sides pushed forward and engaged in some effective shooting, with the Prusskians losing a Line Infantry unit and the Ruthenians a Line Infantry unit forced to retreat and reform.

The Ruthenian Line Infantry retreat and reform.

The Prusskian's lose a Line Infantry unit (red die) and their Artillery has had to retreat and reform.

The Prusskians push past the village but take flanking fire on the way.

The Ruthenian Cavalry move up to support their Line Infantry.

The end of Turn 6. The Ruthenians pushed forward to close with the enemy and once again both sides had some very effective firing. The Ruthenian right flank were pushed back as a Line Infantry unit had to retreat and reform. The same was true on the Prusskain right, but this left them in a very perilous position. 

The Ruthenian right flank once again see their Line Infantry forced back to reform.

At least the Ruthenian Line Infantry has some Prusskian units close to needing to retreat and reform.

The Prusskian left flank is not in a good state.

Ruthenian troops occupy the village.

The Prusskian right flank is close to a complete breakdown.

Ruthenian Cavalry ready to exploit the shaken and reforming Line Infantry.


End of Game
With the Prusskian troops in such a parlous position and state, they wisely quit the field of battle, leaving the Ruthenians to consolidate their positions.

Post Game Thoughts
Well that was great fun and so good to be playing Honours of War again. These really are a superb set of rules and I've yet to have a bad game with them! So some musings on the game as always:

  • The rules came back to me straight away despite not having played them for some time. However I did completely forget to check for Brigadier and General casualties early on in the game, so I just carried on without it for the rest of the game. Mea culpa!
  • Even though this is part of my 2' x 2' series of games, with the haved movement distances for 10mm figures, this table equated to a 4' x 4' when using normal distances for 28mm figures.
  • I reduced the terrain for this game, to reflect the village being smaller some 100 years before the previous game, but also to improve game play. Too much terrain doesn't feel right for the SYW and certainly in Central Europe there are precious few hedges, fences etc compared to say France during WWII.
  • The Prusskians were really, really hampered by having all their Brigadiers rated as Dithering, but sometimes that how the dice roll. It makes for an interesting challenge, but a series of Poor command rolls meant that they couldn't advance, which gav ethe Ruthenians the upper hand early on.
  • It was fun to get my mdf figures out again and it reminds me that I should paint up some more of them, which applies to most of my projects!

My next game is already thought out and it just remains for me to decide which ruleset to use for it. Something to ponder over the next few days. Hopefully those that enjoy seeing some Old School scenario action will be pleased to see what I put on.

So until next time stay safe and keep healthy!