Sunday 16 May 2021

Breaching The Trasimene Line - Italy 1944 - Post Game Thoughts

Well that in the end was a very enjoyable series of games that certainly lived up to expectations from my point of view. So to cap things off to a nice week of gaming, as promised some post game thoughts in no particular order:
  • Being able to leave the table set up nearly all week was an incredible luxury as far as I'm concerned. It meant that nothing felt rushed and the whole experience was a nice and gentle pace. I had time to play bits of the game as and when I wanted, as well as think about things on various levels, such what assets might be available to either side after Day One, where and when to move units etc. This is something I want to do more of, subject to gaining 'Brownie Points' from SWMBO. Oh for my own dedicated games room!
  • Due to the room still being used by the family, I kept the table against the wall which meant I had a rather one dimensional view of the game. In future I will try and move it away from the wall when playing, so I can get a better view of things from both sides positions, which not only give a better perspective on things, but might affect certain decisions based upon the view available. 
  • I've been playing BKCII since they were published and they are still my favourite WWII rules. Familiarity hopefully hasn't bred contempt, but I feel I'm at a point where my knowledge allows me to set up games and scenarios by second nature, without having to think too hard. Also the game flows nicely as I know the rules are rarely have to look anything up. There is a lot to be said from finding a set of rules you like and sticking with them, which I've started to do over recent years. No more chopping and changing from one ruleset to another and then trying to remember which rules apply to which set (famous last words!).
  • With BKCII (and BKCIV) it is all about combined arms operations to allow you to achieve your objectives. Obviously this is historically accurate and the rules certainly encourage you to do this. If you don't it is very hard to achieve said objectives, which is good IMHO. 
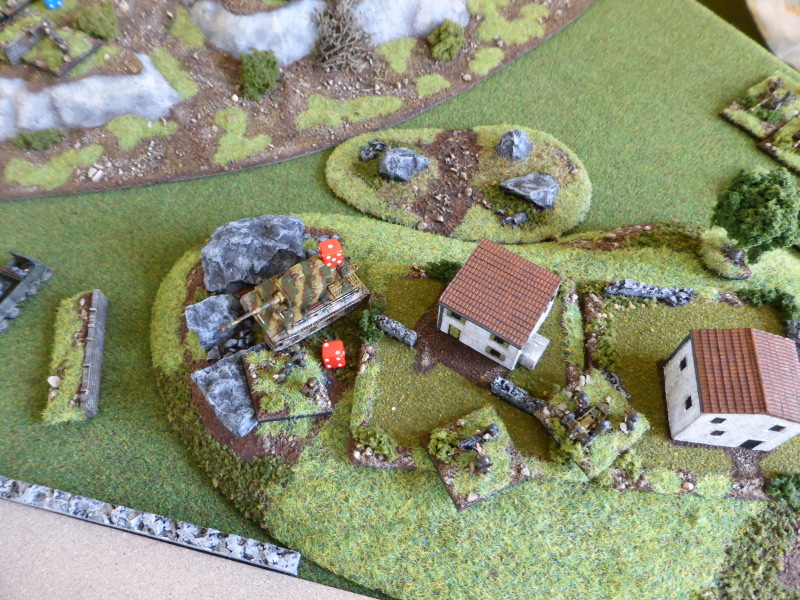
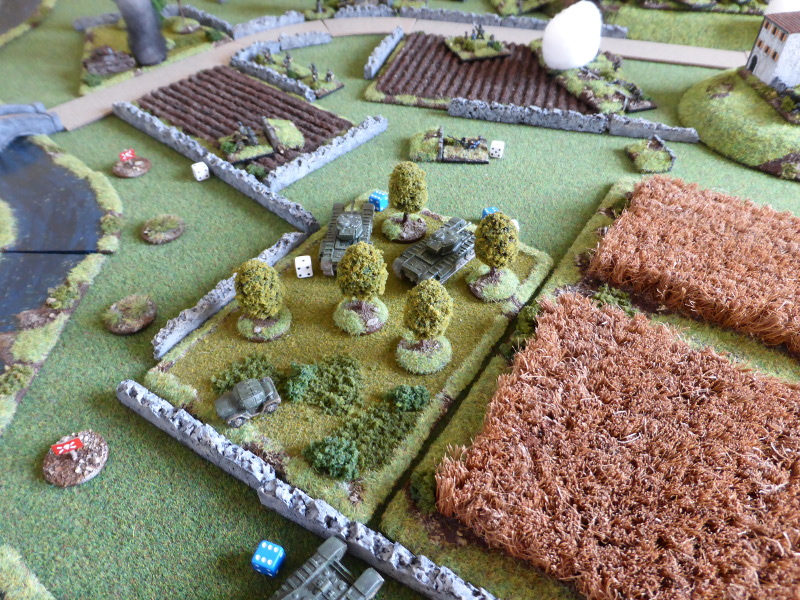
  • Dug-In troops and troops in Stone Buildings are damned hard to shift as one would expect. As with the above, you need to combine your arms to winkle out these troops. Knowing how many troops to have dug-in, how many stone BUAs etc is something that is hard to get right, as too much and it is nigh  impossible for the attackers to win. You also need to know what sort of numerical or materiel advantage to give the attackers to balance that defensive position of the defenders. Again knowledge of the rules certainly helps in achieving this balance. With this being a series of linked games, I had the luxury of adding units to either side as I deemed fit if I thought they were warranted based on the above, such as the Churchill AVRE Petard being given to the British when requested by the CO. A bit of flexibility to give a good game is not to be sneezed at.
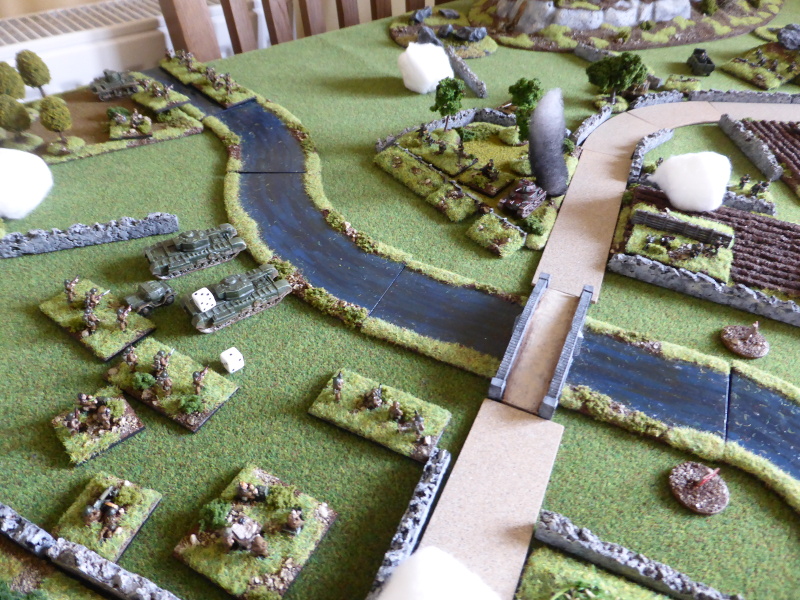
  • The British decision to use smoke to mask the Tiger I and Pak 40 really helped the British cause. If the requests had failed to go through, then the Tiger and Pak may have had a field day, halting the British advance before it had really got going. Then we would have had a Day Three and replacement units and most likely some scheduled assets as the higher command realised that this was needed to overcome the Axis positions.
  • The use of the early morning mist felt right and helped in game terms to give the British a good start out of sight of the Tiger and Pak front. This is something I enjoy using in my games, no matter the period. On recent walks on the local hills looking down in to the Avon river valley and the amount of mist/fog there in the early morning, and you realise that it would actually make it hard for both sides to maintain C&C, spot the enemy etc. In my game I had a -1 to command rolls, 30cm visibility and -1 to hit when inside the mist/fog. I though this worked well and can be tweaked as required.
  • Having the air support arrive at a variable time felt right in terms of the scenario and certainly made things a tad tense for the British. If they Desert Air Force chaps had arrived an hour or so later, then the British might have already been in rather dire straits.
  • I enjoyed starting things off with the British Recce units probing forward, with the battle then developing from thereon. I've done this before in some games and will continue to do so as and when appropriate.
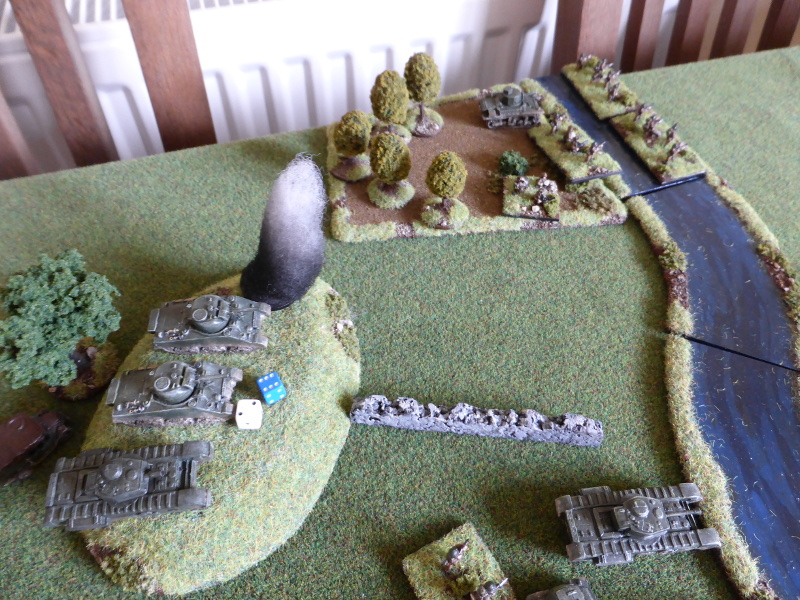
  • With the 145h Tank Brigade having mixed squadrons gave a good game and a nice mix of tanks to play with. The Churchills are really, really tough but lack that good AP firepower. In contrast the Shermans are great support tanks but a real 'Tommy Cookers', as shown by a rather good turn of shooting by the Tiger I and Pak 40. If the British hadn't had the Churchills, I think it would have been a very tough ask for the British.
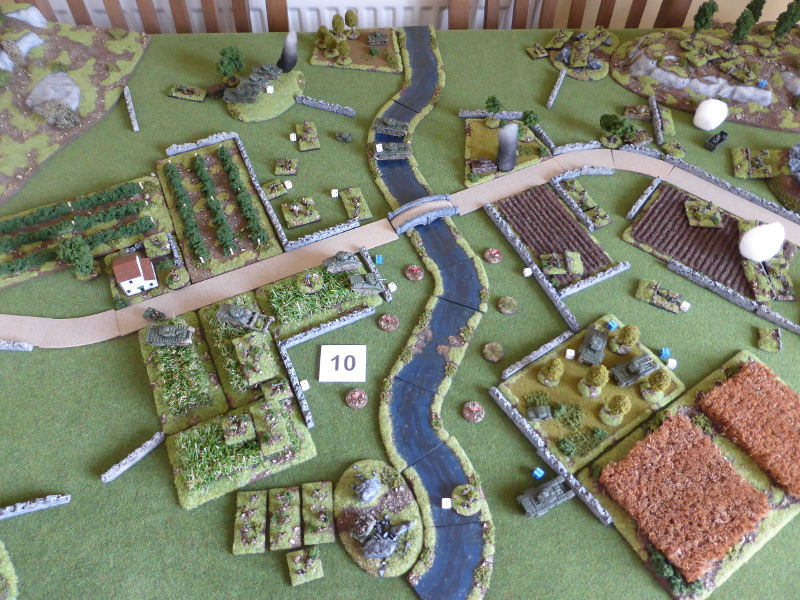
  • The British certainly needed the close support tanks as in the Churchill V CS and the Churchill AVRE, although the latter didn't get to take part. Ditto the WASP carrier. Hammering away with 6 pdr's and 75mm guns isn't going to do much damage to thick stone walls.
  • The concept of the defence in depth worked well and gave me the game I wanted, so was very pleased with that. I could have placed the Axis positions a bit better but hindsight is a wonderful thing. Having access all round the table might have helped improve this.
  • I pondered long and hard as to whether to open fire with the Axis mortars earlier than I did on the advancing 'B' company when in the open. I decided not to as I thought the Axis CO wouldn't want to reveal them to British artillery fire, when he at that point still had a good defence in depth. So I played the scenario as it were rather than the game, in the sense that they should have opened fire and would probably finished off 'B' company a turn or two earlier. The Axis CO wasn't to know that the British actually had limited artillery support, so the decision felt right to me.
  • The Tiger I is a very, very tough opponent, with its good armour and great gun when dug-in with a commanding field of view. Without the smoke to mask it I'm sure it would have devastated the British armour. Again it shows that you need to use combined arms to overcome such a tough opponent.
  • Using only one minefield felt right considering this was a stopping position before the main line of resistance. However the did leave a gap which the British were able to exploit to great effect, turning the Axis left flank with relative ease. I should have positioned it so as to block that gap, funneling the British closer to the bridge and the killing ground dominated by the Tiger I and Pak front. Let's hope I learn my lesson.
  • Playing this solo meant I could tweak things here and there that suited me and my 'house rules' without having to explain every situation or decision to an opponent. Not having to cross the 'T's' and dot the 'I's' was nice as I could just concentrate on the broad game rather than the nitty gritty.
  • I didn't position the Pz IV well and with hindsight shouldn't have moved it, as it was is an OK position and would also have meant that 'C' company couldn't have moved towards the Axis mortar positions quite so easily.
  • As with the above, I failed to use the 6 pdr ATG at all, when it could have helped shoot the tanks onto their objectives. After all that's what it was there for.
  • To finish things off, I highly recommend anyone getting and reading the Gooderson book to get an great overview of what both sides had to do when fighting in the Italian theatre. It certainly helped me with things such as the limited artillery support for the British and the use of airpower as an adjunct to this. I will certainly continue to use this book for reference in years to come.
And so it ends. I hope you have enjoyed following the action and have stuck with the long AARs, which I broke up into more easily digestible chunks to facilitate this. I certainly enjoyed myself and hope to do similar games in the future, but on a 6' x 4' board, which is need to get as my old one is no longer usable. Although I enjoy my 4' x 4' games, the extra space allows for a greater variety of scenarios or ideas to be tried out.

So what next? I'm not sure really as I have a lot to do on the house and hope to get some units painted ready for some FtF games as and when they can safely resume. Nothing is planned yet but it will not be WWII as I've had a nice few games this week and want something different going forward. so until next time stay safe and keep healthy.

Breaching the Trasimene Line - Italy 1944 - Day Two 11.00am to 1.00pm

Day Two continued...


Positions at 11.00am onwards. With 'B' company taking a battering on the left wing, the CO was relieved to hear that his air support was on its way, but wouldn't arrive until sometime after 1.00pm. Would he be able to hold on until then, considering he still faced well dug-in troops and the Tiger I and Pak 40 that had already made their mark. to try to buy time he ordered his FAO to bring down smoke and once again it arrived and obscured the view from the Axis guns on the hilltop.

'A' company and the Shermans of 2nd squadron continued to provide fire support to the Churchills and 'D' company as they moved across the river. Another Pak 35/36 was KO'd as well as the dug-in 20mm AA gun. Only the Pak 38 was offering any meaningful opposition to the 2nd squadron tanks, but this soon ended after it failed to hit anything and was KO'd by massed opportunity fire. The way was no open on the British right flank if they could move enough troops forward in time before the Axis troops could respond.

As the 1st squadron Churchills moved forward into the orchard, they came under fire from the Pz IV and dug-in Stug III. Both sides took hits as the blazed away, with one Churchill becoming suppressed. 'B' company came under murderous mortar fire and ceased to exist, with only the attached MG unit left.

With 'C' company closing in on the dug-in mortar units, the Axis CO had limited options at his disposal to deal with the British advances across the river. He ordered a platoon of FJ infantry to move to support the mortars, but could do little else whilst his other units were masked by smoke.

The 2nd squadron Churchills have little in front of them that they can see, other than the units they know are in the hilltop town.

'D' company move across the river as 'A' company join them, but the latter come under mortar fire and have a platoon suppressed (red die).

The Sherman flail has move up under the cover of the smoke to begin to try and clear the mined ford.

With 'B' company gone the 1st squadron Shermans move off the hill and into the 'shadow' of the orchard to support the moves by 2nd squadron the other side of the bridge.

The Churchills, Pz IV and Stug III knock the living daylights out of each other.

'C' company close in on the dug-in mortars by the FJ platoon arrives just in time to provide much needed support.

The Axis defences by the bridge have been breached with them falling back towards their next lines of defence. However there is little protection to their left flank which is wide open.

Positions at Midday onwards. The Sherman flail cleared the ford of mines which opened up another way across the river that avoided the narrow bridge. Knowing that air support is on the way soon to target the hilltop town, the CO orders his FAO to target the FJ troops in the open in front of the town. The artillery once again is bang on target, suppressing a FJ platoon as well as its HQ and more importantly the CO!

'A' and 'D' company continue to advance towards the orchard, but the 2nd squadron tanks come under fire from the Tiger I and Pak 40, with a Sherman suppressed. As 'C' company attack the dug-in mortars, which continue to fire regardless of the threat, the 1st squadron Churchills KO the Pz IV in the open, but then command confusion sees them advance forward into the open with one becoming suppressed.

With the Axis CO suppressed, the 2nd kompanie HQ ordered the mortars to keep on firing, leading to them KO'ing the remaining platoons of 'A' company, but they took suppression in return. The Tiger I and Pak 40 then had a field day as the KO's two Shermans from 2nd squadron and one Churchill from 1st squadron and another one suppressed. With the tide having been against them for so long, could things finally be turning in their favour?

The Churchills of 2nd squadron line up ready to attack, with 'D' company now on close support.

As the Sherman flail clears the ford, other Shermans live up to their nickname of 'Ronsons'.

Despite KO'ing the Pz IV, the 1st squadron Churchills have taking a pasting.

'C' company struggle to KO the dug-in mortars in the closely wooded and rocky terrain.

Two platoons from 2nd kompanie have been rushed forward to the houses on the hilltop to cover the exposed left flank.

The Tiger I and Pak 40 have wreaked havoc and it may be the high water point of the British attack.

The British infantry casualties begin to mount.

However the Axis casualty list is growing ever longer.

In the distance comes the distinctive sound of Rolls Royce Merlin engines and soon the RAF comes into view and not a moment too late from a British point of view.

Just after 1.00pm, the Avro Lancaster makes its approach run...

... and 'Tail End Charlie' has a great view of the suppressed Tiger I and Pak 40. Well done chaps!

As the Hurricane begins its strafing run, combined Ack-Ack forces it to abort.

Position at 1.00pm onwards. Following on from the successful bombing raid, the FAO, not to be outdone, once again calls in his artillery, leading to a FJ platoon being KO'd and the Axis CO suppressed yet again. To add insult to injury the Honey Recce unit that had moved across the bridge, assaulted the exposed FJ HQ and destroyed it in a command overrun.

As 'D' company and the Churchills of 2nd squadron advanced towards the hilltop town, they managed to suppress one of the newly newly arrived FJ platoons from 2nd kompanie. The Sherman flail managed to KO the Pak 40 and the Churchill V CS KO'd the dug-in Stug III.

With few units left and many suppressed, any chance of effective Axis resistance evaporated and those units that could, retreated, leaving the field of battle to the bloodied but unbowed British.

'D' company and the 2nd squadron Churchill close in on the hilltop town.

The right side of the bridge is firmly in British hands, with little Axis opposition to the fore.

Burning tanks litter the field of battle.

The Tiger I suppressed and unable to offer any meaningful resistance, as it has limited support.

The FJ mortars fired to the very end, despite 'C' copmany's best efforts.

The platoons of 2nd kompanie suppressed and unable to fight back.

It's been a costly battle for both sides.

The British losses (there should be another Sherman and Churchill here)

The Axis losses (there should be a Stug III here too)


With that the British has seized their objective, but at some cost, but the defence had cost the Axis dearly too.

I hope you have enjoyed these battles and AARs and if so, I will put up some post game thoughts in another post. Until then, stay safe and keep healthy!

Breaching The Trasimene Line - Italy 1944 - Day Two 7.00am to 10.00am

So with the British in position, the CO ordered his troops into action...


Positions at 7.00am onwards. The Recce infantry quietly crossed the river, confirming that there was a gap between the minefield and the rocky outcrop, which the relayed to the CO. On the left flank both 'C' company and the Churchills from the 1st squadron, failed to receive there orders, but fortunately the CO was close at hand to remedy this. As the Churchills advanced through the mist, they came under fire from the dug-in M15/42, which failed to inflict any damage on the tanks, but the M15/42 survived a hail of fire as it was most certainly well dug-in. 

The Italian infantry in the orchard spotted the British Recce infantry by the river bank and fired at them, but only inflicted minor damage. The M15/42 failed to receive orders to carry on firing at the Churchills. No other Axis units could see anything through the mist by the river, so held their fire.

As the British Recce infantry cross the river, they come under fire from the Italians in the orchard. However the fact that they found a crossing point has given the British CO another option for flanking the Axis positions.

Two troops of Churchills arrive at the river edge and come under fire from the dug-in M15/52, which fails to damage the Churchills (the 3 hits are from Day One), but manages to survive being shot at from close range due to being well dug-in. 'C' company advance to the edge of the orchard (top of picture) where the Honey has managed to locate a PzIV through the mist.

The British reinforcements requested at the end of Day One begin to arrive in the form of a Sherman Flail, Churchill AVRE and WASP Carrier.

Positions at 8.00am onwards. The mist began to lift so that it was imperative that the British get a move on before they came into full view of the Axis troops. The British Recce infantry contacted the FAO who then managed to call in his battery of artillery on the Italian in the orchard. The strike left them suppressed and then 'A' company on the right opened fire on the Italians, leading to one infantry platoon being lost as it retreated back into the suppressed Italian HQ. With another crossing located, the CO ordered the Churchills of the 2nd squadron to move to the right, with the Shermans moving up in support to help shoot them over the river.

On the left flank the Churchills of the 1st squadron KO'd the M15/42, as 'B' company was ordered  forward in support of the tanks. 'C' company by the orchard quietly crossed the river and held position on the river bank to see what was in front of them once the fog lifted.

With the Italians to a man suppressed, they were unable to respond the the British moves, whilst the FJ 1st kompanie could only opportunity fire on 'B' company as they emerged through the mist, as they had a failure of command when it mattered the most. The FJ CO ordered the PzIV from its position to move to support the dug-in Stug III to help counter the emerging threat from the Churchills to their front. This move left a potential gap for 'C' company to exploit.

The Italians take a pounding from the British artillery and 'A' company.

The 2nd squadron Churchill tanks begin to move forward to try and exploit the crossing found by the Recce infantry, whilst the Shermans move up to support them. 'A' company hold their positions to also provide support.

'B' company move forward to support 1st squadrons Churchills but comes under fire from the FJ 1st kompanie dug-in on the edge of the orchard.

The Pz IV has moved to its new position as ordered, but has unwittingly left a gap on the flank.

'C' company have quietly crossed over the river and as yet have not been spotted.

The reinforcements near the farm and the action. 'D' company is still being held in reserve behind the farm.

Positions at 9.00am onwards. As the mist cleared, the British FAO once again called his artillery down onto the hapless Italians in the orchard, who were all KO'd. This left a gap that the British needed to exploit quickly before the Axis troops could react. As the tanks of 2nd squadron advanced, they came under fire from dug-in Pak 35/36 and Pak 38, who failed to halt the Churchill tanks. 'A' company provided supporting fire but failed to silence the guns. The CO ordered 'D' company to move from its position in reserve to the right flank to help support the push across the river by 2nd squadron and 'A' company.

1st Squadron on the left began a fire fight with the dug-in FJ to their front, supported by 'B' company. The British weight of fire finally told, leading the the FJ losing one platoon, but 'B' company were hit hard, losing a platoon too as well as a platoon suppressed. 

The Axis CO ordered his Tiger I and Pak 40 to fire on the 2nd squadron tanks hull down on the hill, managing to brew up one Sherman and suppress another. He ordered his other units to hold fire, especially the mortars whose positions he didn't want to reveal yet. Not sure of this was a wise move, but only time would tell.

The Churchills of the the 2nd squadron continue to push towards the river, but come under fire as they approach, with 'D' company moving up in support (bottom left).

The reserves take up positions and await further orders.

1st squadron and 'B' company come under intense fire and the latter are in an exposed position in the open.

The Shermans take heavy and effective fire the Tiger I and Pak 40. 'C' company are ordered to hold their position along the river bank and await developments before moving forward.

The greater range and firepower of the German guns has already began to take its toll on the British tanks.

The Pak 38 has had less effect against the heavily armoured Churchills.

The Pak 35/36 'door knockers' try their best to dent the British armour, but to no avail.

The Pz IV has no targets yet, so waits patiently.

Positions at 10.00am onwards. With no sign yet of his air support, the British CO ordered his FAO to call down smoke on the hilltop town, in an attempt to 'blind' the Axis troops there. Luckily the FAO go through and the smoke landed as ordered, with the Tiger I and Pak 40 unable to see any targets, plus the mortars had a restricted field of view.

The 2nd squadron Churchills moved across the river and into the orchard, as 'A' company and the Shermans KO'd a Pak 35/36 and suppressed some dug-in FJ infantry by the bridge, but a Sherman was suppressed by the Pak 38 on the hilltop that was not blinded by the smoke. 'D' company continued to move forward in support. The CO ordered the Sherman flai forward to try to clear the ford of mines to allow another avenue across the river.

The 1st squadron Churchills moved across the river and KO's the dug-in MG42, but as they did so, 'B' company was hit by mortar fire and suppressed. 'C' company quickly moved off from the river and into the rocky outcrops near to the Axis mortar positions.

The FJ 1st kompanie engaged the exposed 'B' company, which took hits but the FJ lost a platoon to combined fire from 2nd squadron tanks. With the orchard almost certainly lost and the British infantry closing towards the mortar positions, the Pz IV was ordered back to try and take up a better position.

The 2nd squadron Churchills move to the edge of the orchard, were they come under fire from the dug-in AA gun and the Pak 38, but they have little effect against the Churchill's armour.

'D' company moves slowly forward as the Sherman flail moves up to try and clear the ford of mines.

2nd squadron Shermans begin to clear the bridge surroundings of Axis troops with 'A' company support, but start to take hits in the process.

'B' company is in a parlous state as the Churchills and Shermans of the 1st squadron have cleared the orchard of the enemy.

'C' company at the foot of the rocky hill and are in a good position to begin to threaten the Axis dug-in mortars. The Pz IV hasn't been able to join the battle yet as it has been ordered hither and tither.

The Pak 38 tries to halt the tanks of the 2nd squadron but to no avail.

The Stug III and Pz IV await targets of opportunity.

The Axis losses begin to mount.

To be continued.