A week or so ago the opportunity arose for a solo game of BKCII, a rare occassion these days. I remembered in "Invasion!" by Kenneth Macksey, the fictionalised account of Operation Sealion, an account of an attack over a golf course in the South of England. I thought this would make for an interesting scenario and certainly a different looking table. So I read up on the 'battle' and with a look at Google maps, I was able to come up with the layout of the table.
My next decision was whether to go with the battle based around Operation Sealion or one set in the AVBCW. In the end I decided with the latter purely as I wanted to field my armoured canal boat as well as some cavalry units that hadn't seen 'action' for some time.
Scenario
I felt that the Deliberate Attack scenario best fitted in with the forces at my disposal as well as the feel of the battle as described. The BUF were to be dug-in around the clubhouse as well as defending the bridge crossing the military canal. Their Italian Allies would be off table and held in reserve to come onto the table via mobile deployment at a time of their choosing. The BUF also had three pre-registered defensive fire areas, with the clubhouse acting as their command post.
The Loyal Army of the South deployed as per the scenario in the rulebook, with one battalion of infantry South of the canal, with the remainder to the North on the golf course. Their objectives were to be the control of both the bridge and the clubhouse by the end of the game.
British Union of Fascists & Italian Expeditionary Force
1 x CO
3 x HQ
1 x FAO
1 x Infantry Recce
12 x Infantry (Regulars) with 3 x ATR upgrade
5 x MG
2 x Mortars
1 x 45mm ATG
1 x IG
1 x MKIV Male Tank
3 x L3/35 Tankettes
3 x Cavalry Horses
3 x Motorcycles
3 x 75mm Artillery (off-board) with 3 x HE Assets
1 x Command Post
2 x Barbed Wire
9 x Trench
2 x Gun-pit
Loyal Army of the South
1 x CO
5 x HQ
1 x FAO
2 x Infantry Recce
23 x Infantry (Regular)
6 x MG
2 x Mortar
1 x 45mm ATG
5 x Armoured Cars (non-Recce)
3 x T-26
5 x Cavalry Horses
1 x Truck
3 x 3" Artillery (off-board) with 6 x HE & 3 x Smoke Assets
1 x Bomber with 1 x Air Asset
1 x Armoured Canal Boat
Armoured Canal Boat
After some thought I came up with the following stats for the canal boat:
Move Weapon AT AP CA Hits Save Cost
10 (MG) - 2/40 2 3 6 100
(Mortar) 3/120 3/120
(Mortar) 3/120 3/120
Hit on 5+ due to being in the water. If attacker on the river bank hit on 4+ as 'in the open'.
Starting Positions
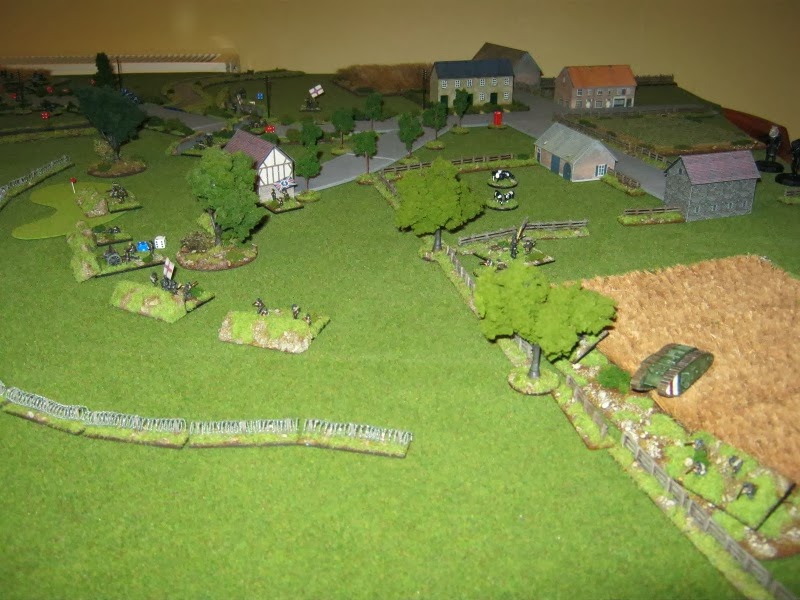
 |
| A view of the battlefield from the East. The BUF are dug-in in and around the clubhouse and by the bridge, behind a defensive screen of barbed wire. The LAotS are at their jump off points on the Southern end of the table. |
 |
| A view from the South and the LAotS starting positions. Their plan was to pin the forces down at the bridge, and force a crossing if the battle went well for them on this flank. Meanwhile th main part of the battlegroup would swing around the woods in the centre of the golf course to try and flank the BUF positions. Speed would be the key to victory. |
 |
| The main BUF force dug-in by the clubhouse. |
 |
| The BUF force guarding the bridge. |
 |
| The LAotS force tasked with capturing the bridge if at all possible. |
 |
| The armoured canal boat that would add its fire to the bridge attackers. |
 |
| The main LAotS force ready to attempt to force the BUF flank. |
 |
| The tanks and cavalry that would spearhead the attack. |
 |
| The BUF command and reserve awaiting to see where the 'schwerpunkt' would develop. |
Turn 1
A patchy start by the left flank of the LAotS saw some of the units advance towards the bridge, supported by the armoured canal boat. The cavalry on the right flank advanced towards the hedgeline, but the centre failed to move in support as planned.
With the slow start by the enemy, the BUF commander kept his powder dry and watched to see where the schwerpunkt would develop.
With the slow start by the enemy, the BUF commander kept his powder dry and watched to see where the schwerpunkt would develop.
 |
| Both flanks advance but sadly the centre fails to move up in support. |
 |
| On the left flank troops advance towards the bridge, supported by armoured cars and canal boat. |
Turn2
The cavalry on the right flank made a gallant dash from the hedgeline towards the wooded ridge and halted awaiting further orders. Once again the centre was less than supportive but at least made an effort to move to aid the cavalry, who were somewhat exposed on their own. On the left flank the troops and armoured cars once more advanced, this time to contact with the enemy, with their recce unit spotting for the mortar on the canal boat. The FAO tried to get through to his battery of guns but once again failed.
With contact joined at the bridge, the BUF concnetrated fire towards the LAotS centre, causing hits from off-table artillery and dug-in infantry gun and mortar. The CO moved the 'Beast of Bodmin' and his reserves towards the wooded ridge to counter the threat from the cavalry and T-26s. The Italians were still held in reserve with the aim to take the LAotS forces in the flank as planned.
With contact joined at the bridge, the BUF concnetrated fire towards the LAotS centre, causing hits from off-table artillery and dug-in infantry gun and mortar. The CO moved the 'Beast of Bodmin' and his reserves towards the wooded ridge to counter the threat from the cavalry and T-26s. The Italians were still held in reserve with the aim to take the LAotS forces in the flank as planned.
 |
| The cavalry have swept around the flank as planned, but are somewhat isolated as their nearest support is still behind the hedgeline. |
 |
| The left flank gathers for the attack. |
 |
| The 'Beast of Bodmin' and support moves up to protect their left flank. |
Turn 3
The LAotS unleashed its scheduled bombardment of the bridge with HE, shortly after followed by a light bomber flight. Sadly for the LAotS troops preparing to attack the bridge, the bombardment was less than effective, only suppressing the dug-in ATG on the road.
Under cover of the bombarment, the troops advance towards the bridge ready to assault over it, but communications break down at the critical point, leaving them rather exposed on the road...
Once again the centre is on the slow side of tardy and the cavalry fail to do anything, despite the earnest attempts by the CO to get through to them. A poor turn for the LAotS.
The BUF troops on the bridge, hardly able to believe their luck, call down a registered barrage on the LAotS troops in the open. Rather unsuprisingly they are badly mauled as a result, with many units being suppressed. The CO moves up the 'Beast' and his reserves to the fence line behind the clubhouse to take up a strong defensive postion on the left flank.
Sensing the time is right to attack the beleagued cavalry, the Italians launch their assault, but a somewhat less than effective, only causing one hit on the cavalry.
 |
| The light bomber follows on after the preliminary bombardment of the bridge, but to little effect. |
 |
| The LAotS left flank caught in the open by the registered concentration of fire from the BUF artillery. The effect is all too clear to see. |
 |
| The Italians launch their suprise attack. |
 |
| The LAotS attack is stalling. |
 |
| Despite their suprise assault, the effectiveness of the Italian attack is plain to see. |
 |
| The 'Beast' and supporting troops take up position along the fence line behind the clubhouse. |
Turn 4
Fortuitously for the LAotS left flank, a smoke barrage arrives to cover their attempts to reform after the BUF bombardment, which is all they are really able to do. The centre once again is a few shots off the pace and the cavalry dismount in the face of the Italian assault. The CO and his tanks advance in support of the cavalry, with the combined fire disrupting the Italian units.
With most of the BUF force blinded by the smoke, the CO opts to stay put along the fence and the Italians fail their command roll, obvioulsy shaken by the strength of the counter-attack.
With most of the BUF force blinded by the smoke, the CO opts to stay put along the fence and the Italians fail their command roll, obvioulsy shaken by the strength of the counter-attack.
 |
| The LAotS attack is spread out and so the effectiveness is dissipated. |
 |
| The LAotS counter-attacks. |
 |
| The smoke screen brings relief to the LAotS left flank. |
Turn 5
As the smoke screen lifted, the LAotS left flank launched a piece meal attack towards the bridge, achieving the destruction of the dug-in ATG. With the way open, other troops in support fail their command roll! Finally the centre gets going and combined movement and fire from all units sees the demise of the dug-in IG in front of the clubhouse. The way is starting to open up for an attack towards the clubhouse. Things are looking up for the LAotS.
On the right flank, the Italians continue to takea lot of fire, losing units and a L3/35 tankette with the other 2 suppressed. The dismounted cavalry take up positions along the wooded ridge, effectvely sealing off the Italian attack.
With the bridge looking vulnerable, the BUF FAO calls in his artillery, which even thought it deviated, still supresses LAotS infantry on and around the bridge. The dug-in infantry add to the woes caused by the artillery, finishing off 2 infantry units and supressing more. The ability of the LAotS troops to prosecute their attack on the bridge has been severely reduced.
The Italians do their level best to hold their own against the T-26s, but there is only so much a mortar can do. Their lack of AT weapons leaves them extremely vulnerable to the T-26s and armoured cars of the LAotS.
 |
| The attack begins to make headway in the centre and the right flank is more than holding its own. |
 |
| The Italians are hard pressed by fire from the T-26s. |
 |
| Having forced the bridge with armoured cars, the infantry are still some way back, held off by the combined fire of the dug-in BUF troops. |
 |
| The BUF centre is weakend by the loss of the dug-in IG. |
Conclusion
At this point time was against me and I called an end to the game. Even thought the LAotS had lost more troops than the BUF, the latter had no AT weapons left and only 1 tank. This was not much to face 3 T-26s and 5 armoured cars. I think it would have been only a matter of time before the BUF were overwhelmed by the LAotS troops, supported by their tanks and ACs, as they still has another 7 Turns to go. It would most likely have been a pyhrric victory though, so in my mind the battle was a draw.
After the game I made some notes on my observations of the game in particular, and gaming in general:
- In the cold light of day, I simply had too many units on the table for a solo game. I kept forgetting things like mortars and auto-suppression, mainly due to the fact that I had som much 'stuff' to command. The forces would have been fine for a normal or even multi-player game, but not solo. In future I will try and resist the temptation of getting all of my toys on the table. Sometimes it's definitely a case of "less is more".
- The scenario, although fun to research from the book, didn't work that well as a game. The wide open space of the golf course and the limit of the canal, made it rather hard for the attackers. Maybe it would have worked better for a game centred around 1944 and the forces available to both sides. Maybe I can try this another day. At least the attackers did suffer as they did in the book, so maybe I got something right.
- Don't play when you're tired. This didn't help the first point above.
- The BUF need more armoured support, or consequently the LAotS less. Personally I like having armour on the table, so it will be a case of the former I'm sure.
- Once again dug-in troops proved they are hard to shift. Unfortunately I didn't remember auto-suppression from artillery until Turn 3, which didn't help. For my next game I want a very different feel from attacking dug-in troops, so I will have to have a think on this with regards to scenario choice.
- The canal boat was fun to have on the table, but I don't think this scenario suited it that well. Again I will have to have a think about this.
- Uping the command value of the CO and HQs to 9 and 8 respectively worked well. It certainly gave for a more fluid agame, despite the LAotS trying to prove otherwise.
- Post match I thought that the LAotS might have been better off making a dircet assault with all of their forces either side of the canal. The cavalry could have provided an effective screen to the right flank along the hedgeline and the central wood, allowing the rest of the force to conctrate on attacking the dug-in troops in front of the clubhouse.
- I enjoyed the adhoc mobile Italian force but they were of limited use, due to their lack of AT capability. However in other scenarios they will be rather useful.
- The cavalry on both sides as well as the motorcycle riders proved to be very mobile and as above, rather useful for future games.
- The clubhouse command post was very beneficial to the BUF and their FAO especially. From his elevated position combined with the +1 to his CV, the artillery fire he was able to call in was most effective.
- Registered targets work very well when in defence, especially combined with the point above.


