Saturday 5 March 2022

Operation Cygnet - Campaign Moves - Day Three

With the British attack for the bridge South of Pemba having been a comprehensive success, both sides settled down for the night and carried out any moves as required.

Day Two - Night Moves
As the remnants of the German force defending the bridge retreated towards Pemba, the British 'B' & 'C' Coys secured the bridgehead, with their accompanying Sherman's. The 3rd Recce Sqdn moved over the bridge and advanced to the outskirts of Pemba, with one eye to the North in case any German reinforcements appeared from that direction.

'A' Coy and the 2nd Recce Sqdn continued to monitor the situation to the West in square 7. 'D' Coy with the AVRE's in support kept a weather eye towards Wuppertell, as did what was left of the 1st Recce Sqdn. The British Churchills moved to link up with the 1st Recce Sqdn, with the Cromwell's and Artillery moving towards 'D' Coy's positions.

For the Germans, the Fallschirmjager continued to hold Wuppertell whilst a Blank unit moved in from 16. Another blank unit moved from 6 - 7 to reinforce the Volkstuurm there. The remnants of 1st Fallschirmjager Kompanie moved from 15 to 14 with their Blank unit, possibly able to threaten the British LoC. 

The final German reinforcements arrived at 6 and two in 2.

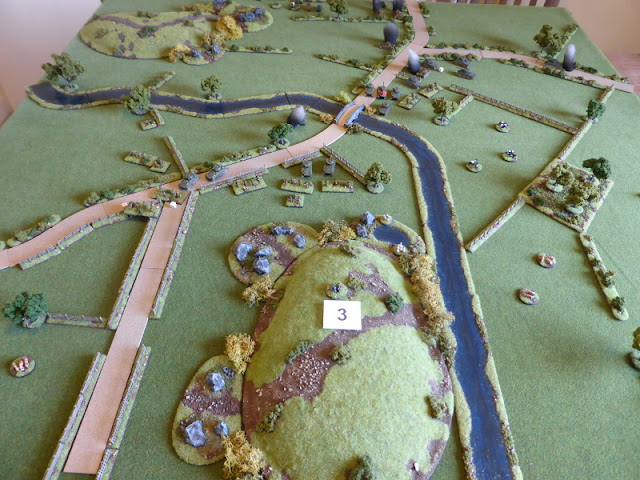
An overview of the night moves at the end of Day Two.

The British are in a strong position near Pemba (3), but the Germans are massing in 6 & 7 which could cause problems for the British Club Route.

Much needed British reinforcements arrive (17 & 18), but again the Germans are massing either side of 'D' Coy, with units as yet unknown.

Day Three - Turn 1 - Weather - Mist
The German prayers must have been answered as as dawn broke, the whole area was covered by mist, thus grounding the British Air Support.

Despite this (hopefully) minor setback to their plans, the British decided to attack Pemba at first light, with 'B' & 'C' Coy's and the 3rd Recce Sqdn. 'A' Coy and 2nd Recce Sqdn would continue to monitor the Germans in 7, with support from the newly arrived AVRE's. The Cromwell's and Artillery arrived by 'D' Coy's positions, with the Artillery deploying alongside another Battery to support 'A' Coy's positions. The mist meant that any other support was unfeasible due to visibility problems. The Churchill's arrived by the 1st Recce sqdn and observed Wuppertell through the wisps of mist.

The Germans sensing an opportunity with the dreaded 'Jabo's' grounded, decided to mount an attack from 7 towards 'A' Coy and their supporting armour. The Blanks revealed themselves to be the 2nd Fallschirmjager Kompanie and the Panzer Schule Kompanie with their older marques of Panzers.

Some of the Blank units turned out to be just that, but in 2 a unit turned out to be a Battery of Nebelwerfers, whilst the other Blank in 2 moved into 1. The 1st Fallschirmjager Kompanie and their Blank unit moved into 13, ready to bring pressure to bear on the British 'D' Coy positions. With no armour support the Falschirmjager in Wuppertell stayed put and dug-in as best they could.

An overview at the end of Turn 1 - Day Two.

The fight for Pemba (the campaign objective), with the Germans receiving much needed support from the Nebelwerfers in 2.

The German attack goes in against 'A' Coy's positions, with the British luckily receiving another Artillery Battery just in time to support the defence.

Things could get interesting around Wuppertell and 'D' Coy's positions during the next Campaign Turn...


So some more interesting moves on the Campaign front, with two very different battles to be fought. The British should have the advantage in their attack on Pemba, but fighting in the mist in a BUA might out weigh the numerical and materiel superiority.

In contrast, what a mix of German units going into the attack! Thankfully for them they have the mist to help their advance and hopefully this will not cause and C&C issues. This could be quite closely fought and I must admit I'm rather looking forward to this one, given there are Volkstuurm and obsolete Panzer's being used!

With luck at least one of these battles will be fought next week, but not sure which yet will get to the table first. Plenty to think about in advance though. So until then stay safe and keep healthy!


Operation Cygnet - Day Two - The Bridge to Pemba

Having just seen off a determined attack by the Fallschirmjager from Wuppertell, the British High Command decided to try and force the bridge to the South of Pemba before the German defences could harden. Time was of the essence with it being late afternoon and the attack needing to go in before nightfall.

German OOB
1 x CO
1 x FAO
2 x HQ
3 x Infantry
1 x MG
1 x 81mm Mortar
1 x IG
3 x Stug III
1 x 105mm Artillery

1 x HQ 
2 x Pz IV

British OOB
1 x CO
1 x FAO
1 x FAC
5 x HQ
8 x Infantry
1 x MG
1 x 6pdr ATG
9 x Shermans
3 x Sherman Fireflies
1 x 25 pdr Artillery
1 x Typhoon GA

Scenario Details
The German troops have been able to make some defensive preparations, but not to the extent they would have liked. The British broadly knew where the Germans were due to the high ground which over looked their positions. With limited time to prepare for the attack, the British hoped that planned Air Support and a flank attack would allow for a successful operation.

Some details to note:
  • The German infantry units count as Dug-In, so they were hit on a 5+ and I gave them a 6+ save. 
  • The German Pz IV's would arrive at the start of Turn 2.
  • The British CO and FAO would only arrive on Turn 4, to reflect them rushing from the recent clash near Wuppertell to support this attack.
  • The British had one Scheduled Attack by the Typhoon.
  • Dusk would fall on Turn 7, then Night on Turn 8.
  • The river can only be crossed by the bridge.

Table Layout
As per previous games, the Warplan 5/5 maps and terrain details made this an easy table to set up. The terrain is broadly open grazing land with fences. I had to use some hedges as you need a lot of fencing, even on just a 4' x 4' table. 

An overview of the table, with the German troops deployed just North of the river, with the British 'A' & 'B' Coys to the South of it with their accompanying armour, whilst 'C' Coy and their tanks would arrive on the road from the Eastern table edge.

The objective, with open flood plains either side of the river and only the narrow bridge from which to cross the river.

The German troops spread either side of the road, with the Stug III's mixed in with the Infantry.

The view from the German lines towards the bridge.

The German FAO on the hill.

The British tank park, with 'A' Coy to the left and 'B' Coy to the right, with a combined tank force as the vanguard.

'C' Coy to the left and 'C' Sqdn to the right, ready to come on with mobile deployment.

The British Air Support, CO & FAO.


Turn 1
The British started their attack with the Typhoon coming in on a scheduled ground attack run, suppressing a Stug III, an Infantry unit and causing hits on others. The British tank Vanguard moved off, closely followed by 'B' Coy, whilst 'A' Coy held their positions and acted as a reserve. On the flank 'C' Coy moved on and paused by the fence, whilst 'C' Sqdn moved smartly forward and engaged the German Infantry and Stug III to their front, KO'ing the latter. Certainly things got off to a good start.

Across the board the Germans all failed their command rolls, but the CO managed to move a Stug III to cover their left flank, taking up position to cover the road and KO'd a Sherman in the process.

The Typhoon leads the attack, dodging desultory AA fire...

... and leaves mayhem in its wake.

The end of Turn 1

The British Shermans lead the advance with 'B' Coy following on behind.

'A' Coy hold their positions.

'C' Coy move to the fence on the left whilst 'C' Sqdn KO the Stug III to their front, but lose a Sherman in the process.

The Stug III, having moved to cover the flank, successfully engages the Sherman on the road.

Turn 2
The British FAC failed to call in another Typhoon strike, but the tank vanguard pushed onto the bridge, but could get no further and had a Sherman suppressed by opportunity Fire. 'B' Coy failed to move forward, but 'A' Coy advanced and engaged a Stug III across the river, suppressing it and forcing it back, with combined Sherman and 6pdr ATG fire. The Germans responded with their MG42 htting the 6pdr, but failed to suppress it. On the flank, 'C' Coy advanced cautiously, whilst 'C' Sqdn moved to the road and in a prolonged duel (ie really bad die rolls over 4 goes!) finally managed to KO the Stug III that was covering their approach.

The Germans attacked with what they could, given their losses in armour, with the FAO calling in his artillery on 'A' Coy, suppressing two Infantry units. Combined MG, Mortar and IG fire KO'd the 6pdr ATG and KO'd a Sherman by the bridge. Not a moment too soon the Px IV's arrived but could only advance to the first hedgeline.

An overview at the end of Turn 2.

'A' Coy have come under Artillery and Infantry fire from across the river.

The Sherman vanguard could only make it to the middle of the bridge, losing a Sherman as they advance.

'C' Coy moves up to the next fence line to support the attack across the bridge.

'C' Sqdn struggle to hit the Stug III but eventually manage to KO it.

Turn 3
The FAC managed to get through to the Typhoon cab rank and called them in on the newly arrived Pz IV's, to great effect, KO'ing both! The Sherman vanguard moved over the bridge only to be hit by a Panzershreck, leaving a Sherman Firefly suppressed, whilst 'B' Coy moved up in support. 'A' Coy in support KO'd the German MG unit, whilst 'C' Coy and 'C' Sqdn continue to probe forward.

With the Germans having sustained so many losses already, they pulled back, hoping for the Artillery to cover their withdrawal, which it failed to do, but they did manage to exit the table with the remnants of their force.

The Typhoon swoops down to the attack, again dodging AA fire and...

...leaves carnage in its wake.

Another view of the Falaise like destruction.

An overview at the end of Turn 3.

'A' Coy begin to move forward in support.

'B' Coy likewise move up in support.

The Sherman vanguard and 'C' Coy meet up as a Firefly only just survives being a hit by a Panzershreck.

The remains of the German force as they prepare to exit the table.


End of Game
The German troops had little option but to withdraw vaguely intact whilst they could, given the losses already sustained and the position that the British troops were already in.

German Losses
1 x Infantry unit, 1 x MG unit, 2 x Stug III, 2 x Pz IV, with a Mortar unit and Infantry unit over 50% hits.
British Losses
2 x Shermans, 1 x 6pdr ATG and 1 x Firefly nearly KO'd.

Campaign Impact
With such a comprehensive victory to the British, the road to Pemba appears to be pretty open, with only an Artillery unit in there and the German remnants from this engagement fleeing back to the town to bolster the defence. The Germans have to hope and pray that some reinforcements arrive during the night to come to the aid of the town. We shall have to wait and see.

Post Game Thoughts
Well that was much more one sided than I thought it would be. Unusually the Germans never got a chance to really get into the game. A few thoughts on why that might have been and on the game itself:
  • The Typhoon's attacks really got the British attack off to a great start, followed by its attack in Turn 3. The Germans were never really able to recover from this. Even what little AA fire there was failed to hit.
  • The BKCIV Ground Attack template, which is 30cm x 10cm (12" x 4") is much better than the previous circular templates. However it is not easy from reading the rules to know how you are meant to align it. So I simply pivot it on the spot to try and cover as many units as possible. I stand to be corrected on this and will check the Pendraken forum to see if there has been any clarification on this.
  • Alongside the Typhoon attacks, the rapid and deadly advance by 'C' Sqdn significantly contributed to the easy victory over the Germans. With their flank turned early on the Germans were in a tricky position from the start.
  • The failed command rolls by the Germans in Turn 1 only added to their woes. Normally the Artillery and Mortars, especially the latter, would inflict casualties and suppression on Infantry unit, severely disrupting the ability of the British to prosecute their attack. This just didn't happen to any significant effect in this game.
  • The Pz IV's not being able to get into the game at all was a huge bonus for the British. Normally I would expect them to arrive and cause mayhem amongst the Sherman's, brewing quite a few up. They never got to fire a shot!
  • I made a mistake with the Mortar & Infantry Gun KO'ing the Sherman by the bridge, when in fact it should have only been able to suppress it with indirect fire. I know it was relatively 'easy' to penetrate and engine deck with 'shrapnel', thus disabling a tank, but this could be reflected by allowing say 120mm Mortars to actually KO a tank. Something to ponder.

So there we have it. Another interesting campaign game and one that normally you would not play, given the disparity in the forces involved. But it could have turned out a lot worse for the British compared to the actual result. I'm looking forward to the next few campaign Turns and to see what that brings up in terms of potential games to be played etc.

So until next time stay safe and keep healthy!