Tuesday 25 January 2022

Books Old & New

Frankly you can't beat sitting down with a good book to read rather than one of those Kindle thingy's! I can see their appeal, don't get me wrong, but I just love to have a physical book in my hand. Over the past few months I've tried to spend the first part of the morning reading a chapter or two, which has been a real pleasure. I used to always read in bed at night, but recent back problems have meant that this is not always possible, plus often I would begin to fall asleep half way through the chapter, which is less than ideal as you can imagine.

At the weekend some more books arrived to add to the 'to read' pile and I must admit a slight frisson when I open the packages and get my grubby mitts on them! the first flick through the pages is always a joy, reading bits here and there, looking at the photos, maps etc. So enough waffling from me and onto the books:


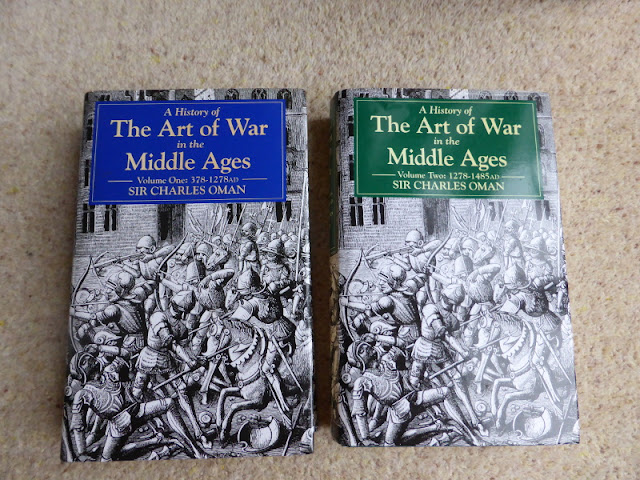
That excellent chap, David Crook of 'A Wargaming Odyssey' Blog fame, gifted me these two books whilst he was having a clear out. They had been ones that I had considered buying for sometime but had never quite gotten around to it, so I was more than happy to take these off his hands. Earlier I had sent him a booklet on Shermans used in Burma that I too was gifted by a friend a good few years ago, which would be  of more use to him than myself.

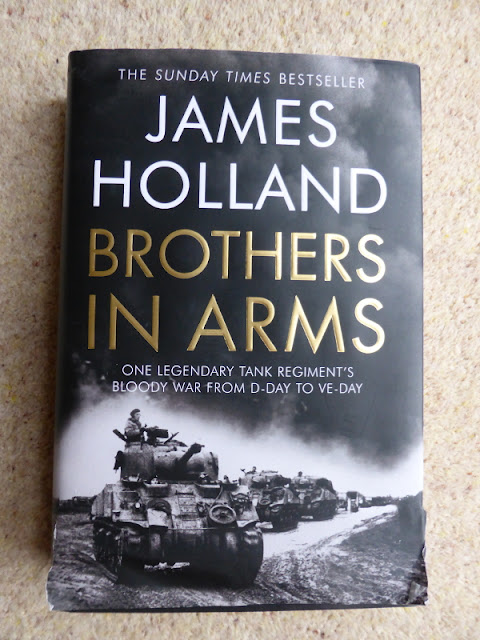
Having really enjoyed his book on Sicily 1943, I'd had my eye on this book, but when it came out in paperback. These are much my preferred type of book than hardbacks, as the latter take up too much space in my 'library'. However I needed to add something to an Amazon order to qualify for free postage and this was heavily discounted due to a torn cover. Along with the good price this book has lots of good images that I know from experience lose something when in paperback form. Given that many of them would be perfect reference for wargames scenarios, I was quite happy to make some space for the hardback version.

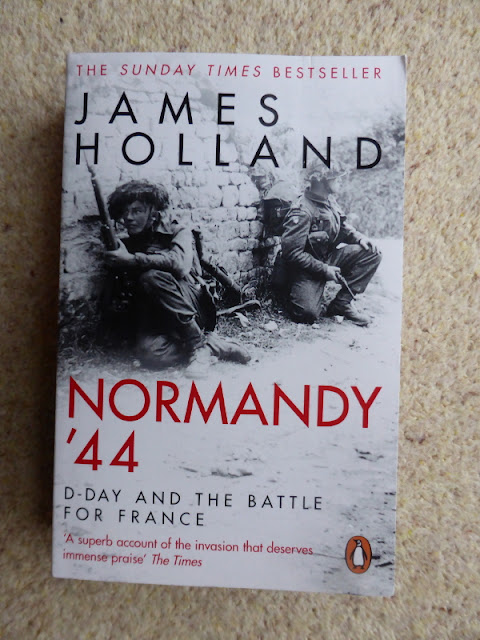
Can one have too many books on the Normandy campaign? A moot point of course but given that I learnt quite a few new things abut the Sicily campaign, I'm looking forward to reading this and see what fresh new perspectives he brings. An author that I find a pleasure to read and one that I put up with Hasting, Beever & Kershaw.

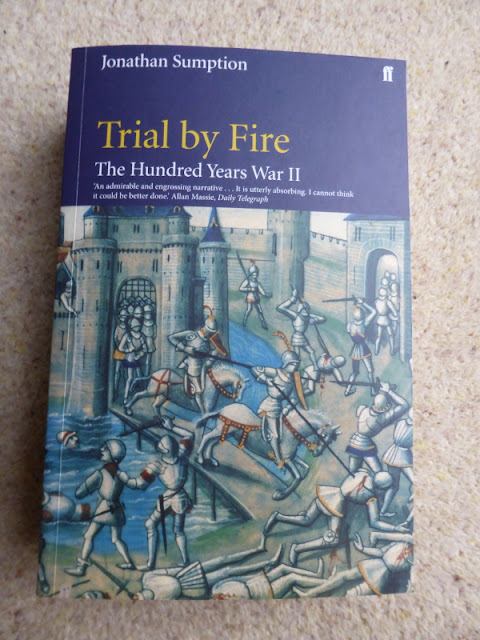
I've had this book for over 5 years or more now and really enjoyed the first book in the series. Bought at a time when I had planned some Hundred Years War games, which never materialised, it has sat on the shelf rather forlorn as my attention turned elsewhere. But no longer! Wanting a change from recent periods being read, I picked this off the shelf (another advantage of books over Kindle et al) and was immediately taken once again my Sumption's fantastic skills as an author. Impressive for any normal author but he was also a practising QC at the time then this was written! For any one interested in the HYW his books really should be your first choice. It certainly has given me many more ideas for Lion Rampant games, which is good.


Sadly real life in the form of decorating means that my chapter or two reading this morning failed, but maybe I might squeeze in sometime this afternoon, if I'm lucky. So I must crack on and make progress so that I can justify having a day or two off to play my campaign game!


Monday 24 January 2022

Operation Cygnet - Campaign Moves Day One

A bit more detail on the campaign, before things kick off in earnest. To start with I tweaked the following from Wesencraft's original, to try and reflect more Autumnal weather. At the start of each Campaign Turn move I would roll 2D6 to see what the weather was and then the following moves would be 1D6, to see if the weather changed or not. Nominally 3 Campaign Turns roughly equates to one day.

Weatherboard
2-3     Fog
4        Mist
5-9     Fair Weather
10-11 Light Rain
12      Heavy Rain

German Forces
For the Germans, I thought what might plausibly be in the 'front line' plus a few 'Blinds', then three units were chosen randomly from the following:
Heer Kompanie
1st FJ Kompanie
FJ Assault Engineers Kompanie
Stug III Kompanie
2 x Blinds

Deployment
With the German markers selected, it placed two on the villages in squares 12 & 19, with another one by the bridge in square 8. Naturally all were placed 'face down' so I, as the 'Attacker' wouldn't know what was in them. Alongside this I would play as if I didn't know something was there, but would send Recce units forward to probe the route of advance and likely areas of resistance.

The British would start arriving via the roads on squares 22, 23 & 24, led by the squadrons from the 43rd Recce Regiment (the Gloucestershire Regiment), followed by the 7th Somerset Light Infantry and the Sherwood Rangers.

The starting positions.


Turn 1 - Weather Fair
The 1st Recce Sqdn moved forward on the left towards the hills and stopped by the sanatorium (17) to observe the village of Wuppertell (12), but saw no enemy activity. The 2nd Recce Sqdn pushed up to the edge of the craggy foothills (13) but encountered no enemy. The 3rd Recce Sqdn on the right moved up to the village of Tremleurr and again there was no sign of the enemy. The 7th SLI then followed up Club Route (the main line of advance towards the objective in 13) with the Sherwood Rangers.

For the Germans, three new 'units' arrived via randomised die rolls and selection, all via the Western or Northern edges. Seeing the British Recce units approaching Tremleurr, the unit inside chose to reveal itself by opening fire and turned out to be the 1st Kompanie of the 3rd Battalion, Fallschirmjager Regiment 6.

The 43rd Recce Regiment lead the advance.

German re-inforcements begin to arrive from the North & West.

As the 3rd Recce Sqdn approach Tremleurr, the defenders open up, causing them to halt and radio back the situation to the 7th SLI Colonel.


Turn 2 - Weather Fair
With the enemy engaging the 3rd Recce Sqdn from Tremleurr, 'C' Coy 7th SLI and its supporting armour move towards the village in preperation for an attack. The reserves began to arrive and a Battery from the 94th Field Regiment Royal artillery deploys to be ready to provide fire support if required.

With the enemy on the right flank, the 2nd Recce Sqdn push carefully forward to the crossroads (13) but spot no signs of the enemy. The 1st Recce Sqdn move towards Wuppertell, but again see no signs of the enemy. 'A' & 'B' Coy's move up to the edge of the rocky ground (13) and wait, so as not to get too far ahead of the possible assault on Tremleurr.

The German re-inforcements move to the bridge (8), towards the road junction (7) and close in on Wuppertell. With the enemy so close, again the German 'unit' in Wuppertell chooses to reveal itself and turns out to be the Assault Engineers from the 3rd Fallschirmjager Battalion.

The end of the Campaign Turn 2.

The 1st Recce Sqdn have failed to spot the enemy in or near Wuppertell. The 2nd recce Sqdn is on 'overwatch' at the crossroads.

The British begin to move units towards Tremleurr in preperation for an assault, as they need to take the village quickly so as not to hold up the advance.


Turn 3 - Weather Mist
The weather takes a turn for the worse as late afternoon approaches, with a mist beginning to form. This will hamper visibility and so prevent any air support arriving and limit what the FAO can see. This does not prevent the build up to the assault on Tremleurr, as the AVRE unit is brought up and 'D' Coy moves forward in case it is needed to aid the assault. 'A' & 'B' Coys move through the craggy hills to support the 2nd Recce Sqdn that are holding fort at the crossroads. As this mist begins to form the 1st Recce Sqdn spots a German unit moving to the outskirts of Wuppertell and it turns out to be the 3rd Kompanie of the 3rd Battalion, Fallschirmjager Regiment 6. Seeing this the 2nd Recce Sqdn withdraws a safe distance from where they will observe the enemy whilst awaiting support.

Two more German 'units' arrive on the Northern table edge, whilst the 'unit' in 17 moves to the road junction there so as to be able to move towards either Wuppertell or the bridge (8) as required. With two Fallschirmjager Komapnies in Wuppertell, this is now a strong position and one that will require some effort to take, or it will remain a thorn in the side of the British advance.

The end of Campaign Turn 3.

Wuppertell appears to be strongly held. do the British try to take it or mask it as they continue their advance?

The British are ready to assault Tremleurr.


Next Moves
Well the next thing to do is to transfer the assault on Tremleurr to the table top. With the mist coming down and no air support and limited artillery support, plus dusk approaching, this might be a rather tough ask. Do the British wait until Dawn and attack then, hoping for better weather, or try and risk an assault from the line-of-march? Given their timetable to get to the bridge as quickly as possible, the latter option seems the best fit in campaign terms.

Thoughts So Far
It's early days I know, but so far things are working out as planned in terms of the broad campaign mechanics, which is all one can hope for really. The map and terrain information help drive the logical movements etc by both sides, which in turn helps drive the narrative. The 'Blinds' are working well along with the Recce spotting rules from Battlegroup Panzer Grenadier, although the British units have rolled very low, hence them not seeing a thing by and large! Still it all adds to the story.

The other good thing is it has motivated me to get back to the painting table and to try and finish off all those little additional units that have been in the queue for far too long! The actual game itself may be some days away due to real life, but I'm hoping to get it played out later on this week, all being well.

Until then stay safe and keep healthy!

Friday 21 January 2022

Operation Cygnet - a BKCII Campaign

With the start of a New Year and with the family soon to depart back to Uni and to work, my mind turned to organising a simple solo campaign to be played at my leisure. As with these things there were plenty of options available, but in the end I chose a sort of 'Operation Market Garden' as it was quite some time since my WWII toys had graced the table.

Campaign Mechanics
I chose to use one of the Warplan 5/5 maps as the basis for the terrain generation and movement, as most of the work had been already been done on this front. Also it had the added advantage that each square could equate to a 4'x4' board, which has become my default board size for games these days. Movement on the map would be quite simple, with all units moving one map square per campaign Turn, except for Recce which could move two. The whole campaign would be very much narrative driven, but have an overall objective.

I wanted to try and add in some more detail than my previous SCW campaign, just to see how easy it was to do and how much it brought to the table. In this respect I decided to use the weather board from Charles Wesencraft's superb Practical Wargaming book to bring a bit of unpredictability to say availability of air support, how far units could see etc. 

A must for every wargamer IMHO.

As I would be playing the British, I wanted some simple way to generate an enemy, but without me knowing what and were they were. To this end I went down the counters route, with units written on them but deployed upside down and only revealed when spotted by the British. Amongst these would be some blanks too, to add another level of uncertainty. Some units would be deployed at the start of the game whilst others would arrive on random board edges by a standard D6 die roll.

One thing that has never really worked for me has been the Recce rules in BKC stable. Quite by chance one evening I picked up a copy of Battle Group Panzer Grenadier by DCR Brown. This I had bought some years ago after a chat with Jon, one of a group of friends/gamers that meet up now and then, very cheaply off ebay. Not having given it more than a cursory glance I was not only was struck by how similar the current 'O' Group rules seem (well they are by the same author afterall) but how many good ideas they contain within their pages. So after a few read throughs I decided to try the rules for Recce, Ambush/Concealment and random Air Support, again another issue that I had wanted to tackle. They look to be good but the truth will out I'm sure once the campaign gets under way.

These I picked up for about £5.00 and are worth every penny. Thanks for the recommendation Jon!

Background Fluff
So with the broad mechanics sorted, the narrative was the next on the list, which was quite easy to do, given the campaign is inspired by 'Market Garden. A British Battlegroup is advancing forward towards an objective of securing a bridge over a river to allow the advance to continue forward. Having broken through the light German defensive crust, the Germans are rushing units to the area to support those already deployed.

British OOB
3 x Recce units
1 x Infantry Battalion - A, B, C & D Coy's, each with attached Sherman Sqdns
1 x AVRE troop
1 x 25 pdr Battery
1 x Air Support - Typhoon

German OOB
1 x Fallschirmjager Battalion -1st, 2nd, 3rd & Heavy Weapons Kompanies, plus Assault Engineers
1 x Heer Kompanie in half-tracks
2 x Volksturm Kompanies
1 x Panzer Schule with Pz III & early Pz IV
1 x Pz IV kompanie
1 x Stug III Battery
1 x Schwere Kompanie (Tiger I & Elefant)
1 x 105mm Battery
1 x Nebelwerfer Battery

Objective
The main objective is to secure the bridge crossing in square 8 and then the BUA in square 3.
Insert map image. British units will arrive via squares 22, 23 & 24. German units will start in squares 12 & 19, with possibly one other square to be decided upon.


The Warplan 5/5 map that the action will take place over.

Next Steps
Well with everything pretty much set up, it remains for me to kick things off in earnest. Real life has prevented the start that I had hoped for a few weeks ago, but I'm hoping to make the first map moves this weekend. Nothing is set in stone so there may be tweaks along the way but I hope nothing too drastic! I'm really looking forward to playing this  and hope to post some update soon.

So until then stay safe and keep healthy.