Thursday 22 October 2020

MDF Figures and Blocks

I first saw Commission Figurines at the WMMS show a good few years back, around the time I was really getting into 10mm wargaming. The display put on by Walt, the owner, was very impressive, even though he was sharing a stand with another company at that point. I was really taken with the mdf figures and sorely tempted to buy some, but for once managed to resist. Then a few years later I was looking to get into Napoleonics IIRC, using a free Warmaster variant, and so ordered some sample figures. These were based up and painted and then as is normal with me, they lay untouched for many years.
 
Quite by chance on evening during gaming with my chum Dave, we got chatting about these and it transpired that Dave and Walt were good friends and had started out at BT as apprentices many years ago. It's certainly a small World! As Dave had a large collection of 6mm armies, I decided to buy some for use with Bloody Big Battles and broadly around the War of 1812 whilst at Colours a year or so ago. Looking at what I purchased I think I planned two forces, but can't be sure! Anyway, I had a good chat with Walt and left the show happy with my bags of figures. 
 
Fast forward to a month ago and a post by David Crook about moving away from figure gaming to wooden blocks and WoFun figures led me to re-assess my gaming needs. As with other gamers I have a lead mountain that only seems to grow, despite my best efforts. Given this state of affairs I re-visited my mdf figures and resolved to use them to make two simple but usable armies for use with Bloody Big Battles, Black Powder II etc, thus giving me time, hopefully, to tackle me lead mountain at leisure.
 
An order was placed with Pendraken for some mdf bases and when these arrived, I set about how best to base these with the aim of keeping it simple and quick to finish. The results can be seen below. In total I think both armies cost me around £25 - £30, which I reckon is pretty damned good value.
 
Both armies on parade and are identical in terms of units.

The Infantry, with the supplied drums glued on and dress making pins cut to length and glued into holes in the bases for the flags.

The Artillery were the hardest to assemble, as I cut the wheels in half with a scalpel (very easy to do) and then had to support the carriage whilst the glue set on the wheels.

The Cavalry. I'm unsure whether to add flags to these or not...

The Skirmishers in their 'Egyptian' pose.

The Commanders.

 
Now I know there will be some gamers out there writing to their MP's about the lack of two ranks, the wrong frontages etc, but they work for me and I love the simple look, which is the most important thing! In fact I may end up using them for most of my games and off load a part of my lead mountain, but that remains to be seen.
 
I think the toy soldier look would be a good way to get kids into gaming as they are exceptionally good value and easy to paint. You could even go 'Old School' basing with just green paint. Personally I'm going with my normal basing regime so they fit in with the rest of my terrain etc. My aim is to get these finished before Xmas if at all possible, so watch this space!

My regular followers will now my penchant for my painted mdf blocks in my games. Once again David Crook's post made me thing about these once again and following an exchange of e-mails, I finally made some NATO symbols for them which had been on my 'to-do' list for far too long. the results can be seen below.


Samples of the red and blue blocks.

From clockwise at the top we have cavalry, pike and shot, infantry and artillery.

 
I was very happy how these turned out and already have plans for some games and even a campaign with them, whilst the mdf figures get painted. Unfortunately a variety of things have prevented me from starting gaming with these, but hopefully I will be able to get them onto the table soon. So until next time...

Tuesday 13 October 2020

Operation Sealion - Game 4 - Bristol or Bust!

Having broken through the GHQ Green Line, the FJ II Battalion had to pause and reorganise after the losses sustained in the attack. The Assault Engineers merged with the 1st Kompanie, bringing them up to a strength of two Kompanies with supporting arms. Still a formidable force but one that couldn't afford to take many more casualties as it continued its drive towards Bristol.
 
Despite the breakthough, the British Area Command didn't panic, having already set in motion re-inforcements in the form of the 5th Battalion the Gloucestershire Regiment, supported by tanks from the 3rd Royal Tank Regiment that had been training new recruits only a day or two before. RAF Fighter Command had re-allocated resources to cover the airspace over Bristol and the South West, in light of the increased air attacks and air support to the German Airborne Forces. Although they had been able to stop German daylight air support, they had failed to prevent a re-supply drop from Ju-52's during the night.
 
Scenario
The FJ having reformed, have renewed their drive on Bristol. As dawn breaks they are close to the village of Bramley End that lies astride the main road to Bristol. Their objective is to take control of the village to use it as a base as they await the 2nd Kompanie and other re-inforcements that are due soon.

The British know the broad location of the FJ Kompanies due to local intelligence from within the village. As such they have planned a dawn raid from Bristol Blenheim bombers based at Filton airport in Bristol. The 5th Battalion, the Gloucestershire Regiment are moving to the attack from their line-of-march, whilst 'C' Co of the Somerset Light Infantry and the tanks from the 3rd Royal Tank Regiment make a flank attack at the same time.

II Battalion 3rd Fallschirmjager Regiment OOB
1 x CO (CV10)
2 x HQs (CV9)
6 x Fallschirmjager
2 x MGs
3 x 81mm Mortars
1 x Pak35/36 + tow
1 x 75mm IG + tow
 
5th Battalion Gloucestershire Regiment, 'C' Co Somerset Light Infantry & Elements 3rd Royal Tank Regiment OOB
1 x CO (CV8)
4 x HQ (CV8)
1 x FAO (CV6)
12 x Regular Infantry
2 x MGs
1 x 3" Mortar 
1 x 18pdr Field Gun
3 x Vickers MkIV Light Tanks (use Vickers MkIV stats)
3 x Vickers MkII Medium Tanks (use A10 stats)
1 x Bristol Blenheim Bomber
 
Deployment
The FJ have formed up for the attack on Bramley End, with Kompanies astride the main road and by a stream coming down from the Mendip Hills. The Gloucesters are on route from bristol and will arrive via the Northern table edge, using Mobile Deployment. The 3rd RTR will arrive via the Western table edge, supported by 'C' Co the Somerset Light Infantry.
 
An overview of the table looking North.

The 3rd FJ Kompanie on the right flank andscreened from view by a hill.

The objective, the sleepy hamlet of Bramley End.

Tanks from 3rd RTR and 'C' Co SLI.

The 5th Battalion the Gloucestershire Regiment.
 
Turn 1
The FJ could hear aircraft in the distance and wrongly assumed it was more support from the Luftwaffe. As they sought cover, a Bristol Blenheim appeared and dropped it's cargo of bombs right on target, with 3rd Kompanie hardest hit, with 3 platoons, 2 MG units, a mortar and HQ suppressed.

With a successful start to the British counter attack, the 5th Battalion GR was somewhat tardy, with only 'B' Co arriving on the main road from Bristol. At least the 3rd RTR and 'C' Co arrived to threaten the FJ left flank, advancing towards the windmill on the hill.

Hearing armour to their left, the 1st FJ Kompanie moved back into a cornfield to try and form a better defensive position, whilst the only platoon not suppressed in the 3rd Kompanie moved forward to get a better view from the hill to its front.

The Bristol Blenheim arrives...

... and is bang on target.

The end of Turn 1.

1st Kompanie withdraws into the cornfield, with the Pak35/36 porteee moving up in support.

The Vickers MkIV's lead the advance...

... with the Vickers MkII's in support.

'B' Co arrives, but with no support yet.
 
Turn 2
The FAO attached to the 5th Battalion GR called in his 18pdr artillery, hitting the 1st Kompanie, suppressing 2 platoons. 'A' & 'D' Co's of the 5th Battalion arrived and moved forward along with 'B' Co. The 3rd RTR played a blinder, with the MkIV's and MkII's advancing at speed and managed to shoot up some of the 1st Kompanie, leading to one platoon being KO'd, with others suppressed and taking hits. Opportunity fire back hit the MkII's but did not suppress them.

The 1st Kompanie continued with their firefight with the 3rd RTR,  knocking out one MkII, but losing the Pak/35/36 Portee to opportunity fire. The CO called in the IG and mortar on the hill to support the 1st Kompanie, leading to the loss of the second MkII tank. Having recovered from the air attack, the 3rd Kompanie managed to advance towards Bramley End, occupying one of the houses.

The end of Turn 2.

The 1st Kompanie firefight with the 3rd RTR.

The 3rd Kompanie begin to enter Bramley End.


The Vickers MkII's brew up all too easily.

'C' Co SLI move up in support of the tanks.

The 5th Battalion advance towards Bramley End, but may not get their before the FJ's.
 
Turn 3
As the FAO failed to get through this Turn, the 5th Battalion continued to push forward, with 'B' Co reaching the orchard on the outskirts of Bramley End. 'C' Co SLI failed to move and the Vickers MkIV's only managed to cause some hits on the 1st Kompanie ATR platoon.

With a slight lull on the attack on them, the 1st Kompanie moved back towards the hedgeline across the road to try and form a better defensive postion. As the 3rd Kompanie moved into the churchyard, they attacked one platoon of 'B' Co, forcing it back suppressed, but opportunity fire back from 'D' Co on the hill led to the loss of the supporting MG unit.

The end of Turn 3.

1st Kompanie have pulled back across the road to the hedgeline.

3rd Kompanie occupy more of Bramely End.

'B' Co comes under fire, with a platoon suppressed.

'A' Co continues to try and advance to support 'B' Co's move into the hamlet of Bramley End.
 
Turn 4
The FAO managed to maked contact with his 18 pdrs with the 1st Kompanie once again on the receiving end, leading to the supporting mortar and HG suppressed. 'A' & 'B' Co's moved the houses across from the church as 'D' Co moved down off the hill and towards the cornfield on the outskirts of Bramley End. 'C' Co SLI moved to support the tanks, who failed to move.

1st Kompanie held their positions but there was little else they could do. The 3rd Kompanie attacked 'A' & 'B' Co's across the street, leading to 'B' Co losing a platoon and both Co' having platoons suppressed. Opportunity fire back cause little damage to the 3rd Kompanie.

The end of Turn 4.

1st Kompanie awaits renewed attacks from the 3rd RTR.

3rd Kompanie get the better of the opening firefight in Bramley End.

'D' Co push towards Bramley End with the aim of flanking the 3rd Kompanies positions.
 
Turn 5
Again the FAO brought his 18pdr's to bear on the 1st Kompanie, leading to them losing a platoon as well as the supporting MG and mortar units. 1st Kompanie had now ceased to be an effective fighting force. As 'C' Co SLI moved forward in the orchard, the Vickers MkIV's advanced to the road edge, taking fire from the IG on the hill, leading to one tank suppressed.

'A' & 'B' Co's having made some Initiative Moves and Shooting, then failed to cause any hits on the 3rd Kompanie. 'D' Co continued to advance but rather too slowly to aid the attacks from the other Co's.

3rd Kompanie made the most of their respite, leading to 'A' Co losing a platoon and another becoming suppressed. Opportunity fire back did however at least suppress on platoon in 3rd Kompanie. With 1st Kompanie hors de combat, the CO ordered the IG to once again fire on the tanks, with one MkIV suppressed, but opportunity fire back suppressed the IG.

The end of Turn 4.

The beleagured 1st Kompanie facing off against the Vickers MkIV's.

The 5th Battalion Co's close in on the 3rd Kompanie.

The action in the centre of Bramley End.

'D' Co's somewhat slow advance.

 
End of Game
With the FJ at their Break Point and the 1st Kompanie effectively out of the game, I quickly rolled some die, with the FAO once again hitting the 1st Kompanie hard, leading to its complete loss as well as the IG on the hill. So it was obviously game over that the 3rd Kompanie surrendered to the 5th Battalion troops, thus ending the drive on Bristol.
 
Post Game Thoughts
With that the campaign had reached its natural conclusion and I had great fun in researching and playing it. The narrative very much drove the next game and it developed a momentum of its own. So with this at an end and the game, time for my usual thoughts etc:

  • Despite being outnumbered, the FJ put up a good fight. In the end the 'quantity has its own quality' won out, but for a moment early on I thought the better CV's and AP stats of the FJ might win the day. They are certainly tough cookies to beat.
  • However with the FJ being airborne troops with limited support options available to them, when faced with anything approaching regular troops with armour and artillery support, their limitations became very apparent. This game in particular made me think of the issues surrounding Operation Market-Garden or the British Airborne troops trying to hold the left flank on D-Day.
  • The initial bomber attack got the British off to a good start, but the follow up support from the FAO really made a difference. Despite a pretty low CV, the amount of attacks called in really hit the 1st Kompanie hard. Without the artillery support the FJ might have been able to  make more of a fight to it, given their past performances.
  • I now need a break from BKCII, as you can have too much of a good thing. I also need to go away and think about the things that have cropped up in this (and other) games, such Recce, the use of on table smoke, digging-in etc. A break will allow me to look at these with new eyes and re-read BKCIV to see how these are dealt with.
 
So what next? Well aside from a whole host of partially painted tanks and infantry, I want a complete change of scenery in terms of rules and period. Currently I will be using my wooden blocks to fight a variety of games and really must give the BP ECW rules a run out as I've had them far too long. Some ACW games are on the cards, again with my wooden blocks.

I'm also taking stock of my lead mountain, the rules and periods I enjoy playing as I feel I have spread myself too thinly over the past few years. I want to downsize, which I started before lockdown hit, so I can focus more on what I really enjoy gaming. more on this in another post I'm sure! So until next time...

Monday 5 October 2020

Blogging - Ten Years And Counting

Jonathan Freitag's last post mentioned that he had been Blogging for 8 years, which got me to a wondering how long I had been on the Blogosphere. So a trawl through the old Commander Series forum showed that my first post was on the 18th January 2010, with the subject an AAR of a BKCII game. I know a friend had started Blogging late on the previous year using, I presume a now defunct, platform based in Germany that was free (you had to pay for some in the UK back then!), but with limited storage. If you wanted more you had to pay for it, so posts had to be deleted, or less pictures used. Now not being the smartest computer person in the World by a long shot, I dipped my toes in the water and with a bit of help, merrily started Blogging away. I vaguely remember there being issues with this platform, but what they were are lost in the mists of time, but on 26th May 2011 I switched over to Goggle's Blogger platform and the rest is, as they say, history. 
 
To date I have 97 followers and have made 274 posts, excluding this one. Briefly looking back over the post list is quite revealing, with a typical wargames butterfly approach to projects, most of which have stalled early on due to a whole variety of reasons, most relating to work getting in the way from what I can remember. Rules have come and gone, periods played to death and then sidelined, such as Dux Bellorum whilst others like BKCII have remained a constant.
 
A year or so ago I did mention in my end of year review whether it was worth continuing Blogging, given the time and effort involved and the often limited feedback received. The overwhelming response was to carry one, which was rather heartwarming! I'm glad I did but I do wonder if Blogging will still be around in another 10 years time? The trend to move over to platforms such a Facebook seems to continue unabated, but personally I like a good Blog post to read rather than glance at a Facebook or Instagram message. Afterall you can't do a good AAR on Facebook, although I've seen that people have tried.
 
Like many others I have enjoyed being able to keep in touch with other gamers across the World during the trying times we are currently living through, when face-to-face contact has not been possible for our family. Getting that virtual gaming hit has been more important than ever and looks like it will continue be that way for the foreseeable future. Blogging has also enabled me to 'meet' other gamers I am highly unlikely to ever meet in person, as well as discover new periods, rules, scenarios, figures, etc and at this time has become the next best thing to a wargames show. I know I've not been too keen on them in the past but you only really miss something when it's not there!
 
To end with I'd just like to say a big 'Thankyou' to all the Bloggers I follow for the time and effort that you've all put into your Blogs and which I've enjoyed reading no end. Also another big  'Thankyou'  for those that take the time to read my efforts and to make comments, all og which are greatly appreciated! So until next time...


Saturday 3 October 2020

Libertad! SCW Supplement

When BKCIV was released, it was announced around that time that there probably would be supplements to follow, given the space restrictions within the main rulebook. One of these was to be for the Spanish Civil War, a period that attracted me more or less from the off when I first started playing BKC I & II. Having put on demo games at Colours and played a variety of one off games over the years, this interest morphed into the A Very British Civil War fictional setting, with the timeframe similar to that of the SCW.

So when it was announced a month or so ago that the supplement was ready as a pdf and a hard copy would soon follow, I was a very happy bunny. Last week the hard copy was available and I duly ordered my copy, which arrived today.

The first thing that you notice is the very striking front cover which I love and I think captures the period very well. The supplement runs to 36 pages, so what do you get for your money? Well some images can be found below and then I'll run through the contents after:

 
The front cover that will certainly stand out when wargames shows return at some poitn in the future.

One of the scenarios inside with a great map by Henry Hyde.

The Army Lists.

A sample army list in the same format as the BKCIV rulebook.

 
 The supplement has been written by Rob Anderson and Mark Fry and I think they've done a fantastic job! Leon at Pendraken has given the supplement a lovely clean look to it so it a pleasure to look at. The the maps by Henry Hyde are beautifully done in his usual style and are clear to read whilst at the same time having a great look to them. So 10/10 for presentation.

The rules specific to the SCW all feel right and nothing jars which is good to see. The 'Improvised Street Barricades' rule I can see working equally well for WWII and beyond. The  'Line Commander' rules I'm not sure whether I'll use or not yet, as my current vogue for Company Commanders might make them less applicable for my games, but I'll have to have a proper read through first. Some Armies have 'Improvised Portees' which is a nice touch and again could transfer to early WWII. I think another 10/10 here.
 
There are five scenarios in the supplement, with a paragraph or two of background information, excellent OOB and as already mentioned, Henry's maps are great. Each scenario ends with the number of Turns to be played and Victory Conditions for both sides. These are so well presented and tempting, whether a large or small battle, that I'm keen to give one or two of them a run out soon. Once again 10/10 for the scenarios.

There are 11 Nationalist and 13 Republican Army Lists, ranging from the standard to the obscure for me. You are certainly spoilt for choice here, that's for sure. I will be using these alongside Bob Cordery's excellent SCW source book, 'La Ultima Cruzada'. All the lists can be used as a basis for AVBCW and some have nice additions, such as improvised portees, which I certainly want to make for my games. I think 10/10 for the sheer breadth and depth of the lists.

At the end of the supplement are two pages listing all of Pendraken's SCW range, which I think is rather useful to have to hand, rather than constantly referring to the internet for said ranges.

It will come as no surprise that this supplement comes highly recommended, whether as a pdf or hard copy, the latter being my preference everytime. At £6 I think this is excellent value and well worth the money. So if you like the SCW or the AVBCW, I think you will find much to enjoy in this supplement. Rumour has it that a Korean supplement may be in the offing in the future, but this is of less interest to me, but never say never! Until next time...


Thursday 1 October 2020

Operation Sealion - Game 3 - Assault on the GHQ Green Line

Having broken through the Taunton Stop Line with comparitive ease, the II Battalion, 3rd Fallchirmjager Regiment were now ready to make an assault on the GHQ Green Line, the last defensive position guarding Bristol and the surrounding areas. Without their integral artillery support, the Fallschirmjager would have to rely upon the Luftwaffe to support them in their attack.

The 1st Battalion, the Somerset Light Infantry had had limited time to create their defensive line, but hoped the recently and somewhat hastily constructed pillboxes would help strengthen their positions. They were at full strength and determined to make a last stand here, as there was nothing behind them to stop the enemy from taking Bristol.

Scenario 4: Deliberate Attack
This is pretty much as per the scenario in the BKCII rulebook, with the following tweaks:
Pillboxes. These are 6+ to hit, 6+ save. The lower than normal save is to reflect the hasty nature of their construction and the fact that many were just made of brick.
Railway Embankment. This counts as linear terrain only for blocking line of sight. It does not restrict movement. Units behind it are hit on 5+

1st Battalion Somerset Light Infantry OOB 
1 x CO (CV8)
2 x HQ (CV8)
2 x HQ (CV7)
12 x Regular Infantry
2 x MG (in pillboxes)
1 x 3" Mortar
1 x 18pdr Artillery (on table)

II Battalion 3rd Fallschirmjager Regiment OOB 
1 x CO (CV10)
3 x HQ (CV9)
1 x FAC (CV8)
6 x Fallschirmjagers
3 x Assault Engineers
3 x MGs
3 x 81mm Mortars
1 x Pak35/36 + tow
1 x 75mm IG + tow
1 x Ju-88 (scheduled)
1 x Ju-87 (scheduled)
1 x Bf-109

Deployment
The British defence would be based around the two pillboxes covering the road and rail junction, with supporting trenches either side, with two covering flank attacks. Two companies would be in 'reserve' and mobile to respond as needed, depending upon where the attacks would fall. 

The German plan was simply to use the Luftwaffe to suppress the units in the pillboxes and trenches as they made a concentrated attack on the British left flank, with the aim of turning the line and rolling it up. As much as possible they wanted to avoid direct attacks upon the pillboxes, knowing these would more than likely be very costly and of limited effect.

 
An overview of the table, with the Somerset Light Infantry to the North and along the railway line.

The Somerset Light Infantry deployed.

The two pillboxes and trenches guard the rail crossing.

The Fallschirmjager at their jumping off points.

The road towards their objective.

Captured civilian vehicles have been pressed into service as artillery tows.

The Luftwaffe.
 
Turn 1
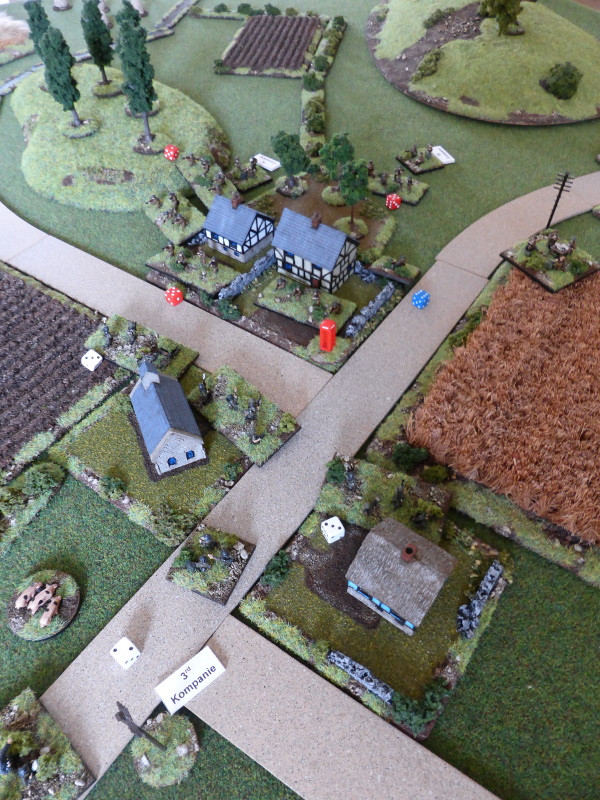
The 1st Kompanie moved off and occupied the farm by the 'T' junction, whilst the Assault Engineers in the centre and the 3rd Kompanie kep abreast of each other as they advanced.

The Somerset Light Infantry (SLI) held their fire, not wanting to reveal their positions too soon. 'D' Co moved down from the hills to the railway embankment to meet the threat to the left flank, whilst 'C' Co crossed the railway on the right flank, with the aim of attacking the German flank.

The end of Turn 1.

1st Kompanie occupy the farm.

The Assault Engineers (on the left) and the 3rd Kompanie push on.

'C' Co move off to threaten the German flank.

'D' Co line the embankment.
 
Turn 2
The Luftwaffe arrived in the form of a Ju-88 whose bombing run KO'd one platoon from 'B' Co and also suppressed other platoons in this and 'A' Co. Across the board the FJ made a steady advance, not really capitalising on the effects of the Luftwaffe raid.

With no targets worth shooting at, the SLI held fire and only 'C' Co continued on their flanking move, reaching the orchard by the barn.

The Ju-88 start their bombing run...

... and the rash of red die show how effective it was.

The end of Turn 2.

1st Kompanie leave the farmhouse to support the Assault Engineers in the centre.

The Assault Engineers group together ready to push on through the orchard.

3rd Kompanie continues to move on the flank to try and get in a position to turn the British flank.

'C' Co on the German right flank, which they are unaware of.
 
Turn 3
As the SLI have only just recovered from the Ju-88 raid, the sound of Ju-87's diving in can be heard, with dive bombing seeing 'A' Co lose a platoon and other platoons and 'B' Co HQ suppressed. The Assault Engineers and 3rd Kompanie move into view of 'B' & 'C' Co's, who open fire, suppressing two Assault Engineer platoons. In response 'D' Co comes under sustained fire, taking lots of hits and one platoon forced back, nearly KO'd. The SLI 18pdr joins the fray, but is KO'd by the mortar of 1st Kompanie, who have moved up to support the Assault Engineers.

'B' Co & 'D' Co continue the firefight with the FJ, leading to the Assault Engineers MG unit being suppressed. Opportunity fire saw 'D' Co lose a platoon, whilst 'A' Co and the CO failed their command rolls. Fortunately 'C' Co managed to carry on advancing unseen, but could not reach the hedgeline to be in a position to shoot.

The Ju-87 arrives and...

... does some damage, but not much.

The end of Turn 3.

'C' Co close on the German flank.

The Assault Engineers and 3rd Kompanie engaged in a firefight, getting the better of 'D' Co who are leaving the flank vulnerable to attack due to their losses.

The Assault Engineers having a tough time from 'B' Co in the pillbox and trenches.

The view from the SLI left flank.

The view from the SLI positions at the rail crossing.
 
Turn 4
The FJ FAC failed to get through to the Luftwaffe, giving the SLI a reprieve from air attacks for the moment. The Assault Engineers and 3rd Kompanie continued the firefight, leading to the 3rd Kompanie crossing the railway and 'D' Co ceasing to exist. The 1st Kompanie moved into the orchard to support the Assault Engineers, taking hits in the process but managing to KO another 'B' Co platoon.

As 'C' Co continued to move on the German right flank, 'A' Co moved out of their trenches and lined the wall by the road, leading to 1st Kompanie losing their MG unit and a platoon, as  'B' Co kept up the fight with supporting fire.

The end of Turn 4.

'C' Co can't quite bring all their guns to bear just yet.

'A' Co line the wall and catch the 1st Kompanie with flanking fire.

1st Kompanie and the Assault Engineers battle it out with 'B' Co.

3rd Kompanie have begun to cross the railway.

1st Kompanie take fire to their front and left flank.
 
Turn 5
The FJ FAC managed to call in his Bf-109 who made a bombing and strafing run on 'A' Co, leaving one platoon suppressed and others taking more hits. The 3rd Kompanie and the Assault Engineers cross the railway and advance along it, ready to roll up what remains on the SLI left flank. The 1st Kompanie continue to slog it out with 'A' & 'B' Co's, with both sides losing a platoon and the 1st Kompanie close to losing another.

Across the board the SLI fail their command rolls, bar 'B' Co's MG unit in the pillbox that KO's another 1st Kompanie platoon.

The Bf-109 arrives to bomb and strafe the stricken SLI...

...leaving one platoon close to breaking and others with more hits accrued.

The end of Turn 5.

'C' Co on the German left flank and not yet spotted.

'A' & 'C' Co's in a great position on the German flank.

Only the pillboxes remain to try and halt the Germans.

The SLI left flank well and truly rolled up.

Only 'B' Co HQ and the CO remain to try and stem the German advance.

The badly battered 1st Kompanie.

 
End of Game
Despite a heroic defence, the British position was untenable, having lost over 3/4's of their units and only the pillboxes holding out in the centre, the CO surrendered, but 'C' Co managed to sneak away to fight another day. For the Germans this had been a costly victory, with them losing around a 1/3 of their force. Not quite 'Pyrrhic' but pretty close.

Post Game Thoughts
Even though this was only a 5 Turn game in the end, it felt a lot longer due to their being quite a lot of action to deal with. As always an enjoyable run out with BKCII, with my usual house rules and some bits from BKCIV thrown in for good measure. So as always so thoughts on the game and campaign:
  • Despite yet another British loss, they managed to blunt the German advance and certainly gave the Fallschirmjager a 'bloody nose'. This will have an interesting effect upon the campaign and I'm mulling over some ideas as to what will happen next. I imagine it will be some form of counter-attack by the British...
  • Having read Peter Fleming's excellent Operation Sea Lion book since the last game, I was rather generous in giving the British a Battalion's worth of support to fight with. In reality more than likely they would not have had any MG's, mortars or atillery to play with, as the limited number available would have been in East Anglia and the South East to meet the expected main landings. However without them it wouldn't have been much of a fight!
  • The Luftwaffe filled their roll of airborne artillery rather well and again, I was generous on this front, as they might not have had the range for the attacks, given the 'planes used. But as with the above, it was done to make a game of it.
  • I had planned on using smoke as mentioned in my last AAR. However I wasn't entirely happy with the 'rules' and also there wasn't much opportunity to use it early on. I didn't want it to become a smoke laying exercise with both sides firing it off ad infinitum. When the chance did arrive, I simply forgot! So more thought required.
  • The reduced strength pillboxes rules worked well I thought. The ones I've seen in East Anglia were made of brick and certainly wouldn't have stopped any reasonable calibre gun firing directly at them. Given when the campaign is set they were being hastily constructed and were certainly not to the level seen on the Maginot Line or West wall.
  • Having Company commands worked really well and I will run this out across my other forces in the future. It gives a much better game IMHO and yet still feels historically accurate if you know what I mean.
 
With the weather set to make a turn for the worse this weekend, who knows I might get the next campaign game in then. I think there are one or two games left to go before it all reaches a natural conclusion. After it ends I fancy a return to something 'Black Powder'ish', but haven't decided what yet. One step at a time! So until next time...

PS: Oh and the new Blogger is making things so slow with its constant saving and adding paragraphs between 'photos, which was easy last time is now a real pain! Bring back the 'Legacy' version I say!