Following on from the victory at Carlisle, it seems that the Jacobites had stopped their infighting at Derby, listened to the 'Bonnie Wee Laddie' and had started their advance on London. Good King George had prepared for this eventuality and whilst the Duke of Cumberland was assembling his forces elsewhere, moved out of London to Finchley Common and arrayed his troops ready to meet the young upstart.
Hanoverian Forces
George II C-in-C - Dependable
Guards Brigade with attached artillery - Superior and Dependable
Tower Hamlets London Trained Bands - Inferior and Dithering
Brigade of Dragoons - Standard and Dependable
Jacobite Forces
Charles Stuart the Young Pretender C-in-C - Dithering
Highlander Brigade - Standard and Dependable
Highlander Brigade - Standard and Dependable
Lowlanders Brigade - Inferior and Dithering
French Brigade - Standard and Dependable
Baggots Hussars - Inferior and Dependable
Scenario Details
For King George II, he simply had to stop the Jacobites from reaching London and not get killed in the process. For the Jacobites, get to London and remove that Hanoverian usurper.
For King George II, he simply had to stop the Jacobites from reaching London and not get killed in the process. For the Jacobites, get to London and remove that Hanoverian usurper.
Deployment
The Hanoverian troops could deploy any where they saw fit, up to roughly the half-way point of the table. The Jacobites deployed along the opposing table edge.
The Hanoverian troops could deploy any where they saw fit, up to roughly the half-way point of the table. The Jacobites deployed along the opposing table edge.
 |
| The Hanoverians deployed their Guards across the London road, with the cavalry Brigade on the hill. King George II was kept back in reserve with the Trained Bands until he saw how the Jacobites would deploy and move towards London. |
Turn 1
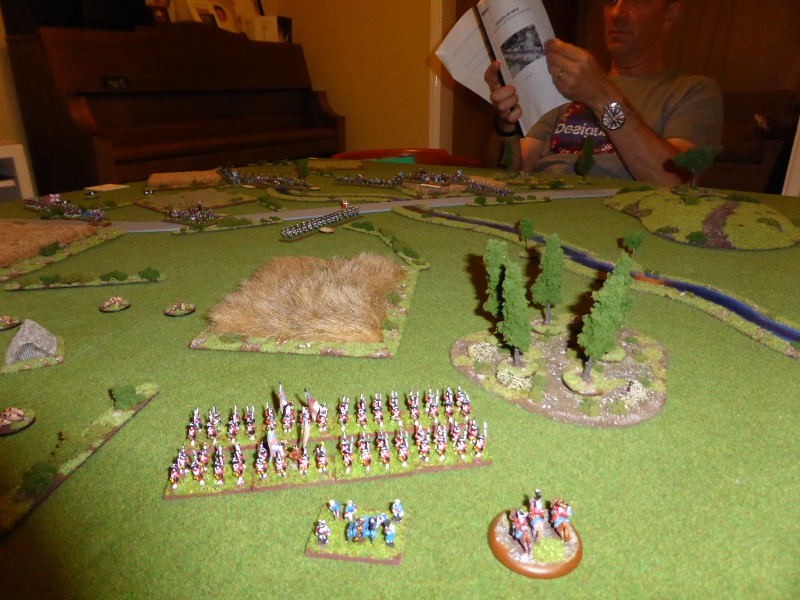
In true Jacobite style, the Lowlanders rolled a Poor and promptly started crabbing across the table. Apparently this was planned (yeah right it was) by Dave to allow his French Brigade to advance past them. As the Highlanders moved forward the Trained Bands moved onto the battlefield and deployed towards the Hanoverian right flank, with King George II in tow.
In true Jacobite style, the Lowlanders rolled a Poor and promptly started crabbing across the table. Apparently this was planned (yeah right it was) by Dave to allow his French Brigade to advance past them. As the Highlanders moved forward the Trained Bands moved onto the battlefield and deployed towards the Hanoverian right flank, with King George II in tow.
 |
| The Hanoverian Trained Bands march out as the Jacobites and their Allies advance forward in true Linear style. |
Turn 2
It was the Highlanders turn to roll Poor commands and then crab about the table. The poor Guards Brigade were getting somewhat dizzy at the unusual tactics once again being shown by the Jacobites. As the Lowlanders caught up with the French of the Jacobite left flank, the Hanoverian cavalry brigade moved off the hill to make way for the Trained Bands, who chose to make a cautious advance.
It was the Highlanders turn to roll Poor commands and then crab about the table. The poor Guards Brigade were getting somewhat dizzy at the unusual tactics once again being shown by the Jacobites. As the Lowlanders caught up with the French of the Jacobite left flank, the Hanoverian cavalry brigade moved off the hill to make way for the Trained Bands, who chose to make a cautious advance.
 |
| The Guards brigade refuse their right flank as the Highlanders dance about rather than advancing forward. |
 |
| 'Moses parts the Red Sea', or that's what it felt like as the Jacobite flanks parted company. |
 |
| The Trained Bands ready to move onto the hill to meet the Lowlanders and the French. |
 |
| The Guards wait patiently as their artillery causes hits on the Highlanders and Jacobite cavalry. |
Turn 3
A turn in which both sides had some Poor command rolls. The Highlander right flank refused to advance, leaving their compatriots to move into the centre, with Baggots Hussars whizzing down the right flank to the edge of the woods. As the Lowlanders became entangled with the French, due to the latters poor command roll, the Trained Bands moved onto the hill. The Hanoverian Dragoons moved off towards their left flank to meet the threat from the Jacobite cavalry.
A turn in which both sides had some Poor command rolls. The Highlander right flank refused to advance, leaving their compatriots to move into the centre, with Baggots Hussars whizzing down the right flank to the edge of the woods. As the Lowlanders became entangled with the French, due to the latters poor command roll, the Trained Bands moved onto the hill. The Hanoverian Dragoons moved off towards their left flank to meet the threat from the Jacobite cavalry.
 |
| The battle lines of the Jacobites start to become somewhat fragmented. |
Turn 4
The Jacobite Highlanders finally get their act together and advance towards the Guards brigade astride the London road. The Lowlanders and French start to become disentangled, but this allows the Trained Bands to deploy nicely across the hill as they do so. As Baggots Hussars probe around the wood, the Dragoons move towards them as quickly as they can.
The Jacobite Highlanders finally get their act together and advance towards the Guards brigade astride the London road. The Lowlanders and French start to become disentangled, but this allows the Trained Bands to deploy nicely across the hill as they do so. As Baggots Hussars probe around the wood, the Dragoons move towards them as quickly as they can.
 |
| The battle starts to take shape, as the Hanoverian flanks are slightly refused due to the Jacobite threat. |
 |
| A firefight develops, with the Guards causing 3 hits on the highlanders but take 1 in return. |
 |
| The Highlanders close in but are at risk from the Guards attached artillery. |
Turn 5
Battle is well and truly joined as the Highlanders charge in, but suffer from closing fire and the Hanoverian artillery. In the melee, a Highlander units is destroyed but manages to force a Guards unit back to reform itself. The Highlander commander was killed, with his replacement a Ditherer rather than Dependable. Not what they really wanted. Elsewhere the French advance with Baggots Hussars evading the Hanoverian Dragoons charge.
Battle is well and truly joined as the Highlanders charge in, but suffer from closing fire and the Hanoverian artillery. In the melee, a Highlander units is destroyed but manages to force a Guards unit back to reform itself. The Highlander commander was killed, with his replacement a Ditherer rather than Dependable. Not what they really wanted. Elsewhere the French advance with Baggots Hussars evading the Hanoverian Dragoons charge.
 |
| The battle breaks up in the centre but the flanks are still under threat. |
 |
| Two Hanoverian units are forced back as a result of Jacobite and French firing, resulting in them having to reform before being able to rejoin the fray. |
 |
| The Highlanders have been taking a beating from the Guards brigade, with their centre and right flank severely disrupted. |
Turn 6
The Trained Bands roll a Feeble command, resulting in them having to retire in the face of the enemy due to so many of their units already hainvg hits on them. The French and Lowlanders advance to take advantage of this tactical retreat. As the Dragoons retreat to support the centre and right flank, Baggots Hussars charge them in the flank. In a prolonged melee, Baggots Hussars come off worse and are destroyed. In the rally phase, one of the Trained Bands retreats off the table as they are unable to fall back far enough to reform.
The Trained Bands roll a Feeble command, resulting in them having to retire in the face of the enemy due to so many of their units already hainvg hits on them. The French and Lowlanders advance to take advantage of this tactical retreat. As the Dragoons retreat to support the centre and right flank, Baggots Hussars charge them in the flank. In a prolonged melee, Baggots Hussars come off worse and are destroyed. In the rally phase, one of the Trained Bands retreats off the table as they are unable to fall back far enough to reform.
 |
| The Highlanders in the centre fall back to try to reform at a safe distance. The Hanoverian right flank is under severe pressure and tries to stabilise itself as best it can. |
 |
| Baggots Hussars charge in but come off worse, despite attacking the Dragoons in the flank. |
Turn 7
The Highlanders charge in to try and put pressure on the Guards brigade, but come off very much the worse, with them retreating more or less en masse in an attempt to reform at a safe distance once again. The Trained Bands come under severe pressure as the French managed to flank them. An isolated Trained Band unit is caught in the flank but French fire, resulting in it being destroyed. As King George was close by, a stray musket ball hits him, killing him stone dead!!!
The Highlanders charge in to try and put pressure on the Guards brigade, but come off very much the worse, with them retreating more or less en masse in an attempt to reform at a safe distance once again. The Trained Bands come under severe pressure as the French managed to flank them. An isolated Trained Band unit is caught in the flank but French fire, resulting in it being destroyed. As King George was close by, a stray musket ball hits him, killing him stone dead!!!
 |
| The (Hanoverian) King is dead, long live the (Stuart) King! |
 |
| The moment that the campaign swung decisively in favour of the Jacobites. Despite the Highlanders having been driven off, the loss of the King and the Trained Bands hands victory to 'Bonnie Prince Charlie', who can hardly believe his luck. |
Post Game Thoughts
Well another cracking game of Honours of War and one that ended is such a dramatic and memorable fashion! It has certainly opened up a whole new set of possibilities for our narrative driven campaign, but more of that later. So as always a few post game musings;
Well another cracking game of Honours of War and one that ended is such a dramatic and memorable fashion! It has certainly opened up a whole new set of possibilities for our narrative driven campaign, but more of that later. So as always a few post game musings;
- This game really showed up the difference between Superior and Inferior troops. The Highlanders really struggled to make any impact on the Guards brigade, whilst the Trained Bands had a tough time against the French.
- Light Cavalry are very useful for slowing down attacking troops due to their ability to evade close combat.
- The Dragoons suffered from being unable to get to grips with Baggots Hussars. My aim was to try and destroy them and then get around the Highlanders flank to threaten them if they were reforming etc. A lack of width and the evade ability of the Hussars prevented this from happening.
- Inferior troops really suffer when they have to start reforming or when the Brigade has to retreat due to a Feeble command roll. Your whole flank can suddenly buckle as it did in this game.
The Campaign Moving Forward
As the game finished quite late, Dave and I only had a brief moment to discuss future possibilites, but broadly some of the options might be:
- The North and parts of Wales rises up in support of the Jacobites, now that they see that they have killed the Hanoverian King.
- Scotland might move over to supporting the Jacobites en masse.
- The French seeing a suprising success for their Allies, commit more troops to support the new King, resulting in the War of the British succession'.
- The Duke of Cumberland still has a sizeable and experienced army massing in the East of England and with him being the Hanoverian heir, is unlikely to give up his claim lightly. Civil war is a distinct possibility given the natural distrust of a Catholic King in large parts of Britain.
- The American Colonies, fearful of a Catholic Monarch, send over troops to support the Duke of Cumberland.