Sunday 29 November 2015

Wargames Rules

These days there seems to be hardly a month that goes by without yet another set of wargames rules being released. This is no bad thing, as some of the recent ones have become firm favourites with myself. Yet I am constantly suprised by the wide variance in price of said rules. As an example:

Maurice (with cards) - £47
Blucher - £40
Black Powder - £30
Kings of War - £25
Blitzkreig Commander II - £20
Bloody Big Battles - £18.50
Honours of War - £12

Now I am fully aware that there is a big difference in the size, number of pages and the production values of the above. If I had the inclination (which I don't), I could work out the price per page as it were to see which rules were possibly the best value. Now I know that many of these rulesets can be bought more cheaply off Amazon, Evil bay etc, but I'm showing the RRP to get a fair comparison.

For my money Blitzkreig Commander II used to be the best value ruleset going. You got the rules, scenarios and army lists all in one book. No need for supplements. I would now say that Dux Bellorum, Lion Rampant and Honours of War are the equals to, if not better than, BKCII in this regard. 

Now admittedly I'm at that stage in life where I no longer need loads of eye candy and fluff with my rules. Yet the aforementioned Osprey titles still provide beautifully presented, well written rules, with enough fluff and eye candy to keep most gamers happy. And all for around £10. Just as nice to look at as the 'GW style' rules, but at a fraction of the price.

Now I'm not alone in my thoughts on this. Most of my wargaming friends feel the same way. The general consensus is that £20* is about as much as we would be happy to pay for a set of rules. Afterall we have all been bitten too often when buying rules that promised so much but sadly failed to deliver. I'm hoping that the standard and pricing set by Osprey will help keep future rulesets within a reasonable (to my mind) price range. But I'm not holding my breath...

* Note: To my daughter £50 doesn't seem a  lot of money, but to me it does. There is obviously an age gap issue to be factored in as well. Or maybe I'm just a tight fisted old git...

Friday 20 November 2015

Operation Sunlounger - a BKCII Spanish Civil War AAR

Dave and I agreed that our narrative '45 Rebellion had reached at natural conclusion with the decisive victory achieved by the Duke of Cumberland. This is not to say that we may not revisit this in the future, but at present we decided to give it a break. Afterall you can have too much of a good thing.

So what to play next? Given that we have been playing an awful lot of 'Black Powder' period games of late, a complete change was in order. So after a brief chat, we agreed to give BKCII a run out. For once the scenario and figures were my responsibility. After mulling over a few ideas, I settled upon a sort of Spanish Civil War scenario. Sort of in the sense that I took a few libertties with the forces to give a more balanced and hopefully enjoyable game, more of which later.

The scenario was based upon one from CS Grant's Programmed Wargames Scenarios, but tweaked to suit BKCII. Some of the options on force choices given would have made the game too one sided, hence my tweaking. After a typically cheeky comment from Dave in an exchange of e-mails, I came up with the following back ground fluff:

Operation Sunlounger - Spain 1938
The Condor Legion are keen to get to the beaches first and put their towels down on the best sunloungers. To aid them in this, they have advised General Franco that a move to bypass the current Republican position would be a good one. To this end the Italian CTV and a Nationalist Naval unit have been given the mission of turning the Republican righflank.

Republicans
1 x CO
2 x HQ 
1 x Recce Armoured Car
9 x Regular Infantry (3 with anti-tank rifle upgrade)
3 x Cavalry (able to dismount)
3x MGs
1 x Mortar
1 x 45mm ATG with Truck
1 x 75mm Artillery Support Unit with Truck
1 x 45mm T-26

Nationalist CTV
1 x CO
2 x HQ
1 x Recce Cavalry
9 x Regular Infantry (3 with anti-tank rifle upgrade)
3 x Cavalry (able to dismount)
2 x MGs
1 x Mortar
1 x 45mm ATG with Truck
1 x 75mm Artillery Support Unit with Truck
6 x L3/35 tankettes
1 x L3/35 Flamethrower tankette

Nationalist Naval Unit
1 x HQ
3 x Regular Infantry
1 x MG
1 x Mortar
2 x Armoured Trucks
1 x Trubia Naval Tank (use FT-17 stats)

Scenario Details
Reports have come in that a Nationalist Force is moving to try and bypass the main Republican position. With their right flank under threat, a re-inforced battalion has been sent post haste to form a blocking position across the predicted Nationalist Line-of-Advance. Their mission is to hold on at all costs, to allow the main Republican force time to re-establish a tenable defensive position.

The Republican Forces deploys on the Western table edge, using the mobile deployment rules.

The Nationalist Forces deploy on the Northern table edge, coming in on either of the roads, with their deployment determined by a random die roll.

The Scenario lasts 8 Turns.

Given the time at our disposal and the number of units involved, I didn't attempt to make any detailed notes of how the game unfolded. Instead I hope the following pictures and notes will help give an idea of how the game played out.

The Republicans made a good opening move, with all of their troops moving onto the table. The Nationalists found their forces split up, with the CO and his units moving on on via the left hand road, whilst the rest of his force decided to arrive on the right hand one. Not the best way to make a combined attack...
The Republican Cavalry screen to the fore as Nationalist troops move to make the best cover
L3/35 tankettes take the lead as the first of the CTV troops arrive. Failed command rolls leave the rest and the Nationalist Naval units off table
Battle is joined on the Republican left flank, with both sides cavalry dismounting and taking up positions in the woods, farmhouse and cornfield.
The Republicans face the fearsome might of the L3/35 tankettes.
As the battle rages on, failed command rolls hinder the Republican right flank. More of the CTV arrives whilst the rest advance, albeit slowly towards the farmhouse.
At a critical point the Republicans have a failed command roll, with the L3/35s facing the might of the T-26 and an anti-tank rifle. This allows the L3/35s to see off the anti-rifle threat and move out of the way of the T-26.
The Republican right flank is painfully slow in advancing, whilst the arrival of the Nationalist Naval Unit looks to possibly tip the battle in favour of the Nationalists.
The battle in full flow as both sides head towards Mutually Assured Destruction. Only the T-26 has the abnility to stop the L3/35s as the Republicans have lost all of their anti-tank assets.
The L3/35 flamethrower tankette positions itself in front of the farm, whilst the Nationalist Naval Units armoured trucks and Trubia Naval can be seen advancing along the road.
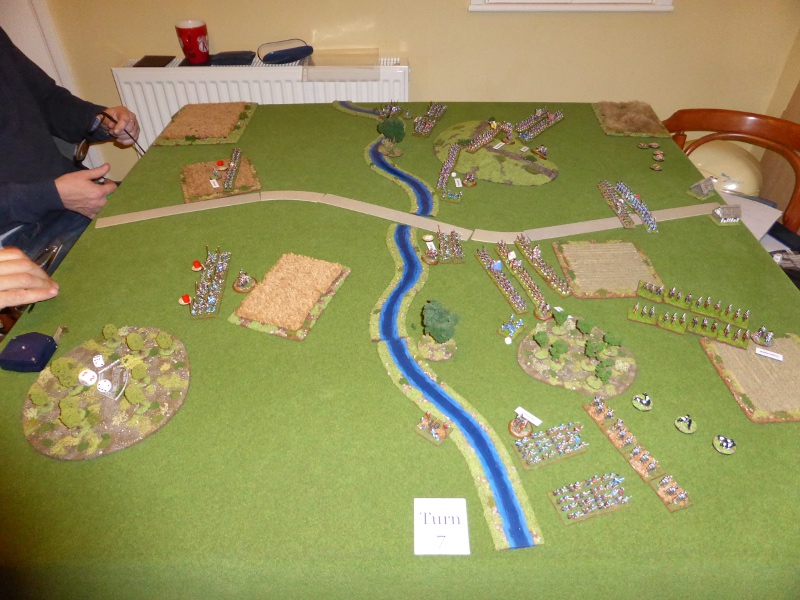
Finally the Republican right flank advances, but their left flank is under severe pressure.
As the Republicans advance to the crest of the hill, the Nationalist forces are slow to move up to try and break through the potential blocking position that is developing.
The disjointed Nationalist advance is still the major threat, and both sides have suffered large losses in and around the woods.
The Nationalists start to advance past the farmhouse that is now under their control...
...as the Republican forces look on from the crest of the hill.

Post Game Thoughts
In the end time beat us but we both agreed that the Nationalists were in a slightly better position and more than likely gained a minor victory. It was nice to be playing BKCII once again, but it was certainly not a classic game. For reasons why read on:

  • Dave as the Republican commander was beset by a series of Blunders that hampered his ability to move his troops quickly to where he needed them. This certainly prevented his right flank being able to play an active part in the game.
  • We both suffered from a series of poor command rolls. In this game I upped the CVs of the COs to 9 and the HQs to 8 as experience has taught me that anything lower invariable leads to a rather dull and static game. Not what you want for an evenings gaming.
  • Not historically accurate, but I gave each Battalion 3 anti-tank rifles. Again experience has taught me that without them, facing any form of armour leads to an almost Flames of War situation, where the armour fights amongst itself, with the winner then able to roam around the talbe almost at will. Fine for a longer game, but not for a couple of hours on an evening.
  • Cavalry are great fun to use. They are quick, look great and are able to advance to hold ground whilst supporting untis advance to support them.
  • I love my L3/35s. Cheap as chips they seem to survive in games when they should have been smoking wrecks ages ago. At one point Dave had 8 shots at them in two Turns and only managed to inflict 3 hits, 2 of which were saved. However they do have to be used with care so as not to unbalance a game, as they are effectively armoured MG units. I'm going to convert a few into Solothurn anti-rifle armed ones purely for my AVBCW forces.
  • The L3/35 flamethrower variant is lethal if allowed to attack BUAs. Anything in there really doesn't stand a chance.
  • The random entry rolls did work well, as I did not know where they would arrive. However with most of them arriving along one raod, this did hamper my ability to attack the Republicans as for most of the game there was a bit of a traffic jam.
  • Having played so much 'Black Powder' gaming of late, I did have to take care with placement of terrain. Too much and you can hinder movement and firing (think Bocage), whilst too little and there is not enough cover for defender or attacker. I think I got it right for this game, but it does require some thought.
  • The T-26 feels like a Tiger II when facing it are machine gun armed L3/35s. I was expecting it to have more of an impact on the game, but Dave was simply unluckly with his die rolls.   

I do like BKCII and really must try and get some more games in, whether SCW, AVBCW or WWII. So after this brief foray into the modern era, are next game is planned to be Hail Caesar, with Romans against Ancient Britons. Dave is back on figure and scenario duties, so will have to wait to see what unfolds next week.

Saturday 7 November 2015

'Cumberland's Sausage' - an Ealing comedy set during the '45 Rebellion

For this weeks game we were lucky enough to have my good friend, Keith Flint, come up for the evening to have a look at our variant of his 'Honours of War' rules. Dave and he would take command of the Jacobites whilst I would be the Duke of Cumberland. Traffic meant that we were unable to chat for as long as we had hoped, so we more-or-less went straight into the game, after some chocolate cake and jelly babies!

Background
With King George dead at Finchley Common and the 'Young Pretender' now declaring himself King, the Duke of Cumberland is rapidly advancing on London to try and save the day for the Hanoverian cause.

The situation that confronts him is of the Jacobite forces running rampant towards the West of London. He has dispatched orders to the remnants of the London Garrison from Finchley Common to assemble at Ealing with all speed, whilst he and his army advances to meet up with them, with the intention of bringing the Jacobites to battle.

Scenario Details
The London Garrison would start on the table, deployed as they saw fit, whilst eagerly awaiting the Duke of Cumberland and his army. They would arrive from Turn 3, on a die roll of 6+, on Turn 4 on a die roll of 5+ and so on.

The Jacobites, buoyed up by the success at Finchley, would advance en masse with the intention of destroying the last Hanoverian obstacle to 'King' Charles Stuart and his coronation.

Hanoverian Force
London Garrison
Dithering Commander
1 x Guards Infantry (Superior)
2 x Militia (Inferior) 
1 x Artillery (Inferior)

Dependable Commander
2 x Cavalry (Standard) 

Duke of Cumberland Force
Dependable General

2 x Brigades of:

1 x Dependable Commander
3 x Infantry (Standard)
1 x Artillery (Standard) 

Jacobite Force 
Mix of Dithering and Dependable Commanders
2 x Highlander Brigades
1 x Lowlander Brigade 
1 x Frecnh Brigade

Table Layout


Keith surveys the massed ranks of the Jacobite troops whilst the London Garrison is deployed on and around the hill.
Dave 'Hoots Mon!' Fielder on the left and Keith 'Neeps & Tatties' Flint on the right.


Turn 1
Things got off to the by now standard start with the Jacobites (Keith) rolling a Poor command for his Highlanders. He admirably restrained himself from uttering any Anglo-Saxon expletives. Naturally this caused a good bit ribbing from me, but given my past performance I had to take what solace I could. Fortunately by and large the rest of the Jacobites moved forward. The London Garrison shook out into line to meet the massed ranks of the Jacobites and their Allies.

A cautious advance gets things off, with the Jacobites moving on a broad front.


Turn 2
Another turn in which the Jacobites advanced on a broad front, forcing the London Garrison to move their cavalry over to their left flank to provide some support to prevent the threat of it being turned early on.

The Jacobite advance is somewhat disjointed at this stage, with their flanks not keeping pace with their central units.
The Hanoverian cavalry move up to protect the flank.


Turn 3
Huzzah! The Duke of Cumberland arrives, spurred on by the thought that he might be able to be crowned King if he sees off the 'Young Pretender'. With the arrival of the 2 Brigades of experienced Hanoverian troops, things may have turned againt the Jacobites at last...

On the Jacobites left flank, the Highlanders and French advance towards the stream. Cumberland and his troops stream on, with one Brigade moving off to the right and the other to support the centre.
The Hanoverian cavalry seal off the left flank for the time being.
'Hoots Mon!' Fielder and 'Neeps & Tatties' Flint look justifiably concerned.


Turn 4
A rash of Poor Command rolls affect both sides, but finally the Lowland Jacobites advance, whilst a firefight breaks out between the French and the Hanoverian Guards.

The Jacobite right flank begins to form up, whilst combat is joined on their left flank.
The London Garrison faces off against the Jacobites whilst the Duke of Cumberland moves support to the right flank.


Turn 5
At a crucial moment the Highlanders on the left flank roll a Poor command, failing to advance to support the attacks going in around the hill. The Hanoverians get the better of the firefight, seeing a French unit destroyed and another forced to retreat and to reform. The French commander is killed, being replaced by a Dithering commander. Definitely not what the Jacobites needed at this moment in time.

On the Jacobite right flank, the Highlanders also roll a Poor command, seeing them crab off towards the centre, leaving the Lowlanders and Baggots Hussars on their own by the stream.
  

The Jacobites forces are now strung out into 3 distinct 'battles'.
The French attack falters under the combined firing of the London Garrison.


Turn 6
A turn in which both sides advanced and engaged each other with muskets and cannon fire!

The Jabobite forces by now have been split into three distinct groups. Their right flank is struggling to get over the stream and into battle, as is their left. Only in the centre are they getting to grips with the Hanoverians, who have moved up a Brigade to support the London Garrison.
The Jacobite commanders begin to wonder if it is all going wrong for them, as they face overwhelming superiority in the centre.
A glimmer of hope possibly as Baggot's Hussars drive the cattle before them in the hope that they might inflict some casulaties on the Hanoverian cavalry...


Turn 7
Finally the Jacobite flanks managed to cross the stream and move to threaten the Hanoverian flanks. However these are easily covered by the cavalry on the left and the infantry Brigade on the right. In the centre the Highlanders take a punishing amount of fire, seeing two units forced back to reform, but at least have the satisfaction of a Militia unit having to do the same.

The Jacobite Highlanders are shot at from the front and are given a whiff of grapeshot in their flanks. Unsuprisingly two of the units are forced to retreat to reform.
With the threat to the centre diminishing, the Hanoverian flanks are looking very secure.


Turn 8
In a last ditch attempt the Jacobite flanks advance, but the Highlanders in the centre succumb to the weight of shot directed against them. With their forces unable to make co-ordinated attacks and outnumbered, the Jacobites call it a day.

The Hanoverians in command of the field of battle.
With the Highlanders outnumbered, their centre is about to cease to exist.
The Hanoverian right flank positioned to deal with anything that the Jacobites can throw at them.
The cows failed to turn the tide for the Jacobites.


Post Game Thoughts  
Well it will not come as a suprise to say that it was yet another great game of HoW. Having Keith present was great, as he was able to clarify a few points as we went along as well as offering some suggestions to our 'stats' for the Highlanders.  So a few thoughts on the game:
  • From the start the Jacobites were unable to co-ordinate the advance of their troops. This allowed the Hanoverians to deal with their attacks in detail.
  • The arrival of the Duke of Cumberland  on Turn 3 really dealt a blow to the Jacobites. His experienced Brigades were able to move into position quickly, reinforcing the London Garrison.
  • This is the first time that the Jacobites had faced some many Standard troops. Coupled with Dependable Commanders this turned the tide in favour of the Hanoverians.
  • At Keith's suggestion, we will be adding a +1 Charge bonus  to the Highlanders to better respresent their famous Highland Charge. This will count for the first charge only.
So what next for our campaign? Are the French still sending troops to back the Jacobite cause? Has the North risen up in favour of the new 'King' Charles Stuart? I'll have to wait and see what Dave has planned for next week. Whatever it is I'm sure it will be fun.