For
this weeks game we were lucky enough to have my good friend, Keith Flint,
come up for the evening to have a look at our variant of his 'Honours of
War' rules. Dave and he would take command of the Jacobites whilst I
would be the Duke of Cumberland. Traffic meant that we were unable to chat for as long as we had hoped, so we more-or-less went straight into the game, after some chocolate cake and jelly babies!
Background
Background
With King George dead at Finchley Common and the 'Young Pretender' now declaring himself King, the Duke of Cumberland is rapidly advancing on London to try and save the day for the Hanoverian cause.
The situation that confronts him is of the Jacobite forces running rampant towards the West of London. He has dispatched orders to the remnants of the London Garrison from Finchley Common to assemble at Ealing with all speed, whilst he and his army advances to meet up with them, with the intention of bringing the Jacobites to battle.
The situation that confronts him is of the Jacobite forces running rampant towards the West of London. He has dispatched orders to the remnants of the London Garrison from Finchley Common to assemble at Ealing with all speed, whilst he and his army advances to meet up with them, with the intention of bringing the Jacobites to battle.
Scenario Details
The London Garrison would start on the table, deployed as they saw fit, whilst eagerly awaiting the Duke of Cumberland and his army. They would arrive from Turn 3, on a die roll of 6+, on Turn 4 on a die roll of 5+ and so on.
The Jacobites, buoyed up by the success at Finchley, would advance en masse with the intention of destroying the last Hanoverian obstacle to 'King' Charles Stuart and his coronation.
The Jacobites, buoyed up by the success at Finchley, would advance en masse with the intention of destroying the last Hanoverian obstacle to 'King' Charles Stuart and his coronation.
Hanoverian Force
London Garrison
Dithering Commander
1 x Guards Infantry (Superior)
2 x Militia (Inferior)
1 x Artillery (Inferior)
Dependable Commander
2 x Cavalry (Standard)
Dithering Commander
1 x Guards Infantry (Superior)
2 x Militia (Inferior)
1 x Artillery (Inferior)
Dependable Commander
2 x Cavalry (Standard)
Duke of Cumberland Force
Dependable General
2 x Brigades of:
1 x Dependable Commander
3 x Infantry (Standard)
1 x Artillery (Standard)
Jacobite Force
Mix of Dithering and Dependable Commanders
2 x Highlander Brigades
1 x Lowlander Brigade
1 x Frecnh Brigade
Table Layout
Turn 1
Things got off to the by now standard start with the Jacobites (Keith) rolling a Poor command for his Highlanders. He admirably restrained himself from uttering any Anglo-Saxon expletives. Naturally this caused a good bit ribbing from me, but given my past performance I had to take what solace I could. Fortunately by and large the rest of the Jacobites moved forward. The London Garrison shook out into line to meet the massed ranks of the Jacobites and their Allies.
Turn 2
Another turn in which the Jacobites advanced on a broad front, forcing the London Garrison to move their cavalry over to their left flank to provide some support to prevent the threat of it being turned early on.
Turn 3
Huzzah! The Duke of Cumberland arrives, spurred on by the thought that he might be able to be crowned King if he sees off the 'Young Pretender'. With the arrival of the 2 Brigades of experienced Hanoverian troops, things may have turned againt the Jacobites at last...
Turn 4
A rash of Poor Command rolls affect both sides, but finally the Lowland Jacobites advance, whilst a firefight breaks out between the French and the Hanoverian Guards.
Turn 5
At a crucial moment the Highlanders on the left flank roll a Poor command, failing to advance to support the attacks going in around the hill. The Hanoverians get the better of the firefight, seeing a French unit destroyed and another forced to retreat and to reform. The French commander is killed, being replaced by a Dithering commander. Definitely not what the Jacobites needed at this moment in time.
On the Jacobite right flank, the Highlanders also roll a Poor command, seeing them crab off towards the centre, leaving the Lowlanders and Baggots Hussars on their own by the stream.
Turn 6
A turn in which both sides advanced and engaged each other with muskets and cannon fire!
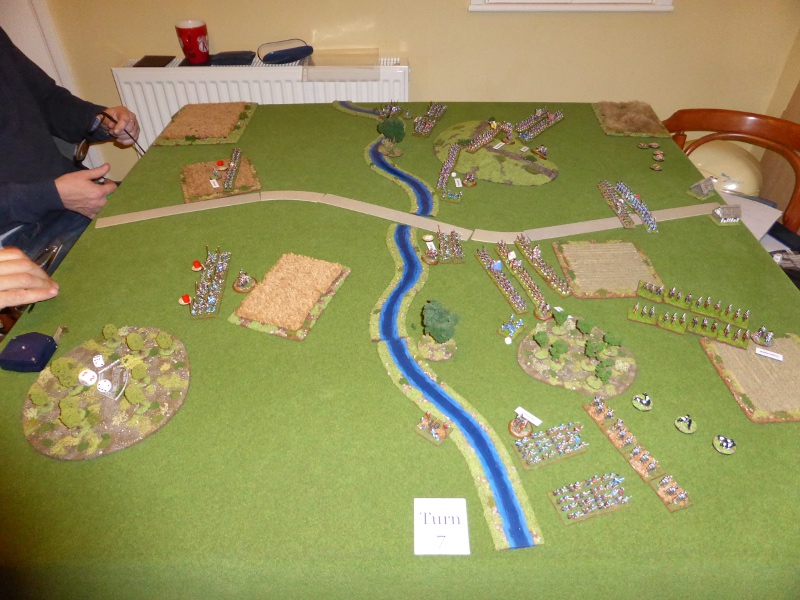
Turn 7
Finally the Jacobite flanks managed to cross the stream and move to threaten the Hanoverian flanks. However these are easily covered by the cavalry on the left and the infantry Brigade on the right. In the centre the Highlanders take a punishing amount of fire, seeing two units forced back to reform, but at least have the satisfaction of a Militia unit having to do the same.
Turn 8
In a last ditch attempt the Jacobite flanks advance, but the Highlanders in the centre succumb to the weight of shot directed against them. With their forces unable to make co-ordinated attacks and outnumbered, the Jacobites call it a day.
Post Game Thoughts
Well it will not come as a suprise to say that it was yet another great game of HoW. Having Keith present was great, as he was able to clarify a few points as we went along as well as offering some suggestions to our 'stats' for the Highlanders. So a few thoughts on the game:
 |
| Keith surveys the massed ranks of the Jacobite troops whilst the London Garrison is deployed on and around the hill. |
 |
| Dave 'Hoots Mon!' Fielder on the left and Keith 'Neeps & Tatties' Flint on the right. |
Turn 1
Things got off to the by now standard start with the Jacobites (Keith) rolling a Poor command for his Highlanders. He admirably restrained himself from uttering any Anglo-Saxon expletives. Naturally this caused a good bit ribbing from me, but given my past performance I had to take what solace I could. Fortunately by and large the rest of the Jacobites moved forward. The London Garrison shook out into line to meet the massed ranks of the Jacobites and their Allies.
 |
| A cautious advance gets things off, with the Jacobites moving on a broad front. |
Turn 2
Another turn in which the Jacobites advanced on a broad front, forcing the London Garrison to move their cavalry over to their left flank to provide some support to prevent the threat of it being turned early on.
 |
| The Jacobite advance is somewhat disjointed at this stage, with their flanks not keeping pace with their central units. |
 |
| The Hanoverian cavalry move up to protect the flank. |
Turn 3
Huzzah! The Duke of Cumberland arrives, spurred on by the thought that he might be able to be crowned King if he sees off the 'Young Pretender'. With the arrival of the 2 Brigades of experienced Hanoverian troops, things may have turned againt the Jacobites at last...
 |
| On the Jacobites left flank, the Highlanders and French advance towards the stream. Cumberland and his troops stream on, with one Brigade moving off to the right and the other to support the centre. |
 |
| The Hanoverian cavalry seal off the left flank for the time being. |
 |
| 'Hoots Mon!' Fielder and 'Neeps & Tatties' Flint look justifiably concerned. |
Turn 4
A rash of Poor Command rolls affect both sides, but finally the Lowland Jacobites advance, whilst a firefight breaks out between the French and the Hanoverian Guards.
 |
| The Jacobite right flank begins to form up, whilst combat is joined on their left flank. |
 |
| The London Garrison faces off against the Jacobites whilst the Duke of Cumberland moves support to the right flank. |
Turn 5
At a crucial moment the Highlanders on the left flank roll a Poor command, failing to advance to support the attacks going in around the hill. The Hanoverians get the better of the firefight, seeing a French unit destroyed and another forced to retreat and to reform. The French commander is killed, being replaced by a Dithering commander. Definitely not what the Jacobites needed at this moment in time.
On the Jacobite right flank, the Highlanders also roll a Poor command, seeing them crab off towards the centre, leaving the Lowlanders and Baggots Hussars on their own by the stream.
 |
| The Jacobites forces are now strung out into 3 distinct 'battles'. |
 |
| The French attack falters under the combined firing of the London Garrison. |
Turn 6
A turn in which both sides advanced and engaged each other with muskets and cannon fire!
 |
| The Jabobite forces by now have been split into three distinct groups. Their right flank is struggling to get over the stream and into battle, as is their left. Only in the centre are they getting to grips with the Hanoverians, who have moved up a Brigade to support the London Garrison. |
 |
| The Jacobite commanders begin to wonder if it is all going wrong for them, as they face overwhelming superiority in the centre. |
 |
| A glimmer of hope possibly as Baggot's Hussars drive the cattle before them in the hope that they might inflict some casulaties on the Hanoverian cavalry... |
Turn 7
Finally the Jacobite flanks managed to cross the stream and move to threaten the Hanoverian flanks. However these are easily covered by the cavalry on the left and the infantry Brigade on the right. In the centre the Highlanders take a punishing amount of fire, seeing two units forced back to reform, but at least have the satisfaction of a Militia unit having to do the same.
 |
| The Jacobite Highlanders are shot at from the front and are given a whiff of grapeshot in their flanks. Unsuprisingly two of the units are forced to retreat to reform. |
 |
| With the threat to the centre diminishing, the Hanoverian flanks are looking very secure. |
Turn 8
In a last ditch attempt the Jacobite flanks advance, but the Highlanders in the centre succumb to the weight of shot directed against them. With their forces unable to make co-ordinated attacks and outnumbered, the Jacobites call it a day.
 |
| The Hanoverians in command of the field of battle. |
 |
| With the Highlanders outnumbered, their centre is about to cease to exist. |
 |
| The Hanoverian right flank positioned to deal with anything that the Jacobites can throw at them. |
 |
| The cows failed to turn the tide for the Jacobites. |
Post Game Thoughts
Well it will not come as a suprise to say that it was yet another great game of HoW. Having Keith present was great, as he was able to clarify a few points as we went along as well as offering some suggestions to our 'stats' for the Highlanders. So a few thoughts on the game:
- From the start the Jacobites were unable to co-ordinate the advance of their troops. This allowed the Hanoverians to deal with their attacks in detail.
- The arrival of the Duke of Cumberland on Turn 3 really dealt a blow to the Jacobites. His experienced Brigades were able to move into position quickly, reinforcing the London Garrison.
- This is the first time that the Jacobites had faced some many Standard troops. Coupled with Dependable Commanders this turned the tide in favour of the Hanoverians.
- At Keith's suggestion, we will be adding a +1 Charge bonus to the Highlanders to better respresent their famous Highland Charge. This will count for the first charge only.
So what next for our campaign? Are the French still sending troops to back the Jacobite cause? Has the North risen up in favour of the new 'King' Charles Stuart? I'll have to wait and see what Dave has planned for next week. Whatever it is I'm sure it will be fun.
Exellent AAR matey!!!
ReplyDeleteWould love some close up pictures of you minis but might be hard as the are quite small, but if possible.
Best regards Michael
Glad you enjoyed it Michael:). Let's hope you and your son can get another game in soon.
DeleteI'll try and get some close up shots next time (the figures are Dave's), but the lighting is not too good and my photography skills leave much to be desired. In the meantime check out the link below to see what can be done with 10mm figures that are beautifully sculpted:
http://www.pendrakenforum.co.uk/index.php/topic,7622.0.html