Saturday 26 October 2013

A Trip Down Memory Lane


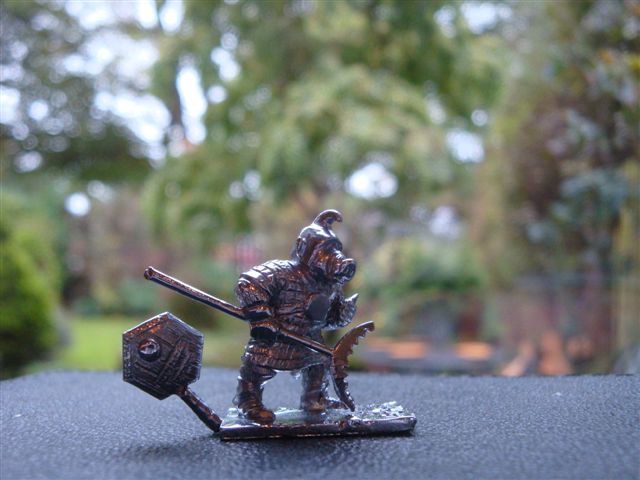
Quite by chance I stumbled across this very old range of figures that were produced around the time that Dungeons & Dragons became popular at secondary school in the 1970s. Amazingly they are still in production by Minifigs and I still have the figure, sadly chopped about on the altar of conversions. IIRC they were the first range of Orcs produced and this one was popular with us at school and was christened 'the Farmer' for some reason lost in the mists of time.


ORC5 - Orc with Serrated Crescent

A weekend treat would be to take a trip to the 'Old Soldier Modelshop'  by Hyde Park Corner in Cambridge, just opposite the Catholic Church, to view the ranges on offer. The level of detail and pose of the sculpt really shows its age compared to todays work, but I must admit I still really like this figure, purely for nostalgic reasons. I can see me buying this as a 50th birthday treat to myself. Sad I know but it would make me happy.

I still have a few figures in the attic from around this time, that I've never quite been able to part with, again for purely nostalgic reasons. Having recently purchased In Her Majesty's Name wargaming rules from Osprey (via Amazon of course), I can see myself digging out the aforementioned figures to try and come up with a company for use in the game.


Only time will tell if I'm successful, but it could be a lot of fun, which after all is what it's supposed to be all about.


Monday 7 October 2013

A Little Bit of Gun Boat Diplomacy

As a kid my Dad had a load of old Airfix magazines that he passed onto me. These were read avidly in the evenings and re-visited many, many times over my early teenage years. I was always impressed by the articles on scratch built vehicles or planes, and at times attempted to do minor conversions, but frankly with little success. However I enjoyed the whole experience, despite the finished quality of my work.

Fast forward 35 odd years and the opportunity and desire to scratch build stuff has re-emerged. This is in part largely due to my interest in the whole A Very British Civil War 'era' and the weird and wonderful kit that existed, or may have 'existed' in the Inter-War years. As always I have loads of ideas of things I would like to make, but time is always limited. After all my full-time job is as a model maker for a design company, so at times it can feel like a bus mans holiday making stuff for yourself in the evenings etc.

However, as I have no deadlines other than those imposed by myself, or by forthcoming games or shows, I set about deciding I would finally get around to making something. But what to make given the plethora of ideas in my head? In the end I decided upon an armoured canal boat as my first project. Why? Well it would be relatively easy to make and would be fun to use on the wargames table, especially as my AVBCW forces have fought actions near to or by the River Avon near to where I live. 

So then after a bit of research on the internet, I had enough information to get the rough overall sizes of the sort of canal boats that cruise along the Avon. I then drew up plans of the boat in 1/144th scale to fit in along side my 10mm Pendraken AVBCW forces. I wasn't quite sure what to layout I wanted in terms of armaments etc, so I sketched out a few ideas and would leave it until the boat was being made to see what looked best, as well as provide for a good game.

I made the model out of a mixture of ABS plastic sheet and Ureol modelboard, with a bit of filler here and there plus some brass wire for the MG barrels in the turrets. In reality the actual making of the model didn't take that long, but it was spread out over about 6 months, due to a variety of factors. 

So with the model made and primed, it was then a case of what colour and camouflage scheme to paint it. After some research I came across the following information on the White Ensign Models website that fitted the bill as far as I was concerned. The camo schemes were interesting and would fit the boat nicely, as well as the colours which would certainly look rather nice on the table.


I decided to use the 'Light Modification' camouflage scheme above as a guide, and then tried to make it fit with the canal boat, which is obviously rather different to a Vosper MTB. I'm not entirely happy with the way the paint job came out, but have decided to walk away and leave it for a while, so that I can view it with fresh eyes as it were.

Port side view as she cruises along a narrow waterway.
View to starboard with the turrets turned ready to fire.
A good view of the blue camouflage to mask her in the water. Also the mortar near the bridge at the back of the boat can just be seen with the doors open ready to fire.
With a command base and WWI armoured cars as a guide to her size. She is 145mm long by 13mm wide.

All-in-all I really enjoyed this project from start to finish, despite its rather long gestation. I've already started on an armoured train for use with my AVBCW and WWII Eastern Front forces, but details will follow when the project is completed. I wouldn't hold your breath though given the timescales with regards the above.
Wednesday 2 October 2013

The Battle for Holywell

Post Colours my free time for war gaming has been somewhat limited to say the least. However I was inspired by my friend Keith, who is in a similar situation, and his recent post regarding DBA2.2 on his Blog. Dux Bellorum is very similar in feel to DBA2.2 so I resolved to get a solo game in at the first opportunity, given that I now have two painted warbands after our Colours demo game.

Scenario.
For speed and simplicity I decided to go for the Village Raid scenario, with both warbands having 32 pts to choose from and with no 'extras'. Details of each warband can be seen below:

Derfel Cadarn - Welsh- 6th Century
1 x Companion Warriors
2 x Noble Warriors
5 x Ordinary Warriors
2 x Skirmishers (1 x bow, 1 x javelin)

Hrothgar the Angle - Sea Raiders - 6th Century
1 x Companion Warriors
4 x Noble Warriors
2 x Ordinary Warriors
1 x Skirmishers (bow)

Hrothgar and his Angles were by default the Agressors being a Raider warband, so Derfel Cadarn and his Welsh got to choose terrain being the Repellers. I chose a wood, hill and stream, the latter chosen purely because I had recently made it for Colours and wanted to give it another run out.

Table Layout.
I decided on a 2'x2' table, for speed more than aything else, plus it would help to make for a fast game, limiting room for manouevre. To be honest I think the game plays, and looks better, on a 3' x 2' table.  

The Angles deployed on the left of the table, with the Welsh facing them on the right, defending the objective, the former Roman settlement of Holywell.
Deployment.
Quite by chance I came across some details of variations on deployment for solo gamers by Donald Featherstone. I was quite taken with these and with it being a solo game fancied giving them a go. Broadly speaking each unit was allocated a 'chit' with a number on it, with a couple of blanks thrown in to add to the uncertainty on the deployment. These 'chits' were then turned upside down and jumbled up and then arranged into a left wing, centre and right wing. These were then deployed on the table. Once both sides had deployed, the 'chits' were turned face up and the relevant units put in their place.


I found this worked really well and the blinds added a nice twist to the deployment over and above the blind nature of it all. Details of how the warbands deployed can be seen below:
A view from the hill towards the Welsh battle lines.
The Welsh left flank where the main units of the warband ended up deploying.

The rather weak centre.
Derfel Dadarn and his Companions drawn up outside Holywell.

The Angle host arrayed for battle.
The strong Angle right flank.
Hrothgar and his Companions in the centre unfurl their Raven banner prior to the battle.
The rather small Angle left flank.

Turn 1
The Angle skirmishers got off to a flyer with a double 1, advancing briskly over the stream to come within bow range for next turn. The Angle right flank wheeled to move along the stream to meet the threat from the Welsh left flank. The centres movement was rather patchy and the left flank advanced up to the stream ready to cross it next turn.

The Welsh left flank and centre all advanced in a confident fashion, however the units around Derfel Cadarn all failed leaving him somewhat in the lurch.
 
The positions of all units at the end of Turn 1.

Turn 2
The Angle skirmishers loosed their arrows which found their target in the form of a Noble Warrior unit, causing 1 point of cohesion to be lost. Irked by this disply of fine shooting, the Welsh responded by a volley of arrows that saw the demise of the upstart Angle archers! The Angles were already down 1 LP and it was only Turn 2.

Things didn't get any better with the right flank blundering and all units lost 1 point of cohesion each. The only bright point was that Hrothgar was able to form a good battle line with his centre and left flank.

The Welsh continued their advance on the left flank and the right flank got their act together and dressed ranks to form a more cohesive battle line. The centre however was somewhat shaken by the flight of arrows that hit them and refused to move.

Both sides start to close at the end of Turn 2.

Turn 3
Having formed two battle lines the Angles were able to advance en masse. The Welsh responded in kind, with the right flank advancing supported by a skirmish screen of javelins. The centre recovered their poise and promptly rolled a double 1 and charged into the Angle centre. Sadly their charge didn't have quite the effect hoped for with both combats being drawn.
 
Battle is finally joined and South of the stream both battle lines draw ever closer.
The Welsh centre charge Hrothgar and his Companions and Nobles.

Turn 4
With both sides so close together combat was inevitable, given that both sides were Warriors. The Welsh skirmishers loosed arrows and javelins towards the Angles, but only causing one unit of Ordinary Warriors to lose 1 point of cohesion.

The Angle left flank charged towards Derfel and his Companions, inflicting an impressive 3 hits on them, but with one unit being destroyed as a result. In the centre Hrothgar drove back the Welsh loses more points of cohesion, but the Welsh centre manages to hold.

On the Angle right flank the combat ebbed to and fro, but one attack in a flurry of swords swipes and spear thrusts saw the demise of one unit of Welsh Warriors!

The battle ebbs and flows as both sides meet.
The fighting is fierce and bloody South of the stream.
The Welsh centre holds for now.
Derfel Cadarn on the right flank is looking in a good position for next turn.

Turn 5
With both sides fully engaged, the battle started to break up into smaller engagements. The Welsh javelin men missed from point blank range but then made amends by rolling a double 1 and moving over to pin Hrothgar and his Companions in place by a flank attack. The Welsh centre seized their chance and charged into Hrothgar who was surely doomed. By some miracle (ie appaling die rolling) he and his Companions survived, the same of which could not be said for the Welsh centre, which ceased to exist.

Derfel Cadarn failed to show the same martial prowess as Hrothgar, and was only able to draw his combat. The fight South of the stream was very bloody, with ony three units left at the end of the turn.

By now the Welsh were at their break point, and lost one other unit to a rout test but managed to avoid an automatic rout. The Angles were equally close and the Welsh needed to cause a lot of damage to the Angles next turn to try and snatch victory.
 
The somewhat depleted battle field.
Hrothgar surrounded and outnumbered is surely doomed?
Sadly not for the Welsh as he sees of his attackers with ease. The same cannot be said for derfel Cadarn and Co.
Two Welsh units face a lone Angle one.

Turn 6
For the Welsh it was now a case of do or die.  South of the stream they finished off the last Angle unit, and the Welsh right flank finished off another Angle unit, putting them on break test as well. Somehow the Welsh skirmishers were able to survive Hrothgars fury as he rolled 9 attacks and only caused 1 hit! Maybe the Welsh could snatch victory at the last throw of the die.

Sadly for them it was not to be. Another unit failed its break test putting them on an automatic rout as they had lost 75% of their force. The Angles rolled and managed to pass their tests to gain a somewhat Pyrrhric victory at the end.

Hrothgar, Lord of all he surveys.

Post Game Thoughts
Well it was certainly a bit of a 'Vin Diesel' game in that it was certainly fast and furious. I deliberately decided against using any LPs for defence and instead went for all out agression, as I wanted a quick game but it also seemed in keeping with having two Warrior warbands on the table. It certainly produced an enjoyable game and one suited for the limited time that I have at present for games.

I think in future I will play my games on a 3' x 2' table, as it gives for a more tactical game and also looks better as mentioned above. I will also keep up the agressive stance for Warrior warbands but allow every other LP to be used for soaking hits if required, to give a more balanced game. I'll see how this goes and adjust if necessary.

So I'm hoping now to try and get a small game in once a week on my 4'x4' table, whether it be Dux Bellorum, BKCII or any of my other games. The proof of the pudding will be in the eating as they say...