It's been about 2 1/2 years since I've hosted a face-to-face game at home for rather obvious reasons. But recently with the weather improving (although it's pouring down as I type) it has felt safer to make a return to more normal gaming with friends. So after the game a Chris Gregg's last month, my good friend Keith Flint and I were able to meet up as planned for a game of 'Shadow of the Eagles'. I've only ever played these solo, so it was great to not only to play them FtF but also with the author!
I suggested the second scenario from the book, which Keith thought a good call, as it's a decent sized game to give a good run out of the rules. With a deadline approaching I managed to finish enough of my Commission Figures troops for the scenario, but completely forgot on the HQ's front, meaning I had to make a last minute substitution of some cavalry bases to use for them.
The scenario was inspired by a map on the Little Wars TV site that was used as part of their Marengo campaign. Forces wise I fancied something set around the 1809 Danube, as the French aren't uber powerful nor the Austrians as weak as a wet paper bag (famous last words). Keith was happy with this choice, so everything was pretty much set for his visit.
Luckily the weather was great so with the windows and patio doors open to keep things cool and help on the Covid front, we settled down to the usual pre-game chat and then once we'd rolled for command quality etc, we were set for the game. I didn't take any notes as I wanted to concentrate on the game itself, but took some photos which will help explain how the game unfolded. So without further ado:
 |
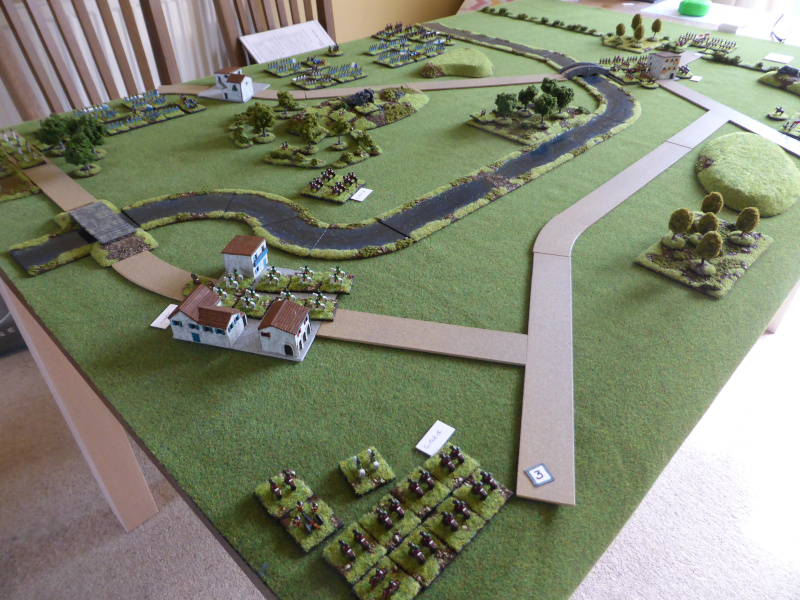
| An overview of the table, with the Austrians South of the river and the French appearing from the Northern table edge. The river can only be crossed by two fords or the bridges, with the objectives being the two towns occupied by the Austrians, plus the fords themselves. |
 |
| A small Austrian brigade occupies the town on their right flank with two battalions of infantry and an artillery battery. Note the unit bottom left are reinforcements that will arrive later on on a random Turn as dictated by a die roll. |
 |
| Two Regiments of light cavalry occupy the town on the left flank. Again the troops at the bottom are reinforcements. |
 |
| An independent Austrian Light Battalion occupies the wood and steep hill in front of the river to try and slow the French advance down. |
 |
| The French have a significant numerical advantage at the start, but need to move swiftly to make this tell. However the wood and steep hill in front of their centre will make this possibly difficult to achieve. |
 |
| The French advance on their right and the Austrian Light Battalion push forward to the edge of the woods to engage them. |
 |
| The other French Brigades move forward, watched by another Austrian Light Battalion in the woods. |
 |
| The Austrian Light Infantry Battalion have fallen back, to avoid coming the grips with the French. Light Cavalry clash to the left of the photo, with the Austrians managing to push the French back. |
 |
| A view from the Austrian left flank. The Austrian Light cavalry brigade has moved out of the town to cover the bridge. Their French counter parts watch, unable to risk a near suicidal charge acorss the bridge in line. A Mexican stand off develops, with both commanders exchanging details of their tailors, invitations to dances, point-to-points etc. |
 |
| An overview on Turn 3. The French are pushing forward in the centre, but the steep hill is lowing their progress. Their Heavy Cavalry has crossed the ford, but is unable to do much without artillery support, which is still limbered up to their rear. The French right flank Infantry Brigade is being held up somewhat by the lack of room to deploy due to the woods and the cavalry. Austrian reinforcements have begun to arrive and advance to cover the ford over the river in the centre of the table. |
 |
| The Austrian Light Infantry harass the advancing French coming over the steep hill with flanking fire. |
 |
| More Austrian troops arrive, this time on the right flank, where they can either reinforce the town, cover the approach of the French heavy cavalry or move towards the centre. They choose to deploy their artillery to cover the French heavy cavalry, whilst the infantry move past towards the town. |
 |
| The Austrian Heavy Cavalry move up on the left flank towards the ford in the centre of the river. |
 |
| Both sides race to reach the ford: who will win? |
 |
| Austrian reinforcements arrive on their right flank. The French Heavy Cavalry face a formidable obstacle in the form of the artillery and infantry lining the town. |
 |
An overview around Turn 5. The French have driven off the Austrian Light Cavalry that were slowing down their right flank, but are still struggling to bring their infantry brigade into the game. In the centre, the French have begun to cross the ford, led by their Guard Infantry. On their left flank, the Infantry Brigade has begun to attack the town as best they can.
Even though the Austrians have been beaten to the central ford, they have a strong position from which they can attack any units that begin to cross. On the steep hill, the Austrian Light Infantry Battalion has moved up to shoot the French artillery battery in the flank. |
 |
| The Austrians are taking casualties in the town, with their artillery battery being particulalry hard hit by counter-battery and musketry fire. The French infantry are taking equally heavy fire, with Austrian Light Infantry (just seen top left) enfilading them. |
 |
| A view from the Austrian right flank in the town. |
 |
| Even though the French Guards have begun to cross the ford, they have Austrian units to both flanks and an artillery battery to their front. It doesn't look good to be honest. |
 |
| The Austrian light infantry enfilade the French battery, forcing them to divert part of their fire. |
 |
| The view from the other Austrian Light Infantry Battalion that are enfilading the French infantry by the bridge. |
 |
Around Turn 6. Things have reached a critical point, with the Austrians close to having to retreat or face the possibilty of routing. Top right can be seen the French Heavy Cavalry that made a Cardiganesque type charge aginst the Russian Austrian guns: it didn't end well. |
 |
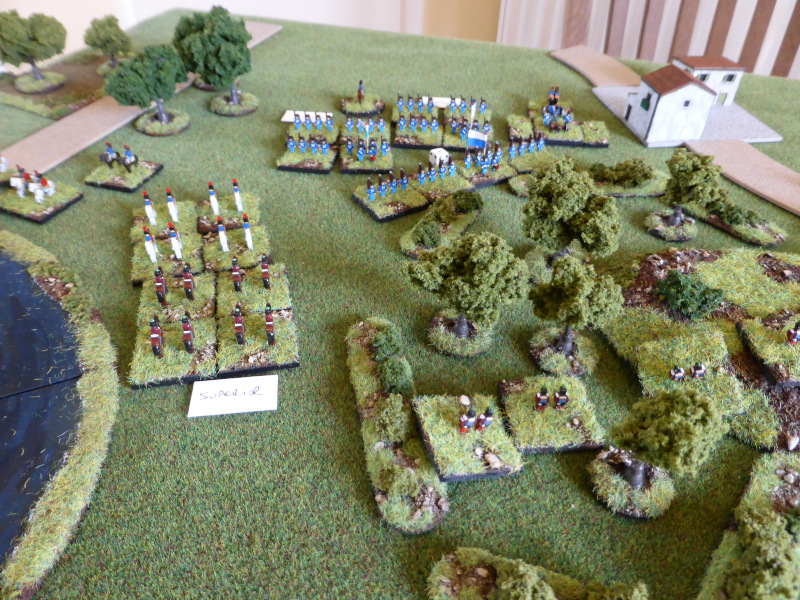
| The French Guards take heavy casualties as they move across the ford and only their Superior status keeps them in with a slight chance of survival. |
 |
Turn 7 and the end of the game. Suddenly the French lost around two units of infantry and one of cavalry, with other units having casualties too. With the Austrians in a strong position, there was little hope of the French having any realistic prospect of victory, so they began to prepare to withdraw. As the French commander was heard to say:
"I was in this Position at the battle of Marengo, I lost the Battle at 2 o'clock, BUT I DIDN'T WIN IT BACK AGAIN AT SEVEN."😉 |
 |
| The Austrians have managed to hold on long enough to tip the battle on their right flank in their favour. |
 |
| The Austrian Light Infantry Battalion are engaged by the French, but too late to alter the course of the battle. Their enfilading fire helped save the town. |
 |
| The Austrians close in on the ford. With their numerical advantage, the French cannot realistically take it. |
 |
| The Austrian artillery battery and infantry that routed the French Guard. |
 |
| Before the French retire, invitations are sent out by both sides for an officers ball in the town. |
Post Game Thoughts
Well that was very, very enjoyable and after so long, great to be to be able to have a good friend round for a game. As always the game was played in the right spirit with plenty of good natured banter flowing to and fro, which is all part of the fun of wargaming. Playing the rules with Keith meant that I learnt quite a bit that I wasn't sure about, plus a few interesting points were raised that might lead to some slight clarifications/amendments to the rules. Anyway, a few thoughts on the game itself:
- The game certainly felt Napoleonic, with all those French columns advancing forward, compared to the recent SYW game we played in. It certainly looked good and had a nice feel to it.
- The rules came back to me very easily which is always a good sign and Keith was able to clarify a few things as we went along. Both of us forgot or either chose not to use skirmishers on front the infantry units.
- The terrain certainly hampered the French, much more so than the Austrians who could pretty much move about freely on their side of the river.
- We both agreed that the French needed some Light Infantry to help them with their advance and especially through the difficult terrain of the woods and the steep hill and to combat the very effective Austrian Light Infantry.
- Having played the scenario, as it stands it is a hard task for the French. Delaying the Austrian arrivals would help, plus giving the French the Light Infantry for the reasons mentioned above. The central ford is beyond the reach of the French, which they need to secure to be able to flank either of the towns to have any chance of unlocking the Austrian defence.
- Hindsight is a wonderful thing, but post game we thought that the French right flank should have had the Infantry Brigade move straight towards the town which was only defended by an Austrian Light Cavalry Brigade. Of course the French commander would not have known what units were there, so it could have been a failed gamble. The other options was to push past the woods to move towards the central ford, but really they needed Light Infantry to help them with this.
- The mdf figures did their sterling job once again and I now want to paint up some more to bulk some of the units up and maybe paint some as a generic third force that can be used as Allies for either side in future games. I just need to check what I actually have before I make my decision.
All-in-all a great days gaming with a good friend. What's not to like? Let's hope that things continue in the same vein. I have no immediate plans for any games as soon I need to go and pick up our daughter from Uni, now that she has finished he final year. So with a full house once again, gaming possibilites are unknown at present.
So until next time, keep healthy and stay safe.