For the third game in our campaign, Dave and I decided that the 'Dawn Attack' scenario fitted the bill. The scenario was played straight from the book, with no house tweaks or anything. The game was played over a week ago and despite some notes, my recollection is a bit vague. However I will do my best to give you a feel of how the game played out.
Deployment
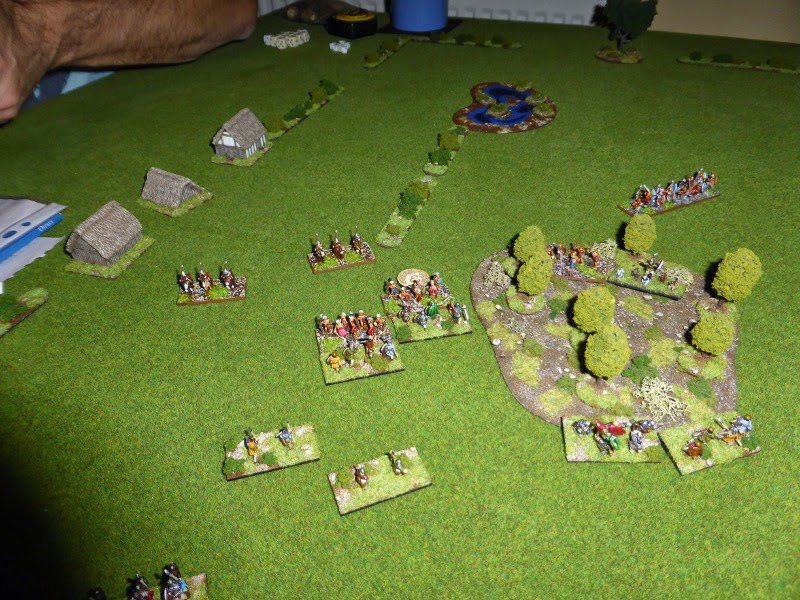
Dave arrayed his forces in his deployment zone, screened somewhat by a marsh and hedge, with a wood in the centre to try and disrupt my troops as much as possible. As per the scenario I moved two of his units (see the end for thoughts on this), choosing his Companions and one unit of cavalry. I 'broke' the cavalry up to try and slow down their formation into a group that would most likely hinder my advance. As Dave only had to hold on for 14 Turns for a win, anything I could do disrupt him would help my cause.
Dave arrayed his forces in his deployment zone, screened somewhat by a marsh and hedge, with a wood in the centre to try and disrupt my troops as much as possible. As per the scenario I moved two of his units (see the end for thoughts on this), choosing his Companions and one unit of cavalry. I 'broke' the cavalry up to try and slow down their formation into a group that would most likely hinder my advance. As Dave only had to hold on for 14 Turns for a win, anything I could do disrupt him would help my cause.
Turn 1 Welsh - 9LPs Irish - 6 (1) LPs
The Welsh advance got off to a classic with:
Steve: "Watch me blunder in the first Turn."
Well suprise, suprise that is exactly what I did! Complete Muppet. It did cause much hilarity but once the laughter died down, the blundered unit advanced forward which was what I wanted to do in the first place. Elswhere the Welsh advanced whilst the Irish tried to form groups.
 |
| Both sides deployed ready for a merry-go-round chase around the central wood. |
 |
| The Irish after I had moved two units. |
 |
| The Blunder... |
 |
| ... and the Muppet that rolled it. |
Turn 2 Welsh - 9 LPs Irish - 6 (2) LPs
General movement by both sides, with the Welsh moving cavalry and skirmish units forward, whilst the Monks just knelt and prayed. The Irish formed up as best they could.
General movement by both sides, with the Welsh moving cavalry and skirmish units forward, whilst the Monks just knelt and prayed. The Irish formed up as best they could.
 |
| The Welsh wheel around the wood whilst the Irish try and form up to get away as quickly as they can. |
Turn 3 Welsh - 9 LPs Irish - 6 (3) LPs
Basically a repeat of Turn 2
Basically a repeat of Turn 2
 |
| The Irish have been able to form up and make good use of the wood to keep away from the Welsh. |
Turn 4 Welsh - 9 LPs Irish - 6 (4) LPs
The Welsh line starts to break up due to failed Bravery rolls, especially with the cavalry stalled in front of a major part of the Welsh battleline. The Irish deploy a screening force by the hedge whilst they try and manouevre round the wood.
The Welsh line starts to break up due to failed Bravery rolls, especially with the cavalry stalled in front of a major part of the Welsh battleline. The Irish deploy a screening force by the hedge whilst they try and manouevre round the wood.
 |
| The battlelines of both sides fragment. |
Turn 5 Welsh - 9 Irish LPs - 6 (5) LPs
The Welsh manage to move enough units into range of the Irish, triggering an uncontrolled charge. This is enough to stall the planned withdrawl of the Irish, allowing the Welsh to bring their advantage in units and Leadership die to bear.
The Welsh manage to move enough units into range of the Irish, triggering an uncontrolled charge. This is enough to stall the planned withdrawl of the Irish, allowing the Welsh to bring their advantage in units and Leadership die to bear.
 |
| Battle is joined at last. |
 |
| The Welsh win, pushing the Irish back. |
Turn 6 Welsh - 9 LPs Irish - 6 LPs
Both sides are irresistibly drawn into the battle, which is what the Welsh wanted.
Both sides are irresistibly drawn into the battle, which is what the Welsh wanted.
 |
| More units move into combat, but a major part of the Welsh warband is stuck behined their cavalry. |
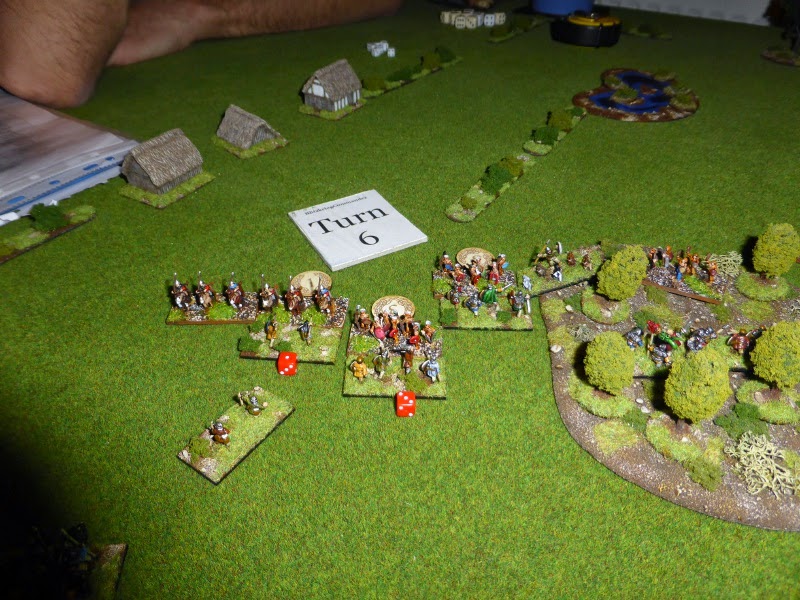 |
| The mixed melee is clearly evident. |
 |
| Units move into the woods but are unable to see each other. The Irish Companions and support start to make a dangerous flanking move... |
Turn 7 Welsh - 9 LPs Irish - 6 LPs
The Welsh cavalry finally manage to charge, but it is still hard to bring units to bear where they are needed. The first losses happen, with the Irish losing 2 units to the Welsh 1, all being skirmish units.
The Welsh cavalry finally manage to charge, but it is still hard to bring units to bear where they are needed. The first losses happen, with the Irish losing 2 units to the Welsh 1, all being skirmish units.
 |
| The Monks have advanced but 3 units of the Welsh left flank simply cannot find a way into the melee. |
 |
| Battle rages in the woods, but the Welsh are able to use their extra Leadership points to their advantage. |
Turn 8 Welsh - 8 LPs Irish - 4 LPs
The loss of 2 units really hurts the Irish cause, as the Welsh now have a 2:1 advantage in Leadership points, allowing them to dominate the combat.
The loss of 2 units really hurts the Irish cause, as the Welsh now have a 2:1 advantage in Leadership points, allowing them to dominate the combat.
 |
| Despite still not being able get 3 units into combat, the Welsh certinaly have the upper hand. |
Turn 9 Welsh - 8 LPs Irish - 4 LPs
The Welsh pressure finally tells as the Irish lose a Warrior and Cavalry unit. This much surely spell the beginning of the end for the Irish...
The Welsh pressure finally tells as the Irish lose a Warrior and Cavalry unit. This much surely spell the beginning of the end for the Irish...
 |
| The Irish are under pressure all across the battle lines. |
Turns 10-11 Welsh - 8 LPs Irish - 2 LPs
The Irish manage to hang on in Turn 10, but in Turn 11 they lose more units, causing them to automatically break.
The Irish manage to hang on in Turn 10, but in Turn 11 they lose more units, causing them to automatically break.
 |
| The Irish under severe pressure on the left of the woods... |
 |
| ... that proves too much in Turn 11, handing the game to the Welsh. |
Post Game Thoughts
As always another entertaining game of Dux Bellorum. So as usual some post-game thoughts:
As always another entertaining game of Dux Bellorum. So as usual some post-game thoughts:
- This was always going to be a hard game for the Irish, but especially off the back of two successive losses and the advantages that that had given the Welsh.
- Dave's tactics were spot on in trying to avoid combat as long as possible. However some failed Bravery rolls put pay to his plans early on, allowing the Welsh to force the Irish into combat.
- We thought that the ability of the Agressor to swap two pairs of units a bit harsh, so we reduced this to just two units. However, this really hampered Dave, so in future games I may ditch this (but see below re: LPs).
- One thing that has really stood out in this mini-campaign is the advantage that having 3 extra LPs has given the Welsh. At the start I didn't think this would be such a game changer. How wrong could I be. Originally I was going to take 'Stampede', but Dave chose this along with 'Wardogs'. This only left my with my unit of 'Monks', so I chose these plus another point of leadership just to see how it played. Well, it really handed the Welsh a massive advantage, which only became obvious having played so many games. This may be due to the fact that we played with 32 points plus 5 points of Strategies & Tactics, just for the fun of having plenty of choices. However this is something to bear in mind for future games.
Post game thought


