Background
A few weeks ago I decided it was high time that my Italians forces had a run out. I fancied something a bit different so after perusing the BKCII rulebook I thought I'd go for a scenario based around the Italian involvement in Operation Barbarossa 1941. Fortunately for me I hadn't long ago finished my 5th Peoples Flying Column for use in the AVBCW, and being a Socialist force these were painted Soviet uniform colours. So Hey Presto! I had an opponent for the Italians.
Some background research into the early Italian involvement came up with the Corpo di Spedizione Italiano in Russia. After some reading of this and other articles, I decided to choose the 3rd Cavalry Division Amedeo Duca d'Aosta as the basis for my battlegroup. This would broadly consist of two Battalions of the 3rd Bersaglieri Regiment, supported by a squadron of the San Giorgio Armoured Battalion. It would seem that the Italian airforce was not involved that much at the start of the campaign so I went with some German support in the form of Stukas.
The Russian forces would be an
adhoc force of mainly infantry supported by some armoured elements; in
short an excuse to use most of my 5th PFC units. However being cut off
they would be devoid of artillery support.
During Operation Barbarossa the
Russians were constantly being cut off by the advancing German Panzer
forces, with the following infantry left with the task of mopping up the remaining
pockets of resistance. Having read plenty of such examples in the superb "War Without Garlands" by Robert Kershaw, I decided to use one of these as the basis of the scenario for the game.
Scenario Details
I based the game upon Scenario 2:Assault with the following 'house rules' to suit the above:
- The Russians began the game dug-in in hastily constructed foxholes. This meant that they were hit on 5+ but had no save. This was to try and simulate the hastily constructed nature of there defensive line.
- Hits stay on. I have tried this in a game before and liked it as it speeded up play.
- Auto-suppression for hits suffered from artillery, air, mortar and infantry gun fire. The latter two I hadn't tried before but wanted to give it a go.
- The Russian units counted as Stubborn, meaning that they deducted one die when rolling for fall-back from supression. This was based upon accounts in the Kershaw book where the Russians fought to the bitter end in many cases.
- The game was extended to 12 turns rather than 8 due to playing down the length of the table. There was no reason for this other than the table looked better layed out this way!
- The objective for the Italians was to gain control of the bridge and for the Russians to simply deny them this crossing point.
So I had accrued plenty of TOIL over the week to have Friday off and as the kids were in school and SWMBO was at work, it seemed the perfect opportunity to get a nice leisurely solo game in. The table was set up and the forces quickly sorted out first thing and then it was onto deployment ready for the off!
Turn 1
The Russian forces deployed in a broad defensive arc around the bridge with a reserve on the other side. The Italians deployed oppossite them using mobile deployment and flank deployment.
The Italian recce unit on the left quickly spotted Russian troops in the orchard on the village outskirts. However the Italian battlegroup was less than keen to get to grips with the Russian foe, with only the CO managing to get any real movement from his units.
The Russians were not unduly alarmed at the arrival of so few enemy units and moved up some armour in response to get better fields of fire.
 |
| An over view of the battlefield and the Russian deployment. |
 |
| Russian troops hastily dug-in in the orchard. |
 |
| The Russian reserve units guarding the bridge. |
 |
| AT gun, infantry and armour covering the centre and left flank. |
 |
| The Italian deployment. |
Turn 2
The Italian advance continued to be somewhat patchy and as a result the Russians were content to sit and watch.
 |
| Overview at the start of Turn 2. |
 |
| The Italians not living up to being a cavalry division. |
Turn 3
Almost a repeat of Turn 2, but with the Italians getting more units onto the table and opening fire on the Russians courtesy of their recce units spotting the dug-in enemy. The Russians once again kept their powder dry.
 |
| The IG suppressed as the result of opportunity fire. |
 |
| The mortar unit that suppressed the IG unit. |
 |
| Finally the Italians start to move. |
Turn 4
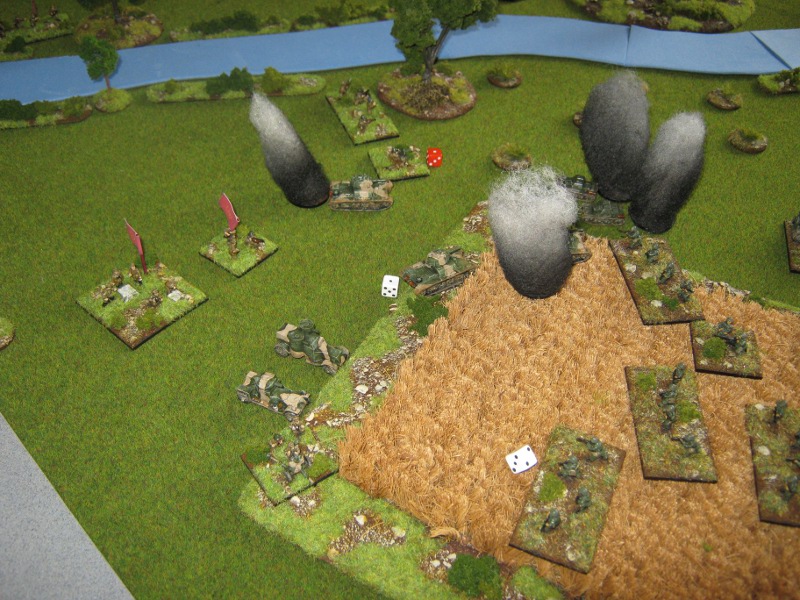
Things start to hot up as the FAC successfully calls in a Stuka strike, which survives the ack-ack fire but loses 50% of its attacks. As a result it decides to concentrate all of its attacks on one T-26 tank, supressing it. The infantry continue to advance, with the centre advancing to the edge of the cornfield. AT gun fire knocks out a T-26 which opens up the way for the L3/35 tankettes to advance.
With the sudden advance of the Italians in the centre, the Russians need to respond, and quickly. Combined fire sees the demise of an infantry unit as well as the IG. The CO moves his armoured units over the bridge to the centre to help counter the Italian threat there.
 |
| Overview at the start of Turn 4. |
 |
| Stuka support arrives. |
 |
| The demise of the T-26. |
 |
| The Russians respond. |
 |
| The Italian advance in all its glory. |
Turn 5
Once again the FAC manages to call in the Stuka, which again survives the ack-ack fire, causing an infantry and tank unit to be supressed. Attacks start to go in against the units in the village. Unfortunately the CO was the only command unit to be successful, moving the L3/35 tankettes to the conrfield.
The Russians got off to a bad start with the HQ in the village blundering, meaning that this turn and the next all HQs would be at -1 to their command roll. The CO although unaffected, was only able to move the T-25s towards the tankettes.
 |
| Overview at the start of Turn 5. |
 |
| The Stukas attack goes in past the burning wreckage ot the T-26. |
 |
| The Italians going nowhere fast. |
 |
| The advance of the L3/35s. |
 |
| The Russian armoured support advances to counter the tankettes. |
Turn 6
The FAC manages to call in the Stuka again but only for the ack-ack fire to see it off this turn. The Russians lose an MG unit to IG fire in the village, whilst in the cornfield both sides echange fire to no effect.
Only the Russian CO manages anything this turn, with the tanks and armoured cars suppressing some infantry units and destroying a tankette.
 |
| Overview at the start of Turn 6. |
 |
| The Italians slowly make headway. |
 |
| Both sides exchange fire to no effect. |
 |
| The Russian fire is more effective... |
 |
| ... supressing the infantry units with AT rifles. |
Turn 7
The FAC is single handedly taken the fight to the Russians it seems, once again calling in the Stuka. Despite heavy ack-ack, it hits and supresses a T-26 tank, the major threat to the Italians in the centre. Attacks continue going in on the infantry in the orchard on the outskirts of the village. The Italian infantry are still painfully slow, which could cost them the battle at this rate.
The Russians have a better turn, with an Italian AT rifle unit destroyed and the other supressed, along with other units hit and supressed as well.
 |
| Overview at the start of Turn 7. |
 |
| The Luftwaffe shows how it should be done (again!). |
 |
| The Italians take lossess in the centre. |
Turn 8
The FAC fails this turn, but the Italian units on the left flank step up to the mark and in a devastating display of combined arms, clear the village of all Russian infantry units. Typically they then fail to captitalise on this as all the other units fail their command rolls!
The Russian somewhat shaken by the sudden loss of their right flank, only manage to destroy another AT rifle unit. However this is leaving the Italians with precious little with which they can fight the Russian armour. The game hangs in the balance still.
 |
| Overview at the start of Turn 8. |
 |
| The Italians somewhat strung out. |
 |
| The village cleared of infantry. |
 |
| The loss of the AT rifle units is keenly felt. |
Turn 9
The Italians have a quiet turn, with the L3/35s finishing off an infantry unit and other fire causing some suppression, and the advance continuing to be patchy.
The Russians have little to fight back with and only manage to destroy on tankette, despite an awful lot of fire being directed at them. The armoured cars retreat to a safe distance from the Italain infantry.
 |
| An overview of Turn 9. |
 |
| The infantry close in on the armoured cars, but fail to assault. |
 |
| The Italians are still scattered across the battlefield. |
 |
| Discretion is the better part of valour. The armoured cars make a tactical withdrawl. |
 |
| A tankette finally succumbs. |
Turn 10
The Stuka arrives again after a rest and true to form flies through the ack-ack to suppress an MG unit. A double 1 on the left flank sees the village completely clear of the enemy as the remaining ATG unit is destroyed. 2 blunders in a row see Italian units advance 1/2 a move towards the enemy (1 unit had the same blunder the previous turn!). The cntre fails again but the CO manages to get an order off to the ATG unti which destroys a T-26.
Things are looking pretty rum for the Russians, who start to make small tactical withdrawls where possible, as they are close to their break point.
 |
| Overview at the start of Turn 10. |
 |
| The Stuka flies through the smke from the burning tanks to press home his attack. |
 |
| The Russian centre under pressure. |
Turn 11
With victory in sight, the Italians put in one last effort and manage to destroy an AT gun, mortar and MG unit. The Russians are now over their breakpoint and fail their command roll at the start of their Turn.
 |
| Overview at the start of Turn 11. |
 |
| The severely weakened centre. |
 |
| The Italians close in for the kill. |
 |
| The village in Italian hands |
 |
| The left flank all but gone. |
 |
| The final view as the Russians collapse. |
Aftermath
Well what I thought would be a quick game turned into one that almost went to the wire. The Russians so very nearly hung on but in the end the Italians were able to combine their fire to cause casualties when it mattered. Totting up the victory points at the end meant the the Italians had been able to gain a Major Victory.
As always it was great to be playing BKCII again, after what seems to have been quite a long time. The 'house rules' worked well I thought and I certainly will be using the newer ones again. So how did the game go overall? Well here are a few thoughts:
- Keeping hits on certainly made the game flow more. If I had stuck with hits come off at the end of the turn, it would have turned into a slugfest which would not have been fun.
- I liked the mortars and infantry guns causing suppression as per artillery. This feels right to me when you read how effective they were on the battlefield. A few more games are required to make sure it doesn't skew game balance too much.
- Two low CV battlegroups can make for a stop-start game, which can get a bit frustrating at times, especially for the attacker. This is certainly true when playing down the length of the table. One suggestion that my good friend Keith Flint made, was to up the CVs of both sides by 1 to try and make the game flow a bit more. After all we want to have fun at the end of the day. Again a few more games with low CV battlegroups would need to be played re: game balance to make sure the feel of each battlegroup was maintained.
So hopefully it won't be too long before I can get another game in, maybe next time a return to the AVBCW milieu.