Wednesday 28 August 2019

Cotswold Wargaming Day - Scenario Dry Run

With the second Cotswold Wargaming Day only a few days away, Dave and I got together to give the Battle of Kurudere from the Crimean War a quick run through. Previously we had played this out with bath tubbed forces and on a 4' x 4' table. For the show we decided to use the standard 6' x 4' board as per the scenario and with full forces for both sides. It was really useful to have the run through to sort a few things out in our minds in advance, which will hopefully make the set up and the day go more smoothly. 

The gaming board I made myself from 6mm and 9mm mdf. I followed the BBB map as closely as possible. I had intended to add quite a bit of detail to the board, but a sudden increase of workload at work put pay to this, but actually I love the Old School simplicity of the look. I've still a little bit of work to do, but not more than a few hours.

Below are some pics from the run through, which I hope you enjoy.


The overall view of the table.

The Russians in and around Kurudere and Poldervan.

The Turks on the Karayal hill.

A view from the Russian lines.

The end of Turn 1 (I think?).

Turkish re-inforcements begin to arrive.

The Turks advance towards the Russians.

Masses of Turkish re-inforcements arrive.

The Russians appear to be threatened on their flanks, but working on interior lines aids their defence.

The action continues on the Karayal.

The Turks struggle to press their attacks in any co-ordinated fashion,

The view from the Turkish side.

The Turks try to split the Russian defence.


Eagle eyed readers will note that we were actually using French and Prussian Napoleonic figures for the game, due to Dave having the forces to hand and the fact that the Crimean War was largely Napoleonic in nature. I also cheekily added in some Minion figures for a bit of fun, with them seeing who would win and possibly become a Gru like leader for them...

Monday 12 August 2019

The Battle for Heimsdorf - a BKCII AAR

With the weather still iffy and a bad back continuing to put pay to any decorating, I was able to have a go at playing a BKC game on a 2' x 2' board, in a mainly built up area, as mentioned in my last post. Luckily I have a 2' x 2' board already for 'The Portable Wargame', so it was simply a case of playing around with some terrain until I was happy with the look and feel of everything. Then it was onto coming up with some forces to play with. 

Given my foray into NWE last game, I decided to stick with this theatre, mainly due to having more buildings for this than Italy, which I was tempted with (think Ortona). With my German infantry painting stalled, it was a case of calling upon my favourite Fallschirmjagers and Stug III's to form the core of the defence. With these soon sorted, it was relatively easy to come up with an opposing British force. The result of my deliberations can be seen below:

Fallschirmjager OOB
1 x CO (CV9)
2 x HQ (CV8)
6 x Fallschirmjager (with Panzerfaust & Panzerschreck upgrades)
2 x MG
2 x Mortar
2 x Pak 36
1 x Pak 38
2 x Stug III 
5 x Gun Pits
6 x Trenches

British OOB
1 x CO (CV9)
3 x HQ (CV8)
1 x FAO (CV8)
12 x Regular Infantry (with PIAT upgrades)
2 x MG
1 x Mortar
1 x Churchill Crocodile
4 x Shermans
3 x 25 pdr Artillery

Scenario 4 - Deliberate Attack
Details as per the rulebook.
Random die roll to see which table edge the British arrive on.
Reserves rule for the British as per CWC & BKCIV.
House rules of hits stay on and units suppressed by unsaved artillery or mortar fire.

I decided to keep the scenario fairly simple, in essence a set piece attack to take the village against dug-in infantry with armoured support. Historically the British would have used an awful lot of artillery in preperation of the attack, but I've found this makes for a bit of a dull game. Therefore I went with an attached FAO just to make things a bit more interesting for both sides. Whether I would regret this decision I would have to wait and see.

My normal house rules were in force, plus I added in the 'Reserves' rule to reflect the British often keeping one or more Company's in reserve, adding them into the battle as required. Having layed the board out, I thought it would be good to randomly roll from which table edge the attack went in from. This way I would not be favouring either side with the terrain I had set up.
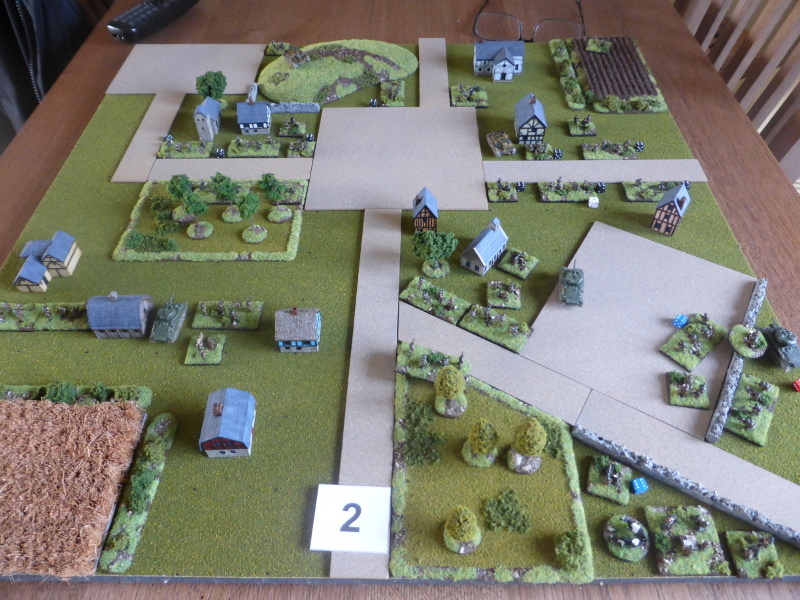
Table Layout
The terrain consisted of a largely BUA, with the exception of:
  • Town squares which were classed as open terrain.
  • A hill as normal with the normal line of sight rules.
  • Parks, which had trees in them and counted as orchards for line of sight.
  • Crops and ploughed fields classed as open terrain.

The table viewed from the British table edge.

The British right flank view.

The British left flank view.

A view from the German positions.

The German left flank.

The German right flank.

The British ready using mobile deployment.
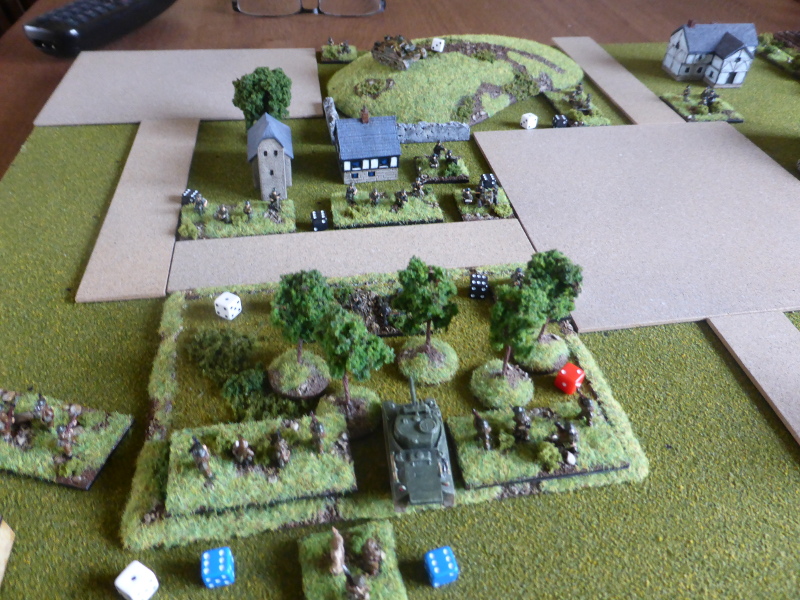

Turn 1
A cautious opening turn for the British, as they advanced slowly into the BUA, avoiding the main road in the centre, which was wise as the germans had deployed a Pak38 to cover it. As the Germans had no targets, they held their positions.


The end of Turn 1.

The British push forward either side of a town square. The Shermans make sure they are not getting ahead of their supporting infantry, to try and keep them safe from Panzershrecks or Panzerfausts.

The left flank reaches the field wall.


Turn 2
As the British advance continued, the Germans caught sight of an infantry unit in the town square and opportunity fired on them, leaving them suppressed. The firefight continued in the German turn, with the suppressed infantry unit finished off, but opportunity fire by the British left a German unit suppressed in their trench. A Sherman fired at a Stug III, missing it, but was itself then suppressed and only just surviving brewing up.


The end of Turn 2.

The British left flank and centre in a firefight with the Germans.

The Stug III joins in the action, shooting at the Sherman.


Turn 3
The FAO now having some targets failed to get through to his artillery. On the right flank and in the centre, combined fire sees the Germans lose and infantry and MG42 unit. On the left flank, they advance to the edge of the park and are immediately engaged by the Germans, but niether side is able to gain any advantage. In the German turn, the Stug III's brew up two Shermans, whilst their Pak 36's and Pak 38 fail to hit anything.


The end of Turn 3.

The left flank in the park come under fire from the dug-in Germans,

The British centre and right flank are making head way but have lost their supporting Shermans.

The brewed up Shermans.


At this point I stopped the game as it just wasn't working as I'd hoped it would. So rather than carry on, I thought I'd take stock of things to see if I could make any changes, tweaks etc to get the game I was hoping for.

Post Game Thoughts
I made some notes as I went along of things that occured to me, which I've put down below in no particular order:
  • As the line of sight is very limited (5cm or 10cm), you are suddenly upon the enemy and then straight into combat, as you cannot spot them until then. Having some Recce units may help with this issue.
  • Due to the above, having an FAO is almost pointless, as to be able to call down fire, he has to be so close as to be caught in his own barrage. Pre-planned artillery therefore makes sense, but not smoke as there is no advantage in it due to the already short lines of sight. Even then artillery is not that effective in wearing the enemy down, unless you take an awful lot of it. I'm currently reading 'The Fighting Wessex Wyverns' by Delaforce and was amazed at how much artillery was used to  help shift a couple of Companies from a French village, sometimes even AGRA shoots. Now this is possible in the game, but I don't know if I'd ever want to use it, as it would possibly make it too one sided.
  • The game by the nature of the terrain and only hitting on 6's by its nature becomes very attritional. Add in saving throws for trenches (5+)  or stone buildings (4+) only adds to this. Now I know that fighting in BUA's was very attritional, but I'm looking at it from making it an entertaining and challenging game, for both sides.
  • SMG armed troops, assault engineers with flamethrowers or flamethrower tanks really aid the attacker, due to the above. 
  • For both sides it is hard to support other units due to the very short lines of sight. This was immediately apparent until the fire fights started. This makes planning an attack or defence quite hard, as it's almost one or two units against each other, with it feeling like who gets lucky on the die roll, rather than good tactics etc.
  • Fighting in BUA's works OK in a normal game where you may have one or two villages, so the footprint is much smaller than this game, which was 2' x 2'. Then you can mutually support, try to get flank attacks in etc. Maybe I was trying to be too ambitious and the rules simply weren't designed for this type of game?
  • Despite all of the above I think you could make it work, by tweaking the line of sight to say 10cm for everything, having more broken or open terrain that was classed as Low Area Terrain, some houses classed as Strongpoints, some Trenches etc. I would have to think on this but it might just be possible. The other option of course is to play this type of game with a different ruleset, one that is maybe more skirmish in style? Afterall I want it to be fun, which this game really wasn't.

So what next? Well I will certainly reflect upon the above, re-read BKCIV for some inspiration and maybe re-visit this at some point in the future. Game wise I feel the need for something different as well as getting back to the painting table, now that the weather is cooler. So until next time...

Saturday 10 August 2019

What a Tanker! - the BKCII variant

After lots of 19thC games of late, which I have greatly enjoyed, I had a hankering for some WWII action. As always BKC is my 'go to' ruleset for this conflict, but I fancied something a little bit different from the norm. After reading an AAR on the Honours of War website, where an all infantry force took on an all cavalry one, it occured to me that an all tank battle might just be the thing.

So I got my little grey cells working and soon came up with a plan for quite a simple game. I did think of using some infantry as part of the scenario, but discounted this as I wanted just AFV's on the table. The broad outline of the scenario and rules can be found below:

NW Europe, August '44. 
The Allies are rushing through Northern France/Belgium on the 'great swan'. They are advancing so fast that they have left their motorized infantry behind, who are mopping up some pockets of local resistance. As they approach a small hamlet by a river crossing, they break out from their column of march and deploy into battle formation, in case it is held by the enemy.

The Germans are rushing any forces they can to try and plug holes in the frontline. Fortunately some much need armour has arrived from the Eastern Front via the railway, and has been sent straight from the train towards the river crossings.

Scenario Encounter Battle - 8 Turns. 
The Objective is to seize and control the bridge crossing.
Use optional Commanders rules from p134 of the BKCII rulebook.
If a command unit is knocked out, another tank in the unit takes over command, but rolls for the CV value straight away:
1-2 CV7
3-4 CV8
5-6 CV 9
Both sides deploy using Mobile Deployment.
The British go first.

The aim of the game was to have fun (as always) and to really see if the game worked well with just armoured forces. So both sides had roughly equal points, based pretty much upon what armour I had available that was painted. I made notes as I went along as it was a solo game, so hopefully the pics and my text will give you an idea of how the game unfolded. So without further ado...


An overview of the table, with the British at the bottom, the Germans the top.

The Shermans have moved off the road just in case there is a nasty '88 lurking up ahead. Note that the yellow die indicate which tanks are the commanders.

The bridge over the river, which is unfordable.

Another bridge, this time scratch builts by yours truly.

The hamlet is nice and quiet at present. It's been quite a while since these Timecast buildings have seen the light of day and i had forgotten how nice they are.

The British arrayed for battle, with the Shermans in the centre and right flank, with armoured cars and light tanks on the left.

The Germans, with 250's on their right flank, Pz IV's in the centre and Stug III's on the left with a Tiget I as their CO.

Turn 1
On the British left, they Honey and armoured cars advanced towards the farmhouse, ready to move off towards the wooden bridge. The Shermans moved out on the right flank and the centre moved up the road to try and rush forward towards the bridge.

The Germans all moved, bar their Tiger I who failed to show. The 250's moved towards the wooden bridge, whilst the PZIV's made for the orchard. The Stug III's advanced, safely hidden from view by the hamlet.


The end of Turn 1.

The British Honey and armoured cars.

The long and not winding road.

The Shermans on the right flank ready to shoot their way into the hamlet if required.

The German advance.

The PzIV's by the orchard.

The Stug III's with their commander in a StuH-42.

Turn 2
As the British right flank advanced, a PzIV opportunity fired at the Shermans, suppressing the command tank. In response, the Firefly returned fire, brewing up the PzIV. Take that Fritz! In the centre, the Shermans advanced and fired down the road. However their shooting was poor (Tiger fear?), but more German opportunity fire from the 250's and PzIV's suppressed the other Firefly and a Sherman.

On the German left, the Stug's moved into the Churchyard and around the hamlet, but were unable to fire and the Shermans in the open. The 250's then Blundered, leading to them leaving the table and out of the game as they had to make a full move backward! The PzIV's moved into the orchard, but were hit by opportunity fire, suppressing some. The Tiger I arrived, but opportunity fire from the Shermans failed to suppress it, but it in return completely missed the Shermans smack bang in the midlle of the road.


The end of the British Turn 2.

The Shermans on the right flank have come under fire.

The Friefly used it's 17 pdr to good effect, but is suppressed.

The amoured cars use the cornfields for some form of cover.

The end of the German Turn 2.

The Shermans on the right flank are somewhat exposed.

The Shermans face the Tiger I in the distance and the PzIV's in the orchard.

The 250's that left the battle and their first outing too.

The Tiger I dominates the road.

The Stug's in the graveyard.

Turn 3
The Shermans on the bridge open fire on the Tiger I, but completely miss it (real Tiger fear!). Other Shermans knock out the PzIV HQ and the replacement HQ in the following phase. In response a Sherman is brewed up and another suppressed. On the left flank the armoured cars move onto the bridge, whilst on the right the HQ tank is knocked out (the new replacement is CV9). The Shermans fire back at the Stug's suppressing them.

The German Turn has little effect, due to suppressed HQ's or failed command rolls.


The end of Turn 3.

The armoured cars in the process of turning the German flank.

Tanks on both sides are burning across the battlefield.

The Stug's suppressed in the churchyard.

Turn 4
The Shermans open up on the Stug's in the churchyard, destroying the HQ StuH-42 and forcing a Stug III back, suppressed. At the bridge, the Shermans and Tiger I exchange fire, leading to the loss of the Tiger I. With so many losses, the Germans wisely decide to withdraw at this point.


The end of Turn 4 and the game.

The Shermans have fire ascendancy.

The Shermans control the bridge as they survey the burning German tanks.

The view from the German side as they prepare to withdraw.


Post Game Thoughts
Well that was fun, fast and furious! It pretty much did everything I was hoping for and reminded me of some childhood games with Airfix and Matchbox tanks and simple rules. As always, a few thoughts on the game:
  • The overall mechanics worked as planned and gave a good game. Certainly for a purely AFV clash they worked well. More games will be needed and some different terrain to mix things up a bit to see if any issues crop up.
  • The very open terrain did give that feel of the open Dutch and Belgian countryside. I'm sure a 'Hell's Highway' scenario would work with the rules as written. It has made my hanker after some Western Desert games which again take me back to childhood battles. Too many other projects on the go at present (as always) but you never know.
  • It was nice to get the Timecast buildings out of their box after so long. They are the right size for this 'smaller' game, but I much prefer Leven Miniatures 6mm buildings for my standard games.
  • The beauty of the BKC family of rules is that you can tweak things here and there or bring in bits from previous editions, with out breaking them as a set of rules. I can see why people don't like them due to the C&C system, but for me they never fail to give an excellent game.
  • If time permits, I would love to play an even smaller action (AVBCW/SCW) using Bolt Action II, but first I need to paint up some infantry etc.  I have plenty of spare figures, it's just a case of finding the time and not being distracted from other projects.

With unseasonable weather at present and SWMBO away for a few days, I might try and get in another game, but this time fighting in a BUA using a 2' x 2' table. I tried something similar last year but, having seen Norm's recent AAR, it has inspired me to have another go. My terrain won't be as bespoke as this, but will be enough, hopefully, to give me a  challenging game. Time to get my thinking cap on...