Having broken through the GHQ Green Line, the FJ II Battalion had to pause and reorganise after the losses sustained in the attack. The Assault Engineers merged with the 1st Kompanie, bringing them up to a strength of two Kompanies with supporting arms. Still a formidable force but one that couldn't afford to take many more casualties as it continued its drive towards Bristol.
Despite the breakthough, the British Area Command didn't panic, having already set in motion re-inforcements in the form of the 5th Battalion the Gloucestershire Regiment, supported by tanks from the 3rd Royal Tank Regiment that had been training new recruits only a day or two before. RAF Fighter Command had re-allocated resources to cover the airspace over Bristol and the South West, in light of the increased air attacks and air support to the German Airborne Forces. Although they had been able to stop German daylight air support, they had failed to prevent a re-supply drop from Ju-52's during the night.
Scenario
The FJ having reformed, have renewed their drive on Bristol. As dawn breaks they are close to the village of Bramley End that lies astride the main road to Bristol. Their objective is to take control of the village to use it as a base as they await the 2nd Kompanie and other re-inforcements that are due soon.
The British know the broad location of the FJ Kompanies due to local intelligence from within the village. As such they have planned a dawn raid from Bristol Blenheim bombers based at Filton airport in Bristol. The 5th Battalion, the Gloucestershire Regiment are moving to the attack from their line-of-march, whilst 'C' Co of the Somerset Light Infantry and the tanks from the 3rd Royal Tank Regiment make a flank attack at the same time.
II Battalion 3rd Fallschirmjager Regiment OOB
1 x CO (CV10)
2 x HQs (CV9)
6 x Fallschirmjager
2 x MGs
3 x 81mm Mortars
1 x Pak35/36 + tow
1 x 75mm IG + tow
5th Battalion Gloucestershire Regiment, 'C' Co Somerset Light Infantry & Elements 3rd Royal Tank Regiment OOB
1 x CO (CV8)
4 x HQ (CV8)
1 x FAO (CV6)
12 x Regular Infantry
2 x MGs
1 x 3" Mortar
1 x 18pdr Field Gun
3 x Vickers MkIV Light Tanks (use Vickers MkIV stats)
3 x Vickers MkII Medium Tanks (use A10 stats)
1 x Bristol Blenheim Bomber
Deployment
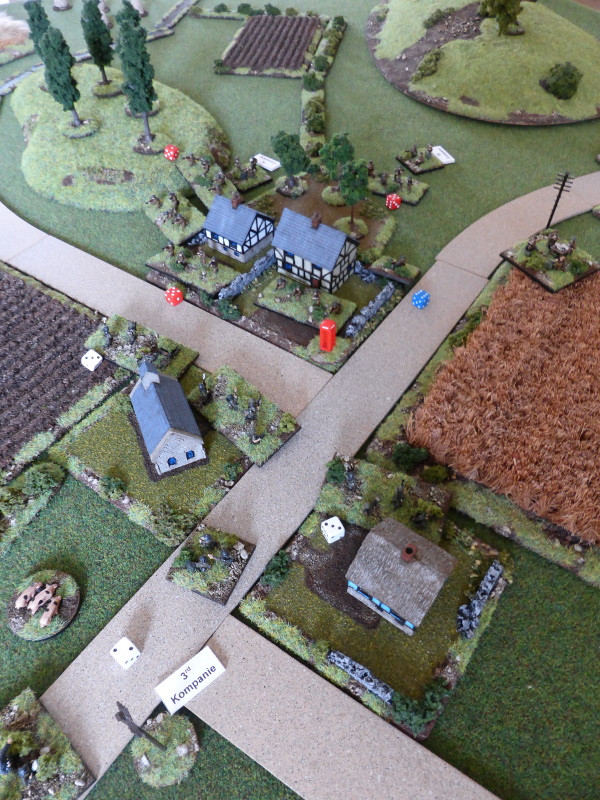
The FJ have formed up for the attack on Bramley End, with Kompanies astride the main road and by a stream coming down from the Mendip Hills. The Gloucesters are on route from bristol and will arrive via the Northern table edge, using Mobile Deployment. The 3rd RTR will arrive via the Western table edge, supported by 'C' Co the Somerset Light Infantry.
 |
| An overview of the table looking North. |
 |
| The 3rd FJ Kompanie on the right flank andscreened from view by a hill. |
 |
| The objective, the sleepy hamlet of Bramley End. |
 |
| Tanks from 3rd RTR and 'C' Co SLI. |
 |
| The 5th Battalion the Gloucestershire Regiment. |
Turn 1
The FJ could hear aircraft in the distance and wrongly assumed it was more support from the Luftwaffe. As they sought cover, a Bristol Blenheim appeared and dropped it's cargo of bombs right on target, with 3rd Kompanie hardest hit, with 3 platoons, 2 MG units, a mortar and HQ suppressed.
With a successful start to the British counter attack, the 5th Battalion GR was somewhat tardy, with only 'B' Co arriving on the main road from Bristol. At least the 3rd RTR and 'C' Co arrived to threaten the FJ left flank, advancing towards the windmill on the hill.
Hearing armour to their left, the 1st FJ Kompanie moved back into a cornfield to try and form a better defensive position, whilst the only platoon not suppressed in the 3rd Kompanie moved forward to get a better view from the hill to its front.
 |
| The Bristol Blenheim arrives... |
 |
| ... and is bang on target. |
 |
| The end of Turn 1. |
 |
| 1st Kompanie withdraws into the cornfield, with the Pak35/36 porteee moving up in support. |
 |
| The Vickers MkIV's lead the advance... |
 |
| ... with the Vickers MkII's in support. |
 |
| 'B' Co arrives, but with no support yet. |
Turn 2
The FAO attached to the 5th Battalion GR called in his 18pdr artillery, hitting the 1st Kompanie, suppressing 2 platoons. 'A' & 'D' Co's of the 5th Battalion arrived and moved forward along with 'B' Co. The 3rd RTR played a blinder, with the MkIV's and MkII's advancing at speed and managed to shoot up some of the 1st Kompanie, leading to one platoon being KO'd, with others suppressed and taking hits. Opportunity fire back hit the MkII's but did not suppress them.
The 1st Kompanie continued with their firefight with the 3rd RTR, knocking out one MkII, but losing the Pak/35/36 Portee to opportunity fire. The CO called in the IG and mortar on the hill to support the 1st Kompanie, leading to the loss of the second MkII tank. Having recovered from the air attack, the 3rd Kompanie managed to advance towards Bramley End, occupying one of the houses.
 |
| The end of Turn 2. |
 |
| The 1st Kompanie firefight with the 3rd RTR. |
 |
| The 3rd Kompanie begin to enter Bramley End. |
 |
| The Vickers MkII's brew up all too easily. |
 |
| 'C' Co SLI move up in support of the tanks. |
 |
| The 5th Battalion advance towards Bramley End, but may not get their before the FJ's. |
Turn 3
As the FAO failed to get through this Turn, the 5th Battalion continued to push forward, with 'B' Co reaching the orchard on the outskirts of Bramley End. 'C' Co SLI failed to move and the Vickers MkIV's only managed to cause some hits on the 1st Kompanie ATR platoon.
With a slight lull on the attack on them, the 1st Kompanie moved back towards the hedgeline across the road to try and form a better defensive postion. As the 3rd Kompanie moved into the churchyard, they attacked one platoon of 'B' Co, forcing it back suppressed, but opportunity fire back from 'D' Co on the hill led to the loss of the supporting MG unit.
 |
| The end of Turn 3. |
 |
| 1st Kompanie have pulled back across the road to the hedgeline. |
 |
| 3rd Kompanie occupy more of Bramely End. |
 |
| 'B' Co comes under fire, with a platoon suppressed. |
 |
| 'A' Co continues to try and advance to support 'B' Co's move into the hamlet of Bramley End. |
Turn 4
The FAO managed to maked contact with his 18 pdrs with the 1st Kompanie once again on the receiving end, leading to the supporting mortar and HG suppressed. 'A' & 'B' Co's moved the houses across from the church as 'D' Co moved down off the hill and towards the cornfield on the outskirts of Bramley End. 'C' Co SLI moved to support the tanks, who failed to move.
1st Kompanie held their positions but there was little else they could do. The 3rd Kompanie attacked 'A' & 'B' Co's across the street, leading to 'B' Co losing a platoon and both Co' having platoons suppressed. Opportunity fire back cause little damage to the 3rd Kompanie.
 |
| The end of Turn 4. |
 |
| 1st Kompanie awaits renewed attacks from the 3rd RTR. |
 |
| 3rd Kompanie get the better of the opening firefight in Bramley End. |
 |
| 'D' Co push towards Bramley End with the aim of flanking the 3rd Kompanies positions. |
Turn 5
Again the FAO brought his 18pdr's to bear on the 1st Kompanie, leading to them losing a platoon as well as the supporting MG and mortar units. 1st Kompanie had now ceased to be an effective fighting force. As 'C' Co SLI moved forward in the orchard, the Vickers MkIV's advanced to the road edge, taking fire from the IG on the hill, leading to one tank suppressed.
'A' & 'B' Co's having made some Initiative Moves and Shooting, then failed to cause any hits on the 3rd Kompanie. 'D' Co continued to advance but rather too slowly to aid the attacks from the other Co's.
3rd Kompanie made the most of their respite, leading to 'A' Co losing a platoon and another becoming suppressed. Opportunity fire back did however at least suppress on platoon in 3rd Kompanie. With 1st Kompanie hors de combat, the CO ordered the IG to once again fire on the tanks, with one MkIV suppressed, but opportunity fire back suppressed the IG.
 |
| The end of Turn 4. |
 |
| The beleagured 1st Kompanie facing off against the Vickers MkIV's. |
 |
| The 5th Battalion Co's close in on the 3rd Kompanie. |
 |
| The action in the centre of Bramley End. |
 |
| 'D' Co's somewhat slow advance. |
End of Game
With the FJ at their Break Point and the 1st Kompanie effectively out of the game, I quickly rolled some die, with the FAO once again hitting the 1st Kompanie hard, leading to its complete loss as well as the IG on the hill. So it was obviously game over that the 3rd Kompanie surrendered to the 5th Battalion troops, thus ending the drive on Bristol.
Post Game Thoughts
With that the campaign had reached its natural conclusion and I had great fun in researching and playing it. The narrative very much drove the next game and it developed a momentum of its own. So with this at an end and the game, time for my usual thoughts etc:
- Despite being outnumbered, the FJ put up a good fight. In the end the 'quantity has its own quality' won out, but for a moment early on I thought the better CV's and AP stats of the FJ might win the day. They are certainly tough cookies to beat.
- However with the FJ being airborne troops with limited support options available to them, when faced with anything approaching regular troops with armour and artillery support, their limitations became very apparent. This game in particular made me think of the issues surrounding Operation Market-Garden or the British Airborne troops trying to hold the left flank on D-Day.
- The initial bomber attack got the British off to a good start, but the follow up support from the FAO really made a difference. Despite a pretty low CV, the amount of attacks called in really hit the 1st Kompanie hard. Without the artillery support the FJ might have been able to make more of a fight to it, given their past performances.
- I now need a break from BKCII, as you can have too much of a good thing. I also need to go away and think about the things that have cropped up in this (and other) games, such Recce, the use of on table smoke, digging-in etc. A break will allow me to look at these with new eyes and re-read BKCIV to see how these are dealt with.
So what next? Well aside from a whole host of partially painted tanks and infantry, I want a complete change of scenery in terms of rules and period. Currently I will be using my wooden blocks to fight a variety of games and really must give the BP ECW rules a run out as I've had them far too long. Some ACW games are on the cards, again with my wooden blocks.
I'm also taking stock of my lead mountain, the rules and periods I enjoy playing as I feel I have spread myself too thinly over the past few years. I want to downsize, which I started before lockdown hit, so I can focus more on what I really enjoy gaming. more on this in another post I'm sure! So until next time...
Superb conclusion in what sounds like a very exciting game and which could have easily have seen the British attack run out of energy had dice rolls differed at critical moments. A replayable action I would have thought.
ReplyDeleteI well understand the sentiment of ‘spreading too thinly’. My interest in both boardgames and figures adds a magnitude to the same problem.
Thanks Norm! Certainly something to replay in the future but, as mentioned, I'm taking a break from WWII for a while. I think the whole Covid-19 situation has made many gamers re-assess what is important to them in terms of rules, periods etc. For me it's going to be a case of less is more, so I can hopefully spend more time gaming. Updates to follow in due course.
DeleteAlways a fabulous set table and interesting narrative. Seems to me that artillery was a deciding factor in this encounter. The FJ were pounded from air and ground by artillery. I am not sure they stood a chance.
ReplyDeleteI have enjoyed your BKC campaign but look forward to seeing what you have in store next. I understand very well the feeling of being spread too thin. I have yet to consider any purge, thus far.
Thanks Jonathan! I always try ot make the table as visually pleasing as possible for feloow Bloggers and of course myself. In this game the air and artillery support was particularly effective. I've played other games when both had barely made a dent on the opposition as it were.
DeleteI'm glad you enjoyed the campaign and going forward, this sort of narrative approach I find works best for me, given I only have to please myself. There is enough detail to make it reasy to decide the next scenario based upon the game just finished, but not too much that it become onerous.
I had thought that with being made redundant, I would have maple time to indulge multiple projects and periods, but being a full time househusband and carer now, I find I have very little spare time in fact. However I am my own boss so can shop, clean, cook and game when I want, so not all bad!
Steve, it is comforting to see that you are adapting to your new role and that it brings tranquility. I worked (yes, past tense) in the aerospace industry until June when I accepted a voluntary layoff offer. With the double whammy of grounding of aircraft due to engineering issues and the pandemic, the commercial aircraft industry has taken a big blow. Now, I wonder how I ever found time to work!
DeleteI hope you are adjusting as well as me to your new role Jonathan. I too wonder how I ever managed to find the time to work!
DeleteWhat a pity such a good-looking game had to be fought solo. At least by blogging it you give us all some vicarious pleasure from it. Particularly glad to see your pigs sporting the correct colour scheme for that theatre of operations!
ReplyDeleteChris
Bloody Big BATTLES!
https://groups.io/g/bloodybigbattles
http://bloodybigbattles.blogspot.com/
https://www.facebook.com/groups/1412549408869331/
I'm glad you enjoyed it Chris. I don't mind solo games (I don't have much option to be honest at present!) but I am missing the banter and bonhomie that FtF gaming brings to the table. Also the general chat before and after a game is all part of its allure IMHO.
DeleteAh, I'm glad you spotted the Gloucester Old Spots and given where I live, they couldn't be any other breed really! Although my favourites are Saddlebacks as that's what my Granfather had when I was a kid.
Great report, really enjoyed the whole theme and it was a good mix of forces. Thank you.
ReplyDeleteI'm glad you enjoyed the campaign Will! Having a variety of troop types was fun to play with too.
DeleteGreat post Steve, the FJ put up a great fight, but as you say quantity won the day, a great campaign and following on from your earlier post, perfect fodder for blogging.
ReplyDeleteBest wishes
Stu
Thanks Stu and really glad you enjoyed the campaign:)
DeleteAn interesting and enjoyable series of games with this campaign. I look forward to reading about your next change of wargaming scenery.
ReplyDeleteThanks Peter and very happy you enjoyed the campaign games. I hope you enjoy my next foray as much!
DeleteThis could be the screenplay for a British wartime propaganda film Steve, the nasty Nazis win three out of four encounters but get dealt to by the lucky Brits in the end! I am glad you managed to save Bristol from the ravages of Nazi tyranny. What is all this sacrilegious talk about getting rid of unused armies and concentrating one two or three periods - are you mad man! I have painted figures in my garage that have literally NEVER been in action - but I would never consider getting rid of them!
ReplyDeleteMaybe if I was more au fait with technology Keith, I could have done a Pathe newsreel style video, or something akin to 'Went the Day Well?' film? I did name the village after that used in the film as an homage to it!
DeleteI know it's sacriligeous talk but some periods I'm no longer interested in, having bought them as retail therapy etc. Also lack of storage space is an issue and SWMBO is very understanding as it is, but I don't want to push my luck!
Late to the party here though I read the earlier AARs a while ago. Looked like a good show. Interesting and plausible combat.
ReplyDeleteEchoing others thoughts a lovely little series of games 👍 who knows one day my campaign might reach Bradley End !
ReplyDeleteThanks Matt and your Sealion stuff is very inspirational. It would be great if you did 'A Went the Day Well?' type scenario or even 'The Eagle Has Landed' one, both of which I think we all aspire to play!
Delete