The final game of my 2' x 2' series was played out this afternoon, using Honours of War as planned, with my Commission Figurines mdf miniatures. I decided to keep things fairly 'vanilla', mainly for my benefit, going with the Austrian stats which over the years I've found give a pretty good balanced game. Both sides rolled randomly for their Brigadiers, with the Ruthenians all being Dependable, but the Prusskians had a bit of a nightmare, with theirs all being Dithering! The objective was quite simply to control the village of Heimsdorf, within 8 Turns. So onto the action.
 |
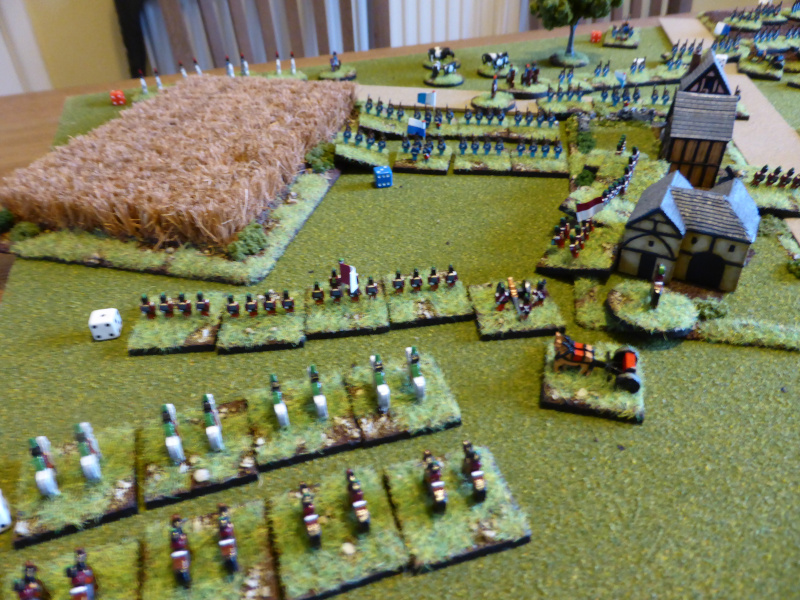
| An overview of the table, with the Ruthenians at the bottom, the Prusskians at the top. |
 |
| The Ruthenian right flank led of by their Light Infantry. |
 |
| The centre all in line due to being close to the village, with their flank covered by the Cavalry. |
 |
| The Prusskain centre and right also in line and covered by Cavalry. |
 |
| The Prusskian left in column for speedy moves early on, led by their Light Infantry. |
 |
| The end of Turn 1. The Prusskian moved first, with their centre and right moving forward, but their left stayed firmly put. The Ruthenian right flank in contrast made a double move and the rest moving steadily forward. |
 |
| The Ruthenian troops advance towards the Prusskian Light Infantry screen. |
 |
| The Ruthenian Light Infantry advance towards the wood, followed by the Line Infantry. |
 |
| The Prusskian Line Infantry close in on the village. |
 |
| The end of Turn 2. The Prusskian Line Infantry in the centre rolled a Poor move so failed to enter the village. Boths sides advanced elsewhere and the flanks became engaged in some light firing. |
 |
| The Prusskian Cavalry take some fire from the Ruthenian Line Infantry by the village. |
 |
| The Prusskian Light Infantry get the upper hand against the Ruthenian Line Infantry. |
 |
| Ruthenian troops move through the wood. |
 |
| The end of Turn 3. Once again the Prusskian centre failed to move (another Poor command roll) and the left flank rolled Poor as well and so could only deploy into line. Their Cavalry charged and took some fire on the way, leaving them shaken, which helped their demise in the ensuing melee, but the Ruthenian Cavalry had to retreat to reform. The Prusskian Light Infantry came off worst in the firing phase, having to retreat too to reform, causing some disruption to the Line Infantry behind them. |
 |
| The Ruthenian right flank take control of the woods and drive off the Prusskian Light Infantry. |
 |
| The Prusskian Light Infantry reform in the rear (red die). |
 |
| The Prusskian Cavalry are KO'd (red die top left). |
 |
| The Ruthenian Cavalry have had to retreat to reform in the rear. |
 |
| The end of Turn 4. A poor Turn for the Prusskians, with the centre and left flank both rolling Poor once again! This really hampered their ability to take the fight to the Ruthenians and to take the village. At least they were able to drive off the Ruthenian Light Infantry from the wood with a whiff of grapeshot. |
 |
| The Ruthenian Light Infantry are forced to retreat to reform. |
 |
| Hits build up on both sides. |
 |
| The Ruthenian Line Infantry begin to occupy the village. |
 |
| The Ruthenian Line Infantry and Artillery dominate their flank at present. |
 |
| The end of Turn 5. Both sides pushed forward and engaged in some effective shooting, with the Prusskians losing a Line Infantry unit and the Ruthenians a Line Infantry unit forced to retreat and reform. |
 |
| The Ruthenian Line Infantry retreat and reform. |
 |
| The Prusskian's lose a Line Infantry unit (red die) and their Artillery has had to retreat and reform. |
 |
| The Prusskians push past the village but take flanking fire on the way. |
 |
| The Ruthenian Cavalry move up to support their Line Infantry. |
 |
| The end of Turn 6. The Ruthenians pushed forward to close with the enemy and once again both sides had some very effective firing. The Ruthenian right flank were pushed back as a Line Infantry unit had to retreat and reform. The same was true on the Prusskain right, but this left them in a very perilous position. |
 |
| The Ruthenian right flank once again see their Line Infantry forced back to reform. |
 |
| At least the Ruthenian Line Infantry has some Prusskian units close to needing to retreat and reform. |
 |
| The Prusskian left flank is not in a good state. |
 |
| Ruthenian troops occupy the village. |
 |
| The Prusskian right flank is close to a complete breakdown. |
 |
| Ruthenian Cavalry ready to exploit the shaken and reforming Line Infantry. |
End of Game
With the Prusskian troops in such a parlous position and state, they wisely quit the field of battle, leaving the Ruthenians to consolidate their positions.
Post Game Thoughts
Well that was great fun and so good to be playing Honours of War again. These really are a superb set of rules and I've yet to have a bad game with them! So some musings on the game as always:
- The rules came back to me straight away despite not having played them for some time. However I did completely forget to check for Brigadier and General casualties early on in the game, so I just carried on without it for the rest of the game. Mea culpa!
- Even though this is part of my 2' x 2' series of games, with the haved movement distances for 10mm figures, this table equated to a 4' x 4' when using normal distances for 28mm figures.
- I reduced the terrain for this game, to reflect the village being smaller some 100 years before the previous game, but also to improve game play. Too much terrain doesn't feel right for the SYW and certainly in Central Europe there are precious few hedges, fences etc compared to say France during WWII.
- The Prusskians were really, really hampered by having all their Brigadiers rated as Dithering, but sometimes that how the dice roll. It makes for an interesting challenge, but a series of Poor command rolls meant that they couldn't advance, which gav ethe Ruthenians the upper hand early on.
- It was fun to get my mdf figures out again and it reminds me that I should paint up some more of them, which applies to most of my projects!
My next game is already thought out and it just remains for me to decide which ruleset to use for it. Something to ponder over the next few days. Hopefully those that enjoy seeing some Old School scenario action will be pleased to see what I put on.
So until next time stay safe and keep healthy!


Steve, your battlefield is very pleasing to the eye. One would be hard-pressed to ID these units as 2D wood from your game photos.
ReplyDeleteI agree with you on HoW. It really is a great set of rules and the relearning curve after a short break is very mild. Armed only with a QRS, I could dive right back into the action.
Good stuff!
Thanks Jon and when on the table, I forget that they are essentially 2D figures. My friend has mixed in 'normal' 6mm figures and when on the table they are is hardly any difference to see. For most of the game the QRS sufficed, with just the odd check of the rulebook, which speaks volumes IMHO.
DeleteA great way to end the series. The Prussians suffer from dilatory commanders - birth and political influence are no substitute for ability. Can't wait to see what you have up your sleeve next.
ReplyDeleteThanks Chris. The Prusskians did have some exceptional shooting on their left flank, but they could not exploit it when they forced the Ruthenians back. If they'd had some dependable Brigadiers then things might have been markedly different.
DeleteOld School sounds good. I have just pulled Programmed Wargaming Scenarios by Grant from the shelf and am determined to use it. As always the table is lovely. I hadn’t realised it was HoW rules and just assumed it was Black Powder, which made me think that at this size, units might be best represented by 3 rather than 4 bases, though 4 does give a very nice linear effect.
ReplyDeleteI keep meaning to give these scenarios a go too Norm, but never get round to it. Playing several games over the same terrain might push mt to actually getting some onto the table, given that you can have a programmed opponent, or both sides if you so wish, both of which offer many possibilities.
DeleteI hadn't thought of 3 bases per unit, which would give a bit more room on the 2' x 2' table, something to consider for sure. 4 bases does give a better Linear look for sure though.
Yet again Steve, another battle fought between beautiful figures, well painted, on lovely terrain. And all on a 2 foot square tabletop. Thanks for the ARR. Well done 👏👏
ReplyDeleteAs your introduction mentions, the crucial difference between the armies was in their command - the Ruthenians being led by dependable (professional, capable) brigadiers whilst the opposing Prusskian commanders were ditherers (indecisive and far-from-competent).
And lo, thus it did follow in the lands of Heimsdorf that the armies of Prusskia did … err, well, dither.
Such a poor start allowed the Ruthenians to press ahead to achieve their objectives and meant the Prusskians were always “on the back foot”.
Perhaps you might want to consider a small force of Ruszjans & Koszaqs just to “add to the mix” for a bit of variety.
Good luck with your forthcoming battle, I look forward to reading about it.
Cheers,
Geoff
Thanks Geoff. The Prusskians put up a good show and if there shooting had been a tad better on their left flank, they might have just swung the battle their way, but 'twas not to be. I am tempted to add a couple of small Allied contigents to both sides for some variety, but as with all things, I need to actual get off my butt and see what's what in the box they are stored in!
DeleteVery enjoyable report Steve. Lovely table and great to see Commission figs getting game time. They looked very good indeed.
ReplyDeleteMany thanks Richard and I really do like my shiny Commission figures. By and large so easy to paint too:).
DeleteAn excellent conclusion to your series of 2x2 games, Steve. The writing was on the wall from the command rolls really, but stranger things have happened...the Prusskians MIGHT have fluked a whole series of perfect activation rolls.....but obviously, they didn't! Hard for them to come back from repeatedly failing to advance etc, the result seemed a likely outcome, given the disparity in commanders!
ReplyDeleteThanks Keith. When I rolled for the Prusskians and they came up all Dithering, I thought this would be an uphill task and so it proved to be. Mind you failing 3 Turns in a row in the centre really put the final nail in the coffin, as they couldn't contest the village. Some people hate this sort of thing but I find it a bit of a laugh and a challenge at the same time.
DeleteThese MDF figures really are the best. They look so good. The chunky wheels on the limbers are especially nice. I think this very small scale enables so much more on a diminutive battlefield I am surprised more wargamers don't use them. Regards.
ReplyDeleteThanks Tony and I'm glad you like them. They've really grown on me over the past year or so:). I think there is a perception that you need a big table to be able to put on a game. With the smaller scales and around 12 - 15 units per side, you can get a very good game in on this sized table or a 2' x 3' one if you want some room on the flanks.
DeleteSo very impressive to be able to run a fairly big battle like this in such a small space - and it does look very attractive too. Mmm; should be doable with some of Peter Dennis's 10mm Paperboys, I think! Must give it a go... Thanks for the inspiration.
ReplyDeleteCheers,
David.
Many thanks David! I hope you do get to give this sort of thing a run out, with Dennis's 'figures' or otherwise.
DeleteGreat looking battle and shows what can be achieved with a limited size 👍
ReplyDeleteThanks Matt and you don't need loads of space to get a good game in.
DeleteNice looking game.
ReplyDeleteGlad you liked it Roger:).
DeleteA very detailed report. Great work as always. Cheers.
ReplyDeleteMany thanks and glad you enjoyed it!
Delete