A post on Norm's excellent Blog got me thinking about whether BKCII could be played on a 2' x 2' table. So I decided to give it a go and, given that I'm currently reading about the Canadians in Normandy, set the scenario as a fictional encounter on D-day +2.
Objective
Broadly speaking the Canadians are still advancing from the bridgehead and have been tasked with seizing control of the village of Buron. A German Fallschirmjager Kampfgruppe is making a reconnaissance in force, with the objective of forming a good defensive position in Buron from where they will be able to launch further attacks.
Canadian OOB
2 x HQ (8)
1 x Recce Daimler unit
9 x Regular Infantry units (3 x PIAT upgrade)
1 x MG unit
3 x Shermans
1 x Sherman Firefly
German OOB
2 x HQ (9)
6 x Fallschirmjager units (2 x Panzerschreck upgrade)
2 x MG units
1 x Stug III
2 x PzVIs
Set Up
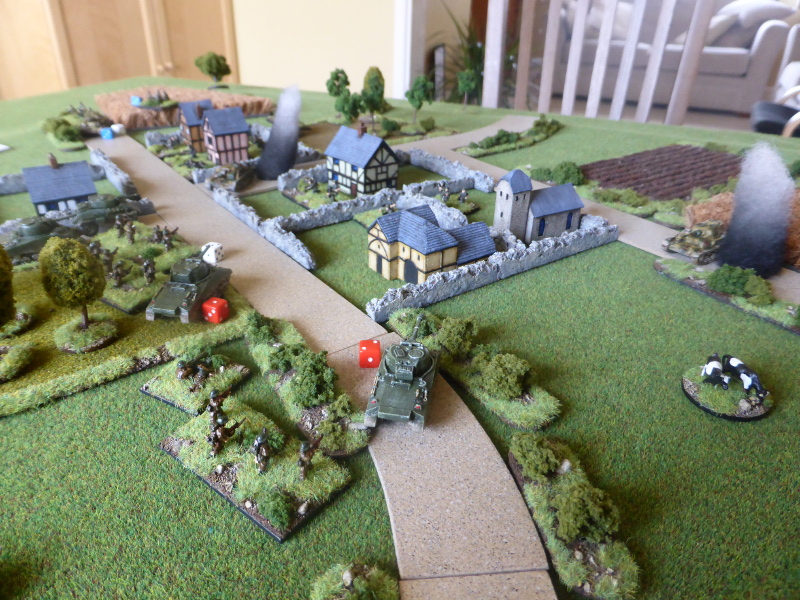
The table was set up with the village in the centre and the important road network coming in from several directions.
 |
| The Germans deployed on the left, the Canadians on the right. |
 |
| The view from the German starting point. |
 |
| The view from the Canadian starting point. |
Turn 1
I randomly rolled to see who went first and it was the Germans. The German right flank advanced well, almost reaching the outskirts of the village, but the left flank failed to arrive. All of the Canadians appeared and cautiously advanced forward.
 |
| An overview at the end of the Turn. |
 |
| A PzIV has taken up a good position, but cannot see the Sherman advancing forward due to the hedgerow. |
 |
| The Stug III controlling the crossroads, but the Canadian armour hasn't quite come into view. |
 |
| The Canadian right flank has pushed carefully forward, not knowing what lies ahead. |
 |
| On the left flank, the supporting armour advances down the road as well as to the left of the village. |
Turn 2
The Germans continue to advance as best they can, whilst both Canadian HQs fail their command rolls.
 |
| The end of Turn 2. |
 |
| The Germans are in a strong position in the village. |
 |
| The German left flank arrives and another PzIV takes up a good position to cover the road. |
Turn 3
With no targets, the Germans advance as best the can. In contrast to the last Turn, the Canadians really take it to the enemy. The right flank gets a Double 1, then a command followed by another Double 1. This the Stug III, a PzIV and some Fallschirmjager units destroyed for just two suppressed tanks. The left flank is not quite so effective, but still destroys an MG unit.
 |
| The action really hots up in turn 3. |
 |
| The sheer weight of Canadian firepower leads to the loss of so many units, including the Stug III. |
 |
| The PzIV and supporting Pak 35/36 cannot make any dents into the Canadian attack. |
 |
| The Canadian right flank from where the main attack came. |
Turn 4
Stunned by the attack, the Germans mount some Initiative moves and firing, but to little effect, with both their HQ units then failing their command rolls. Once again the die Gods favour the Canadian right flank, who once again roll a Double 1 followed by two more successful commands. More Fallschirmjagers are destroyed and an HQ overrun. The right flank advance but can only suppress some German units.
 |
| The Canadians in complete control at the end of Turn 4 |
 |
| The final PzIV brews up. |
 |
| The Canadians have been shot into the village, flanking the Fallschirmjagers. |
 |
| The Fallschirmjagers are very isolated. |
 |
| The dominant Canadian right flank. |
 |
| The left flank ready for the final assault |
Unsurprisingly the Fallschirmjager wisely decided to withdraw, given their losses and that they were out flanked, even though they passed their Break test, leaving the Canadians to occupy Buron.
Post Game Thoughts
Well that was over more quickly than I thought, but was nevertheless and enjoyable game and one that worked well, even though it was played out on a 2' x 2' table. So what did I think of the game?:
- It was certainly fun and one where you very quickly closed to contact, which gave a very different feel to the game. It could certainly work for a Stalingrad or Arnhem type game, which I might try at some point in the future.
- Aside from the Canadian command rolls, the German shooting was poor whereas the Canadians seemed to hit everything. It didn't help that I forgot the extras die that the Fallschirmjager get, but I doubt it would have altered things much. Once the German armour was gone, it was going to be a tough ask for them.
- The sheer amount of firepower that the Canadians were able to bring in Turn 3 really swung the game in their favour. This allowed them to successfully attack the BUAs without having to resort to Close Assault. You can see why flamethrowers would be useful here and I was tempted to take a Wasp Carrier, but thought better of it.
- For once it was nice to be able to use PIAT and Panzerfaust or Panzerschreck upgrades. I honestly can't remember when I actually used them.
- It did feel like a Platoon sized game, rather than a reinforced Company one. Given that I bought Bolt Action II earlier in the year, I really must try and give this a go, as it looks fun and not too complicated.
So what next game wise? I think I've had enough of WWII for now. I'm tempted to have a go at Dragon Rampant just for fun and again can play it quickly and easily on a 2' x 2' table. First I need to knock up some lists so that I'm not constantly referring to the book. So until next time.


Enjoyed reading your battle report
ReplyDeletehttp://www.10mm-wargaming.com/
Take care
Andy
Thanks Andy:)
DeleteLove the 2' x 2' format and the table looks so nice with a lot of variety of terrain in that space. I played a Buron battle with my hexes a few months ago, but the aesthetic of the non-hexed game is much more impressive.
ReplyDeleteYour post inspires me to drag out my new 'poshed up' pinboard and try some 10mm WWII and some 1066 Basic Impetus 2.
Really enjoyable post, thank you.
Glad you enjoyed it and loved the look of the table Norm:). A smaller table does allow you to really pack the scenery in, which is much more important when you are in action almost straight away. Looking forward to seeing your WWII and 1066 games.
DeleteBolt Action II...not BKCII - how very dare you!
ReplyDelete:)
I hang my head in shame;)
Delete