BACKGROUND
FLUFF.
During
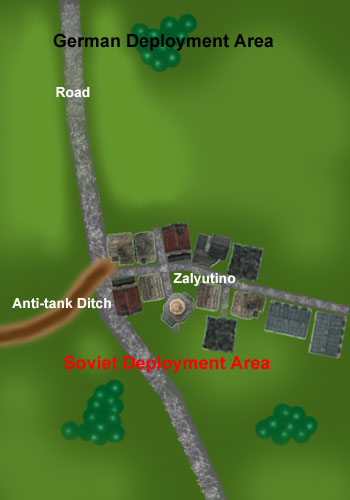
March 11th Das Reich’s Kampfgruppe Harmel advanced from the West and
fought it’s way along the Poltava road to Kharkov. At the suburb of
Zalyutino they were halted by an anti-tank ditch well covered by
Soviet fire. On the night of March 11/12 Harmel sent a detachment of
Pioneers over the ditch and took the Soviet positions on the other
side clearing the way for the ditch to be bridged and the advance to
continue.
SS Das Reich
Kampfgruppe
Harmel:
(SS-Obersturmbannführer Heinz Harmel)
I. and III. Battalions SS-Panzergrenadier Regiment "Deutschland"
III. Battalion SS-Panzergrenadier Regiment "Der Führer"
SS Pioneer Battalion 2
SS Artillery Regiment 2 (less on battery)
SS FlaK Abteilung 2
1 battery of SS Sturmgeschutz Abteilung 2
SS Panzer Regiment 2 (Only a few tanks still running)
1. Kompanie Panzer Abteilung Totenkopf (on loan from SS Totenkopf Division)
SCENARIO DETAILS.
A
brief cold snap has frozen the ground again before the Spring thaw
fully sets in, allowing the SS Das Reich to continue its advance
towards Kharkov. It is imperative that the Division reaches Kharkov
before the advance flounders in a muddy quagmire. Therefore the
objective for Das Reich is to take control of the village as quickly
as possible and advance on towards Kharkov.
Scenario 5:
Breakthrough Attack.
The
scenario details are as per the rulebook with the following special
rules:
- The attack starts at night, with the first 3 turns as night, then 2 turns of dawn, followed by full daylight thereafter.
- Night = -2 CV and visibility to 10cm.
- Dawn = -1 CV and visibility to 50cm.
- Soviet defender only has minimal defences in the form of an anti-tank ditch or minefield.
- Use Hidden deployment as per CWC.
- Use the Random Points modifier from BKCI, also available on the BKC site.
- Use auto-suppression from artillery.
- Use building saves as per page 35 of the rulebook.
- Forces to be taken from the Early Eastern Front lists. The German player to use the Kampfgruppe Harmel list above as a guide.
Deployment.
Once again the passage of time has slightly blurred the actual forces involved, the deployment of said forces etc. So broadly speaking, the Soviets deployed an infantry battalion within the village and some units in the wood on the left flank, with a mobile reserve of a couple of T-34s. The German forces broadly followed Kampfgruppe Harmel as outlined above.
How the game played out.
As per the Operation Barbarossa game in the previous post, the passage of time has erased quite a few of the details of the game. So once again I'm going to have to add a few captions to the pics to give an idea of how the game went.
 |
| The village of Zalyutino looking North. |
 |
| The anit-tank ditch across the Kharkov road. |
 |
| The view of Chekhov's Cherry orchard from the German point of view. |
 |
| The Soviets deploy with the T-34s in reserve. |
 |
| German forces appear on the Soviet left flank. |
 |
| Artillery fire suppresses the Soviet CO. |
 |
| German infantry gun fire suppresses Soviet units. |
 |
| German forces press the centre and right flank. |
 |
| German forces press on all sides. |
 |
| Checkhov's cherry orchard full of German engineers. |
 |
| T-34s on the move to threaten German left flank. |
 |
| German vehicles under threat from Soviet armour. |
 |
| German infantry assault the Soviet right flank. |
 |
| The German assault goes in in the cherry orchard. |
 |
| The assault fails and to great cost for the Germans! |
 |
| German forces press the Soviet centre and right flank. |
 |
| T-34s try to turn the German flank as the Soviet right flank buckles. |
 |
| German forces have turned the Soviet right flank. |
 |
| Soviet forces forced to withdraw under German pressure. |
 |
| German assault guns move to counter Soviet armour threat. |
 |
| German pressure is maintained on the Soviet right flank. |
 |
| T-34s under pressure from sustained German fire. |
Thoughts on the Game.
Once again it was a case of some distinctly poor command and control by the Soviets for much of the game. In the first 5 turns, all of the command units failed their rolls! With such a bad start, combined with a lot units being suppressed by German artillery fire, it was going to be a tough ask to rescue the situation.
In contrast the German forces bided their time and just kept up the pressure on the Soviet right flank until it cracked, thereby allowing them to gain a foot hold in the village. With the flank turned, it was just a matter of time before the village and road to Kharkov was in German hands. I therefore conceded on Turn 10 in the face of overwhelming force.
No comments:
Post a Comment