At the same time as the recent action, Volkstuurm Vorwarts!, was taking place, the main British attack went in with the aim of securing Pemba, the objective of the campaign. Both sides had taken losses in the build up to this, but the British certainly had the numerical and materiel superiority. However the Germans were in Pemba and taking a BUA without artillery or air support would be challenge for sure.
German Kampfgruppe OOB
1 x CO (CV 8)
2 x HQ (CV 8)
1 x FAO (CV 7)
2 x Heer Infantry (one unit with 3 hits)
1 x 81mm Mortar (with 2 hits)
1 x Stug III
1 x 105mm Artillery Support Unit
1 x Nebelwerfer
British OOB
1 x CO (CV 9)
1 x Churchill Crocodile
1 x Churchill SBG
'B' Coy
1 x HQ (CV 8)
2 x Infantry
'B' Sqdn
1 x HQ (CV 8)
2 x Shermans
'C' Coy
1 x HQ (CV 8)
3 x Infantry
'C' Sqdn
1 x HQ (CV 8)
3 x Shermans
1 x Firefly
3rd Recce
1 x HQ (CV 8)
1 x Infantry
1 x 3" Mortar
1 x 6 pdr ATG + Tow
2 x Humber Armoured Cars
Scenario
Quite simply to take Pemba as quickly and with minimal casualties as possible for the British. For the Germans, to hold on as long as possible and to inflict maximum casualties on the British.
Mist -1CV & 50cm Visibilty
 |
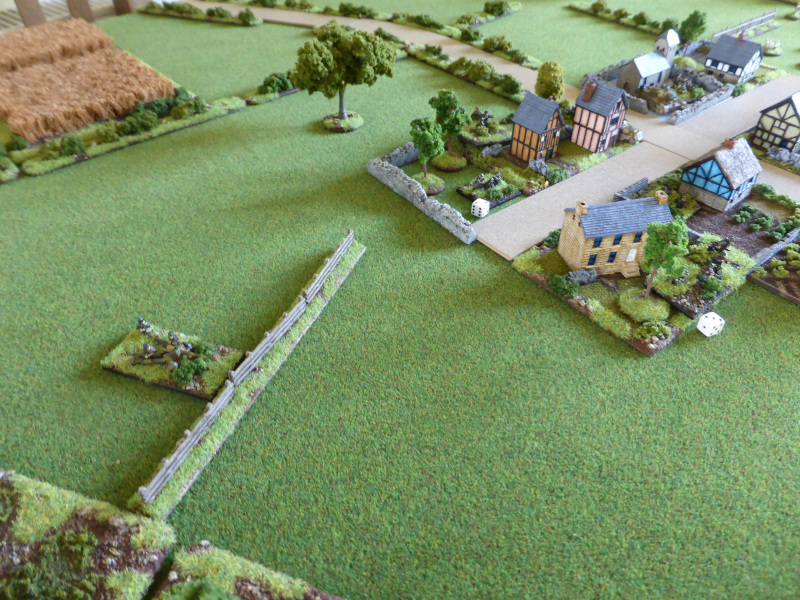
| An overview of the table, with the British entering via the Southern and Easter table edges. The Germans are in Pemba itself. |
 |
| A close up of Pemba, with infantry to the fore and the FAO in the building at the entrance to Pemba, in the attic to gain the best view of the British attack. |
 |
| The second line of defence, with the Stug III and Infantry Gun covering the road. |
 |
| The 105mm artillery piece deployed in a direct fire role (note I had to use a 75mm ATG as my 105mm is not even based. Oh the shame!). |
 |
| 'B' Coy & 'B' Sqdn on the left flank. |
 |
| 'C' Sqdn on the right flank. |
 |
| 'C' Coy on the right flank. |
 |
| 3rd Recce ready to enter to try and quickly unhinge the German defences in Pemba by attacking from the rear. |
The Game
The British plan was to use the left flank to help pin the Germans in Pemba, whilst the right flank formed the main attack, with the 3rd Recce coming in from the rear.
 |
| The end of Turn 1. A poor start for the British attack, with only 'B' Coy moving forward to the next fence line. The rest of the main force simply stayed put. At least the 3rd Recce arrived on the flank. In reply the German FAO called in the Nebelwerfers onto 'B' Sqdn, who got away quite lightly with only one Sherman suppressed. All the other German units remained hidden from view. |
 |
| 'C' Sqdn get a little welcome barrage from the 'Moaning Minnies'. |
 |
| 3rd Recce arrive and push forward to the first hedgerow. |
 |
| The end of Turn 2. 'B' Sqdn moved up to support 'B' Coy, with the latter being hit by mortar fire, called in by the Germans in the house to their front. 'C' Coy and 'C' Sqdn finally moved off, but still not quite as quickly as the CO would like. Luckily for the British the German FAO failed to get through to his Nebelwerfers this turn. |
 |
| 'B' Coy are suppressed by well aimed mortar fire, but at least armoured support has begun to arrive. |
 |
| 'C' Sqdn pushes forward. |
 |
| The end of Turn 3. Their was no movement on the British left flank, as 'B' Coy was suppressed and 'B' Sqdn failed to move. 'C' Sqdn moved forward, aided by the CO, and 'C' Coy moved into the woods with the aim of attacking Pemba from the East. 3rd Recce managed to push forward to another hedgeline and closed in on the German positions in Pemba. At least the much needed Churchill AVRE's arrived. The German FAO got through to his Nebelwerfers, which hit 'B' Coy with devastating effect, KO'ing one infantry unit and suppressing the other, which was then forced to retreat by more well directed mortar fire. The British left flank was now in quite a precarious position, with no real infantry support left and only two tanks in play. |
 |
| 'B' Coy have taken a pasting from the 'Moaning Minnies'. |
 |
| 'C' Sqdn advance as the AVRE's arrive and not a moment too soon. |
 |
| 'C' Coy move through the woods, out of sight of the Germans. |
 |
| 3rd Recce close up with the German positions and have not been spotted yet. |
 |
| The end of Turn 4. With 'B' Coy effectively hors de combat, 'B' Sqdn begun shooting into the houses to try and suppress any defenders (see post game thoughts), but came under fire from the 105mm Artillery. Failing to suppress the Shermans the 105mm Artillery was then KO's by the 'B' Sqdn Shermans. 'C' Sqdn likewise speculatively shot to suppress the leading buildings, whilst 'C' Coy continued to move through the woods. As they did this the Churchill AVRE's roared forward and reached the edge of Pemba. With all the attention fixed to the front, 3rd Recce closed in on the back of the Church and the Stug III located there. Certainly a good Turn for the British. With the German FAO and Infantry units suppressed as a result of the Shermans shooting, there was little that could be done in offensive terms. However the German CO spotted the 3rd Recce Armoured Cars to the rear and ordered the Stug III to about face, but it was suppressed by some accuarte shooting from the Armoured Cars. |
 |
| 'B' Sqdn begin to hose down the houses with MG and 75mm fire. |
 |
| 'C' Sqdn did the same, allowing the Churchill AVRE's to close to within effective range of Pemba. |
 |
| The Churchills prepare for action. |
 |
| 3rd Recce dpeloy for action. |
 |
| The Armoured Cars begin a firefight with the Stug III. |
 |
| 'C' Coy in the woods. |
 |
| The end of Turn 5. The Churchill AVRE's make short work of the German Infantry to their front and also destroy another building. 'B' Sqdn and 'C' Sqdn's fail their command rolls, but at least 'C' Coy moves quickly from the woods and into the outskirts of Pemba. 3rd Recce continues to duel with the Stug III, but neither side gains an advantage. Things were getting serious for the Germans and the FAO managed to call in his Nebelwefers onto 'C' Sqdn, suppressing one Sherman and causing hits on another and the HQ unit. The mortar finished off the last infantry unit in 'B' Coy and the infantry retreat to the next defensive line to try and hold out for as long as possible. The Stug III hit the 3rd Recce Armoured Cars but failed to KO them, but was itself KO'd by Opportunity Fire in return. |
 |
| 'B' Sqdn fail to move or fire. |
 |
| 'C' Sqdn come under fire from the 'Moaning Minnies'. |
 |
| The Churchill AVRE's make short work of the buildings and their defenders in front of them. |
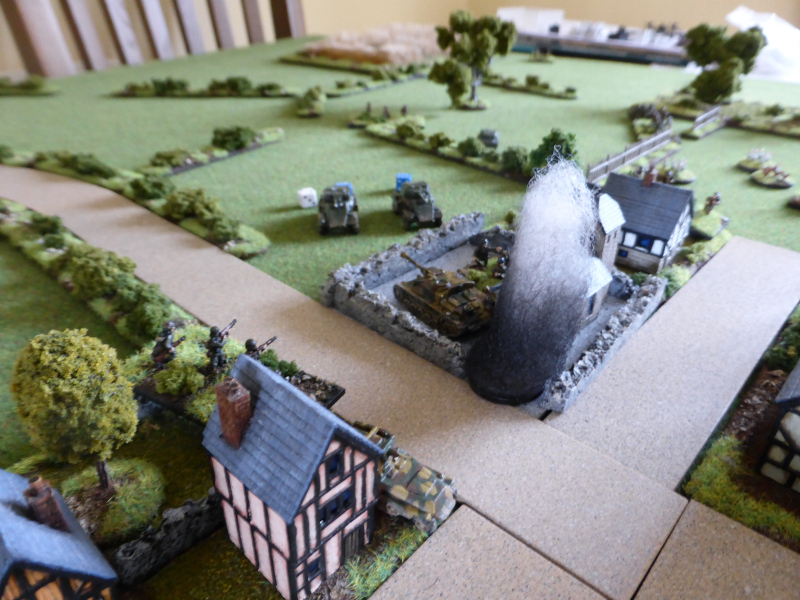 |
| The Stug III brews up. |
 |
| 'C' Coy enters Pemba as the burning buildings cover their advance. |
 |
| The 3rd Recce Armoured Cars happy to survice their encounter with the Stug III. |
 |
| The end of Turn 6. The Churchill AVRE's continue to burn and blow up buildings on the outskirts of Pemba, KO'ing the German FAO as a result. 'B' Sqdn pushed forward and attacked the German mortar in Pemba, as 'C' Sqdn also moved up in support of the AVRE's. 'C' Coy moved further into Pemba, overunning an HQ unit and closing in the German CO. With the situation now completely hopeless, the remaining Germans surrendered. |
 |
| 'B' Sqdn attacks the German mortar that had contributed to the demise of 'B' Coy. |
 |
| 'C' sqdn moves forward. |
 |
| The Churchill AVRE's continue to wreak death and destruction. |
 |
| 'C' Coy begin to occupy Pemba. |
 |
| The German defenders have little option other than to surrender. |
End of Game
In the end, the defeat came about more quickly than expected, with the AVRE's being the real game changer. So victory to the British!
Casualties
British - 2 x Infantry and 1 x Sherman all but done for.
German - 1 x Stug III,1 x Infantry, 1 x 105mm Artillery, 1 x FAO, 1 x HQ and 1 x Mortar all but done for.
Post Game Thoughts
Well that was an interesting game and one in which the British could have taken more casualties than they did, had the German Nebelwerfer been a tad more effective on the die rolls. The game changer was the AVRE's, which were sorely needed in the absence of Artillery or Air Support. Also taking BUA's really requires a lot of infantry, of which the British was somewhat short of, due to campaign losses and the Nebelwerfer and Mortar fire. Anyway, enough waffle and onto some post-game thoughts:
- Nebelwerfers are nasty! There was only one in this game, but with 8D6 and a 30cm diameter template, they can inflict a lot of damage. This can be seen in how quickly 'B' Coy were rendered hors de combat, with supporting mortar fire. Frankly the Shermans got away quite lightly given the amount of dice rolled against them. If the Dice Gods had favoured the Germans more, then it could have been quite a different game.
- Hosing down the houses. Well that's the phrase I came up with to try and replicate the suppressive fire that the British used that I've so often read about, when attacking bocage, woods and BUA's etc, even if they didn't have any view of the enemy. This wokred OK for me in the game and felt right, but others might disagree, as it's not normally something you can do in BKC. My trial required a 6+ to hit, then there was the building save, with any unsaved hits ending in suppression only. A work in progess but something I want to work up for future use.
- The British got off to a slow start, with the Mist -1CV causing trouble once again. The speedy advance by the AVRE's and the flanking attack by the 3rd Recce won the game for them.
- The Germans faced an uphill battle from the start, given that they had som few units with which to play with. Had they not taken so many losses in the previous battle for the bridge, then the British might have had to wait for clear skies to allow for Air Support to help take Pemba. As it was their Nebelwerfers helped keep them in the game with the British losses slowly mounting from early on.
- The British certainly missed having some Artillery Support, whether it be HE or Smoke to cover their advance.
- Taking BUA's is a tough ask. With limited Line of Sight and the terrain favouring the Defender, then you require at least a 3:1 advantage in Infantry, plus a materiel advantage too, such as the AVRE's.
So there we have it, a British victory in the campaign! I will do an update soon of the final map positions, thoughts on what units were left and where, as well as some general thoughts on the campaign.
Until then, stay safe and keep healthy.
Nice one Steve. Lots of lovely toys to play with and a tabletop battlefield crammed with terrain & buildings. Very nice indeed.
ReplyDeleteI like your buildings - home made? They look as if they can doubtless be used for a considerable time-span (i.e./ many historical gaming periods). I find it’s always good to try make things fairly generic, so you can use them in multiple periods. My 2mm nominally Middle Eastern (whitewashed mud brick) buildings not only see use in chariot era Egypt & Syria, but also in the Crusades period, Peninsula War Spain and even Emperor Maximilian’s Mexico.
Regarding the battle I must admit, I had to cheat and skip to the end (just to make sure the Brits won). At one stage the Jerries had the British left flank “hanging on by a thread” but the Brits pressed home their attacks on the right and in the rear. Thankfully all came good in the end.
Would this be time for a “few gongs” or are the troops simply doing “what’s expected” of them?
The nebelwerfers do indeed look to be a rather nasty and unpleasant weapon. As the German FAO wasn’t always able to call down the nebelwerfers then I’m willing to imagine this was the dice gods smiling on the British.
The British speculative fire is a valid tactic (provided you aren’t short of ammunition) and, if any undetected enemy are obliged to “keep their heads down, that’s a positive thing.
I look forward to reading your final summary of the campaign. It’s always useful to learn not only what worked well, but also what didn’t or what needs to be changed.
Cheers,
Geoff
Thanks Geoff. The buildings are from Leven Miniatures and I chose ones that would certainly cover a wide time period, from the 17thC onwards. I did spend a bit more time tarting the table up, which I enjoyed.
DeleteNo problem on skipping to the end, as I've done this on others AAR's too. Some gongs for the chaps? Well we'll have to wait and see on that front.
The Dice Gods chose to be on the side of the righteous in this game, as it could have turned out rather differently if they had withdrawn their favour. The speculative fire works OK and I'm going to check to see if Battlegroup Panzer Grenadier covers this sort of thing, as they have some nice mechanics that port over easily to BKCII.
I hope to have some thoughts up in the next day or so.
"No problem on skipping to the end, as I've done this on others AAR's too."
DeleteWhat? Say it isn't so...
I tend to skim through intially, read the post game thoughts at the end and then re-read it in more detail after that. I find it easier to take it all in that way.
DeleteSorry guys, what I meant to say - similar pattern to Steve - is that I often skip to the end (to see “who wins”) but then go back to do a full read-through. That way, knowing the outcome, I can try to spot the crucial moments, the important decisions, the points where the tide of victory turns in favour of one party.
DeleteOf course, it might just be that I’m being wise after the event, with the benefit to hindsight 😉.
Thanks Steve, an intriguing set up and good read. At one stage I thought that the artillery support imbalance might actually stop the British attacks - historically as well as in the game it seems a reasonable proposition. Conversely, the stand-off HE capability given by the Churchills seems to have been decisive at closer range.
ReplyDeleteI'm glad you enjoyed it. I did worry that the British might simply run out of infantry early on, meaning that they would note be able to take Pemba. Fortunately the suppressing fire kept the German barrages at bay long enough for them to get the win. The Churchills certainly won the battle, as their flamethrower and spigot mortar caused mayhem.
DeleteSteel not flesh, dear chap. Steel not flesh.
DeleteAll seems right for this period. The British were running out of infantry.
Another engaging AAR. And the right result.
Thanks Chris and the 'steel not flesh' is always worth remembering when playing the British, with their limited pool of reserves. Nice to see a British win of course, but it could have gone the other way several times during the campaign, more of which in another post.
DeleteSteve, another fine visual display and another interesting battle. Even though the British seemed to get off to a slow start, fortune really did not seem to favor the Germans in this clash. Hard to believe the StuG could not handle the two ACs. After seeing the casualty list, there were not many Germans left to surrender, I think. Did the StuG get left off of the casualty list?
ReplyDeleteThanks Jon. The Germans didn't get the rub of the green and I thought that the Stug III would have at least KO'd one of the Armoured Cars. I did forget to add the Stug III to the casualty list! I will amend it now.
DeleteAnother great looking and reading game report Steve and a good result too! Lucky that the Germans did not knock out one or bothe of the Churchills, or it might have been a hard ask. I think in 20th and 21st century games, suppressive or reconnaissance by fire etc ie randomly bombarding places the enemy MIGHT be, is perfectly realistic and legitimate and rule sets that insist you can't fire at woods or a building unless you have spotted occupants are inaccurate.
ReplyDeleteThanks Keith and natrually good to see the Brits come out on top at the end. If the AVRE's had been knocked out, I doubt Pemba would have been taken without a hard fight, given that the Brits had so few infantry left to in for some house-to-house clearances.
DeleteIn the rules you can pre-plan some artillery and air missions, but not speculatively in the game. This might have been tweaked in BKCIV, but I don't think so. So one advantage of solo games is that you can try things like my 'house hosing' rule to see how it works. Not a bad start but probably needs some refinement.
That's a great looking game and an absorbing report. Thanks for sharing Steve.
ReplyDeleteYou're very welcome Richard and I'm glad you enjoyed it.
Delete