This scenario has been on the cards for a week or two, but was delayed by my playtesting of the Pike & Shotte rules of late. With these parked for a while, it was time to get this onto the table. Dave once again volunteered to give some basic orders for the Blue team as can be seen below, whilst I took command of the Red team. Due to the nature of the scenario, only broad guidlines could be given by Dave, but they were more than enough for me to try and follow.
As before, the units for both sides were taken from Neil Thomas' Wargaming 19thC Europe, on the basis of the die rolled. As the Red player, I could select my units for the Turn they were due to arrive on, but not know where on the table they would appear. So a nice fog-of-war for both sides.
Below can be seen the map and info I gave to Dave, with my troops already selected and the Turns upon which they would appear. So in advance I would not know his plans. Hopefully the following will give you an idea of the scenario and how the game played.
Scenario Details
The Blue force
has managed to seize an unguarded bridge over a river and is trying to
reinforce the position before the Red force can arrive. The river is
unfordable and so can only be crossed by the bridge. The terrain is
broadly open, with a few fields, a wood by the bridge and a hill in the
distance.
Blue OOB
4 x Infantry
2 x Jaegers (Independent)
2 x Dragoons
2 x Artillery
The
Blue force has two units across the bridge to the North of the river,
deployed in the hatched area. You can deploy them anywhere in this area.
You can select the two units from your OOB above. Your reinforcements will arrive via point D as marked on the map. They will arrive as follows (as chosen by Dave):
Deployed - 1 x Jaegers, 1 x Line Infantry
Turn 2 - 1 x Jaegers, 1 x Line Infantry
Turn 3 - 1 x Dragoons, 1 x Line Infantry
Turn 4 - 1 x Artillery, 1 x Line Infantry
Turn 5 - T1 x Artillery, 1 x Dragoons
You
know the Red force will be sending units to re-take control of the
bridge and they are likely to arrive via points A, B & C as marked
on the map. When and in what strength you do not know.
Objective
To have no enemy units within 12" North of the bridge by the end of Turn 10. The Red force will go first in Turn 1. After that the usual rules for Initiative etc in HoW will apply.
 |
| The map sent to Dave. |
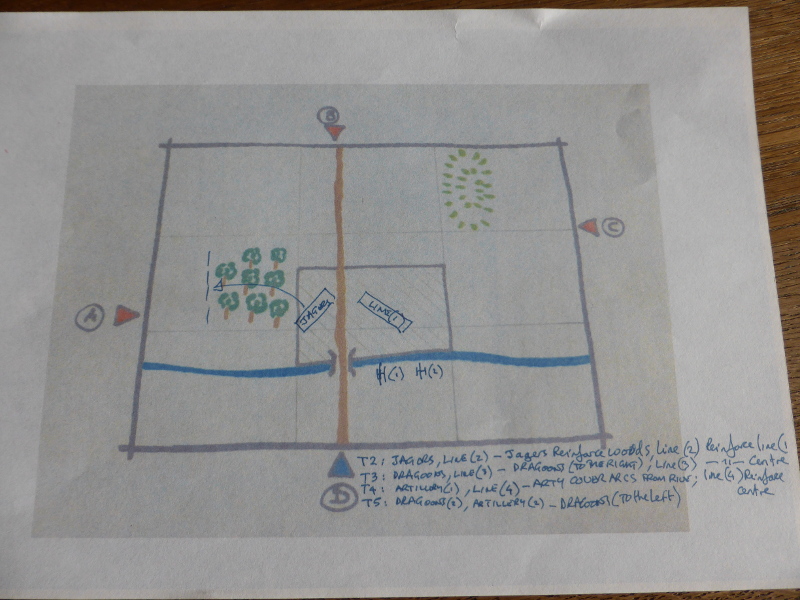 |
| The map sent back by Dave with his orders on it. |
Red OOB
6 x Line Infantry
1 x Jaegers,
1 x Dragoons
2 x Artillery
The troops will arrive on the Turns as listed below and will roll a die to see whether they arrive at Point A, B or C.
Turn 1 - 1 x Jaegers, 1 x Line Infantry, 1 x Artillery
Turn 3 - 2 x Line Infantry, 1 x Artillery
Turn 5 - 1 x Line Infantry, 1 x Dragoons (roll for these two units as one force)
2 x Line Infantry (roll for these two units as one force)
Deployment
I set out the table as per the map, adding some fields purely for decoration and they would have no effect upon movement or shooting.
 |
| The Blue Jaegers on the left, the Line Infantry on the right as per their orders. |
 |
| Both sides re-inforcements ready to appear. |
 |
| Turn 1. The first Red units appeared at Point C, moving on slowly and unable to shoot due to being too far away. The Blue Infantry turned and moved forward slightly to meet the threat, whilst the Jaegers moved into the woods as per their orders. |
 |
| Turn 2. The Red units had a 'Poor' command roll and could not move forward, so chose to deploy into line. The Blue re-inforcements had an 'Admirable' command roll and with the distance from the enemy and being in march column, where able to move swiftly across the bridge. The Line Infantry moved to the right, the Jaegers to the left. |
 |
| Turn 3. Blue received more re-inforcements who again moved quickly forward and across the bridge, with the Dragoons in the lead. The other units moved out to the flanks where possible. Red re-inforcements arrived at Point A and with only a steady move, stayed in march column. At Point C, the Red units deployed into Line, but the Artillery remained limbered. |
 |
| The Blue Infantry try to form a cohesive defensive line before the Red Infantry can fire at them. |
 |
| The Blue Jaegers try to gain the woods, from where they will hopefully have a good defensive position from which to slow or halt the Red advance. |
 | ||
| Turn 4. With threats from both flanks, the Blue forces deployed to try and meet each threat with equal force. The Jaegers moved into the woods and to the edge, whilst the newly arrived Artillery chose to move to the left flank rather than the centre as ordered, to meet the clear and present danger. The Dragoons pushed forward and slightly to the right, hoping to be able to put pressure on or turn the Red flank. The Infantry formed into line on the right flank as re-inforcements moved up to support either flank as required. Red's units at Points A and C both moved forward slightly, deploying into line and unlimbering their artillery. The shooting from both sides caused a few hits, but movement, range and cover meant that not much damage was done. |
 |
| The Blue Artillery supports the Jaegers in the woods against the Red units at Point A. Other Line Infantry units corss the bridge to support either flank. |
 |
| The Red units at Point A come off slightly worse in the firefight with the Blue Jaegers, supported by Artillery from across the river. |
 |
| As the Blue Dragoons move off to threaten the Red flank at Point C, the Blue Line Infantry have formed line, ready to face the Red units, but without Artillery support. |
 |
| Turn 5. As the final Blue re-inforcements arrived, the last Red re-inforcements arrived a Points A and C. Both sides moved to support their existing lines as quickly as possible, with both Blue flanks coming under pressure by numerically superior Red forces. Again the shooting was sporadic and with minimal effect, until the Blue Jaegers in the wood, with Artillery support from across the river, routed one Red Line infantry unit and caused 3 hits on another. |
 |
| The Blue Jaegers have certainly gained fire supremacy against the Red units at Point A. the Red units are struggling to bring their numbers to bear due to the restricted nature of the area in which they can deploy. |
 |
| The Red units at Point C have a numerical advantage, but as yet cannot bring it to bear against the Blue units. Both sides are however taking hits. The Blue Dragoons have moved to the edge of the hill, with the aim to move to pressure the Red flank and preventing them moving all their forces against the Blue right flank. |
 |
| The Blue Artillery in position to begin supporting both flanks with long range fire and hopefully enfilading the enemy if the opportunity allows. |
 |
| Turn 6. Some 'Poor' command rolls hampered both sides, but especially the Red units at Point C and the Blue Dragoons by the hill. Elsewhere both sides moved as best they could to dress ranks, support or plug gaps as required. A few more hits where spread across the table until the Blue Jaegers once again, with Artillery support, routed another Red Line infantry unit at Point A and put another on three hits! |
 |
| Yet more devastating fire from the Blue Jaegers. |
 |
| Both sides struggling to get units into place to support their frontlines. |
 |
| The Blue Dragoons (bottom left) fail to move when the Red flank is there for taking. |
 |
| As the Red Dragoons move to try and open up the situation for the units at Point A, Blue Dragoons are ready to stop them explointing an opportunities. |
 |
| Turn 7. As with the previous Turn, both side struggled to move their troops as they would have wished. The Blue Jaegers again routed another Red Line Infantry unit, leaving little threat from this point as there was only an Artillery unit left there. However on the Blue right flank, the Red units at Point C gained the upper hand, with one Blue Line Infantry unit forced back with 4 hits, having narrowly avoided routing. So with both sides having an advantage on either Blue flank, the game was nicely poised and hard to tell which was it might go. |
 |
| The Blue Jaegers break yet another Red Line Infantry unit, leaving the Red Artillery exposed and really unable to much to support the rest of the Red Force. |
 |
| The Red units at Point C have finally been able to bring their numbers to bear in a meaningful way, forcing a Red Line Infantry unit back to reform and another on three hits. Yet again the Blue Dragoons had a 'Poor' command roll and so were unable to move on the exposed Red flank. |
 |
| The view from the Red positions around Point C. |
 |
| Turn 8. With any real threat gone from Point A, the Blue Jaegers moved back into the woods and towards the road to support the threat to the Blue right flank. Shooting from both sides forced two Blue Line Infantry units back to reform and one Red Line Infantry unit. The Red Jaegers routed having come under fire from the front and artillery fire from the flank. Both sides are bloodied, but the Blue Force is in a slightly better position, still holding on and working on interior lines. |
 |
| The Blue Jaegers withdraw as the Artillery exchanges some long range counter battery fire. |
 |
| The Blue Dragoons move from the hill to support the other Blue Dragoons by the road, to prevent any chance of the Red Dragoons breaking into the Blue rear. |
 |
| Two Blue Line Infantry units have been forced back to reform, but they are still able to form a cohesive defensive line. |
 |
| The Red units at Point C are is some disorder, with one unit forced back to reform and the loss of the Jaegers reducing their combat effectiveness. |
 |
| The Blue Artillery in position to enfilade any Red attacks. |
End of Game
With only two Turns left, the Red force was in a very weakened state and unlikely to be able to contest the objective. Just to be sure I quickly played a Turn with the only Red Line Infantry units that could make a difference and as they advanced forward, another unit was routed and so removed any chance of a Red victory. The Red force had lost 4 x Line Infantry units and 1 x Jaeger unit, whilst the Blue force had lost none. So in the end a convincing Blue win!
Post Game Thoughts
Well that proved to be a cracking game and one which I really enjoyed! It was great to be playing Honours of War again and they are a superb set of rules and the only ones I use to game the Seven Years War. Plenty to reflect upon in the game etc so without further ado and in no particular order:
- The Blue Jaegers were certainly the stars of the game, pretty much single handedly winning the game, with able support from the Blue Artillery. Routing three Line infantry units in quick succession meant that any threat from the Red units at Point A quickly evaporated.
- I was unsure how the scenario would play, but it worked much better than I could have hoped. The random nature of the troops choices before the game, what Turn they would arrive and where certainly created an interesting and challenging game. The Red team was hampered with the units arriving at Point A, as the woods and compact deployment areas meant they couldn't bring their numbers to bear. Not having any units arriving at Point B allowed the Blue team to focus on the main threat to their Right Flank, which certainly helped them. The scenario certainly has lots of replayability to it and is one i think I will come back to in the future.
- Both sides were using the Austrian stats from the book to keep things simple. One could easily have used the Prussians for the Blue team as their better stats would give them an edge, but as it was the game worked perfectly well with 'vanilla' forces. I gave the Jaegers rifles and the Artillery was classed as Medium, with the Lin Infantry having Battalion guns.
- When I set the game up I was unsure whether to put in a few hedges to help the Blue position, but in the end left them out. I think if they had been there, it would have given the Blue team too much of an advantage early on.
- Both sides had their fair share of chances and good and bad command rolls, but as can be seen from above, the Blue Jaegers actions tipped the game firmly in favour of the Blue team. Without their sterling effort, I think the game would have been much closer and certainly a lot tougher for the Blue team. Even so if those units in Turns 7 & 8 had routed rather than retreated to reform, then we could be looking at a Red victory.
- The 10 Turns for the game was just right, as I felt 8 would not be enough, given the slower movement rates and ranges when using the 10mm stats from the rulebook.
- I was fairly flexible with the C&C of units, given the unusual arrival and deployment nature for both sides. A bit of common sense was applied and for me it worked out OK. If I had played 'as per the rules' then I don't think the scenario would have worked out as well as it did.
Once again thanks to Dave for taking the time and the effort to give me the Blue orders to follow, which gave me a more enjoyable game, as I could obviously not know what he had planned in advance. This is probably the easiest and best way to give fog-of-war to these sort of solo games. I hope to get another of these games in next week, again using Honours of War, subject to the usual caveats.
That was a close fight, well done Jagers who clearly ensured victory. Both regiments will have the Cross of Cabbage bestowed on them in honour of this famous victory ;-)
ReplyDeleteThanks Dave:). The cabbage has been harvested and ready to be made into crosses.
DeleteNice action, the unit (block) frontages are working very well with that space and number of units to give a good SYW look. Were you using 6mm or 10mm measurements?
ReplyDeleteThanks Norm:). The 80mm total frontage has worked best I've found for HoW, certainly on the smaller tables I use. I was using the 10mm measurements, which again gives time and space for some manouevre in a game.
DeleteLooked a very interesting game.
ReplyDeleteThanks Ray:)
DeleteAnother great report on what was definitely an exciting game Steve - if the Blue jaegers were the heroes, the villains were those tardy dragons, who failed to exploit the open Red flank!
ReplyDeleteThanks Keith:). The tardy Dragoons certainly failed to make the most of their opportunity, which was incredibly frustrating in the game!
DeleteSteve I really like the blocks- it gives the table a nice "kriegspeil" appearance! A Lovely looking game!
ReplyDeleteThankyou! The whole 'kreigspiel' aesthetic really appeals to me and I enjoy getting them onto the table for a game:).
Delete