This scenario, the first of the campaign, has been ready to go for sometime now, but a combination of decorating and 'real life' over the past few weeks has meant that it was only a couple of days ago that I was finally able to get the game onto the table and played out. I could have played it earlier but it would all have felt a bit rushed, which I certainly didn't want. So without further ado some background info and then the AAR itself.
German OOB - 1st Kompanie, 3rd Battalion, FJR 6
1 x HQ
3 x Fallschirmjager (1 x Panzerfaust upgrade)
1 x MG
1 x 81mm Mortar
1 x Pak 35/36 (with stielgranate 41, count as Panzershreck)
British OOB - 'C' Coy 7th Battalion SLI & 'C' Sqdn' Sherwood Rangers
1 x CO
2 x HQ
3 x Infantry Veterans (1 x PIAT upgrade)
1 x MG
3 x Shermans
1 x Firefly
1 x Churchill Crocodile
1 x Churchill AVRE
1 x 25 pdr Battery (1 x scheduled strike)
British OOB - 'C' Sqdn 43 Recce Regt
1 x HQ
2 x Humber 37mm
2 x Infantry
1 x 3" Mortar
1 x 6 pdr ATG + tow
Weather
Mist - 1CV & 50cm Visibility
Dusk - 1CV & 25cm Visibility
Night - 2CV & 10cm Visibility
Scenario Turns (8 max)
1 - 3 Mist
4 Dusk
5+ Night
Objective
British - To seize Tremleurr and cover the bridges to the East.
Germans - To delay the British for as long as possible and minimise casualties.
Set Up
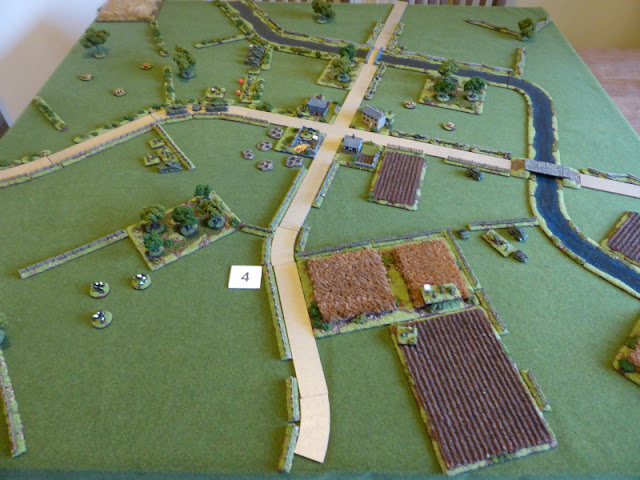
Taking the info from the Warplan 5/5 maps and terrain details, it was pretty easy to set things up, which makes things a lot easier for me. Most of the terrain was fairly open grazing land, with hedges and fences, except for the South Eastern area that was more arable and cultivated land. The river was deep and so could only be crossed via the two bridges.
 |
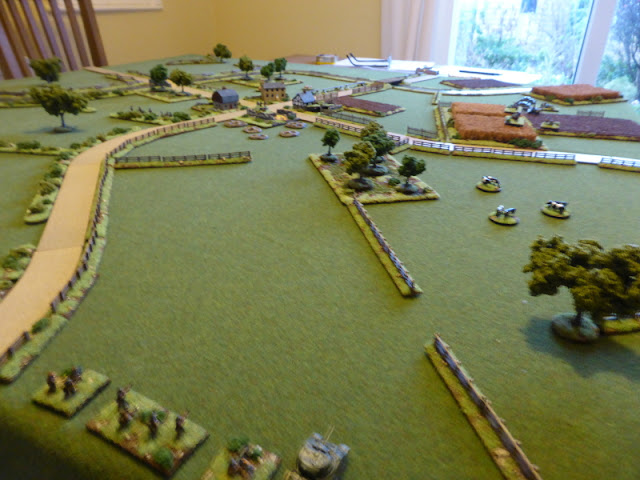
| An over view of the table, with Tremleurr in the centre, occupied by the Fallschirmjager. 'C' Sqdn 43rd Recce Regt deployed to the South of Tremleurr, with 'C' Coy 7th SLI and 'C' Sqdn Sherwood Rangers entering from the western table edge. |
 |
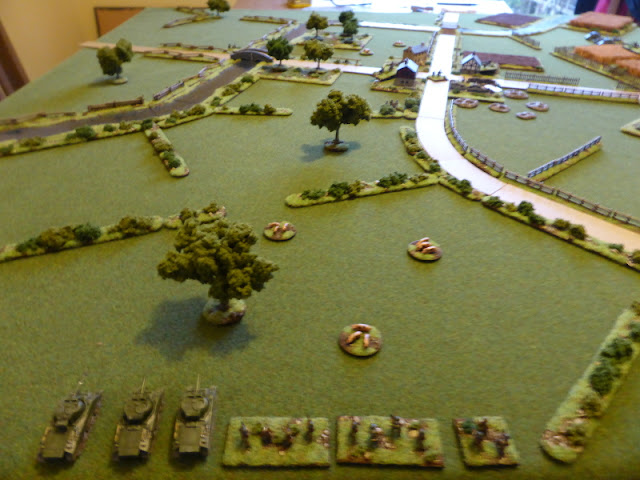
| The view from the 3rd Recce Sqdn, with their aim being to pin the Fallschirmjager in position and to swing past Tremleurr with their armoured cars to cut off their retreat if this became a viable option. |
 |
| One platoon and troop of Shermans were to advance along the right of the road with... |
 |
| ... with the CO and the AVRE's advancing along the road and... |
 |
| ... the rest of the force to swing left to try and attack Tremleurr from the rear. |
 |
| The Fallschirmjager in all position, covering both approaches towards Tremleurr. |
The Attack
 |
| The end of Turn 1 (-1 CV & 50cm visibility). The 3rd Recce Sqdn moved off to the attack, spotting the Fallschirmjager in the house on the SE edge of Tremleurr. The armoured cars moved to provide fire support and to attack the flank, leading to the FJ becoming suppressed. Only the infantry and Shermans to the left of the road managed to arrive through the mist, carefully advancing as they went. The Fallschirmjager spotting the Shermans opened up with their Pak 35/36, but failed to do much damage and were suppressed by return fire from the tanks. |
 |
| 3rd Recce Sqdn move to the attack. |
 |
| An armoured car manages to move to the flank and cover the road into Tremleurr. |
 |
| Only part of the British force arrives from the West. |
 |
| The Pak 35/36 (bottom) engages the Shermans but takes fire in return. |
 |
| The end of Turn 2 (-1 CV & 50cm visibility). The British open up with their scheduled artillery strike on the SW edge of Tremleurr, which manages to suppress the Fallshirmjager unit in the ruined building there. The 3rd Recce Sqdn use Initiative Fire to suppress the Fallshirmjager to their front, but then fail to do anything else due to C&C issues. To the West the rest of 'C' Coy and 'C' Sqdn arrive and they all move towards Tremleurr, but do not engage the enemy. The Fallschirmjager, seeing the rest of the British force arrive, move back into Tremleurr and the orchard to the North of it to trade time for space and hope that night arrives before the British can bring their overwhelming force to bear. Unfortunately C&C issues meant that the mortar to the North of the bridge was unable to bring down fire upon the British 3rd Recce Sqdn infantry that were rather tempting targets. |
 |
| The Sherman on the right flank advances, but the infantry lag behind. |
 |
| The CO and the AVRE's move up the road, led by a Churchill Crocodile. |
 |
| The Fallschirmjager pull back into Tremleurr and the orchard (top left). |
 |
| The end of Turn 3 (-1 CV & 50cm visibility). The mist obviously played havoc with the British C&C and ability to shoot, as they pretty much all failed to move or hit anything across the board. with Dusk fast approaching not an ideal situation by any means. For the Fallschirmjager, it was a welcome reprieve and finally they managed to bring down mortar fire on the 3rd Recce Sqdn infantry, with one platoon falling back destroyed another retreating and just avoiding the same fate. |
 |
| The 3rd Recce Sqdn infantry take a pounding and the support armoured cars and 6 pdr ATG fail to suppress the Fallschirmjager in Tremleurr. |
 |
| The stalled advance by the SLI and Sherwood Rangers. |
 |
| The Fallschirmjager 81mm mortar (bottom left by bridge) manages to cause a good amount of damage, along with supporting fire from the Fallschrimjager infantry on the 3rd Recce Sqdn infantry platoons (top by the corn fields). |
 |
| The end of Turn 4 (-1 CV & 25cm visibility). With Dusk upon the battlefield, the 3rd Recce Sqdn made amends for the previous Turn's shooting and managed to KO the Fallschirmjager infantry unit to their front in Tremleurr. This left an opportunity for the armoured cars to push forward and try to cut off any possible retreat Northwards. 'C' Coy and 'C' Sqdn all moved forward and the AVRE's moved along the road too. The Pak 35/35 engaded the leading Churchill tank but failed to cause any damage and the tank was unable to shoot back when in an ideal position to do so. Once again the Fallschirmjager mortar hit the 3rd Recce Sqdn infantry, suppressing them and from the orchard, the Fallschirmjager infantry shot at 'C' Coy, nearly KO'ing one platoon, but they paid a high price for this and superb shooting from the Shermans KO's the infantry unit. |
 |
| The way is open for the 3rd Recce Sqdn to move past Tremleurr on the right to try and cut off the line of retreat over the bridge. |
 |
| The SLI & Sherwood Rangers, with AVRE support, begin to attack Tremleurr. |
 |
| 'C' Coy takes heavy fire from the orchard (left by the bridge) but supporting fire from the Shermans KO's the Fallschirmjager infantry unit that had been there. |
 |
| The end of Turn 5 (-2 CV &10cm visibility). With Night having fallen, the 3rd Recce Sqdn fails to receive orders from their HQ and so remain in position, despite a perfect opportunity to push forward past Tremleurr. At least 'C' Sqdn sherwood Rangers and the AVRE's manage to push forward, but the Churchill Crocodile takes a hit from the Pak 35/36 and is suppressed! With Night covering their moves, the Fallschirmjager begin to withdraw, with the 81mm leaving and the other units pulling back into Tremleurr to try and move towards the bridge to the North and safety. |
 |
| The Shermand and AVRE's begin to close in on Tremleurr, forcing the Fallschirmjager to begin to withdraw. |
 |
| An the noose begins to close, the Fallschirmjager try and move towards the bridge under the cover of darkness. |
 |
| The end of Turn 6 (-2 CV & 10cm visibility). Well not a lot happened as across the board all the British units failed the command rolls, which allowed the Fallschirmjager units to make some Initiative Moves towards the bridge. Unfortunately for them they too then failed their command rolls. |
 |
| The Fallschirmjager move past the Shermans in the dark and begin to close in on the bridge and the road to relative safety. |
 |
| The end of Turn 7 (-2 CV & 10cm visibility). Once again the darkness hampered the 3rd Recce Sqdn who failed to move off yet again. At least the SLI and Sherwood Rangers got their acts together. As the Sherman troop and infantry platoon closed on on the SW edge of Tremleurr, to the NW the rest of 'C' Coy and 'C' Sqdn managed to locate the Fallschirmjager as they made their escape, KO'ing the MG unit. The Churchill Crocodile crew, somewhat miffed at being hit by the Pak 35/36, moved through Tremleurr and spotting it on the road, let rip with their flamethrower and the ATG was no more. As the Pak 35/36 lit up the night sky, the remaining Fallschirmjager infantry unit and HQ quietly escaped over the bridge, leaving the British in control of Tremleurr. |

So with night upon the battlefield and all the C&C issues that that had brought, the British settled in for the night in Tremleurr, sending the 3rd Recce Sqdn to cover the bridge as the rest of the units prepared to moved out at dawn to resume the advance.
Fallschirmjager Losses - 2 x Infantry, 1 x MG and 1 x Pak 35/36.
British Losses - 2 x Infantry '('C' Coy & 3rd Recce Sqdn)
Post Game Thoughts
I really enjoyed that after having waited quite sometime to get it onto the table. As always BKCII provided a great game, with the added bonus of it being part of a campaign. So having had a few days to reflect upon the game, some thoughts in no particular order:
- The Weatherboard provided an interesting start to the game with the battlefield shrouded in mist, with the C&C issues and visibility that that brought. This carried on as Dusk and finally Night fell. I'm really happy with the friction that this provided to the game and it felt right given the reports I've read over the years of the confused fighting that took place during darkness. I imagine it might feature again in this campaign, depending upon how the campaign moves pan out. I did wonder as to whether the Defenders should have less penalties in terms of CV values, based upon they would have knowledge of the terrain they were in and so could move about more freely. Certainly something to think about for future games.
- The British superiority in armour really made a difference, given that they had limited artillery support and no air support. At least they didn't lose any tanks in this attack, which was good.
- When the Fallschirmjager mortar did get going, it did prove to be as deadly as normal. If there had been more daylight and/or better command rolls, the 3rd Recce Sqdn could have been in real trouble.
- The 3rd Recce Sqdn got off to a great start, rolling a Double 1 that allowed them to suppress the Fallschirmjager infantry unit to their front, which helped prevent the aforementioned mortar coming into play for a few, vital, Turns. Having silenced the enemy, they then completely failed to exploit their superb position to quickly move round Tremleurr and cut of any line of retreat for the Fallschirmjager.
- I enjoyed using the Recce and Spotting rules from Battlegroup Panzer Grenadier. They worked for me and I need to type them up onto an A4 sheet of paper for future use, along with a few other rules that look interesting.
- The infantry failed to keep up with the tanks and I completely forgot my plan to use the tank riders rules. This dis happen quite a bit in Normandy, especially were tanks and infantry had been operating alongside each other for quite some time. I do have half-tracks and Kangaroos in the lead pile, which I suppose I should move up the queue to give me other options for transport.
- Campaign wise I need to ponder as to whether the British will blow the bridges to help cover their flanks, leaving some intact for other avenues of advance. Likewise do the Germans do the same, when in position or conducting a fighting withdrawal? Again something to think about.
- Whilst the Pak 35/36 didn't do much, I just love having them on the table. When they do do something, it's rather fun to see. I just hope I might get to use the stielgranate at some point in the campaign.
So next up it's naturally back to the campaign moves and to see what Day Two of the campaign brings. Hopefully these will be made over the next day or too and then another battle might be in the offing. Until then plenty more DIY to be done and the perennial job of being a full-time carer. So stay safe and keep healthy!
Thanks Steve, an enjoyable read. I smiled to myself because I saw the table and thought that it was the most open table that you have played on for a while …. and then I noticed the visibility restrictions :-) It all worked towards a very good narrative and as you say BKC working again.
ReplyDeleteThanks Norm. With normal visibility, the Brits would have required a lot more off table support in the form of artillery and air attacks to help take Tremleurr, without incurring potentially heavy losses. As it was they came out marginally ahead of the FJ, but they had lost their heavier weapons which I'm sure will count more later on.
DeleteWhen I read the OOB's I expected the Germans to get wiped out. Pleasantly surprised they did so well. I would certainly encourage bridge demolition by the Germans, the one sure way to stall the Allied advance. A good read. Regards.
ReplyDeleteGlad you enjoyed it Tony. Troops in BUA's can take quite a bit of fire power (or lucky die rolls) to winkle them out in BKCII, so the FJ had a reasonable chance of causing significant delay to the British. As it turned out, they did take a bit of a battering, but did cause casualties in return.
DeleteAs per Market-Garden, the Germans did want to keep some bridges open for counter-attacks, as per their tactical doctrine. IIRC Bittrich wanted to blow the last bridge before Arnhem, against orders, but the charge didn't go off. I do have some options for both sides regarding this and will have to wait and see how the next few moves go.
Excellent work on the BatRep, Steve! As I look at your game photos and read the narrative, my mind is transported back to all of the fun experienced during your SCW campaign. Now, that was great fun!
ReplyDeleteThanks Jon! This is a sort of dry run to test out some rules for another SCW or early WWII campaign, so watch this space:).
DeleteA great looking game Steve and as Tony said, I did not think the Germans would survive! I must look into those Recce and Spotting rules (I have the rules on my bookshelf but not looked at them for years!).
ReplyDeleteThanks Jon and to be honest I thought the FJ would hold on a bit longer and/or cause more casualties, but the mist and failed command rolls certainly helped the British get onto the objective relatively unscathed.
DeleteI think you might like the Recce, Spotting and Hidden/Ambush rules. The current BKCIV rules have area spotting, which sort of works, but for me these work better.
A nice AAR there Steve - yet another interesting battle featuring plenty of well painted toys on a well presented battlefield. 👏👏
ReplyDeleteIt was good to see the Brits achieve their objectives and “give the Hun a bloody nose”. It wasn’t much of a surprise to see the Jerries hold on until nightfall and then sneak away to (literally) fight another day.
Have you considered a variable visibility for mist? Sure, mist may limit visibility to around 50cm - but why not, say, throw 1d6 with a 1 = 40cm and a 6 = 60cm. After all, mist is sometimes thicker and sometimes not, whereas in respect of night or dusk I’d be tempted to say that darkness or bad light is perhaps more “fixed” if you know what I mean.
Out of sheer curiosity, what is the yellow picture near the ruined house on the 6th image? A damaged advertising hoarding? If so, it’s a clever idea.
As you mentioned, your next dilemma is whether you, as commander of either attacking or defending force decide to blow bridges? I can see there are pros and cons to this - I guess that’s why we play war GAMES whereas the actual, real-world commanders would know that men’s lives hung in the balance as a result of what ever decision they made.
I’m sure the stielgranate was a good idea, but I suspect the guy who had to step out of cover to shove another into the barrel was probably much less enthusiastic.
Good luck with the campaign moves for Day 2. I’m sure we’re all waiting to read about developments and any further battles.
Cheers,
Geoff
I'm glad you enjoyed it Geoff. If the British had been a Turn or two later closing in on Tremleurr, then I think they would have had quite a tough fight.
DeleteThe variable mist is a good idea and something I might try for future games. As it was on one Turn I had forgotten that the visibility had changed and so some devastating fire from the Shermans had to be changed to they couldn't see the enemy!
The yellow picture is indeed an old metal advertising hoarding that I made from some images a friend gave me years ago, pre good quality colour printers. I'm going to do a post on how I made it soon.
The whole bridges thing is adding another unexpected dynamic to the game, for both sides. Blow too early and you limit the opportunities to move, too late and the enemy is across and on your flank etc.
I really enjoyed that Steve. Great batrep. All sounds very plausible. Table looks great too.
ReplyDeleteThanks and I'm glad you enjoyed it on many levels:).
DeleteI agree with all previous comments Steve, this seems very plausible as a recreation if a small action in Normandy as the breakout expands. Personally I would think the Germans would have the bridge wired for demolition and should blow it as soon as the FSJ have pulled back, but as you say, they akways maintained an unrealistic belief that they may need the bridges to counter attack over! For the Brits, it's different....depending on the location in their overall advance, they may wish to use the bridge themselves , or, they may have a different focus and simply want to deny the bridge to the enemy!
ReplyDeleteThanks Keith. Their counter-attack belief does seem contrary to simple logic, especially later on in the war (as we are here), where they have the advantage of good defensive terrain and interior lines.
DeleteOops.....I obviously have not been paying enough attention, as, reading the map moves 2, I realise this is not France 44 but Germany 45....in which case the Germans should definitely blow the bridges....look what happened at Remagen!
ReplyDeleteYou must pay attention Keith:). This is more Autumn '44 and very much Market-Garden inspired. Let's see if a Remagen type scenario presents itself...
Delete