For the next scenario from One Hour Wargames, I was lucky that my good gaming chums, Dave and Keith, were up for taking on the roles of both commanders and issuing orders, based upon the terrain and the OOB that they were given.
As before, the OHW scenario gave the most basic guidance on terrain, which I had to fleshout, based upon the rules being used. Fortunately with enough games under my belt with BPII, I had a good idea on what would hopefully work terrain wise. As before the OOB were generated by a die roll from the Wargaming 19thC Europe book.
Details of the scenario can be found below:
Red OOB (Keith)
4 x Line Infantry
1 x Light Infantry
3 x Cavalry
2 x Artillery
Blue OOB (Dave)
5 x Line infantry
1 x Light Infantry
2 x Cavalry
2 x Artillery
Objective
To control both fords by the end of the game.
Game Length
8 Turns
Map
Troops start the game off the table and can arrive via any part of your table edge, as marked in the photo.
 |
| The map given to both players to decide upon their deployment and orders of attack. |
 |
| Red orders. |
 |
| Blue orders. |
Terrain
The terrain is broadly open, with ploughed fields and some standing corn and the occasional hedgerow.
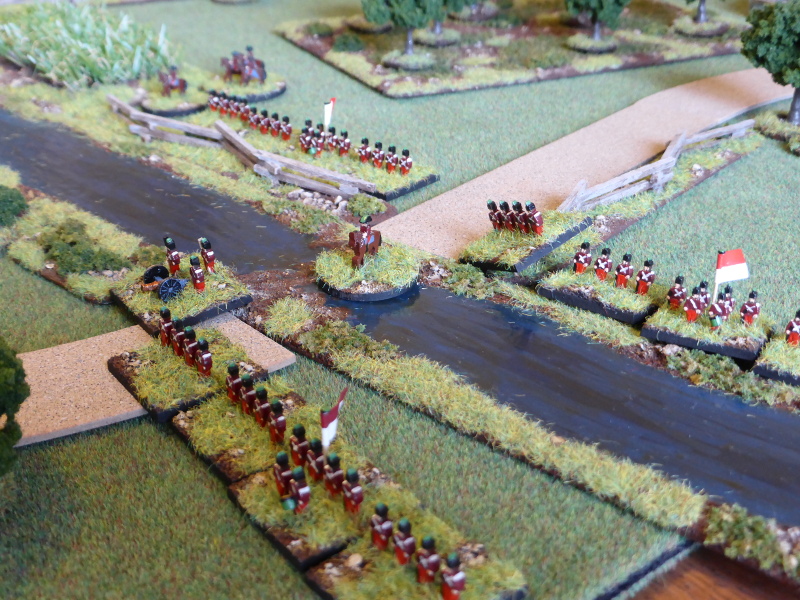
Line infantry, Light Infantry and Artillery can only cross the river at the two fords marked on the map.
Cavalry can cross the river anywhere, but require a full turn to do so.
The light wood in the North Eastern area of the map is only accessible to Light Infantry.
Rules
Black Powder II with Glory Hallelujah! supplement rules.
Deployment
Due to the build up to Xmas, I was unable to provide either player with photos of the table in advance, so they had to rely upon the map and details provided, which in the end provided another level of 'fog-of-war'.
 |
| An overview of the table, with Red deploying at the top, Blue at the bottom. |
 |
| The Blue left wing and cavalry. |
 |
| The Blue right wing and the artillery. |
 |
| The Red right wing, mainly of cavalry with supporting artillery and light infantry. |
 |
| The infantry heavy Red left wing. |
Opening Moves
Red won the roll off to go first and swiftly moved both wings to the fords, deploying into line where possible. Blue's response was patchy, with the infantry not moving in unison or quickly enough to put in concerted attacks against the Red troops. Hampering their efforts was the inability of the artillery to move and unlimber to support the infantry.
As the Red troops started to cause hits and disorder in and around the fords, the Red cavalry charged across the river, with Blue countercharging, with the clash being inconclusive with both sides withdrawing to regroup.
 |
| The table after a few opening moves. |
 |
| The Blue right wing in march column see the Red infantry forming into line to their front. |
 |
| The cavalry eye each other up before charging into contact, watched by the Blue light infantry and artillery. |
 |
| The Red left wing move to try and gain control of the ford. |
 |
| The end of Turn 3. |
 |
| The Blue left wing bring weight of numbers to bear against the Red troops. |
 |
| In contrast the Blue right flank is under pressure from superior numbers of Red troops. |
 |
| The Red troops by the ford. |
 |
| The Red light infantry and artillery try to hold the ford on the right wing. |
Middlegame
As
the Red troops moved forward on the left wing, they destroyed a battery
of Blue artillery, as well as causing Disorder and the light infantry
to go Shaken. On the Red right wing, the Blue infantry came under heavy
fire but managed to hold on, in return destroying the Red artillery
supporting the light infantry and cavalry.
 |
| The end of Turn 5. |
 |
| The Blue right wing begins to crumble under intense fire from across the river. |
Endgame
The Blue right wing does its best to hold on against overwhelming odds, with the light infantry only succumbing to sustained fire in the dying moments of the game, but they are unable to stop Red troops manage to cross the ford. On the Blue left wing, despite the withdrawl of Red troops out of range, the Blue troops struggled to get across to secure the ford, but only did so when the cavalry moved forward to provide flank protection.
 |
| Towards the end of the game. |
 |
| The Blue light infantry finally break as the Red troops cross the ford. |
 |
| Red troops across the ford in force, with support over the otherside of the river. |
 |
| The beleagured Blue right wing. |
 |
| The Blue left wing across the ford. |
 |
| The Red light infantry can only look on as the Blue troops cross the ford. |
End of Game
By the end of Turn 8, both sides had control of a ford each, but the Blue forces had taken more casualties than the Red forces, so the Red forces probably had a minor victory looking at how things stood.
Post Game Thoughts
That turned out to be a nice little game, despite the simplicity of the scenario. I'm enjoying these OHW scenarios and hope they continue to give more good games. Anyway, on with some post game thoughts:
- The Red troops got off to a very good start, with their swift approach to both fords, especially the left, giving them the edge from the start.
- The cavalry clash which could have had an impact on the game, ended up in an inconclusive melee, with both sides retiring and taking no further part in the game. I thought that the Red cavalry, having the advantage in numbers would have had the edge, but poor die rolling by them combined with good by Blue led to the draw. A case of what might have been...
- The Blue artillery was pretty much a complete failure, with repeated failures of orders and only one round of shooting the whole game! Not being able to support both wings, especially the right, hampered their ability to carry out their plans to seize and later defend the fords.
- With both sides controlling a ford each, honours were pretty even, but the Blue forces had lost all their artillery, their light infantry and one line infantry unit, compared to just one Red artillery unit, so I think it fair to call it a Red minor victory.
- The random generation of troops types once again worked well, giving a slight difference between each side. With the other side not knowing what they are facing, this gives a nice challenge to both players I think. The ten units a side also works nicely for a solo game lasting maybe a couple of hours, which is perfect for me at present.
- The 'blind' deployment by both sides gives a really nice edge to the game, echoing the 'old school' curtain across the table approach. Being able to see both sides plans is fun and when it comes to the game, I simply carry out the orders as best I can for each side, allowing for changes as circumstances dictate.
- I feel very comfortable with the BPII rules and with the Glory Hallelujah! supplement additions which to my mind, give a very good game. I'm at the point now that by and large the QRS is all I need for a game, with the odd reference to the rulebook.
With Xmas nearly upon us I don't think I will get in another game such as this before the festivities take over the house. However the plan is to carry on in the New Year, all being well. I do hope to get a game of Rebels & Patriots in though, possibly in the next day or so. So until next time stay safe and keep healthy!
Your hand-drawn maps are terrific and really helpful in understanding the tactical situation. The numerous Star Wars' references were quite good too. Objective to chew 'Bacca' was especially good.
ReplyDeleteRed did manage to get the jump on the blue but with each holding one ford objective each, it looks like a draw to me.
If ever in need of an armchair general to formulate a battle plan, let me know.
Thanks Jonathan and the Star Wars references were all Dave's. I was thinking more Indiana Jones when coming up with the post title, but Dave's one was more fun. I had intended to sort out phonetic Germanic names for the characters, but lack of time prevented this:(
DeleteI'm glad you liked the maps and it certainly makes it easier for me when carrying out my orders, as well as giving you the reader and idea of each sides plans.
Well you beat me to it Jonathan as I was going to contact you to see if you fancied taking part in one of my games. I'm very honoured that you are! Drop me a line at:
sc_johnson03 AT yahoo DOT co DOT uk
A good looking game and the maps certainly do add to the battle report. The 19th Century rules for generating the order of battle does make things interesting for the players.
ReplyDeleteThanks Peter and to be honest I should add in more hand drawn maps for my games, but time and inclination are often my enemies!
DeleteGreat report, line the double blind and love the figures and referring
ReplyDeleteI imagine you meant to add "referring to Star Wars"?
DeleteGreat report, line the double blind and love the figures and terrain
ReplyDeleteThanks Will:)
DeleteNice game with the final result of a ford each suggesting good game balance. I too was surprised that Red’s strength in cavalry wasn’t more telling, but an unscripted system does deliver that nice dollop of uncertainty.
ReplyDeleteLike the maps. Last night I was looking at Programmed Wargame Scenarios by Grant. He has a scenario in which each side is given a map, but the map given to the player on the home ground has slightly more detail added. To reflect local knowledge, which I thought was a superb idea.
I too thought the Red cavalry would gain the upper hand, which would then hamper the Blue's left flank from deploying as planned. This sort of 'uncertainty' is one of the bonuses of the C&C system used by BPII and similar systems, such as BKCII.
DeleteThe PWS by Grant has plenty of great ideas, such as the one you mention. My aim to to try to finally get to play many of these scenarios next year, despite having had the book for several years or more!
Once again a nice little scenario 👍 showing things don’t have to be complex to give an enjoyable battle
ReplyDeleteThanks Matt and I'm finding that often 'less is more'.
DeleteGreat little action and you certainly seem to be getting a lot of use out of the new mdf figures!
ReplyDeleteThanks Keith and the mdf figures are doing what I wanted, namely getting games in with painted figures. This will allow me to paint up my 10mm figures at leisure, without feeling the pressure to rush them onto the table.
DeleteSo there we are - I was wargaming without even knowing it! Thanks for keeping the gaming flag flying Steve. Looks like I would have scored a solid victory if the Red cavalry had performed properly.
ReplyDeleteIt's your age Keith;). If the cavalry had performed as planned, then I think a major victory was within your grasp. Given the current situation with lockdowns, being able to keep gaming is such a bonus!
Delete