In my last post I mentioned that I'd dug out my 'old school' wargames books for some pleasurable reading as well as inspiration. At the same time I stumbled across my Neil Thomas' books and pulled them out for a read through too. They are not everyones cup of tea but they contain some nice ideas and in the case of 'One Hour Wargames', some 30 scenarios, using varied orders of battle for each side. I decided there and then to try and play through most of the scenarios, but using the variable OOB from his excellent 'Wargaming 19thC Europe' and with BPII as the ruleset. To be honest they would work perfectly well with 'Honours of War', my go to set for wargaming the 18thC, which I may or may not give a run out with the scenarios.
 |
The books in question.
|
Scenario 2: Pitched Battle
For the first scenario, I chose the second one which in essence is a simple encounter battle, but with the slight twist that to win, one side needs to be in control of both the hill and the crossroads. The die were rolled for the OOB and came up with the following:
OOB Red
5 x Line Infatry
1 x Light Infantry
3 x Artillery
1 x Cavalry
OOB Blue
5 x Infantry
1 x Light Infantry
2 x Artillery
2 x Cavalry
Deployment
On a random die roll the Blue force would enter via the Northern table edge, with Red via the Southern. Red won the die roll and would go first.
 |
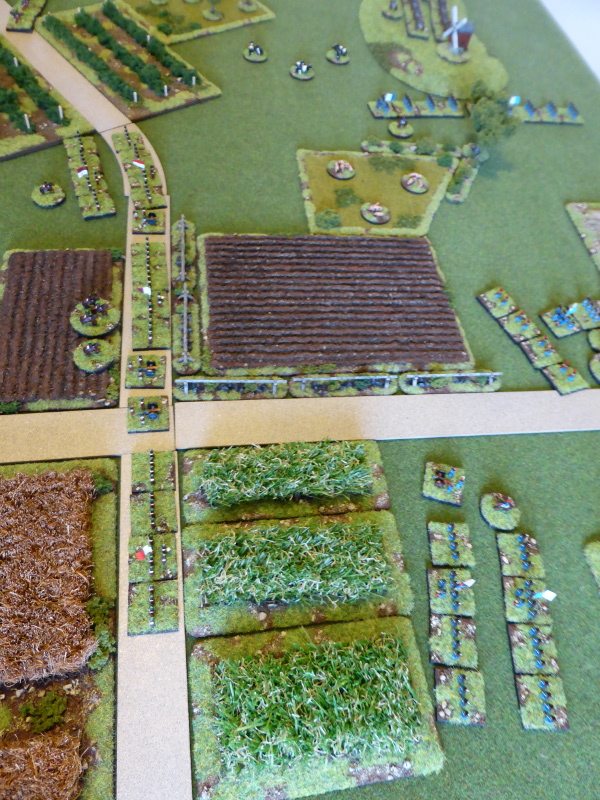
An over view of the table, with both sides deployed to enter the table.
|
 |
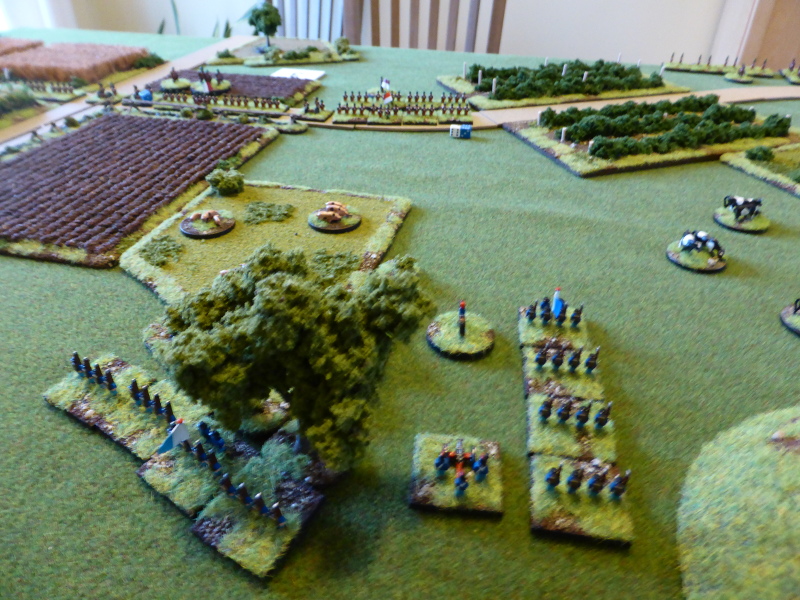
The Red right and centre, with strong artillery support.
|
 |
The Red left.
|
 |
The Red cavalry and light infantry covering the left flank.
|
 |
The Blue cavalry ready to seize the hill with the Blue right flank infantry.
|
 |
The Blue centre and left flank.
|
Turn 1
The Red centre advanced quickly down the road and began to deploy into line. The right failed to move, but the left and the cavalry and light infantry all arrived and pushed forward as fast as they could.
The Blue cavalry moved onto the hill, to observe and exploit any opportunities that might arise. The Blue infantry all arrived and made slow but steady progress.
 |
The end of Turn 1.
|
 |
The Red right fail to arrive.
|
 |
The Red left move on still in column, but the centre is deploying on and around the cross roads.
|
 |
The Red cavalry move on in line whilst the light infantry advance towards the vineyards.
|
 |
The Blue cavalry move onto the hill as the right arrive, still in column.
|
 |
The light infantry lead the Blue centre forward as the left move on into the cornfields.
|
Turn 2
The Red centre and left form a good defensive line at the crossroads, with the right arriving and moving up, but the cavalry and light infantry failed to move.
The Blue left formed into line and advanced forwards, closing in on the crossroads, with the centre and left still in line. The cavalry on the hill just observed.
 |
The end of Turn 2.
|
 |
The Red right arrive and move to support the flank.
|
 |
The strong Red defensive line at the crossroads with formidable artillery support.
|
 |
The Red line still has an open flank at present, which Blue hopes to exploit.
|
 |
The Blue cavalry observe as the right march on in line, which is rather a vulnerable formation due to their proximity to the enemy.
|
 |
The Blue left push forward as the centre swings across to try and support them, as well as moving out of view of the artillery.
|
Turn 3
The Red right move into the corn to try and cover the open flank, but the cavalry and light infantry blunder, leading to them moving back to their jumping off point. The infantry at the crossroads open very effective fire, leading to Blue infantry units across the board becoming disordered and/or shaken.
The Blue infantry respond as best they can, using passage of lines to advance through disordered units and take the attack the the enemy. Their fire is effective, leading to Red units at the crossroads taking hits and becoming disordered. The cavalry move down off the hill to take advantage of the Red cavalry and light infantry blunder.
 |
The Red right flank moves forward to try and secure the open flank of the units by the crossroads.
|
 |
The Red and Blue units begin their firefight, with both sides taking hits and disorder.
|
 |
The Red left come under effective fire, leaving them disordered.
|
 |
The Blunder.
|
 |
The Blue right struggle to deploy as they come under fire.
|
 |
The Blue left and centre also under fire, try to form up to take the fight to the enemy.
|
Turn 4
The Red right moves onto the road and deploys, thus covering the open flank. Shooting across the front sees the Blue light infantry rout after a failed break test, whilst the Blue infantry in column on their right, are disordered and shaken. The cavalry and light infantry move back on, with the latter in the vineyards.
The Blue fail to rally of hits and so a unit remains shaken, but as the centre continues to move to the left to avoid the concentrated artillery fire, the other units cause Red units on both flanks to become disordered and/or shaken. The Blue cavalry see an opportunity to charge in, with the Red cavalry counter charging them. The Blue cavalry emerge victorious, pushing back the Red cavalry who are disordered and shaken.
 |
The Blue light infantry succumb to combined artillery and musketry.
|
 |
The cavalry charge in...
|
 |
... with the Red cavalry coming off worst and are pushed back and in a poor state.
|
 |
The end of Turn 4.
|
 |
The action hots up on the Red right and at the crossroads.
|
 |
The threat to the Red centre has moved off to the right.
|
 |
The Red left holding their own but are coming under effective fire.
|
 |
An overview from the Blue positions.
|
 |
The Blue cavalry may be able to turn the Red flank next turn ...
|
Turn 5
The Red light infantry, seeing that the cavalry battle is not going well, move to the edge of the vineyards to try and prevent the Blue cavalry from exploiting, which they do, as the Blue cavalry retire as the Red cavalry rout. Most Red units hold along the road, but in the centre one unit moves into the ploughed field to try and pressure the Blue infantry in the cornfield, who become disordered and shaken by combined fire. On the left a unit manages passage of lines, but the shooting is rather ineffective, which is a blessing for the Blue right flank.
As the Blue cavalry retire back to the hill to reform, the Blue commands manage to remove units from shaken as they rally off hits. Their shooting again caused disorder and hits on the Red flanks, but are unable to cause any units to break.
 |
The end of Turn 5.
|
 |
As the firefight in the cornfield continues, a Red unit moves into the ploughed field to try and turn the Blue flank.
|
 |
Passage of lines allows the Red left to move forward to keep pressure up on the Blue right.
|
 |
The Red light infantry cover the flank and the road.
|
 |
The Blue cavalry back on the hill to regroup and observe.
|
 |
The Blue forces struggle to make headway through the corn.
|
Turn 6
In the centre, the Red unit moves through the ploughed field to pressurise the Blue flank. On the left the Light Infantry move up in support of the left, whilst eslwhere all units hold position. Combined fire sees the demise of another Blue unit in the cornfield, who rout after sustained artillery and musketry finishes them off. Luckily for the Blue artillery that is rather vulnerable, they manage to pass enough morale tests despite an awful lot of lead coming their way.
Again the Blue commanders manage to rally units from being shaken and as units advance in the cornfield on the left, they cause a Red unit to fail it break test and they flee the table. On the right Blue units are unlucky in that a Red unit only just manages to pass its morale test and hold its position. Maybe this is the high water mark for the Blue force?
 |
A Blue unit routs in the cornfield.
|
 |
The end of Turn 6.
|
 |
The Blue units manage to finally rout a Red unit, with another in bad shape on the right.
|
 |
The Red unit in the ploughed field in danger of being cut off or turning the Blue flank; only time will tell which it is.
|
 |
The Red left only just pass their morale test and hold their position.
|
 |
The cavalry still hold an objective and await an opportunity to aid the attacks.
|
 |
The Blue right only just fail to gain the upper hand.
|
 |
The confused fighting on the cornfield and crossroads.
|
Turn 7
As the Red right held its position, the centre failed to move when it needed to, whilst on the left passage of lines kept the flank in a stable position. At the crossroads the Blue artillery finally routed after combined artillery and musketry, whilst in the cornfield it was the Blue's turn to only just pass a rout test and hold on. However on the left, musketry and artillery saw a Blue unit retire back after a failed tour test with another unit becoming shaken.
Seeing an opportunity for a sweeping advance, the Blue cavalry moved down off the hill and past the light infantry that had moved up to support the Red left. Maybe they could get into the Red rear and destroy the artillery on the road next Turn? With some Red units in a parlous state and clsoe to breaking, the Blue shooting was incredibly ineffective, just when they needed it most.
 |
The end of Turn 7.
|
 |
The Blue cavalry poised to attack the Red rear.
|
 |
The Red right flank and centre under pressure, but Blue could not take advantage of this when it mattered most.
|
 |
The Red left have gained the upper hand.
|
 |
The Red unit ready to exploit or be isolated ...
|
 |
The Blue right in disarray.
|
Turn 8
As the units by the crossroads held position, combined fire saw another Blue unit in the cornfield rout after a failed break test. On the Red left another round of shooting hit the Blue shaken unit on the table edge who routed off the table. With no cavalry on the hill, the Blue light infantry advanced and captured another objective.
 |
The end of Turn 8.
|
 |
Another Blue unit routs in the cornfield.
|
 |
The crossroads are now secure.
|
 |
The Red left have gained the upper hand.
|
 |
The Red light infantry on control of the hill.
|
 |
The broken Blue right...
|
 |
... and the left.
|
End of Game
With that the Blue force was spent and fled the field of battle, coming up short just when it mattered most.
 |
The butcher's bill.
|
Post Game Thoughts
Well that was a cracking game, full of action, it could have gone either way and was only decided in the final turn! So as always some post game thoughts in no particular order:
- Even though the scenario was a simple encounter type game, it worked well due to the addition of having to take two objectives to win the game. The maps in the book are simple and give the bare bones for the layout, so adding in terrain is very much a case of personal choice, as well as knowing what will work or hamper the rules you're using.
- The variable ten units a side worked a treat and even though there was only a slight difference between them, it was enough to give a challenge on how best to use them. The Reds having an artillery advantage made it easier to control the crossroads, which probably edged the game for them. I'm certainly looking forward to using the variable unit across the rest of the scenarios as they do give a nice twist to a game.
- It was certainly a closely fought game and could have easily gone either way. Both sides had important morale tests that they passed, but probably the game was lost for Blue in Turn 7 when their shooting was pretty poor, when they had a couple of Red units on the ropes. On such small things to games turn.
- BPII with the GH! supplement tweaks once again gave a good game and I'm pretty happy with the rules. As with any rules somethings aren't clear in certain situations, such as what happens if you Blunder when making a Rally roll, but I just applied a bit of common sense rather than spend ten minutes looking through the rulebook.
- Having enought painted 19thC figures to game with is great and I'm really enjoying using them. I don't thing of them being made of mdf or even 8mm high when in the game. The 1" square bases will certainly become my default basing option for most rules going forward, as they work so well.
- The 3 1/2' x 2 1'2' table worked perfectly and will be my base size for most games in the futre, bar BKCII, as it reduced ranges and movement equates to a 7' x 5' table. It also means I can game on the dining table and have room at the side for rulebooks, die etc.
- All told the game took just over 2 hours to play and 8 Turns, so just about right for the time I generally have available these days. Much longer and to be honest my attention would start to flag.
- Looking back I think the Blue cavalry might have been better to have tried to move into the Red rear after the routed the Red cavalry. However I was worried that the Red Light Infantry might catch them in the flank with a devastating volley, thus rendering them hors de combat for the rest of the game. However with hindsight it might have been a risk worth taking if they could have got in behind the Red artillery at the crossroads.
Fortunately for me, my gaming chums Dave and Keith have agreed to be guinea pigs once again, with them taking 'control' of either side for future games, as per our earlier narrative campaign. Basically I will pass on the scenario details, table layout, OOB etc to each side and then await their orders, which I will attempt to carry out on the table. Hopefully it should all work out and be fun for all involved.
On a seperate note, this AAR has once again made me ponder how I go about writing them as, in short, it has taken over three hours to do, including downloading the 'photos and reducing their sizes, which is much longer than the game itself. So the question is is it worth it on the current format I use? I would love to know what you all think and any feedback would be welcome.
So until next time, stay safe and stay healthy!


Steve, a really nice game with two good ingredients, as good as the OHW scenarios are, the maps are sparse and adding terrain makes a great visual difference. secondly, BPII with its missed orders and blunders certainly shakes things up and I like that.
ReplyDeleteI had always thought that Blunders were associated with movement orders (only), so that has given me something to check up on.
As for post length etc ..... Mr. wordy here is the last person to offer advice and I continually trying to reduce my keyboard time. My latest thoughts are to offer an opening, a mid battle and a concluding commentary with a bit of a broad brush approach .... but I am often also explaining new systems, so a lot of time goes into doing just that and then using the opening move to highlight process - my feeling has become that it is very useful to the person who is thinking of buying that game, but perhaps tedious to the other 95% as a consequence, I am planning a cut back for 2021 and may do that by putting a cap on the word count, so that the necessary sections of what I feel is important to convey get most of the emphasis. But I said that last year as well :-)
Norm, thanks for you reply and I will check up on the Blunders re: movement orders only. It's probably in the text somewhere where I wouldn't nromally read!
DeleteThanks for your thoughts on post length which has given me food for thought. I suppose I try to convery what happened in the game, but realise it can be tedious, which is of course a concern. The idea of a start, middle and finish is a good idea and will try and give this a go in the next game. Alongside this I will have to think about my photos a bit more to try and get the important action in frame as it were.
Thanks for the report Steve and interesting game and a reminder that I have some scenario books which I need to dig out and have a go ! As for the time it takes to blog I would say over three hours is quite a commitment. You might find a quicker way to upload photos etc. We all follow different blogs. Personally with limited time i do find myself skipping through turn by turn reports. It in no way should reflect on the writers as i know some people love the detail. I will follow whatever, the time you put in needs to reflect the joy encouragement you get back. As he mentions Norm writes a short novel each time 😀
ReplyDeleteI'm glad you enjoyed it Matt, despite its epic length;)
DeleteWith less 'photos, the upload time will be much quicker, ditto the report if I concentrate on the salient points/action. I too tend to whizz through turn by turn reports, hence my requests for feedback on mine. I think a more succinct approach will be better for all involved!
Steve, in my opinion, Thomas' 19thC book is brilliant and one of my favorite wargaming books. Have you tried the rules therein?
ReplyDeleteI enjoyed your lengthy BatRep and fully understand the effort required to produce such a work. It is often not a trivial undertaking. Are battle reports worth the effort? That is a very good question and one I consider often. In fact, I have a partially written, draft post discussing just this topic. Will I ever finish it? Who knows.
Writing battle reports and their style is an individual decision. Who are you writing the battle report for? Is it mainly for your own game chronicling or for readers' entertainment? Are you writing to showcase a particular ruleset? So many questions can go into finding an acceptable trade off between length, style, and effort. In the end, you must answer those questions.
I tried the rules sometime ago Jonathan and now I have enough troops, rather than blocks, I'm keen to give them a go again. I think it is his best book and if nothing else, his thoughts on the various armies contained therein can be used with other rulesets.
DeleteI do sometimes wonder if AAR's are worth the effort that given aside from a few regulars like yourself, I'm never sure how many people actually read them.
Trying to find the right balance in writing an AAR if probably impossible, but one can but try. I will try the more succinct approach for the next few to see how I get on with them. Either way they do take time, which one could argue could be better spent doing other things...
AARs are time consuming to write and Norm's suggestion of a broad brush approach could be worth a try and use the photos to highlight any key moments. Your post game thoughts are most interesting by the way.
ReplyDeleteThanks for your thoughts Peter and I think the broader brush approach is worth giving a go. I'm glad you liked the post game thoughts.
DeleteI enjoy the post-game analysis too!
DeleteThanks Jonathan and I'm happy that it's of interest to other gamers.
DeleteI used to write more detailed AAR's with basic maps I did on Paint to explain how the game progressed etc but nowadays, I dont bother. I think this is partially because Blogger II made it too hard initially (its behaving itself again now by the look of things) and also because, like Norm, I often skip through other peoples detailed accounts due to lack of time. My reports now are really just commentary on the attached photos, as I think most readers are more interested in the images than a blow by blow account - but I may be wrong! Even doing it my way, posting a blog can take an hour at least, and I really dont want to spend any longer than that creating a post, as I would rather be reading other peoples blogs!
ReplyDeleteThanks for your thoughts Keith. I too tend just to look at the photos but often struggle to follow the action, as often there are no shots giving you an overview of the whole table/game. It is certainly a hard ballancing act I would love to get my AAR's down to just an hour!
DeleteKeith and Steve. I, for one, enjoy the blow-by-blow action and good reference points on either maps or the gaming table. Without a play-by-play showing relative positions and activity, it is hard to assess game play and tactics. I enjoy seeing what worked, what didn't, and why. I appreciate Steve's post-game analysis but being an armchair general, I like having information needed to make my own decisions as I read the battle report. I realize I may be in the minority but if someone makes the effort to publish, I read the thing! It is a balancing act, for sure.
DeleteThanks for your thoughts Jonathan. My latest post is less detailed but hopefully gives and idea on the action. I think it needs a little bit more detail, but it is a tricky balancing act. From a purely gaming perspective it is easier not to do an AAR as you can stay in the moment when playing, as making notes and taking photos really does disrupt the flow.
DeleteA most interesting game. I appreciated the turn-by-turn photos and occasional overview of the action.
ReplyDeleteRegards, James
Thanks for your feedback James and glad you liked the game:).
Delete