When my parents re-located to North Norfolk many years ago, on the drive to their new house I noticed a couple of pillboxes en route between Brandon Creek and Southery. Quite why they were there was a bit of a mystery, as they didn't seem to be mutually supporting each other, nor guarding anything of significance. The only thing I could think of was that they were covering a crossing over the Great Ouse river along the A10, one of the old major roads in East Anglia.
Then over the years as I read about Operation Sealion, the British did believe that an invasion via East Anglia was a possibility, to the point that they stationed a large part of the defensive force north of London, presumably in case this transpired to be the route the Germans would take. It was thought that the Fens would be ideal tank country for an invader, but anyone who has lived or travelled there would know that any vehicles stands out for many miles, with little or no cover at all. In fact they look like the ducks at fair ground shoots they stand out so much! Alongside this is the fact that any vehicle is forced to stick to the roads and farm tracks, rather like the Allied AFV's during Operation Market-Garden.
Whether these pillboxes were built during the invasion scare or later, I'm not sure. Looking at the terrain, I think they were largely built to cover any potential paratroops landings as they do not really cover the roads, given that they appear to be built only for machine guns and not anti-tanks guns. To get an idea of the terrain they cover, hopefully the following Google Street View image will give you an idea.
From time to time I have pondered on gaming a 'what if?' invasion based around landings in East Anglia. Nothing came of it until a small window of opportunity presented itself just before Xmas. A few days of scribbled maps and ideas, based upon a 2' x 2' board, coalesced into a game played on the Winter's Solstice. I simply transfered the day to the Summer's Solstice for the purposes of the game, setting aside all the logistical issues in relation to this that would have confronted the Germans.
See below for some basics details of the game:
Basic OOB
The Germans have two Fallschirmjager Kompanies (one are Assault Engineers) and one Luftlande Kompanie with integral Heavy Weapons. The British have a re-inforced Company. Both sides have some off-table support (see below).
Scenario Details
A few things specific to this game were:
- Mist on Turn 1, with 50cm visibility and -1CV.
- Scheduled smoke bombardment on the pillbox on Turn 2.
- Pillbox has MG only and a restricted 45 degree arc.
- The River Ouse embankment counts as linear terrain for shooting and a hill in terms of visibility.
- The windmill and house count as BUA, so 6+ to hit but no saving throw given that the structures are made of wood.
- German Air Support can arrive from Turn 3 on a normal command roll from the FAC.
- British improvised armoured canal boat can arrive from Turn 2. Roll a D3 to see which Turn it arrives.
- The Fallschirmjager and Luftlande troops arrive at random points along their based edge, using a D6 to determine exactly where.
- The British Armoured Cars can arrive from Turn 3. Roll a D3 to see which Turn they arrive.
- The British have the support of one random Hurricane Ground Attack. From Turn 3 it will arrive on a roll of 6+ on a D6, reducing by one each following Turn until it arrives.
The Game
The board was set up the night before and in the cold light of day, a few things tweaked as per my previous post. With everything set it was time to kick-off the action, so without further ado:
 |
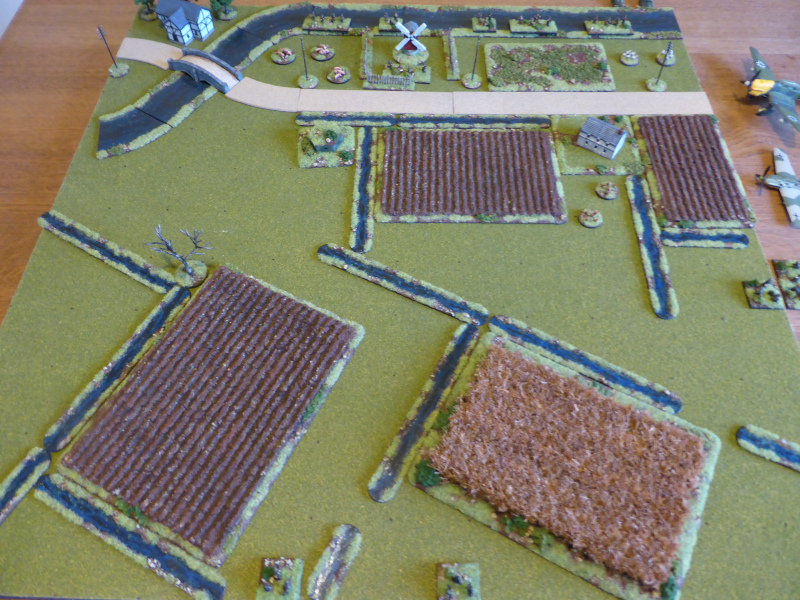
| An overview of the table. The Germans would arrive via the Southern and Eastern table edges. |
 |
| The pillbox guarding the bridge over Brandon Creek. |
 |
| An isolated farmhouse. |
 |
| A windmill powering the drainage pumps and moving the water into the Great Ouse river. |
 |
| The bridge across Brandon Creek and the Ship Inn. |
 |
| The random die rolls placed the FJ in the middle of the table edge, with the Assault Engineers to the left. |
 |
| The Luftlande troops likewise would arrive roughly in the middle of the table edge. Off table support can be seen above them. |
 |
| The British troops dug-in along the banks of the Great Ouse, with commanding views across the Fens. |
 |
| The end of Turn 1. The FJ pushed forward in the early morning mist, but the Assault Engineers were spotted and came under intense fire from the pillbox, suppressing them and causing casualties. The Luftlande troops failed to arrive, no doubt disorientated by the mist. The FJ tried to put down smoke from their mortar by blind the pillbox, but failed to do so. |
 |
| The Assault Engineers take heavy casualties just as the action opens. Not a good start for them. |
 |
| The FJ FAC has moved along the ditches, ready to call in Air Support. |
 |
| The FJ on the right have taken cover in the ditch and started to put fire into the pillbox, but fail to suppress it. |
 |
| At the start of Turn 2, the scheduled smoke arrives to blind the pillbox. |
 |
| The end of Turn 2. The Assault Engineers took advantage of the smoke to move forward to the cover of a ditch, as the Luftlande troops arrived. They came under fire from the river bank, suppressing a unit, but return fire suppress the British unit too. With no targets in range nor visible, the Britsh kept their heads down and remained in cover. |
 |
| The Assualt Engineers close in on the pillbox. |
 |
| The Luftlande troops arrive. |
 |
| The British have a good view of the enemy, but they are out of range. |
 |
| The armoured canal boat arrives at the end of the Turn, ready for action in Turn 3. Their on board mortar will be a welcome boost to the British defence. |
 |
| At the start of Turn 3, the FAC calls in a Stuka strike on the pillbox, but they fail to hit it. |
 |
The end of Turn 3. The Assault Engineers try to move forward to where the rest of their Kompanie is, but their MG is suppressed by fire from the pillbox. The Luftlande troops move into the farmhouse, but one unit is suppressed by fire from the windmill. The FJ reply, suppressing the British unit in the windmill, but their MG is suppressed by mortar fire from the armoured canal boat.
In the British Turn, the pillbox manages to KO the Assault Engineers MG and mortar fire suppresses one of the Assault Engineer units. |
 |
| The Assault Engineers are having a tough time, taking casualties that means their attack plan is already faltering. |
 |
| The Luftlande troops take casualties as they occupy the farmhouse. |
 |
| The mortar support from the armoured canal boat is making a big difference to the British ability to defend their positions. |
 |
| The British Armoured Cars arrive at the end of the Turn and are another welcome boost for the British. |
 |
| Once again the FAC calls in Stuka support, but again they fail to hit the pillbox. |
 |
| The Hurricane arrives shortly after the Stuka departs... |
 |
| ... and its strafing run leads to one Assault Engineer unit KO'd and an HQ and MG unit also suppressed. |
 |
| The end of Turn 4. The FJ at least manage to put down some smoke from their mortar unit on the pillbox and the Luftlande troops suppress the British in the windmill, but other than that they had few targets. Their attack was not quite going to plan. |
 |
| The weakened Assault Engineers. |
 |
| The Luftlander troops are re-inforced by some FJ to try and out flank the pillbox. |
 |
| The Armoured Cars arrive, but are too hesitant to make any impact on the battle this Turn. The pillbox is taking a steady flow of hits and the MG unit inside is close to being KO'd. |
 |
| The Luftlande troops concentrate their fire on the windmill, nearly KO'ing the British there. |
 |
| Yet again the Stuka dives into the attack and finally hits its target, KO'ing the British MG unit inside. |
 |
The end of Turn 5. With the pillbox finally silenced, the remaining Assault Engineers move forward to take control of it. The FJ and Luftlande both advance to try and get the attack moving again, but take fire in the process, with one FJ suppressed in the open.
The mortar once again comes to the aid of the British, KO'ing a FJ and Luftlande unit. With the Germans exposed, the other British HQ failed its command roll. A lucky break for the Germans. |
 |
| The Assault Engineers finally take the pillbox and threaten the Armoured Cars. |
 |
| The FJ and Luftlande troops manouevre to prosecute the attack. |
 |
| The view from the British positions by windmill. |
 |
| At the start of Turn 6, the German FAC calls in the Me-109 for a strafing run along the river bank, which KO's one British unit. |
 |
The end of Turn 6. As the Assault Engineers fire on the Armoured cars, suppressing one, the other Germand units push forward towards the river bank, suppressing one British infantry unit there. In a desperate dash, one FJ unit rushes forward and assaults the windmill, which is held by a badly mauled unit and just takes it hand-to-hand combat.
The British commands all failed their command rolls, meaning the Germans would be in a good position next Turn to really press home their attacks. With their losses mounting, the British quickly withdrew over the bridge at Brandon Creek, leaving the Germans in command of the battlefield, but at a heavy cost to themselves. |
 |
| The Assault Engineers pour fire into the Armoured Cars as the FJ take the windmill. |
 |
| The FJ and Luftlande surge forward. |
 |
| The Luftlande close in on the river bank. |
 |
| The FJ take the windmill. |
End of the Game
With the British withdrawing and the Germans consolidating their positions, time to take stock of the losses suffered by both sides:
British - 3 x Infantry, 1 x MG.
Germans - 2 x FJ, 1 x Luftlande, 2 x MG.
Post Game Thoughts
A nice little game there and a perfect sized action to fit in just before Xmas. A game that could easily have gone the way of the British, but for the odd failed die roll here and there. Likewise the Germans could have had a better start and almost steam rollered the British. So some thoughts from the game:
- For a quickly put together action, albeit one that I've had in the back of my mind for years, I think this played out pretty well and gave some nice challenges for me as the solo player. Being comfortable with BKCII makes it so much easier to construct scenarios, as you sort of get to know what will work, well certainly for the solo games I like to play.
- The British were hampered from Turn 4 onwards by failed command rolls. One of two successful orders might have inflicted enough losses to blunt the German attack, or even stop it dead in its tracks. With the effective shooting from the pillbox on Turn 1, I thought that the Germans were in for a bit of a beating, but 'twas not to be.
- The higher German CV's and Initiative distance reflected quite nicely their better C&C at this stage of the War.
- The Stuka attacks were less than effective, but then trying to hit a pillbox must have been a damned hard thing to do, given how small they were. Still one successful attack might have been enough to give the Germans an early edge.
- Using the German mortar to drop smoke onto the pillbox felt right, even though it took a few Turns for it to actually happen. Bad die rolls were responsible for this, but it did mean that it wasn't easily available for more normal fire support for the infantry.
- I know the canal boat is highly speculative, but I wanted to include it for a bit of fun and was an easy way to provide the British with some indirect fire support at a random point in the game.
- The Hurricane arrived at just the right time and the Die Gods were with the pilot as just enough damage was inflicted on the Germans to hinder their ability to attack.
- What the game did higlight nicely was how hard it is to make an attack over such billiard table flat terrain. Just think of how the Allies suffered in the Peel Country after Operation Market-Garden and you get a good idea of what fighting in the Fens would have been like.
- The Germans I played more aggressively than normal, as with limited support, they really needed to push ofrward to take the objective, no matter the losses, which in the end were significant. The last ditch assault on the windmill went in their favour, just, but could easily have turned out quite differently.
This game has re-inforced my desire to play a 1940 campaign, played over similar terrain, to see what might have happened if the British hadn't moved out from their positions on the Dyle at the start of the French Campaign. Something to research and mull over during Winter and which might push me towards finishing enough German infantry for this to be a realistic prospect in 2023. At least I have nearly everything I need for the British, but a few extras would be useful.
Well this is probably the last game of this year. A review of 2022 will be published before the New Year, all being well. I have my notes so just need to add text as it were. So until then, stay safe and keep healthy!


Steve, as always, a superb wargaming display. An armored canal boat? I never heard of such a vessel. Neat that you could work that into the scenario. The way the action began, I figured the Germans would be repulsed handily. I was wrong! Good stuff and Happy New Year!
ReplyDeleteLooking forward to your Year in Review.
Thanks Jon:). The armoured canal boat I made for my AVBCW games, so is entirely fictional. However seeing some of the cobbled together stuff the Local Defence Volunteers/Home Guard came up with, it's not too far stretched...
DeleteAt the end of the first Turn, I too thought that this was going to be one way traffic for the Brits, but as mentioned, their failed command rolls eventually cost them the position and the game.
Steve....Interesting battle....as usual the FJ win but at a heavy cost. Regards.
ReplyDeleteThanks Tony. In a campaign this would have been a heavy blow to the FJ for sure. They did get a drubbing taking an airfield and bridges in Holland, plus of course Crete. Air support is pretty essential for them to have any chance given their inherent lack of heavy weapons, such as artillery.
DeleteGreat stuff!! Was just thinking I could have a go at that...and then, armoured canal boats?! :-)
ReplyDeleteThanks JWH:). A mentioned above, pure creative gaming on my part on the armoured canal boat front. You could simply have the mortar transported by a normal boat and then disembark on the bank.
DeleteBrilliant game mate! I especially like the armoured canal barge. Scratch built?
ReplyDeleteMany thanks JBM:). Yep, scratch built by me for my AVBCW games a few years ago now. I had fun making it so try to use it when I can, but really it has little chance of an outing.
DeleteSteve, dare I say it again, but a ton of action falling out of a 2’ x 2’ space. Good to see a scenario falling out from something you envisaged years ago. I like the drainage ditches, essential for this landscape, but the best bit was the ‘highly speculative’ armoured canal boat - superb :-) was that hand crafted?
ReplyDeleteThanks Norm and as those Little Wars TV chaps have shown (and others), you can get some good and challenging games on a coffee table sized board. So handy when time and space are at a premium.
DeleteThe drainage ditches were quickly knocked up for another scenario from a few years ago now, to represent streams etc, but are perfect for this sort of landscape.
'Highly speculative' is a good way to sum up the armoured canal boat! And yes, scratch built some years ago now.
Excellent little game Steve. And it played out plausibly too.
ReplyDeleteIn the feature film of the battle the German Feldmarschall would say, “Wiff anuzzer fictory like zis ve vill run out off men before ve get to Cambritch”.
Chris/Nundanket
Thanks Chris and naturally I thought it a plausible little action. However why the British would have thought that the Germans would invade via East Anglia, given the increased sea crossing time, alongside limited Air Cover, again due to the increased distance is beyond me.
DeleteI like the Feldmarschall's speech, which made me chuckle!
An enjoyable game report of a close game, and all on a 2x2 foot tabletop.
ReplyDeleteThanks Peter and I'm certainly enjoying these smaller games.
DeleteA great little scenario Steve with a pretty plausible outcome too. As to East Anglia being an unlikely target for Seelowe, when I were a lad in NE Scotland, we still had pillboxes dotted around the place, plus enormous concrete blocks up both banks of the tiver North Esk for about a mile, intended to prevent Getmabn tank landings! I think the British were just a bit paranoid in 1940....no doubt with good reason!
ReplyDeleteThanks Keith. When researching Operation Sealion, I was surprised to discover the amount of defences in Scotland as you've mentioned. Given the dominance of the Home Fleet in these waters, it is hard to imagine the Germans actually getting a successful landing, talk less of keeping it supplied.
DeleteSplendid looking game and report Steve. A love the idea of a 1940 deal with blitzkrieg campaign. Also, a 1940 Sealion "what if" campaign really has something to offer IMO.
ReplyDeleteLook forward to seeing where you take this one Steve.
Glad you liked it Richard:). These days I find the Early War games more appealing, as the tanks aren't uber powerful etc. Certainly the Invasion of France & Poland are on my to-do list for sure. Some planning has already taken place for the former...
DeleteNice battle report Steve. I trust you have a Pendraken pack of ELM47 (nuns) in reserve. They might’ve made an interesting “infiltration” party…
ReplyDeleteBy coincidence, we went out tonight and drove past the “slit trench” where my Dad stood guard at the top end of our village back in WW2. It was little more than a depression in the early 1970’s so I suspect that now - 50 years later - there will be little trace left behind, if anything.
Cheers,
Geoff
Thanks Geoff and a good idea on the nuns front. I think I have a pack somewhere, but will have a check when I gather some bits'n'pieces for the 1940 project.
DeleteIt would be cool if the slit trench was still there ins some shape or form. I know around the South West there are plenty of remnants of the defence system built in light of potential German invasion, including some trenches and gun-pits, albeit quite shallow depressions now.
Steve, that was fantastic! Hell, you've got me wanting to game Operation Sealion now! ;) Really great table, troops, and fight, please keep it going.
ReplyDeleteV/R,
Jack
Glad you liked it Jack! Certainly the perfect setting for some Kampfgruppe Klink action I would have thought.
DeleteHmmm, very interesting, but they're already up to June '41, or at least April '41 (having finished their campaign in Greece). But again, very interesting!
DeleteV/R,
Jack