After the recent fun game with Post of Honour, I thought it high time to get Honours of War back onto the table as well as working my way through the One Hour Wargames book scenarios. Next in line was Scenario 9 which was inspired by the Battle of Wavre in 1815. I was in two minds as to whether to play this or not to be honest, for a variety of reasons, which I'll address in my post game thoughts. However I decided to give it a go and used the random force generation system from Thomas' Wargaming 19thC Europe. The forces generated were as follows, using the Austrian National Characteristics, with all commanders Dependable:
Red
6 x Line Infantry
1 x Skirmishers
1 x Cavalry
2 x Artillery
Objective
Exit 50% of force off North table edge on the road by game end.
Blue
5 x Infantry
2 x Skirmishers
1 x Cavalry
2 x Artillery
Objective
Control the town and exit 4 units of the North table edge via the road, and/or prevent Red from exiting 50% of its force as per the above.
The Game
With everything set up the day before, it was just a case of finding a spare few hours to play the scenario, which is easier said than done these days! I'll let the photos do the talking and annotate them as required.
 |
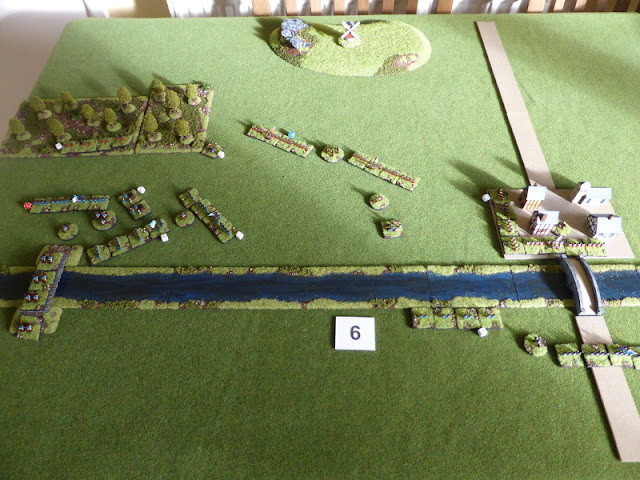
| An overview of the table, looking North, with Red defending to the North of the river and Blue beginning to arrive from the Southern table edge. |
 |
| The town garrisoned by an infantry brigade, with the Blue line and light infantry ready to enter the table. |
 |
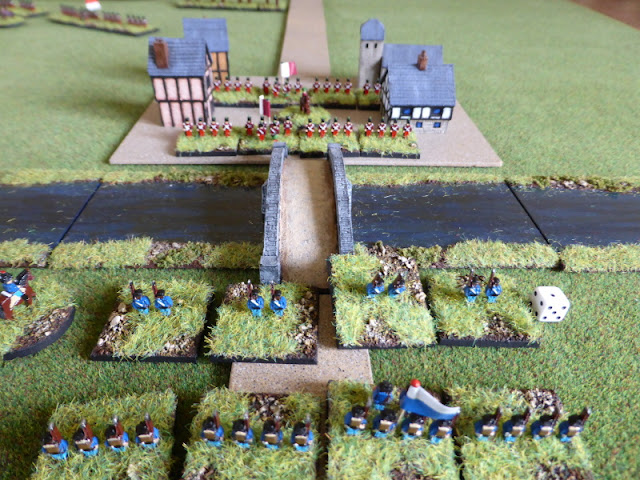
| The main Blue force, lead by light infantry, ready to move across the bridge. |
 |
| Two Red infantry brigades deployed, with skirmishers in the woods to their right. |
 |
| The end of Turn 1. The Blue troops move forward, with the light infantry crossing the bridge and deploying into line, as well as closing in on the town. The Red infantry and cavalry begin to withdraw as per the 'objective orders'. |
 |
| Blue light infantry come under fire from the town. |
 |
| The end of Turn 2. The Blue brigades on the left get a double move and move smartly across the bridge, but come under fire from the woods and the Red artillery. The Red infantry and cavalry continue to pull back and the brigade defending by the wood move their line slightly to form a better defensive position. |
 |
| Red light infantry in the woods and artillery cause more hits on the Blue troops. |
 |
| The Blue light infantry take more hits from the town which causes them to be less effective at firing (3 hits blue die). |
 |
| The end of Turn 3. As the Blue troops advance on the left, the continuing weight of fire sees one infantry unit routed (red die top left) and the light infantry in front of the woods moving to a blue die. In front of the town, the light infantry are forced to retreat due to loss of morale. Again the Red infantry and cavalry continue to retreat to the North. |
 |
| The light infantry are forced back and need to reform before returning to the fray. At least they have managed to cause the Red infantry in the town to move to a blue die. |
 |
| The Blue troops struggle to make headway, not helped by the early loss of an infantry unit. |
 |
| The end of Turn 4. The Blue infantry slowly moved across the bridge, but lost their light infantry to shooting from the woods. In front of the town the Blue infantry moved to blue die as well. For Red, the cavalry moved off the table with an infantry brigade close to doing so too. |
 |
| The light infantry (red die) rout and another infantry unit take hits as they deploy into line. |
 |
| The end of Turn 5. Across the board the Blue troops moved as best they could, whilst the Red infantry moved closer to the Northern board edge. Both sides have very little shooting and what there was was not too effective. |
 |
| The Blue infantry in front of the town begin to dress their lines to bring more firepower to bear. |
 |
| The end of Turn 6. The Red infantry brigade by the woods began to pull back as per their 'objective orders', whilst the artillery and light infantry covered their move. The Blue troops moved up towards the town and across the bridge as best they could. However more very effective fire from the woods say the loss of another line infantry unit for Blue. |
 |
| More deadly fire from the woods sees the loss of an infantry unit. |
 |
| The end of Turn 7. The Red infantry continued to pull back, but their artillery unit by the woods was forced to retreat having taken 4 hits and needed to reform. The Blue troops tried t move into position to pursue the Red infantry. Once again, the shooting was generally ineffective. |
 |
| The Blue troops are making little headway against the town defenders. |
 |
| The town defenders have moved one infantry unit to cover the retreat and threat from the Blue infantry across the river. |
 |
| The Blue infantry, cavalry and artillery struggle to deploy. |
 |
| The end of Turn 8. As Red continue to withdraw, the light infantry in the woods are caught by Blue artillery fire and are forced back to reform. The Blue troops get a double move and managed to charge into the reforming Red artillery , routing them in the process. |
 |
| The Red light infantry about to retreat to reform. |
 |
| The reforming Red artillery caught by the Blue infantry and routed. |
 |
| The troops in the town hold on and pose a threat to the Blue right flank across the river. |
 |
| The end of Turn 9. The Red troops continued to pull back and maintain a defensive line as best they could. However the Blue troops kept up pressure across the board, with a Red infantry unit being forced retreat and reform whilst in the town an infantry unit routed owing to some accurate Blue shooting. |
 |
| The Red troops lose an infantry unit in the town. |
 |
| The Red troops have an infantry unit near the windmill that will be forced to retreat and reform. |
 |
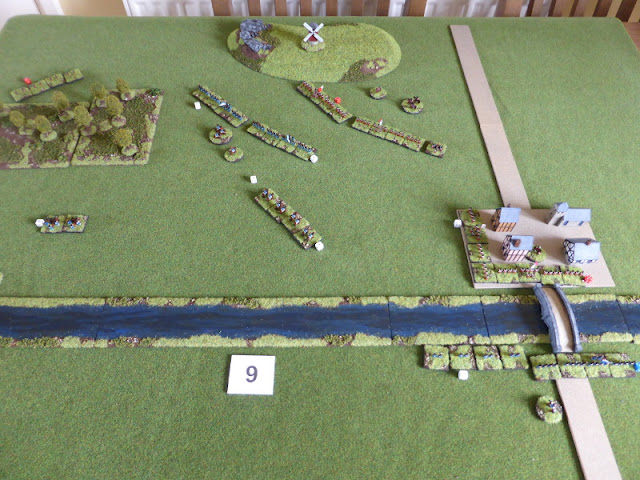
| The end of Turn 10. The Blue troops maintain pressure and move their light infantry into the town, but on their left flank by the hill, the reformed Red light infantry have appeared and are a significant threat. |
 |
| The Blue light infantry move into the town and the Red infantry withdraw to form a defensive position across the road out of town. |
 |
| The Blue left wing suddenly under threat. |
 |
| The end of Turn 11. The Red troops continue to contest the town, but manage to move their artillery and another infantry unit off the table. The remaining Red infantry keep the Blue troops in position, but one is forced back to reform, taking it closer to being able to exit the table. |
 |
| The shooting in the town fails to do any damage. |
 |
| The Blue infantry have to about face to meet the threat from the Red light infantry. |
 |
| The reforming Red infantry. |
End of the Game
At this point the Red force had exited over 50% of their troops and still contested the town, whilst the Blue force realistically couldn't prevent any more Red troops from exiting the table. The Red troops in the town surrendered and were granted the Honours of War.
The Red force had only suffered one infantry unit routed and one surrendered, whilst the Blue force had lost two infantry and one light infantry units routed. Therefore I decided that the Red force had managed a win as they had achieved their objectives and take far fewer losses than Blue.
Post Game Thoughts
First and foremost it was great to be playing 'Honours of War' again and everything came back to me and flowed well, with little recourse to the rulebook, which was great. Also it was nice to get the mdf figures out again, but more on this later. So as mentioned at the start, I had my reservations about this scenario, so without further ado some post game thoughts in no particular order:
- Whilst the scenario might work well for the OHW rules as written, when translating the scenario for other rulesets, problems occur IMHO. Given the deployment options to Red and the units they have to exit off the table, they can simply deploy most of their forces by the hill and behind the woods, which means that for most of the game the Blue troops will be trying to get close enough to them to engage in combat. A token force in the town, backed by artillery, could hold on long enough to delay Blue and/or tie down a significant portion of his force. So in essence to my mind it is virtually impossible for Blue to achieve their objectives and win the game.
- With reference to the above, I chose to deploy Red as if they were defending the crossings and then suddenly received orders to withdraw, to make more of a game of it. It helped but it still didn't feel like a fun scenario to play. In truth i didn't enjoy it, which is unusual.
- Crossing rivers by fords or bridges in the face of an opposing force is always tricky, even with a numerical advantage. With equal forces it is much, much harder. I reckon the attacker needs about a 2:1 advantage to make a game of it.
- I could have deployed my artillery better, either to fire across the river to support the crossing or by the town to shoot the troops onto the objective. Using horse artillery in say the Napoleonic or ACW era might make a difference, but in the SYW with its general lack of mobility, getting a good position early on would have helped.
- The Red light infantry in the woods really helped the Red cause, as they KO'd tow units of Blue infantry, which severely hampered their ability to take the fight to the Red troops.
- Both sides cavalry had little to do, other than for Red to ride off into the sunset or for Blue to struggle to find room to deploy. Again maybe in a Napoleonic game or ACW using them as mounted infantry might have made a difference.
- I made the cover in the town 'light' as otherwise it would have been a nigh on impossible task for the Blue troops to take it, given the assets at their disposal.
- I went for a distinctly 'old school' look to the game, due to a lack of time for something more 'visually pleasing' but also because I like the simple, clean look of 'old school' games.
- Making the Attackers Prussian and the possible advantages of command and movement that this confers on them might have helped, but I wanted to keep things simple for a first game back with HoW. However I think it a good option for future games to go with this and the Austrians as Defenders.
- As with the above, I avoided rolling for commanders this game as I didn't want any 'Dithering' results to unduly affect the game.
So there we have it. Certainly not the best game of late but it certainly helped clarify a few things in my mind as to what makes for a good game, whether balanced or not. I think this scenario could work well with some tweaks as outlined above, but maybe something to revisit sometime in the future.
Moving on I have ordered some more reinforcements from Walt at Commission Figurines, so that I can field Light and Heavy Cavalry, as well as some Grenadiers who will count as Superior Infantry. Originally these figures were meant to be a stop gap to allow me to play games until such time as I'd be able to paint up 'proper' armies for a conflict. However I have grown to love these, hence the extras just ordered.
A recent reply on Jon Freitag's excellent Blog about 'Generational Capacity' has got me to a thinking since I read it. It has given me plenty to ponder over and may even generate its own post in the future. In the meantime I'm not sure what will grace the table next, but until then, given the recent news re: the Omicron variant, stay safe and keep healthy!


Hi Steve. Good to see HoW back on your table. Your able looks super with your mdf armies and micro terrain. I love the look of your table whether you consider it "Old School" or "Visually pleasing." It can be both! A long absence of HoW faces me as well. I need to correct this long hiatus.
ReplyDeleteI agree that this scenario's victory conditions seem almost pointless. Red can win by simply exiting BMUs and Blue can really do little to stop it. Thomas' scenarios are good starting points but targeted toward an attritional combat model. Some rules don't follow those rules.
Thanks for the shout out of the blog! "Generational Capacity" is a useful term, is it not?
I'm happy with both looks these days and can appreciate both. I think the sparser tables favour 18thC games, probably due to them being used for ImagiNations games by the likes of Grant et al.
DeleteI'm glad I tried the scenario but it would be hard to make it work as it is without wholesale changes. Still his are not the only scenarios I've played that don't work. The next one looks more fun and hopefully will grace the table soon.
I love the phrase as it sums up a lot of the issues we all face as we get older. 10 years ago I thought I'd have had my lead pile painted by now. More fool me!
I often say to my wife that I really need two lifetimes: one to paint and one to game.
DeleteSo true Jon!
DeleteNice to see this scenario having a run out with HoW. One of the problems that I have found with OHW rules, particularly when you use the 4 - 6 units, is that units in woods an towns are too tough to remove, especially if a side gets elites and uses them in cover.
ReplyDeleteIn the end, I introduced a morale rule simply so that units defending such places might be forced out earlier, rather than fighting to the last strength.
Thanks for your thoughts Norm. As mentioned, this is the first OHW scenario that hasn't really worked well when translated to other rules. As mentioned on the HoW forum, some Grenadiers would have helped the Attackers for sure.
DeleteAn interesting post and thoughts on the scenario. The MDF units certainly look the part in the photo of the game.
ReplyDeleteThanks Peter. The mdf figures aren't for everyone, certainly not in my single rank glossy finish, but they work for me. I've seen others in a standard double line, painted historically, that look very good and you wouldn't know they weren't 2D mdf from a gaming distance.
DeleteI wouldn’t be replacing those little chaps of yours either, they are charming. The red lads remind me of Trumpton. Pew, Pew, Barney Magrew, Cuthbert, Dibble an£ Grub I think they were. Lol.
ReplyDeleteThanks and I think they are charming too. Ah, you can't beat a bit of Trumpton or Camberwick Green and I have thought about naming the commanders after the characters in Pippin Fort;)
DeleteGreat write up Steve, the One hour scenario's are really well balanced.
ReplyDeleteGood to see the step through the turns to see how the battle played out.
Cheers
Stu
Thanks Stu and I'm glad the photos gave an easy guide to how the game played out.
DeleteA nice little encounter Steve, I think all scenarios with river crossings are tough and yet of course they were a very common historical occurrence. I would agree depending on the period a 2:1 ratio feels about right. As a solo game it is perhaps even harder to create balance as. As for collecting / solo gaming I love the idea of solo gaming but find when I have the time I prefer to paint ? Perhaps when I am worn out painting I will do more ?
ReplyDeleteThanks Matt and I agree that river crossings are tough. Given the amount of times they happened, making them into an interesting scenario for both players is a challenge. Normally I would have sent of details to some chums for a PBEM deployment and taken in from there, but given my misgivings about the scenario in general, I didn't bother.
DeleteGiven I spent some 33 years in the design and prototyping business, I'm quite happy not to paint at present, rather preferring to catch up on many years of missed opportunities to get the toys on the table. Solo gaming is fine by me, but I do prefer a FtF game for a whole host of reasons.
I believe a 3:1 advantage for the attacker is the standard modern military calculation - but then, they ARE trying to make victory a foregone conclusion, not have a balanced contest! Playing scenarios based on real actions has a tendency to have pitfalls like this - if the aim is to withdraw in one piece, then it makes sense those are the victory conditions - maybe there should be a double negative for leaving a force stranded in the town - would real troops have sacrificed themselves so willingly I wonder? I do like the IDEA of solo gaming but have no practical way to carry it out in my current domestic arrangements!
ReplyDeleteGetting the Attacker/Defender ratio is a tricky one Keith, as you want to make it a contest for both sides, rather than a walk in the park for just one. I think the problem here was the scenario victory condition, where you could deploy ready to leave the table on Turn One and therefore win pretty much straight away.
DeleteWhere I find historical actions work well is with the Bloody Big Battles rules, as they have good victory conditions and often work best as a series if linked games where possible. Therefore no Pyrrhic victories or defending to the last man.
I hope you can find time to game at home but appreciate how difficult this can be when trying to juggle work, family and life balance.
I really like your mini-Old School set up: that aesthetic appeals to me too.
ReplyDeleteI have stumbled over the same issues as yourself in analogous situations, often generated by campaigns: how to avoid making it too easy for rear-guard type forces to evade attacks / compel the attacking force to do nothing but a headlong charge to pin the defenders into combat. In truth, this was a historical problem for the attacker too but my go to solution is generally to impose a time-based limit ("must hold for 2 hours/x turns") or some-such, since hore-and-musket rearguards were often tasked with securing the escape of the sick/baggage/main body.
And having been way for a couple of weeks, I am heading over to Jonathan Freitag's blog right now...
Thanks for stopping by and glad you liked the aesthetic:). The issues you mentioned are not easy to address, but a time limit is a good way to give some realism to the situation, ideally linked to a campaign as well. I think the main 'problem' with this scenario is that it is for use with his quite simple rules that make for a good entry point for new gamers etc. However they tend to fall down somewhat with more detailed rules IMHO. Still a brilliant resource for the wargamer and ones that can generate plenty of ideas.
DeleteOn the aesthetic thing, I had pretty much decided to do what you are doing, using Commission Figurines to create very generic "C18" forces to handle all these kind of horse-and-musket games. The reason that I haven't done it is that I ended up having some metal redcoats for the Jacobite rebellions which kind of morphed into a WSS collection...I am still not entirely convinced I made the right choices, this lack of conviction being increased by seeing this excellent set-up in action.
DeleteGeneric forces work for me and certainly allow me to get more games on the table and are of course one step up from my wooden blocks. It's certainly not a new approach, as as mentioned wargaming great such as Stuart Asquith did this. Personally I really like this way of creating your forces, as you can choose the figures and flags you like, along with coming up with a background for both sides if you so wish.
DeleteYes, "if I had known then what I know now" I think I would have done pretty much every period as generic forces. Much more flexible, probably more fun for gaming (as opposed to modelling and painting).
Delete