I've had this scenario ready to go for quite sometime, but after a variety of factors caused some delay, I finally managed to get around to giving it a run out on the table yesterday. Once again my good gaming chums Dave and Keith were up for giving the orders for their respective teams, with my goodself in the position to execute them well or completely cock things up. I'll leave you to decide which...
The excellent scenarios from OHW provided the basis for the game, with the numbers of units involved upped via Thomas' also excellent Wargaming 19thC Europe. Personally the combination of the two give a perfect solo game or one for an evening after work with friends, when time is limited.
Rules - Honours of War
Both sides were using the Austrian stats and had Dependable commanders.
Ruthenian OOB (Keith)
5 x Line Infantry (with battalion guns)
2 x Jaegers (with rifles)
1 x Dragoons
2 x Medium Artillery
Moravian OOB (Dave)
6 x Line Infantry (with battalion guns)
1 x Jaegers (with rifles)
1 x Dragoons
2 x Medium Artillery
Scenario
This is broadly based upon Salamanca and is ideally a game with an umpire for the giving of information to either side and deployment, as will become clear below.
 |
| The map as given to Dave (Moravia) at the start of the briefing. His orders are to break through the Ruthenian blocking force astride the road on the Northern end of the table and raid the enemy supply dump. First of all he has to give give his order of march for his units, which are deployed in the hatched blue area. Once received, he is given the following map. |
 |
| Dave is then informed that as he approaches the blocking position (hatched red zone 1), he suddenly sees Ruthenian troops in the distance (hatched red zone 2), but is unable to determine their number of composition. Keith (Ruthenian commander) has had this map from the start, so knows he is making a surprise flank attack, but again is not certain what strength the Moravian force is. Both sides need to move quickly to either breakthrough or to prevent it. |
 |
| With all the information to hand, Dave & Keith then sent me their plan of attack, as can be seen in the photo. The Moravians are to push forward and try to breakthrough with their 1st & 2nd Brigades, with the 3rd Brigade and Dragoons acting as a blocking force cum flank protections. The Ruthenian 1st Brigade is to hold on to the last man, as the 2nd Brigade moves to reinforce their position. The Jaegers are to harass and fall back if attacked, whilst the Dragoons are to act agressively (remember this bit) and attack where possible, no matter the consequences. |
Deployment
With orders received, I set about deploying both sides as can be seen below. I used my wooden blocks for the game and not only do I find them fun to play with, but they make the action a lot easier to follow, due to my limited photography skills and if using my Commission Figurines figures.
 |
| An overview of the table, typically open Austrian farmland with few hedges or fences. |
 |
| There's an awful of of Moravian troops right in front of very few Ruthenians. |
 |
| The Ruthenian 'cavalry' ready to ride to the rescue. |
 |
| The lone Ruthenian Dragoon unit with orders to act agressively. |
Turn 1
The Moravian troops automatically started first, with movement then following normal Honours of War intiative rolls. The Ruthenians won the Fire Initiative.
 | |
| The Moravian 1st Bde rolled an 'Inspiring' move and quickly closed with the Ruthenian blocking position. The 2nd Bde moved out to the right as ordered, with the 3rd Bde and Dragoons taking up flank protection. The Ruthenian 2nd Bde made an 'Admirable' move and so closed as quickly as they could, with the independent Jaegers and Dragoons moving smartly forward. |
 |
| Both sides open up, with honours fairly even, but the Moravian Jaegers couldn't hit a barn door! |
 |
| The Moravian 2nd & 3rd Bde's on the move, as the Ruthenian 2nd Bde closes fast. |
 |
| The Ruthenian Dragoons advance to the hill, unbeknownst to the Moravian troops. |
Turn 2
The Ruthenians won the movement initiative and elected to let the Moravians move first. They also won the fire initiative.
 |
| The Moravian 1st Bde held position, except that its supporting artillery unlimbered and entered the fray, with the 2nd & 3rd Bde's deploying and moving forward where possible. The Ruthenian 2nd Bde moved forward and formed as solid line from where they hoped to stop the Moravian advance. The independent Jaegers made an 'Admirable' move and closed to the small hedges by the fields. The Ruthenian Dragoons, as per their orders, acted agressively... |
 |
| The fire fight intensifies, with the Moravian 1st Bde losing a battalion and the Ruthenians only just avoiding the same. Maybe if the Moravian Jaegers could hit anything, it might have been different. |
 |
| The Ruthenian Dragoons as they crested the hill they spotted the Moravian Line Infantry, who failed to turn in response as the Dragoons charged in, with them being dispatched in swift order (the red die marks them as routed). |
 |
| The Ruthenian Dragoons then pursued and hit another Moravian Line Infantry unit who, although managing to turn, could not shoot as they were reloading. |
 |
| In two rounds of fighting, the Ruthenian Dragoons once again prevailed, destroying yet another Moravian Line Infantry unit! |
 |
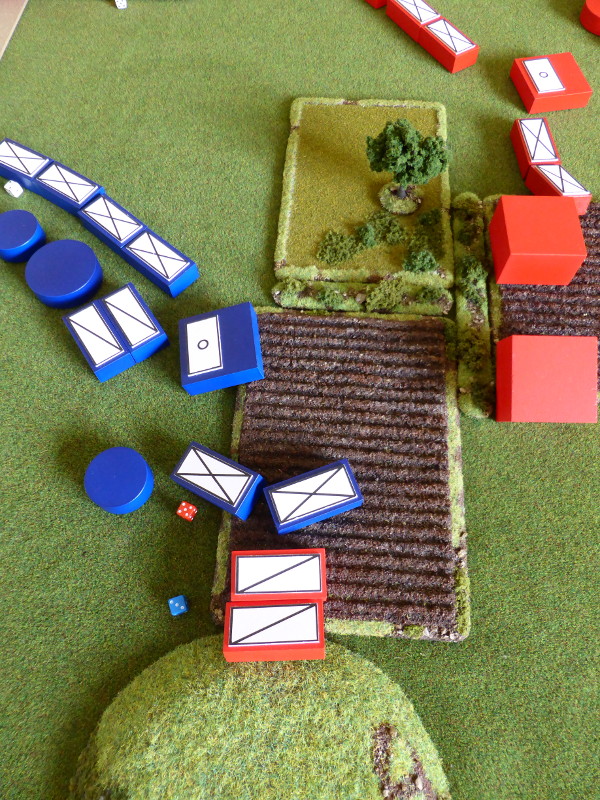
| The end of a rather dramatic Turn 2. |
 |
| The Moravian 3rd Bde has ceased to exist, with the 2nd Bde's flank somewhat in the air. |
 |
| Both sides 1st Bde's have taking a battering, but the Ruthenian's are marginally the less worse for wear. |
Turn 3
The Ruthenian's once again allowed the Moravian's to go first, but crucially the Moravian's won the fire initiative.
 |
| Despite the loss of the Moravian 3rd Bde, they still had a chance to clear the road, albeit a remote one. The Moravian 1st & 2nd Bde's moved forward to close the range, whilst the Ruthenian 2nd Bde made an 'Inspiring' movement roll and also closed the range with the Moravian 2nd Bde. The Ruthenian Dragoons charged into the unlimbered Moravian artillery, as the Moravian Dragoons moved back to try and protect the rear as well as looking for a chance to charge their counterparts. |
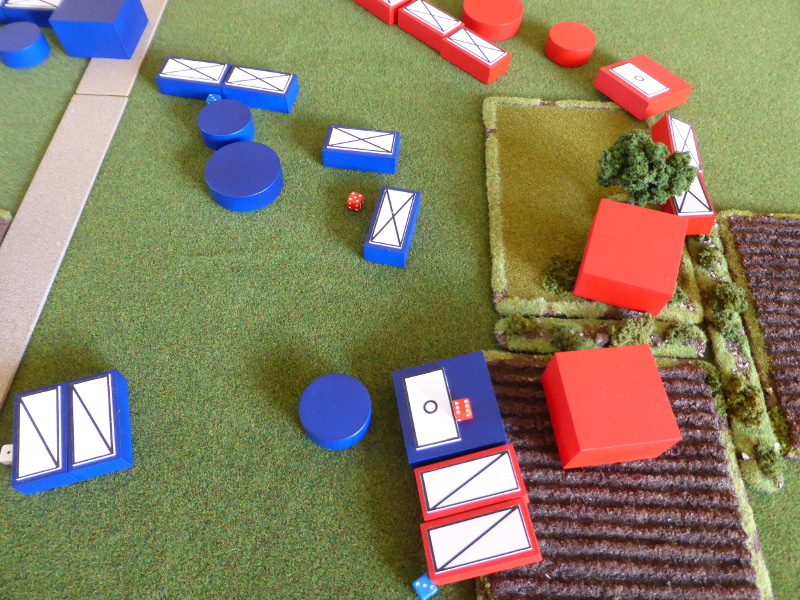 |
| The Moravian's took a bit of a battering, as the limbered artillery was automatically overrun by the Ruthenian Dragoons, whilst the 2nd Bde lost a battalion to converged fire from two sides. |
 |
| The Ruthenian 1st Bde's reforming battalion finally quit the field of battle after taking more hits. Despite this they held firm and the Moravian 2nd Bde had another battalion in a poor way after taking 3 hits. |
 |
| The end of Turn 3 and the game, as the Moravian's were being flanked and had little left with which to achieve a pyrrhic breakthrough of offer any meaningful resistance. |
The End of the Game
Well that was very quick and a much more decisive victory than I would ever have thought, possible, looking at the forces involved and how the scenario was set up. I thought it would be tough one for the Ruthenian's, but 'twas not to be.
 |
| The final butcher's bill. |
Post Game Thoughts
After a bit of a break, it was good to be back on the games table using Honours of War and my wooden blocks. Despite it being a very quick and one-sided game, I enjoyed it and thanks once again to Dave and Keith for their help with the scenario. So as always some thoughts in no particular order:
- As mentioned earlier, this sort of scenario really benefits from an umpire/third party, so that the flank attack is a surpise to the attacking player.
- Both sides had good plans and it could easily have gone the other way, with the Moravian's breaking through, but the die favoured the Ruthenian's when it mattered. Winning the fire initiative and/or the Moravian Jaegers actually hitting anything, could have turned the tide early on. Certainly a scenario that has replay potential to it.
- Both sides had their fair share of 'Inspiring' and 'Admirable' moves, so honours even here.
- The Ruthenian Dragoon's attack in Turn 2 was probably the game changer, as single handedly they destroyed the Moravian 3rd Bde and then in the following Turn their supporting artillery. Keith ordered them to act agressively and they certainly obliged. I was unsure whether to make them charge, as I probably wouldn't have done it, but orders are orders, which is half the fun of these sorts of games.
- Honours of War is really a great set of rules and as mentioned many times, my default rules for the SYW and 18thC gaming in general.
- As the hill blocked line of sight, I simply followed the Moravian orders until such time as they could see the other side of the hill, rather than playing the God like view that some players do. Unfortunately they really didn't get to see the otherside due to the Dragoons attack!
Next up is the second game in my narrative 'Rebels & Patriots' campaign, which should get played in the next day or two, all being well. Fingers crossed things are beginning to move in the right direction here in the UK, so maybe it won't be too long before we can meet up with friends, albeit outside, which will be nice. I think it's about 5 months since I've seen anyone! Face-to-face gaming might be some time off, but at least there's light at then end of the tunnel.
Looks like we need to get the barn door onto the rifle range for some practice. I aim to find as many others to blame as possible. All Brigadiers are off to the far reaches of the Empire for garrison duties. And I will crush the dice (virtually).
ReplyDeleteBarn doors on order as well as a trip to Specsavers;)
DeleteSteve, very good to see your colorful blocks out on maneuvers again. Doubly good to see my favorite SYW rules out too! My, the butcher’s bill was very high for blue. A thumb must have been on the scale!
ReplyDeleteThanks Jonathan and HoW never fails to give a great game! The Ruthenian's generally rolled 4's & 5's on the average die, with the Moravian's in contrast 3's & 2's, hence the high losses for the latter.
DeleteI think even before the first dice are rolled here, high excitement has already happened with the submission of the limited intel map, followed by the fuller intel map once the plan is set - very neat and in the spirit of Grant’s Programmed wargame Scenarios, which I was only reading yesterday evening!
ReplyDeleteThanks Norm. A big part of the fun is seeing the orders of both players, as happened in this case. Keith's plan looked good, as long as his units could move quickly enough which they did. Dave's plan was good to, but the poor die rolling on his behalf by yours truly meant that the plan quickly unravelled.
DeleteThat looks a great way of running a game Steve. Was it just a case of following the initial orders from the two commanders and playing the whole game yourself, or did they get a chance to intervene?
ReplyDeleteThanks and it is a fun way of running a game. Basically I receive the intial orders and overall plans of attack/defence and then implement them to the best of my ability from start to finish. Trying to do a Zoom call as others have done is simply not an option for a variety of factors. Also the solo bit means I can take my time, which is nice.
DeleteThanks Steve we have been pondering suitable SYW rules for a while and I have purchased a copy of HoW skim read but yet to try them so your game is timely 😀
ReplyDeleteYou're welcome Matt and I hope you enjoy the rules as much as I do. The scenarios in the book are a good way to start to get a handle on things, maybe using the Austrian stats to start with to keep things simple.
DeleteMatt, don't miss the HoW website if you haven't already found it:
DeleteHonours of War.com
A enjoyable game report and the blocks do look rather splendid and in many ways do make it easy to follow the game.
ReplyDeleteThanks Peter:). The blocks do make the game easier when playing and when coming to write the AAR, as it's very clear what's what. Not for everyone, but they work for me.
ReplyDeleteNot sure if my previous question about the blocks got through. Do you make them or do you buy them and if so from where?
ReplyDeleteHi, it did get through and I replied on the relevant thread. Maybe Blogger playing silly buggers again prevented you seeing the reply? Anyway, I made them myself. Others ahve used Jenga blocks or Lego to achieve the same effect. I hope this helps?
DeleteGreat help thanks. Regards Lexi
DeleteGreat game report! Enjoyed it very much. I will have to try it out myself.
ReplyDeleteThanks Mark and I'm glad you enjoyed it and hope you have fun giving it a go yourself:)
DeleteNever thought I would say it but your blocks worked rather well and opens a lot of doors for trying out new periods/rules.
ReplyDeleteThose Dragoons were well placed and having the umpire really made the difference.
Thanks Pat. They are certainly not everyone's cup of tea, but they work brilliantly for the job they were designed for, namely testing rules etc. Having orders to follow is great fun, leading to situations one might not normally encounter, such as the devastating Dragoons charge!
DeleteSteve, nice report. As you say, umpiring the game made that flank attack by my dragoons much more effective than our normal method of face to face play. Something to ponder.
ReplyDeleteThanks Keith. Not having the God's eye view that we normally get allows one to play the terrain and what units could likely see or hear etc, which is great.
Delete