With the campaign broadly set up, it was fairly easy to set up the first game, using the campaign narrative as a guide:
Background
Major Molotov was on his third raid into Ruthenian territory, this time having pillaged the cherry orchards of one Anton Chekov. Unbeknown to Molotov, Chekov had managed to get word to Rittmeister Radetsky that his orchards were under attack. Radetsky swiftly assembled some of his troops and aimed to catch the Moravians on their way back across the border.
Scenario J: A Long Way From Home
I chose the above scenario from the rulebook, as it seemed a good way to start the campaign, with the only change being to use 'Dawns & Departures' to generate the terrain, which can be seen below on the map. The NE and SW squares contain cherry orchards, the NW square a small hill and the SE square ploughed fields or crops.
 |
| The Ruthenians have split their force into two, to try and stop the Moravians, who need to exit as many troops off the NE end of the table, ideally via the road. |
Ruthenian OOB - 18 pts
4 x Line Infantry
1 x Jaegers
Moravian OOB - 24 pts
3 x Line Infantry
1 x Light Infantry
1 x Jaegers
1 x Hussars
The Plans
For Rittmeister Radetsky, the plan was simple, in that it was to advance as quickly as possible towards the orchards in the NE corner and to try to form a cohesive defensive line there. For Major Molotov, his plan, if you can call it that as he was unware of the impending ambush, was to quit Ruthenian territory as quickly as possible, using his Hussars and Jaegers to cover his flanks.
The Game
 |
| Both sides deployed, as per their options in the map above. |
 |
| Major Molotov follows his Light Infantry who are leading the way, with the Jaegers and Hussars covering his flanks. |
 |
| The smaller of the two Ruthenian ambush forces. |
 |
| The main Ruthenian force, led by Rittmeister Radetsky. |
 | ||
| The end of Turn 1. The Ruthenians got off to a good start, with all their troops moving forward as quickly as possible. They also rolled a Double 6, followed by a 6, meaning the Grand Duke had agreed to send re-inforcements in the form of another Line infantry unit. this bit of good luck meant that from the off, they were almost at parity with the Moravian troops facing them. Unaware of the ambush, Major Molotove moved forward with his troops, only to receive a message from his Jaegers and Hussars that Ruthenian troops had been spotted on both flanks. |
 |
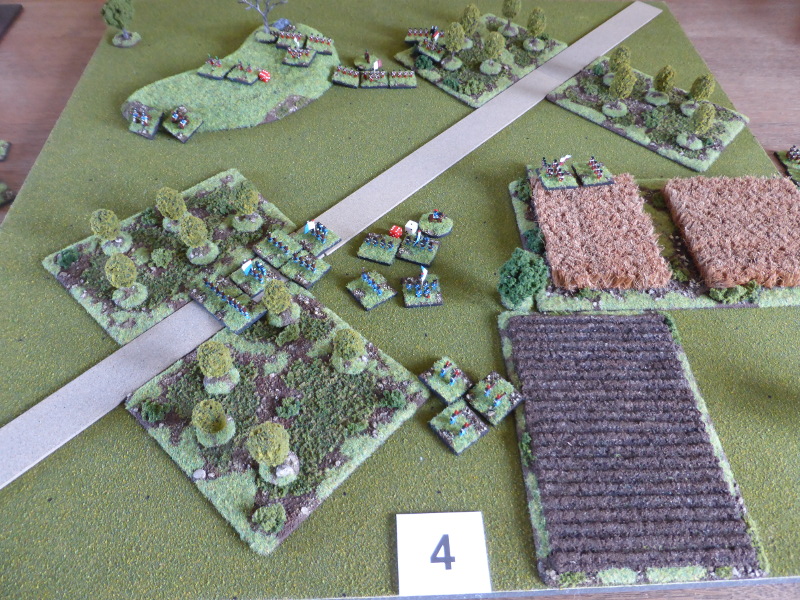
| The Moravian Jaegers spot the Ruthenians moving towards the cornfield. |
 |
| Major Molotov and his troops move through Chekov's cherry orchards, as yet unaware of the ambush that awaits. |
 |
| Rittmeister Radetsky moves off, thankful for the unexpected re-inforcements from the Grand-Duke. |
 |
| The end of Turn 2. The Ruthenian re-inforcements failed to follow Rittmeister Radetsky, possibly due to the rumours surrounding him at court. All other units moved forward, with the Jaegers hitting and disordering the Moravian Hussars. The Hussars rallied from the shock of being hit, whilst the Moravian troops pushed forward to try and clear the orchards. The Moravian Jaegers on the right flank made a skirmish move and managed to disorder the nearest Ruthenian Line Infantry unit. |
 |
| The Jaegers emerge from the orchard and hit the Ruthenians in the cornfield, as the Moravian Light Infantry begin to move clear of the orchards. |
 |
| Rittmeister Radetsky and his troops approach the edge of the orchards, but he is unaware that his re-inforcements aren't following him. |
 |
| The Ruthenian Jaegers draw first blood as they hit the Moravian Hussars, who see their numbers dwindle. |
 |
| The end of Turn 3. Rittmeister Radestsky managed to form his unit into Close Order, but the unit next to him somehow discovered that they were low on ammo (a double 1 rolled), which wasn't ideal, as was the Jaegers failure to shoot. At least the re-inforcements decided to play ball and moved forward. The Ruthenian Line Infantry in the cornfield hit the Moravian Light Infantry, causing them to become disordered. As the Moravian troops continued to clear the orchards, the Moravian Jaegers routed the Ruthenian Line Infantry who had just shot at their Light Infantry. The Moravian Hussars made a skirmish move and disordered the Ruthenian Jaegers on the hill. |
 |
| The Moravian Light Infantry are disordered (middle pic with blue die) by shots from the cornfield, but their Jaegers catch the Ruthenian culprits off guard, routing them as they catch them in the flank with thier shooting. |
 |
| The Moravian Hussars push forward and disorder the Ruthenian Jaegers on the hill. |
 |
| The end of Turn 4. Rittmeister Radetsky could only look on in horror as his Jaegers, with a rush of blood to the head, charged at the Moravian Hussars (a double 1 again). Surprised by this the Hussars failed to counter-charge, yet despite overwhelming odds, the Ruthenian Jaegers survived, but had to retreat back disordered. Things got better when the Moravian Light Infantry routed after taking fire to their front from the remaining Line infantry unit in the cornfield. Having already formed close order and still yet to fire, Rittmeister Radetsky gave the order and a devastating volley errupted from the Ruthenian line, hitting Major Molotov's unit, with himself only just escaping with his life. However his unit was broken and when he failed to rally his troops, they routed from the field, taking him with them in their headlong rush to escape! |
 |
| The Moravian Light Infantry break, with Major Molotov's unit broken... |
 |
| ... who then fail to rally and quit the field! |
End of Game
With Major Molotov suddenly fleeing, another unit failed its morale test and became disordered, at which point it was pretty obvious that the remaining Moravian troops had little to no chance of breaking through the Ruthenian lines.
Post Game Thoughts
Well, that was over much more quickly than anticipated! Still it felt longer and was a fun and entertaining game, more so due to it being part of a campaign. So first of some thoughts on the game:
- The terrain certainly didn't favour the Moravian troops, who were somewhat bottlenecked by the orchards either side of their line of advance. But that's one of the great things about the Dawns & Departures rules, as you never quite know what terrain you will be fighting over.
- The Moravian troops might have been better off trying to move through the orchards first, but as this would have slowed them down, in all likelyhood the Ruthenian's would have had more time to form a formidable defensive line.
- In my games of R&P, it's been very rare to roll any double 1's or 6's, yet there were three in this game, all of them for the Ruthenian side. The re-inforcements at the start really helped Rittmeister Radetsky, as from the off he was almost equal in terms of Line Infantry, which in this type of scenario, really counted. What looked like a tough ask suddenly became a lot easier.
- How the Ruthenian Jaegers survived their suicidal charge, I'll never know, but it was certainly an amusing point during the game, especially when the Hussars failed to counter-charge. Maybe I can weave this into the campaign narrative somehow...
- If you can form Close Order and still have First Fire up your sleeve, then that is a formidable option to have, talk less of if the unit is also Good Shooters, meaning that first volley will hit on 2+!
- As always I'd say the rules gave a fun and quick game, that was easy to play and remember the rules. They may be simple but they are not simplistic, which is a big tick in the box for me these days.
In terms of the campaign, we have:
Rittmeister Radetsky now on 19 Honour.
Major Molotov still on 10 Honour.
I have some idea for the next campaign game, which will move one rung down the ladder, as the Moravian troops were unable to cross the border into their own territory, but more on that in the next post.
I have another game lined up with my friends giving me remote orders, using Neil Thomas' OHW scenarios, as per previous games. Honours of War will be the rules again and I'm looking forward to getting this onto the table. My painting mojo is low as I'm preferring to play games at present, but this might change.
I recently tweaked the layout of my Blog pages, which has allowed me to post larger images, but frankly it has been a pain to format this post😣. For some reason it decided to play silly buggers as a I was writing, which took me over half an hour to correct, with lots of Anglo-Saxon expletives along the way! Hopefully it was worth it and makes it easier to see the action in the accompanying photos, but any feedback would be greatly appreciated.
So until next time stay safe and keep healthy!
Good looking battle, Steve!
ReplyDeleteAfter many playings of R&P, I find that advancing in the open against defenders in cover is a so very difficult. When you can only move OR fire and you must move while the enemy can concentrate on firing only presents a tough situation to overcome. Throwing a dozen dice at the attackers on each volley is bound to cause severe casualties in the approach march. As for throwing double 1's or double 6's, it happens in my games far too often, I think. Always at the wrong time too!
Thanks Jonathan:). The terrain issue is often one of those tricky things to get right; not too much for either side, so the defenders are impossible to shift or the attackers hidden until the last moment. I've pondered on only rolling a die per figure, to avoid a unit of say 7 figures knocking back one of 12, but there are issues with this approach as the rules stand. Plenty to think about though. Also good to know other suffer the whims of the die Gods too!
DeleteThe bigger pictures work well.
ReplyDeleteFor R&P do you use a base instead of single figures? I bought R&P (and TMWWBK) a few months back and have been thinking about giving them a go with my 10mm chaps.
I'm glad the bigger pictures work as I'd hoped:). Currently I'm using a stand to represent 4 figures, so three to a unit, and track casualties with small die. After 4 hits I remove a stand, so easily done. Not as aesthetically pleasing as the suggested basing, but much quicker to move and I can also use the bases for games such as Black Powder, which is very useful.
DeleteSteve, good tale. In this game, the Moravians look to have both the terrain and the Ruthenians as their enemy!
ReplyDeleteThe formatting is fine. When posting I have all the text written out first, leaving ‘INSERT photo turn 6’ type tabs along the way. At the end, I just remove each INSERT text line and replace it with said photo. I just need that kind of structure to keep things right.
Thanks Norm and the Moravians had two enemies as you say! Normally I've not had any problems writing up an AAR, but on this one it just through a wobbly, but managed to sort it out. For larger AAR's I've used the system as mentioned by yourself, which works fine.
DeleteNice work, we have played this scenario in many guises and it is always hard for the break through side. It is rare for them to get across the table. Almost always getting bogged down in fighting.
ReplyDeleteThanks Matt and interesting to note that the side trying to breakthrough rarely make it. At this smaller scale, getting scenarios right is very hard to do.
DeleteWhat a great little game and that is the joy of a campaign...Ne t game you can base it around the fact that the Moravians were forced to retire back into Ruthenia....
ReplyDeleteThe blogger formatting issue is still in evidence alongside photo 8....comments about the Moravian leader quitting the field!
Thanks Keith and I'm still pondering as to whether the Moravians escaped across the border ro not. I think it will come down to which scenario takes my fancy.
DeleteA good looking game. Those MDF figures are very versatile.
ReplyDeleteThanks Peter and they are certainly versatile, which was what I was hoping for from them:)
DeleteThere were a lot of changes in momentum for such a short game! I thought that the trap had been sprung too soon and was not going well so that the Moravians were going to get away. Then it all went to ______ as far as they were concerned.
ReplyDeleteThe MDF figures look great.
Regards, James
Thanks James and glad you liked the mdf figures:)
Delete