Our ACW campaign reached its conclusion with the final battle played out a few days ago. As the Confederates had taken a bit of a kicking so far ( a slight understatement) I was hoping Lady Luck and the Die Gods would be on my side...
Background
Colonel Sanders of Kentucky had set up his defensive positions in and around the town of Kayephcee (place of good eating in the local tongue), with the aim of halting the Yankee advance and thus preventing a break out into the Shenandoah Valley and the threat of cutting off Jackson's lines of communication. He had less troops than he would have liked due to recent losses further up the valley and was particularly worried about his deficiency in cavalry. After all the Union Colonel Shirley Wayne had been acting like old Jeb Stuart in his brave and daring exploits.
Rebs OOB
Colonel Sanders - C-in-C
Colonel Ulysses Everett 'Dapper Dan' McGill
2nd Kentucky - Skirmishers
3rd Kentucky
1 Artillery Battery
Colonel Menelaus 'Pappy' O'Daniel
1st Mississippi
2nd Mississippi
1 Artillery Battery
1 Cavalry Unit - Marauders
Yankees OOB
As they hadn't suffered any losses so far, the Union OOB was the same as at the start of the campaign.
Orders
For the Union ,simply to breakthrough the Confederate positions at Kayephcee. Unsurprisingly for the Confederates their task was to halt the Union advance.
Map
a
Deployment
The Confederates deployed their artillery on the hill, trying to cover as much of the Union attack as they could. The 2nd & 3rd Kentucky were to the North of the town on the right flank, whilst the troops from Mississippi to the South on the left, with the cavalry mounted and ready to meet the Union cavalry threat.
The Union stuck with their successful 'Buffalo Horn' attack, with the infantry in the centre and the cavalry and skirmishers on the flanks. Sly T'Lone's Brigade was in the centre and was tasked with advancing up the road, with Gump's Brigade to the left by the wheatfield.
 |
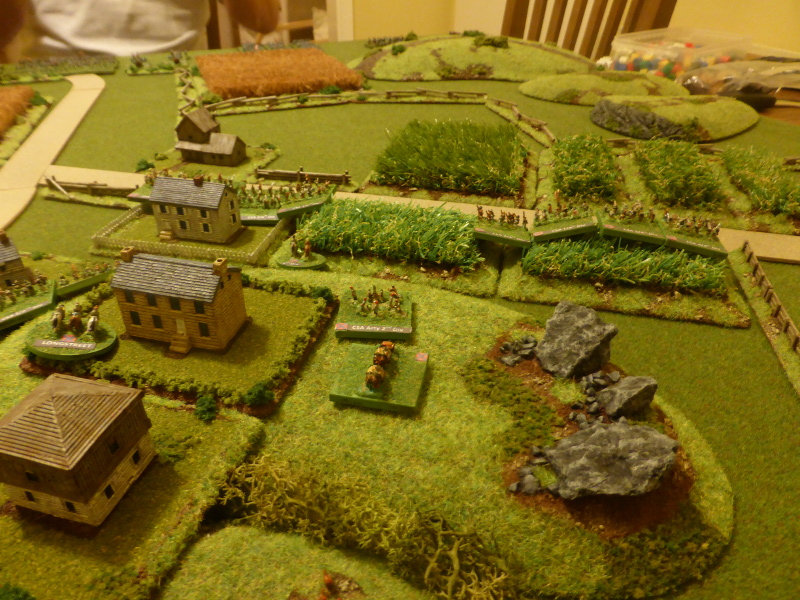
| An overview of the battlefield. |
 |
| The 1st Mississippi in the ploughed field and the 2nd Mississippi on the edge of town. |
 |
The Union Impis troops ready to advance. |
 |
| The Reb's artillery covering the left flank. | |
 |
| The Reb's artillery on the right flank with the troops from Kentucky. |
Turn 1
Shirely Wayne and his troops sounded the bugle call and set off at a fair old trot, moving past the woods and dismounting. Sly T'Lone's Brigade failed to move off, but Gump's troops set off through the wheatfields to try and close with the enemy as quickly as possible.
In reply 'Pappy' O'Daniel moved the cavalry to the snake rail fence, where they dismounted and opened fire on Wayne's troops, but only caused one hit. Only the the right flank had a target, but the artillery failed to hit Gump's troops in line in the wheatfield.
 |
| The end of Turn 1. |
 |
| Wayne's troops come under fire. | |
 |
| Despite a wealth of targets, the Confederate artillery fails to hit anything. |
Turn 2
Having come under fire, Shirley Waynes decided to split his command, with one unit heading to the cover of the woods whilst the other crossed over the fence and move into the ploughed field from where it could should at the Rebel cavalry. Union skirmishers moved up in support and their combined fire saw one hit on the cavalry and 1st Mississippi, both of which were also Disordered.
Sly T'Lone's Brigade moved forward, with the gun unlimbering. In advance of these the Union skirmishers moved forward and occupied the wooden hut at the road junction. Gump's Brigade failed, but as they were in March Column were allowed a free move and so deployed into line. On the left flank the cavalry managed to move but one failed its command roll.
The Confederate left flank had many units Disordered, so was limited in what it could do, but its shooting saw Wayne's cavalry and skirmishers in the woods Disordered. On the right flank the 2nd Kentucky moved forward to the snake rail fence by the cornfields, ready to meet the expected Union cavalry attack.
 |
| End of Turn 2. |
 |
| The Confederate cavalry in a rather exposed postion, but at least they are putting up a good fight. |
 |
| The view from 'Pappy' O'Daniel's command on the left flank. |
 |
| The Confederate right flank is not under threat just yet but does look open to a flanking attack. |
Turn 3
A mixed Turn for the Union boys as Sly T'Lone once again fails his command roll and Gump Blunders, leading to his Brigade moving one move to the right. Things went better for Wayne's troops and the skirmishers in the woods, who managed to cause the 1st Mississippi to move back Shaken and Disordered. On the left flank the cavalry moved up ready to engage the 2nd Kentucky.
The 2nd Kentucky duly oblige and cause one hit on the Union cavalry. On the confederate left flank, the cavalry cause two hits on Wayne's troops who duly save them! Not a good outcome for the Rebs. At least the 2nd Mississippi cause the Union skirmishers to go Disordered.
 |
| The end of Turn 3. |
 |
| The 1st Mississippi in retreat, Shaken and Disordered. Not a good state to be in. |
 |
| The 2nd Mississippi and 3rd Kentucky move forward to make a better defensive line. |
 |
| The 2nd Kentucky engage the Union cavalry on the right flank. |
Turn 4
Numbers eventually tell and shooting from Wayne's troops leaves the Confederate cavalry Shaken and Disordered. As Sly T'Lone's Brigade moved forward to the edge of the wheat field, the Union skirmishers who've moved forward to the snake rail fence put more hits on the 1st Mississippi who once agan have to retreat Shaken and Disordered. The 2nd Mississippi also take hits and become Disordered, leaving the Confederate left flank distinctly vulnerable.
Gump seemed determined to snatch defeat from the jaws of victory by once again Blundering, this time leading to his whole Brigade retreating off the table! Might this be the turning point of the battle? Not yet as the Union cavalry on the left flank Disordered the 2nd Kentucky.
With so many units with Disorder, the Rebs options were limited. The 3rd Kentucky were moved up to the sawmill to threaten Sly T'Lone's flank now that Gump's Brigade had disappeared. The Confederate shooting could have been better, managing only to Disorder some of Wayne's troops and the Skirmishers in the log cabin. What they need was troops going Shaken to even things up a bit.
 |
| The end of Turn 4. |
 |
| Wayne's troops shoot it out with the Confederate cavalry. |
 |
| A view of Sly T'Lone's Brigade advancing through the wheat field. |
 |
| The 1st Mississippi seek the shelter of Kayephcee. |
 |
| The 2nd Kentucky are doing their level best to hold back the Union cavalry. |
 |
| Gump's Brigade can be seen off table on the top right of the 'photo. |
 |
| Dave's 'photo of Gump and his Brigade off table. |
Turn 5
The time was perfect for Wayne to lead his troops in a charge to dislodge the Confederate cavalry, but he failed his command roll. So instead the did an old fashioned shoot out, that led to the Rebs becoming 'Whipped'. Sly T'Lone moved some units towards the Sawmill whilst his next command Blundered, leading to the other units moving off to the right, which was not quite what he had hoped for. Gump and his Brigade reappeared at the edge of the table. With all the moving completed it was a case off shooting all across the line, which was rather effective. As the smoke cleared the 2nd and 3rd Kentucky as well as the 2nd Mississippi all took 2 hits and were Disordered.
Again the Confederate troops could do little other than shoot back which was desultory to say the least, only managing to Disorder one unit of Sly T'Lone's Brigade.
 |
| The end of turn 5. |
 |
| The Confederate left flank in complete disarray. |
 |
| In contrast Sly T'Lone's Brigade are in good order and ready for the assault. |
 |
| Another view of the Confederate left flank. |
Turn 6
As Wayne failed his command roll, Gump and his Brigade pushed smartly forward. The Union shooting was impressive once again, with the 2nd Mississippi becoming Shaken and Disordered, the 2nd Kentucky Shaken and the 3rd Kentucky 'Whipped'.
With som many units Shaken and 'Whipped', Colonel Sanders command effectively ceased to exist as the troops fled the field of battle, leaving the door wide open to the Shenandoah Valley.
 |
| The end of Turn 6. |
 |
| Sly T'Lone's Brigade move in for the kill. |
 |
| Another view of Sly t'Lone's Brigade with Gumps just in view on the left. |
 |
| The beleagured command of 'Pappy' O'Daniel. |
 |
| The 'Whipped' 3rd Kentucky. |
 |
| The 2nd Kentucky, Shaken and about to be stirred. |
 |
| The road open to the Shenandoah Valley. |
 |
| Panoramic 'photos courtesy of Dave. |
End of Game
In the end the Confederate troops were not enough to put up meaningful resistance against the Union 'hordes'. A few die rolls here or there might have made some difference, but in reality would not have affected the outcome. Still a fun game with its comedy moments which we both enjoyed.
Post Game & Campaign Thoughts
So the campaign has reached the end of its course, so time to reflect upon this and the final game. So as always some thoughts in no particular order:
- The idea of the linked campaign based upon movement down a valley works well in principle, but in all honesty failed in practise. Why? Hard to be certain but I think the OOB for both sides would work well for Napoleonics or Seven Years War, but didn't for the ACW. As mentioned in the last post, there is too much cavalry which is 'wrong' for this conflict. Also I'm not sure what rules these scenarios would originally have been aimed at, but I imagine some of the old WRG's ones. There is no publication date in the book so I can't be certain. All of this aside, I think I will try this campaign again, but use the OOB as a guide and maybe play it set in WWII and using BKCII as the ruleset.
- Dave made the comment that when he saw the OOB at the start and at each game, he didn't think the confederates had a chance, and he right he proved to be. As with the above, the balance needs to be tweaked to give the Defenders of the valley a fighting chance which in this campaign they didn't have.
- After 3 games I think we pretty much had a handle on BPII. Some things we may have gotten slightly wrong, but for the most part we used common sense and what seemed right. A good set of rules and ones that I'm looking forward to playing more of soon.
- As others have said in the past, the rules themselves could have been more condensed and so easy to read, especially when you are trying to find a specific rule. However the contents page at the front works really well and the text often refers you to another page to help you find what you are looking for. So a minor quibble to be honest.
- When playing the game I kept thinking that Keith Flint's Honours of War alternate move and shooting sequence would work really well with these rules. I think it adds a nice level of friction and keeps the 'non-active' player more involved if that makes sense? I will keep to the BPII sequence for the time being and explore the alternate option once I've got a few more games under my belt so I can make a more informed decision.
- In our final game we seemed to roll an inordinate number of sixes, leading to widespread Disordered units, but ones with few or no hits at all.
- We soon learnt that once a unit is Shaken and Disordered, it is hard to recover it in the heat of battle. Maybe this is easier to do in a 'normal' linear type battle, but in this scenario it was nigh on impossible.
- In the campaign I made the wheatfields rough terrain. With hindsight I think this is wrong as it slowed the movement of units too much, when sweetcorn fields don't slowed movement, as written in the Glory Hallelujah! supplement. Not a big deal in the scheme of things and one you could almost do on a game by game basis if needed.
- Well even though the campaign was rather one sided, it was great fun and we learnt a lot from it in terms of how to run one and more importantly how BPII works in relation to the ACW. As mentioned before we didn't use any of the optional rules either from BPII or the GH supplement. Going forward I will use these for my solo games but for mid-week ones keeping it simple tends to work well, as we can focus on the game rather than what unit has what 'rule' that we might need to remember.
So what next? The aim is to play some of the scenarios from the GH supplement and the BPII rulebook, as well as some of the scenarios from the Grant & Asquith books. Hopefully this will carry on next week. So until next time...


Great climax Steve, same old problem with the Union swamping the Rebs, we have been playing our own ACW campaign set over 12 hours, I can't say much more, the Union player reads your blog. but hopefully a battle report in a few weeks and a much needed Confederate victory :-)
ReplyDeleteGlad you enjoyed it Stu, but those damn Yankees were simply too strong. Looking forward to reading about your campaign and love the 12 hour idea, which I may anb for future use!
DeleteTop report, thank you
ReplyDeleteThanks Will.
DeleteA nice action and table. I like the chaos that BP throws in, such as Gump leaving the table and all those sixes!.
ReplyDeleteInteresting to read your conclusions. Agree about the cavalry and look forward to more action.
Thanks Norm and glad you enjoyed it. We learnt a lot from our 3 games which will hopefully stand us in good stead for the next few games.
DeleteExcellent stuff, Steve and your battle table is superb. This was a tough campaign for the Rebels, for sure. Reading the turn-by-tun action, it seemed to me that friction may have played a much larger role than necessary to keep the game from flowing smoothly. I was reminded of an over zealous referee continually blowing the whistle to stop play. The Confederates, at times, had difficulty getting things going.
ReplyDeleteWhat are your thoughts on this battlefield friction?
Thanks Jonathan and really glad you liked the table layout. The battlefield friction probably affected the Confederates more due to the fewer troops and Brigades. I find it tends to even out over a more evenly matched game. I do like the curve balls that the C&C throws into the game,as it keeps you on your toes and you never quite now how your plan is going to unfold (or not as the case maybe).
Delete