Having finished our 18thC Brexite campaign this week, I felt I needed a break from painting turnback and tricornes. So looking at several of my projects that have been on the go for varying amounts of time, I decided to try and finish of my WWII US Airborne and actually start getting some WWII Germans onto the table. The latter I have had for an embarassingly long amount of time and were probably my first purchase from Pendraken.
After a few painting sessions I had added another Company of US Airborne, thus completing the Battalion, bar its organic artilery and anti-tank support. A concentrated spell then led to my first Heer Kompanie which, although not much, was a big step forward in getting a Battalion finished. The beauty of the Heer is that, like the British, the same uniform works from 1939 - 1945, which is really rather useful.
Having finished off these units I felt they needed blooding on the table and so started thinking about a simple BKC game, nothing fancy but something small and fun for an evenings gaming. My 2' x 2' board would be perfect for this and my mind went back to my earlier attempt in the year to fight in a heavy BUA environment. This didn't work but I learnt a lot from it as well as getting some very useful suggestions from replies to my Blog and on the Pendraken forum. It was then a case of coming up with some forces and bunging some terrain down onto the table.
Rough OOB
Initially I had planned on a Battalion per side with some armoured support, but as it all ended up a bit last minute, I went with a couple of Companys of infantry plus a mix of tanks and half-tracks. I didn't worry about points or anything, but more or less put the infantry down and then took out the armour as it tookk my fancy.
Terrain & Deployment
The terrain was based upon a sketch I made a few days ago, which gave me a good idea of how I wanted the table to look. Then it was a case of setting the river down, then the roads, followed by the houses, fields and orchards.
As this was a sort of advance to contact type game, there was nothing fancy in terms of deployment. Both sides started off board and used mobile deployment to come onto the table.
 |
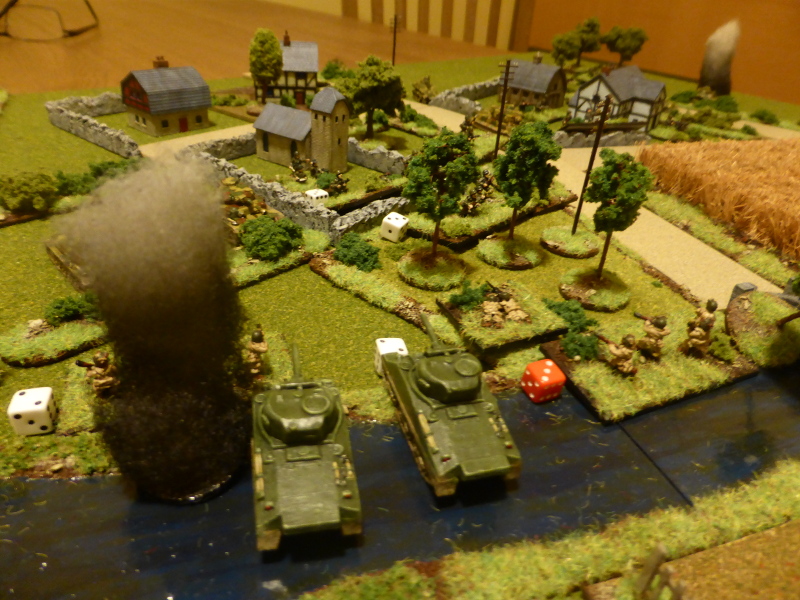
| The Germans would come in from the Northern end of the table, the Allies from the Southern. The river was counted as fordable across its length. |
 |
| A view down the road to the quiet village of Heimsdorf. |
 |
| A view towards the church and its stone walls. |
 |
| The US Airborne. |
 |
| The British amroured support. |
 |
| The German Kampfgruppe, with a mix of Heer, Fallschirmjager and mixed armour. |
Turn 1
I randomly rolled to see who would go first and the Germans won. The Heer on the left flank moved towards the farm wall and the 250's to the edge of the orchard. In a simialr move the Fallschirmjager with PzIV support moved up to another wall and a hedgeline. The CO sent the Tiger I to the bend in the road to dominate the approaches to the village.
The US Airborne on both flanks pushed forward to the river and crossed it in some places, being careful not to send the armour too far in advance without infantry support. The CO failed to arrive, which meant the Firefly wasn't on the table.
 |
| The end of Turn 1. |
 |
| The Allied right flank with the Stuart leading the way. |
 |
| The Allied left flank with the US Airborne safely in the house over looking the bridge. |
 |
| The Tiger I can be seen in the distance dominating the approaches to the bridge. |
 |
| The German right flank with the PZIV's by the hedgeline and the Fallschirmjager by the stone wall. |
 |
| The Heer on the German left flank, with the 250's at the edge of the orchard. |
 |
| The Tiger I in a commanding postion. |
Turn 2
As the Heer push forward on the left flank, the 250's come under Opportunity Fire from the Sherman and the Stuart. The Sherman easily brews one up, but the Stuart fails and takes 1 hit in return. The Heer put their MG42 into the farmhouse as the other units move towards the stone walls. On the right flank, the Fallschirmjager quickly push forward into the churchyard, with one PzIV moving forward towards the next hedgeline. With shooting breaking out on the left flank, the German CO orders the Tiger I forward, where it then engages the Stuart, but takes 18 shots (!!!) to destroy it.
The US Airborne on the right flank fail to move, possibly as a result of all the shooting from and at the armour. On the left flank, the US Airborne move into the orchard with Sherman support. they come under Opportunity Fire from the Fallschirmjager, who hit and suppress one unit. The Sherman shoots back but fails to hit anything, but takes 1 hit from a Panzershreck. The CO arrives and the Firefly shoot at the Tiger 1, causing 4 hits but not suppressing it. In return the Tiger I causes 3 hits on the firefly but does not suppress it.
 |
| The end of Turn 2. |
 |
| Smokes rises from the destroyed AFVs as both sides engage each other. |
 |
| The US Airborne come to grips with the Fallschirmjager in the orchard, supported by the Shermans. |
 |
| The PzIV's deployed in depth. |
 |
| A view from the Firefly towards the Tiger I. |
Turn 3
The Heer on the German left flank failed their command roll, but were in a good postion anyway for Opportunity Fire should the Allies troops advance. The Fallschirmjager and US Airborne firefight continued, with the Fallschirmjager taking hits, but no suppression. In contrast they managed to suppress the US Airborne MG unit as well as destroying an infantry one. Shots from the Panzershreck destroyed 1 Sherman and caused hits on another. The action continued as the CO ordered the Tiger I to continue to engage the Firefly, which it brewed up, then turned its turret and suppressed another Sherman on the Allied right flank. A blunder then sent the German CO back towards his baseline.
The Allied CO looked at his remaining units that were very depleted on the armour front as well as the left flank taking hits and facing an enemy in a strong position. With this in mind he decided to withdraw and try and call in artillery upport in preperation for a future assault to take the village.
 |
| The end of Turn 3. |
 |
| The Allied right flank, with the Sherman suppressed and in full view of the Tiger I. |
 |
| The Firefly burns as the Tiger I looks on in the distance. |
 |
| The action in the orchard and churchyard. |
 |
| Another view of the action on the Allied left flank. |
 |
| The PzIV's line the hedgerow to threaten the Allied left flank. |
 |
| The Tiger I dominating the road junction. |
 |
| The Fallschirmjagers in the churchyard and orchard. |
 |
| The Heer and the German left flank. |
Post Game Thoughts
Well that was a fun game and worked much better than my first attempt. It certainly had the feel I wanted, but is still very much a work in progress. So as always some thoughts on the game:
- The whole table layout worked much better, with smaller BUAs, linked by fields, roads etc. rather than the large blocks I had before. I still need to make some bespoke bases to represent the BUAs, similar to the ones used in our last game.
- For a quick game it worked really well and was well worth setting up and playing. Some things still need testing, such as mortars or the usefulness of artillery and FAOs. A more though out scenario and table will help with this, which I hope to do next time.
- I really liked the feel of the close range firefight in the churchyard and orchard. For once infantry anti-tank weapons such as the Panzershreck actually get used, as in my normal games it is rare for the infantry to be in range.
- Once in a firefight, infantry can succumb very quickly, especially when using Elite troops such as the US Airborne with their higher rate of fire. Next time I will probably go for British and maybe Italians on Sicily, to see what, if any, difference this makes.
- Having had my Germans for such a long time, it was great to finally get them on the table. They may not have contributed much, but I am keen to finish a Battalion off so that I can game a wider variety of conflicts, such as France 1940.
- The 2' x 2' table provided a really nice game with a different tactical challenge to normal BKC games. It is perfect for mid-week games as the game is over much more quickly, given both sides make contact pretty quickly and there are less units involved. It's not to say you couldn't increase the unit count, but you would probably need to keep units in reserve. Again something to try out in the future.
So now it is a case of trying to paint up more Heer units over the Xmas period before our gaming resumes in the New Year at some point. I'm sure I will get in some small games such as this, but it is subject to the usual family pressures at this time of year. So until next time...


Nicely presented narrative and great to see the 2’ x 2’ working with the BKC rules. It amazing how much terrain can fit into that space with 10mm.
ReplyDeleteThanks Norm and I was pleasantly surprised at how much I could fit in, without it looking too crowded.
DeleteThis battle was fought on 2' X 2' table? With all of the terrain, that is hard to believe. My eyes still have trouble believing it! So much terrain in so little space.
ReplyDeleteGreat looking battle. What is the organization for an infantry company and battalion in BKC?
Your eyes are not deceiving you Jonathan! Funnily enough it didn't feel crowded but natural, if you know what I mean? One of the joys of 10mm is that you can play a game like this on a 2' x 2' but it still feels like a bigger battle. To be honest you forget about the board size bery quickly.
DeleteAs for organisation, a Battalion would broadly have:
1 x CO
2 x HQ
9 x Infantry
2-3 x MG
1-3 Mortars
1 x Infantry Gun
1 x ATG
Naturally this can change slightly with different Nations and what year of the war it is. Germans will have more MGs and Mortars for example.
A very nice looking tabletop and figures. Until I read it was a 2x2 foot sized game I would not have picked it. Enjoyed the game report too.
ReplyDeleteThanks Peter and quite a few people surprised that it's a 2' x 2' table. One of several advantages of gaming in the smaller scales.
DeleteI enjoyed reading your battle report.
ReplyDeletehttps://www.10mm-wargaming.com/
https://www.10mm-wargaming.co.uk/
Take care
Andy
Happy to oblige!
DeleteA belated read and a very good one at that. You have given plenty of food for thought here Steve on playing small engagements. Something I must try with my 6mm. The table set up looked great... its amazing how small things such as the addition of telegraph poles really add to the atmosphere of a WW2 game.
ReplyDeleteThanks for your kind words Jon and I'm glad you enjoyed the game and found it useful. I'm sure it would work really well with your 6mm forces, whether WWII or ACW etc. Thinking about it, if I had taken the telegraph poles away, it could have been any period from the 18th to early 19thC. so with one board you could easily play 2-3 rules and see how they fair on a small table. Certianly food for thought!
Delete