This scenario is taken straight from the SotE rulebook and is a great starter scenario, given its relatively small forces and some simple terrain to add into the mix. I used the OOB as given, but realised I should have given the French centre Foot Artillery rather than Horse. Mea culpa! I rolled for the ratings of the commanders using the Wars & Campaigns guides as well as tweaking the ratings for the troops. The results can be seen below:
Austrian OOB (North of the stream)
1 x Brigadier General - Inspiring
2 x Light Cavalry
1 x Horse Artillery
1 x Light Infantry - Independent
Austrian OOB (By the hill)
1 x C-in-C
1 x Brigadier General - Inept
2 x Line Infantry
1 x Foot Artillery
1 x Brigadier General
2 x Heavy Cavalry
French OOB
1 x C-in-C - inspiring
Right Wing
1 x Brigadier General
2 x Light Cavalry
Centre
1 x Brigadier General
2 x Line Infantry
1 x Line Infantry - Inferior
1 x Foot Battery - Superior
Left Wing
1 x Brigadier General
1 x Light Infantry - Superior
2 x Light Infantry
1 x Horse Artillery - Superior
Scenario
The Austrians are moving back towards the village from different directions with the aim of uniting their forces. They are surprised to see a French force to their front, whose aim is to try and occupy the village and defeat the Austrians in detail before they can unite.
Pre-Game Bombardment
The Austrian Foot Artillery deployed on the hill opened up before proceedings got under way and managed to cause two hits on the French Centre, which were shared across two Line Infantry units.
Initiative rolls
Note that the French won the Initiative rolls in each Turn for the duration of the game.
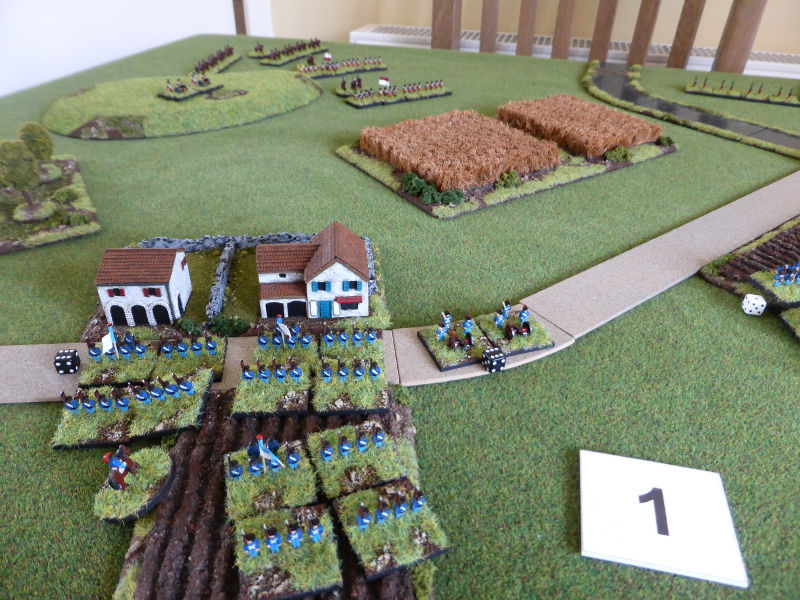
 |
| An overview of the table, with the French at the bottom. |
 |
| The French Light Infantry with the Superior unit to the left (black die). |
 |
| The French Centre with the Inferior Line Infantry unit to the rear (yellow die). The French Light Cavalry are to the right. |
 |
| The Austrian Light infantry and Light Cavalry. |
 |
| The Austrian Line infantry and Heavy Cavalry. |
 |
| The French Left Wing pushed towards the edge of the village, with the Horse Artillery still limbered. The Centre pushed forward towards the bridge with the aim of securing its environs whilst on the Right Wing the cavalry moved towards the stream to cover the flank. The Austrians North of the stream moved forward, but not fast enough to secure the bridge. The Heavy Cavalry moved off from behind the hill and onto the flank with the aim of uniting with the Light Cavalry around the bridge. The Inept Brigadier General failed to get his command moving, leaving them stuck in position, which was hardly an ideal start to the game. At least the Foot Artillery on the hill carried on their good work, hitting a French Line Infantry unit and causing 2 hits, then grazing fire hit the limbered Horse Artillery behind. |
 |
| The French Light Infantry ready to secure the village and then move on from there as required. The Horse Artillery as yet to unlimber. |
 |
| As the French Centre advances, they are hit by Austrian artillery fire. On the Right Wing the French Light cavalry remain in column for ease and speed of manoeuvre. |
 |
| The Inept Brigadier General lack of command ability causes the Austrian Line Infantry to become strung out, as the Heavy Cavalry move off. |
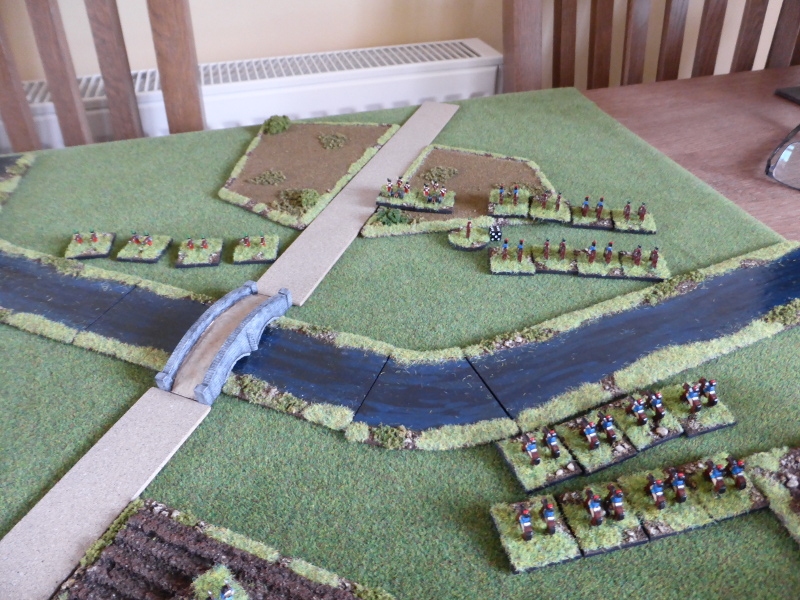
 |
| Both sides try to get to the bridge the 'fastest with the mostest'. |
 |
| The French Left Wing changes formation to skirmish order and occupies the village, with the Horse Artillery unlimbering. The Line Infantry in the Centre also change formation to Line to limit the effects of the Austrian artillery fire. On the Right Wing the Light Cavalry also change into Line and form up along the bank of the stream. Once again the Inept Austrian Brigadier General fails to command, but at least his units do move without him, which is a bonus. The C-in-C can only look on in despair. Elsewhere the Heavy and Light Cavalry advance and the Light Infantry change into skirmish formation. The Austrian Foot Artillery have certainly got their eyes in as they manage to leave a French Line Infantry unit Weakened in the Centre, with grazing fire causing two hits on the Inferior Line Infantry unit in the rear. Even with the Brigadier General and C-in-C attached, they fail to Rally the Weakened unit, leaving it in full view of the Austrian artillery. In reply the French Horse Artillery manages just one hit on a Line Infantry unit. |
 |
| The French Light Infantry occupy the village and the Superior unit moves to the left, with the aim of advancing through the wood to threaten the Austrian position on the hill. |
 |
| The Line Infantry in the French Centre are suffering from the extremely accurate shooting of the Austrian artillery. At least their commanders haven't been hit yet. |
 |
| The Austrian Line Infantry are rather hampered by their Inept commander. soon the C-in-C may have to step in and take over command of one or tow units. The Heavy Cavalry slowly move towards the bridge. |
 |
| The Light Cavalry from both sides eye each other up warily, not wanting to risk an attack across the stream. The Austrian Light Infantry have almost secured the bridge. |
 |
| The French Light Infantry on the Left Wing move off either side of the village, to support the Centre and to attack the Austrian artillery on the hill. The Centre continues to advance, which is risky with one Line Infantry unit Weakened and close to Routing. The Light Cavalry on the Right Wing pulls back to give a better field of fire to the Horse Artillery in the Centre. Once again the Inept Austrian Brigadier General failed to command, leaving the C-in-C to move one Line Infantry unit forward, as the Heavy Cavalry continued their slow move forward. The Light Infantry moved into the stream to try and close the range on the French Centre to provide enfilade the Line Infantry. The Light Cavalry pulled back, worried about the French Artillery to their front, but took two hits from Opportunity Fire as they moved. The French Horse Artillery by the village failed to hit the Austrian Line Infantry, in contrast to the Austrian Artillery who managed to Rout the Weakened French Line Infantry unit in the Centre. As they broke, they ran into the Inferior Line Infantry in the rear, causing them to become Weakened and they only just avoided Routing too. The French C-inC- managed to Rally one hit off but they were still Weakened. |
 |
| The French Light Infantry try to manoeuvre so as to threaten the Austrian Line Infantry and the Foot Artillery on the hill. |
 |
| The French Horse Artillery by the village fail to register any hits once again, as the French Centre takes a pounding. |
 |
| As the French Line Infantry Routs, they almost take the Inferior Line Infantry with them. |
 |
| As the French Light Cavalry pull back, they allow the Horse Artillery to inflict damage on the Austrian Light Cavalry as they try to avoid being too close to the guns. |
 |
| The French Light Infantry on the Left Wing begin to close in on the hill and will soon be in range to open fire on the Austrian Foot Artillery. The Line infantry consolidate in the Centre and also put out Skirmish Screens as the range is closing for musket fire. As the Horse Artillery pivots to support the Centre, the Light Cavalry once again move up to the stream, screening the guns at the same time. Unbelievably the Austrian Brigadier General is once again rather Inept and fails to command, but the Line Infantry also put out Skirmish Screens for the same reasons as the French. As the Light Infantry crosses the stream, the Heavy Cavalry moves almost parallel with the Austrian front line and the Light Cavalry once again moves back towards the stream. For once the Austrian Artillery is rather poor in its shooting where as the French manage to Weaken an Austrian Line Infantry unit, but this is Rallied back to a normal state at the end of the Turn. |
 |
| The French light Infantry begin to press. |
 |
| Both side throw out Skirmish Screens as they close with each other. The French Inferior Line is still Weakened. |
 |
| The Light Cavalry of both sides begin a Mexican Stand Off. |
 |
| The French Light Infantry on the Left Wing formed an extended Skirmish Line as they approached to the hill, supporting the Line Infantry in the Centre as they too advanced. The Inferior Line Infantry moved towards the village to try and put as much distance between them and the Austrian artillery as possible. The Light Cavalry and Horse Artillery maintained their positions. In a surprise move, the Inept Austrian Brigadier General finally managed to command a unit, leading to a Line Infantry unit pivoting to face towards the approaching French Light Infantry. The Heavy Cavalry continued to move but had little hope of uniting with the light Cavalry across the stream. What shooting there was managed to Weaken Line Infantry units from both sides who in the Rally phase, managed to remove their Weakened status. The French Light Infantry opened fire on the Foot Artillery on the hill, causing one hit. |
 |
| The Austrian Foot Artillery are in danger of being overrun, despite the Austrian Line Infantry unit in the rear turning to face the French. |
 |
| The skirmish Screens open fire at each other, with the Austrian Light Infantry across the river still enfilading the French Line Infantry. |
 |
| The Inferior French Line Infantry unit seeks safety. |
 |
| The stand off continues. |
 |
| As expected, the Superior French Light Infantry unit on the Left Wing charged into the deployed Austrian Foot Artillery who failed to turn to face them and so were overrun and destroyed! Combined shooting from the Horse Artillery and the other Light Infantry unit saw the front Austrian Line Infantry unit, which had pulled back, become Weakened. Desperate times called for desperate measures and the Austrian Heavy Cavalry commander (von Bredow?) spurred his horse forward and led his Heavy Cavalry into a death ride towards the leading French Line Infantry unit. Supporting fire from French guns cause hits on the Heavy Cavalry, who carried on regardless, whilst the Austrian Light Infantry's enfilade fire led to the French Line Infantry unit becoming Weakened, which retreated back from the charge but not far enough and were caught by the Heavy Cavalry. Routed by the charge, they fell back through the Inferior French Line Infantry, who took a hit and were then caught by the Austrian Heavy Cavalry as they pursued. This led to the Inferior Line Infantry Routing too! In a blink of an eye the French Centre had ceased to exist. |
 |
| The Austrian Foot Artillery is overrun as the Austrian line Infantry is Weakened by combined fire. |
 |
| The Austrian Heavy Cavalry crash into the French Line Infantry, routing them and then... |
 |
| ... contact the Inferior French Line Infantry unit as they pursue, also Routing them. The French commanders look on in disbelief! |
End of the Game
With the dramatic change in fortunes for the Austrians after the loss of their Foot Artillery, with the French Centre gone and the Austrian Heavy Cavalry ready to run riot in the French rear, I called the game for the Austrians.
Post Game Thoughts
Well after that incredible finale I had to go and catch my breath as I was somewhat exhausted by it all! what a way to finish a game and snatch victory from the jaws of defeat! It's one of those moments in a game that will linger long in the memory and for all the right reasons. So to try and sum it up, as usual my post game musings:
- The Inept Austrian Brigadier General was a real handicap for most of the game and limited what the Austrians could do. Theirs was a tough ask to being with but he only made it more difficult. Oh the joys of playing the Austrians!
- The Austrian artillery played a great game, from the pre-game bombardment onwards. In contrast the French artillery didn't get going until mid game onwards, which was probably lucky for the Austrians.
- The stream led to the Light Cavalry from both sides doing little other than canter about the battlefield. Not wanting to risk a charge across it and attack a defended bank was the reason. Maybe the Austrian Light Infantry could have provided support, but the French artillery was good reason not to.
- The French Light Infantry I think I could have used better, supporting the Centre rather than going around the flank. Their extra manoeuvrability and fire power would have been useful to press the attack in the Centre. One unit on the flank would have sufficed.
- The Austrian Heavy Cavalry's charge was made in desperation and came off despite the odds. I still can't believe it turned the game as it did, but the Die Gods were certainly on their side!
- Both sides Generals survived a lot of fire and came out unscathed. they also played their part in this game, being very useful in the Rally phases. I did get one part wrong but have learnt this and will remember for future games.
- Both sides did use Skirmish Screens as they closed which was good and certainly added another dimension to the game.
- I'm sure I could have used the Reserves rule to get the Austrian Heavy Cavalry moving forward more quickly and maybe the Light Infantry and Light Cavalry too. I need to re-read this section to make sure.
Well I think that pretty much covers everything. I hope you enjoyed the AAR and I certainly enjoyed the game and am enjoying these rules too. I do need to paint up many more of my MDF figures and probably need to order some more cavalry, but in the meantime I will be digging out my wooden blocks so that I can play some bigger games. I feel pretty confident with the rules now and this is only after three games, which I think speaks volumes of the rules and the approach Keith has taken.
I'm not sure when my next game will be and what period, but I'm hankering after some 'Ancients' gaming, but also want to put on a bigger Napoleonics game and maybe even play it as a mini-campaign. Plenty to think about, so until next time, stay safe and keep healthy.
Interesting report, Steve, and your table looks superb. You really set a handsome table with your terrain. Your fields, especially the trapezoidal ones, look terrific. Did you make these or buy?
ReplyDeleteThe inability for the Austrians to repeatedly get units moving would be frustrating. I guess that is expected from a dithering general. I was surprised the Austrians pulled off a victory too. Is SotE becoming your default Napoloenic ruleset?
Thanks Jonathan and I'm glad you like the look of my table. All the terrain is made by yours truly, with the exception of the buildings which are from Leven Miniatures. Being a former modelmaker, terrain making is pretty easy for me as I have all the tools etc. I must admit that often I prefer this to painting miniatures!
DeleteSo many failed command rolls was frustrating, but then that's part and parcel of Austrian C&C;). The cavalry charge was a last ditch effort and the fact that they even managed to contact the French line without being weakened surprised me too. The French artillery consistently underperformed all game as if they had hit, then the cavalry would probably not have been able to make contact as they would have become Weakened.
Certainly for Divisional sized games they are working very well for me, a Napoleonic novice. More knowledgeable gamers might want more 'chrome' but I don't feel it's necessary. BPII is also a candidate but SotE is ticking all the boxes at present. For big games, BBB works a treat and can use the same figures, which is a huge bonus, plus they give a good game in a few hours, which is not something you can say for lots of games.
Perhaps I should commission you for MY long neglected terrain works?
DeleteThe larger the game, the more abstraction I enjoy (and tolerate).
I'd be happy to discuss what you might want, but the shipping costs could be crippling:(. PM me on my e-mail if you want.
DeleteNice to see a bit of drama coming in to the game Steve!
ReplyDeleteBP and BBB are both excellent sets IMHO - I learnt a lot by playing both in the past. Giving the possibility of dramatic events was one thing BP in particular taught me.
It certainly was dramatic Keith, which is what we like in a game; well at least I do! I agree that BPII and BBB are great rulesets, although lots of gamers don't like the drama that the former can introduce in a game. Personally I like this sort of friction, especially in solo games.
DeleteThanks Steve, enjoyed. I wanted to see this scenario played out as it is the one I attempted for a first game (using proxy units) and because of that, I played a 'minimal' game without leader attributes, so the Austrians were not so hampered.
ReplyDeleteMy own game played out quite differently from yours, so i think there is a good sign there, that similar situations are very replayable.
My French took the Village and the Austrians tried to take it off them and I found combat against a BUA tough (rightly).
I love the 'grazing' rule (for those not familiar - this is essentially and artillery 'bounce through' rule, but only successful hit dice are used against the next tine and so on) - simple and clever.
Anyway, I like the scenario very much, very good for a learning scenario as it brings so many rule elements together and would be a good bench mark scenario for other rule sets. Thanks for the detailed run through.
I'm glad you enjoyed it Norm and gave the scenario a go. for a first game I would have left out leader attributes, but with a few games under the belt it felt the right time to give them a go.
DeleteWith rules such as these, 'simple' scenarios have lots of replayability, which is great, especially for solo games. The friction that is inherent in the C&C in SotE is great and again is great for solo players. I didn't fancy trying to take the BUA with the limited Line Infantry at my disposal, as they are hard enough to take at the best of times, even with parity of troops.
I'm hoping the detailed run through encourages to give these rules a look in as they seem to have flown under the radar somewhat.
Well that was a turn around. I too like the simple abstraction without loosing the core element of wargaming, it shows what can be achieved..very nice 👍
ReplyDeleteThanks Matt and I too was rather surprised by the result, but in a good way, even as a solo player. Sometimes 'less is more' in life and certainly in wargames rules, which can often have too much chrome to them. With these rules you can focus on your plan and tactics, rather than endlessly looking through the rulebook or combat resolution charts.
DeleteGood stuff, as ever Steve.
ReplyDeleteI thought I’d commented a while ago, but at the last second I got an error message so I guess I’ll hafta retype again. Groan…
The MDF figures are lovely and your paint job is great. I searched Google and, from what I saw, your technique looks best/most effective. The glossy, toy soldier painting style is great - I have a couple of 25mm nineteenth century “imaginations” armies painted in the same sort of style and they really do have a certain je ne sais quoi.
I really like your terrain too - first rate. Is it worthwhile making, say, modern tarmac roads and also pre-industrial revolution tracks (dirt, grass verges etc) so you can use the appropriate type of road depending on the period of the battle? I guess your generic roads can be used for any period.
I have really enjoyed your Napoleonic battles (your recent WW2 Italian campaign battles were also enjoyable to read and very inspirational). I’ll keep an eye open for your next efforts, whichever period they might be.
Cheers,
Geoff
Thanks Geoff. The gloss finish does make a big difference on the MDF figures, as the colours pop more than with a matt finish.
DeleteRe: the roads, I've stuck with these as they are easy to store and work for most periods. As I no longer game post WWII games anymore, I have no need for tarmac roads, although I did have some at one point.
I'm glad you enjoy my battles, no matter the period and it's always good to get feedback from other Bloggers. Hopefully the next game won't be too far away.
Nice report, and those MDF figures look great (trawls internet looking for manufacturer...).
ReplyDeleteCheers,
Aaron
Thanks Aaron! They are great figures and they are available from Walt at Commission Figurines.
Delete