Somewhat later than planned, I managed to get in the final game of my mini-campaign. The Italians having won the last game had had time to make good their defensive postions in and around the town of St Pietro. The British having received a bloody nose last game, assembled as much support as they could muster before making the attack on the town. Whether it would be enough remained to be seen...
Italian OOB
5 x Infantry
2 x MG
1 x Mortar
3 x L3/35's (one with an ATR)
2 x Semovente 75/18's
British OOB
9 x Infantry
2 x MG
1 x Mortar
1 x Honey
3 x Shermans
2 x 25pdr Battery's
Scenario Rules
I thought I'd give the 'Constructions' optional rules from BKCI a go to reflect buildings taking damage and possibly collapsing, but tweaked them slightly for this game:
Hit on 6+, 6+ Save, 6 Hits. Units inside the building take hits if the building fails its save. Once the building has 6 hits, it collapses destroying any units inside.
Table Set Up
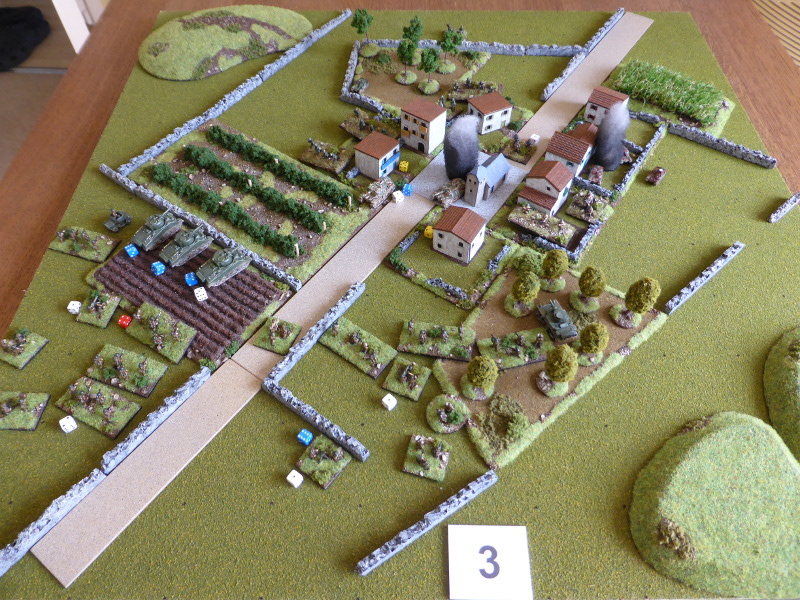
St Pietro dominated the table, sitting in a small valley and surrounded by crops ans stone walls. The Italians had a weaker left flank, with a stronger right and the armour in the town square and on either flank. The British seeing the lie of the land, decided to attack the Italian right flank in force whilst pinning the left.
 |
| An overview of St Pietro. |
 |
| The Italian left flank with L3/35 support. |
 |
| The Italian right flank, with the Semovente's in the town square. |
 |
| The British force. |
Turn 1
The British pushed their pinning force towards the Italian left flank, deploying to cover the approaches to the town and moving towards the orchard. The Honey spotted the L3/35's and engaged them with mortar support. On the British left flank, the infantry failed to show up but the Shermans pushed forward, before a Blunder saw the CO having some issues, resulting in his CV being -2 for the next Turn. The FAO arrived and moved to support the right flank as they had targets for his 25 pdr's.
The L3/35's used their Initiative Move to beat a hasty retreat away from the Honey and its supporting infantry. The troops on the right flank engaged the British to their front, hitting the mortar unit but not suppressing it. The other Italian units made some minor adjustments to their positions, not wishing to reveal their positions just yet.
 |
| The end of Turn 1. |
 |
| The Honey and supporting infantry push into the orchard on the outskirts of St Pietro. |
 |
| The Shermans on the left flank lack support, whilst the infantry on the right flank have come under fire. |
 |
| The road to St Pietro. |
Turn 2
The British right flank used some Initiative fire to try and silence the Italians to their front, which they managed to do when they suppressed an MG unit. The FAO seeing the L3/35's, called in his artillery with devastating effect, knocking out both tankettes, damaging buildings and suppressing the Italian CO! The British right flank failed their command roll and the CO, with his -2CV, failed to get through to them, just when they had a chance to push on against the Italian left flank. As the Shermans advanced, their supporting infantry arrived, with both coming under fire from Semovente's and an MG unit in a building. Both sides took hits and one British Infantry unit was suppressed.
The Italian left flank opened fire on the British to their front once again, causing some hits but Opportunity Fire back suppressed an MG and Infantry unit. The Italian right flank openend up on the British infantry in the open, destroying one unit and suppressing 3 others. The Shermans retaliated, damaging the building and the MG unit inside. With the CO suppressed, the Semovente's were unable to join in the action.
 |
| The end of Turn 2. |
 |
| The British right flank gains fire superiority over the Italians in St Pietro. |
 |
| The L3/35's burn after the devastating artillery barrage. |
 |
| The Shermans line up by the vineyard. |
 |
| The British infantry caught in the open come under sustained fire. |
Turn 3
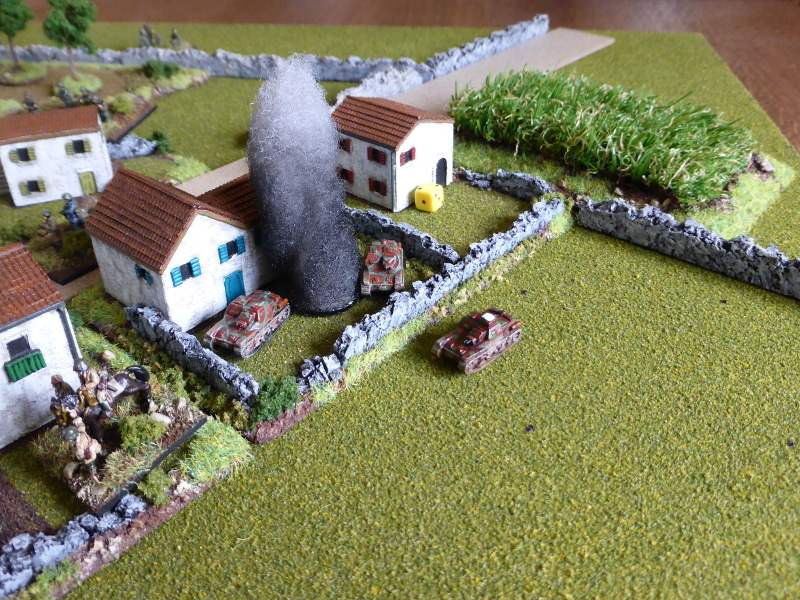
The FAO having moved to support the attack on the Italian left flank, called in his artillery support and only manages to suppress the infantry, but this could be vital to aid the British assault. As the smoke and dust cleared, the Honey and supporting infantry advanced into the orchard and destroyed the MG and Infantry unit which had been holding up their advance. On the left flank the Shermans engaged the Semovente's, destroying one but having one Sherman suppressed by Opportunity Fire. As the infantry moved up in support, they once again came under sustained fire, leading to hits and suppression across the board.
With the Italian left flank in tatters, it was up to the right flank and the Semovente's to rescue the situation. The infantry were targeted again, but Opportunity Fire from the Shermans and the mortar unit saw the building destroyed which contained the MG unit. The Italian CO Blundered, leading to the remaining Semovente coming under fire but luckily taking no hits.
 |
| The end of Turn 3. |
 |
| The British right flank moves towards the undefended part of St Pietro, which the Italians are unable to stop. |
 |
| The Shermans have provided vital firepower to help with the assault on St Pietro. |
 |
| A Semovente burns by the church. |
 |
| The British infantry are taking a bit of a beating. |
End of Game
With the Italians already in a precarious position, I started to play Turn 4. The FAO again called in his artillery, which led to the loss of the remaining Semovente and another building destroyed. With this and the previous lossed, the Italians were in no position to hold St Pietro, so they withdrew as quickly as possible.
Post Game Thoughts
In the end a rather easy British victory. I had thought that this would be a tough task for the Brits, but why was it not? Some thoughts on the game and the campaign might help explain this:
- This was one of those games where the artillery really made a difference. Knocking out the L3/35's early on then arriving each Turn and doing enough to suppress units or add on a few hits told in the end. As I'm sure many of us have experienced, artillery doesn't always arrive, hit where you want or do any damage. In this game none of these applied. The lack of deviation except for 1D6 due to the British accurate gunnery helped, as did being on a hill.
- Generally I think the die Gods favoured the British, as as with the artillery, each bit of shooting did enough to add a hit here or there, suppress a unit when it mattered. This got the British onto the front foot early on and the Italians never really recovered.
- The Italians did have chances, especially with the British left flank infantry in the open. Another round of shooting or the odd extra hit here or there might have been enough to turn the tables. I did think of giving the Italians an Infantry Gun or off table artillery support, but I thought that this would have been too much and made it even harder for the British. We will never know.
- As with the previous games, the 2' x 2' table gave a nice game and again one full of action. Certainly being in action straight away gives a very different dynamic to the game.
- I enjoyed the whole campaign and it does give a greater depth and meaning to the games, as they are not stand alone affairs. The only thing I would say is that they probably work better if you can maintain the momentum and play them out in a week or so. I found it a struggle to get the last game in due to various factors. Later on in the year I would like to run another campaign, this time on a 4' x 4' table, but that's for another time.
Next up is a (hopefully) simple PBEM campaign that I will be running with a couple of friends who have kindly agreed to take part. Details will naturally be rather sparse until it's all over, so that I can maintain the Fog of War for both players. A fellow Blogger very kindly sent over a wonderful set of maps that I will use to run this, with the players telling me where they would like to move their units etc. Once an engagement beckons, I will play the game out out home, based upon orders received and then feedback the results and await further orders. I'm not sure how long this will last but I hope it will be fun for all involved. So plenty for me to do which I'm looking forward to. So until next time...a
Nice looking game Steve, my own thoughts from the top of the page was that the. Three Shermans should give the Brit’s the advantage, but I think by inclination, I wrongly tend to undervalue Italian armour. Nice to see the campaign through to a conclusion.
ReplyDeleteThe Italian armour is admitedly not as good, but the Shermans aren't that great either, as seen in the previous game. Having the Italian CO suppressed in Turn 2 prevented the Semovente's possibly contributing as much to the game as they could have. After all there was only one more Sherman than Semovente.
DeleteOne of the 'downsides' of the BKC rules, if it can be called that, is a run of good command rolls can really alter a game. I've seen it happen, albeit very rarely. Other players have limited it to 3 successful command rolls per Turn to try and offset this happening. They are rules that can easily be tweaked to fit various gaming preferences.
Another great read, thanks Steve.
ReplyDeleteYou're welcome and glad you enjoyed it.
DeleteHandsome table, Steve, especially with your town and gardens. The British handled themselves better than I expected or maybe the Italians worse than expected. Artillery seemed to be the decider in this game. Enjoyable battle account and looking forward to your upcoming campaign.
ReplyDeleteI'm glad you liked the look Jonathan. The British certainly had a plan and stuck to it, plus as mentioned the die rolls seemed to go their way. The Italians didn't get much luck and if they had, it could have ben very bloody for the Brits.
DeleteExcellent fight and excellent campaign, Steve, thanks for sharing!
ReplyDeleteI thought this fight was very exciting, it didn't seem too easy at all for the British to me, I thought they had a pretty rough time, particularly the infantry on the left getting beat up, though I agree wholeheartedly, the 25-pdrs were really zoned in and working out!
I have a couple questions, if you don't mind:
1) Regarding the destruction of the buildings mechanism, are you saying that British units would shoot at buildings and hit the buildings (with the buildings saving on 6s), but that units within the buildings didn't take those hits if the building successfully saved? And if that's the case, when the Italian unit took the hit, what modifier did you give it for saves (open/light/hard cover)?
2) For playing on the 2' x 2' table, did you change movement/firing/command distances?
Thanks in advance!
V/R,
Jack
Hi Jack, I'm glad you enjoyed the campaign. To answer your questions:
Delete2) Distances as per the rulebook.
1) Say an infantry or mg unit was firing at a unit in the building, the building would not take any damage. the unit would be hit on 6's and not have any saves.
If the Shermans or artillery hit the building, then the building would potentially take damage from failed saves. If the save was failed, the building took a hit as did the unit inside, to represent flying debris etc causing casualties.
I hope this makes sense? It was the first time I'd tried it and it seemed to work OK. In bigger games I use the rules as written where BUAs represent more than one building. In this smaller game I wanted to try and reflect the ability to blast units out of buildings, with the risk of them collapsing etc.
Steve,
DeleteDistances as per the rules, gotcha. I need to give that a shot; I suppose there isn't as much movement as I would expect as everyone is already in combat range, so it's just a matter of getting LOS.
And yes, thank you, I understand how you did the collapsing buildings.
V/R,
Jack
I'm glad the buildings bit made sense Jack. Getting the right amount of terrain takes a bit more thought on the smaller table, so both sides don't just blast away from the off. I tend to set the table up the day before so I can look at it with fresh eyes on game day, which normally results in a few tweaks.
DeleteA great encounter Steve, a tough ask for the Italians with the Shermans and artillery supporting the assault. Looking forward to see how the pbem plays out. We have just finished a great diplomacy game between 7 of us at the club, great fun.
ReplyDeleteCheers
Stu
Thanks Stu. I thought it would be tough for the Brits, as normally it's tricky to get infantry out of BUA's. In this game if the Semovente's had had a bit more luck, then things might have been different.
DeleteTop report, well fought.
ReplyDeleteThanks Will.
Delete