After our rather brief last game, we decided to have a go at one of the scenarios from 'Scenarios for Wargames' by C S Grant, to hopefully give us both more of an interesting challenge and a longer game. Having flicked through the book I settled upon Scenario 41 'Chance Encounter'. This seemed to offer all that we wanted as well as giving both players the option of what units to field from the selection available. This I tweaked to make it more suitable for the American Civil War, the details of which can be seen below.
OOB
Each player can choose 10 units from those listed below. These units can then be formed into 2 - 3 Brigades as the player sees fit.
8 x Line Infantry
2 x Light Infantry (Marauders & Skirmishers)
2 x Mounted Infantry
2 x Artillery
Our choices from the above were as follows;
Confederate
1st Bde
3 x Line Infantry
1 x Artillery
2nd Bde
3 x Line Infantry
1 x Artillery
3rd Cavalry Bde
2 x Mounted Infantry
Union
1st Bde
3 x Line Infantry
1 x Artillery
2nd Bde
3 x Line Infantry
1 x Artillery
3rd Cavalry Bde
1 x Mounted Cavalry
1 x Light Infantry (we counted these Independent as per Honours of War)
Scenario
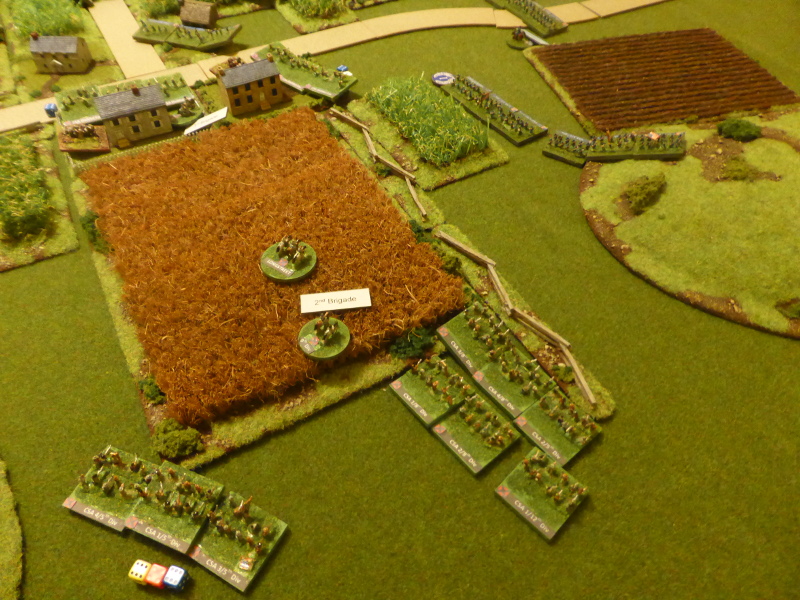
The table was broadly layed out as per the map below:
The Union troops would arrive from the top left hand corner, the Confederates from the bottom right, all in line of march columns. Cavalry or Light Infantry units could deploy 12" away from the road should they wish to do so.
The Confederate plan was to push the 3rd Cavalry Bde out on the right flank and move towards the village to make contact with the enemy. The 1st Bde was to move up the road to secure the left flank whilst the 2nd Bde would move between the hills towards the village. As and when contact was made, troops would advance towards the sound of the guns.
The Union plan was to move the 1st & 2nd Bde's along the road to the junction, then deploy when the enemy was encountered. Their 3rd Bde and Light Infantry would push forward towards the village, avoiding the woods to try and make best speed.
The winner would be those left in control of the village at the end of the game.
Deployment
The 'photos below give an idea of how both sides deployed.
 |
| An overview of the table. |
 |
| The view from the Confederate jumping off point. |
 |
| A view from the Union side with their jumping off point out of shot in the left hand corner. |
Turn 1
The Confederates won the die roll to see who would move first. The 3rd Cavalry Bde moved off on the right flank and the 1st Bde slowly moved along the road. The Union troops were in a similar position, with the flanking force moving towards the village and the 1st Bde along the road.
 |
| The end of Turn 1. |
 |
| The 3rd Cavalry Bde stay in column to speed their movement as do the 1st Bde. |
Turn 2
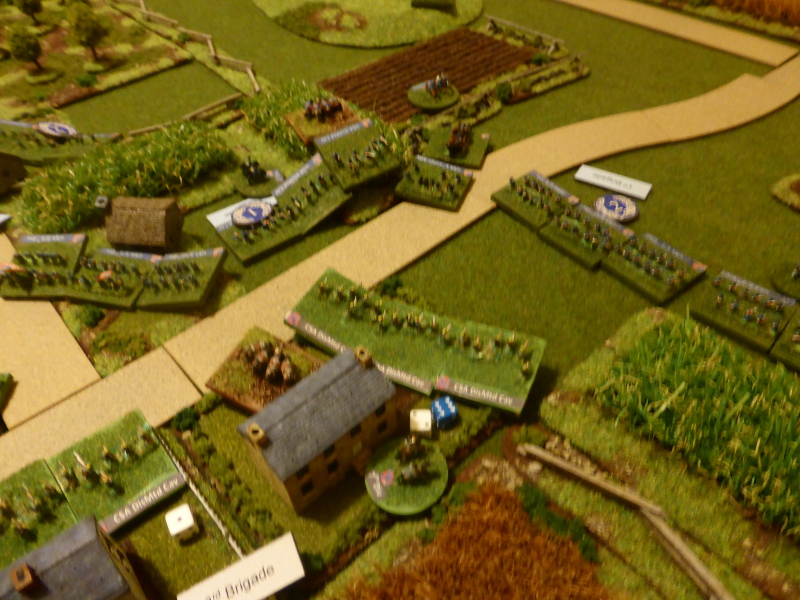
The Confederate 3rd Cavalry Bde moved up to the wheat field on the outskirts of the village and dismounted, whilst the 1st Bde still moved slowly along the road.
The Union troops were keener to get to the objective, with the 1st Bde moving up to the road junction and the 2nd Bde began to arrive on the road. The 3rd Cavalry Bde and the Light Infantry moved up to the ploughed field near to the village, with the cavalry dismounting.
 |
| The end of Turn 2. |
 |
| The Confederate 1st Bde advance slowly and cannot see their objective due to the hill. |
 |
| The Confederate 3rd Cavalry Bde dismount in the wheatfield and see the Union troops arriving in the distance. |
 |
| The Union 1st Bde arrive near the road junction. |
Turn 3
Knowing the enemy was nearby, the Confederate 3rd Cavalry Bde advanced into the village, taking up residence in stone and wooden houses, hoping that reinforcements would soon arrive. The 1st Bde reached the road junction and the 2nd Bde pushed on between the hills with their artillery moving onto the hill to get a good field of fire. There was little shooing, with the 3rd Cavalry Bde rolling three '1's', which we christened Aussie sixes! Not a good start.
The Union 1st Bde quickly shook out into battle lines ready to move towards the village, whilst the 2nd Bde moved up to support the 3rd Cavalry Bde, which had failed it's order. Shooting from the Union Light infantry managed to Disorder a unit of the Confederate 3rd Bde.
 |
| The end of Turn 3. |
 |
| As the Confederate 1st Bde reaches the road junction, the 2nd Bde begins to move between the hills. |
 |
| The Confederate 3rd Cavalry Bde come under fire from a rather imposing Union battle line. |
 |
| Another view shows them rather on their own as the 2nd Union Bde can be seen arriving in the distance. |
 |
| The Confederate 2nd Bde artillery moves onto the hill. |
Turn 4
As the Confederate 1st Bde moved astride the road, the 2nd Bde advanced with one unit moving from column into line. The 3rd Cavalry Bde continued to manouevre in the village, but once again their shooting was ineffective.
Once again the Union 3rd Cavalry Bde failed their command roll, forcing the Light Infantry to move across into the corn field to keep up pressure on the Confederates in the village. The 2nd Bde began to move into line and advance towards the sawmill at the edge of the woods. The 1st Bde advanced towards the village and engaged the Confederate 3rd Cavalry Bde, who somehow managed to survive 4 rounds of shooting, with only 1 hit and a Disorder the result.
 |
| The end of Turn 4. |
 |
| The Confederate 1st Bde moves across the road ready to advance towards the sawmill. |
 |
| The Confederate 2nd Bde begins to form line as the rest of the units arrive. |
 |
| The Confederate 3rd Cavalry Bde come under a lot of pressure as the occupy the village. |
 |
| Another view from the 3rd Bde. |
Turn 5
The Confederate 3rd Cavalry Bde held position as the 2nd Bde moved up to the snake rail fence line, whilst the 1st Bde pushed forward either side of the road to the edge of the village. The shooting managed to cause hits and Disorder on the Union 1st Bde.
The Union 1st Bde moved a unit out onto the flank to increase its firepower having already come under fire itself. The 3rd Cavalry Bde and Light Infantry continued to move through the cornfield and into the log cabin across the road from the Confederate 3rd Cavalry Bde. The 2nd Bde pushed on past the sawmill with other units following on behind. The Union shooting was markedly more effective than that of the Confederates, as a unit from the 2nd Bde was 'Whipped' and once again the 3rd Cavalry Bde had a unit Disordered.
 |
| The end of Turn 5. |
 |
| The Confederate 1st Bde advances to the edge of the village. |
 |
| The Confederate 2nd Bde comes under intense fire leading to a unit becoming 'Whipped' (bottom left). |
 |
| The Confederate 3rd Cavalry Bde still hang on despite coming under sustained fire. |
Turn 6
The Confederate 3rd Cavalry Bde had little option but to hold their current position, as the 2nd Bde moved a unit up to the fence line to replace that recently vacated by the 'Whipped' unit. The 1st Bde on the left fmoved a unit across the road to reinforce their flank. The shooting was better this Turn with the Union 1st Bde having units Shaken and Disordered, with the Union 3rd Cavalry Bde and Light Infantry also taking hits and Disorder.
The Union had limited movement options, but the 1st Bde advanced where it could, as did the 2nd Bde. Shooting led to units right across the Confederate lines taking hits and Disorder.
 |
| The end of Turn 6. |
 |
| The Confederate 1st Bde in the wheat filed engages the union 2nd Bde in the corn fields. |
 |
| The Confederate 3rd Bde stubbornly hangs on, despite the ever increasing pressure. |
 |
| The Confederate 2nd bde cannot get the better of the Union 1st Bde, no matter how hard they try. |
Turn 7
As the Confederate 3rd Cavalry Bde and 2nd Bde held their positions, the 1st Bde failed their command roll. The shooting was effective, leading to the Union 1st Bde having a unit 'Whipped' and another Shaken and Disordered.
As the Union 1st Bde held position, the 2nd Bde moved another unit up into the corn field to bring more fire to bear on the Confederate 1st Bde in the wheat field. The 3rd Cavalry Bde in the corn field rolled a '10', causing them to become 'Disorientated', allowing me to move them one move away from my troops (more on this later). Right across the Confederate lines more units again took hits and Disorder, whilst the 3rd Cavalry Bde had one unit Shaken.
 |
| The end of Turn 7. |
 |
| The Confederate 1st Bde still locked in a firefight with the Union 2nd Bde. |
 |
| Another view of the firefight. |
 |
| The Union 1st Bde finally take significant hits with a unit 'Whipped' (top right). |
 |
| The 3rd Cavalry Bde finally succumb to the effects of massed fire and are Shaken. |
Turn 8
The commander of the Confederate 3rd Cavalry Bde managed to rally his troops, thus removing a hit and their Shaken status at a critical juncture in the game. Sadly the 2nd Bde failed their order whilst the 1st Bde moved a unit onto the flank to engage more of the Union 2nd Bde. The shooting could have been better, but hits, Disorder and some units became Shaken which wasn't too bad, but some could have become 'Whipped' if the shooting had been more effective and Dave's saves less so.
As the Union 3rd Bde re-appeared having regained their bearings, the Union 1st and 2nd Bde's managed to rally of hits and removing Shaken status on their troops, again at a critical time. Across the board the Confederate troops took hits, Disorder and some units Shaken. With both sides racking up hits etc, who would break first?
 |
| The end of Turn 8. |
 |
| The Confederate 1st Bde are being bettered by their Union opponents. |
 |
| A view from the Confederate 1st Bde as they try to cross the road to support their brothers in arms. |
 |
| The view from the Confederate 2nd Bde, who failed to move to take advantage of the open Union flank. |
 |
| The Confederate 3rd Bde still some how hang on against all the odds. |
Turn 9
The Confederates had a disastrous Turn as the 2nd Bde blundered, leading to a unit moving 2 moves to the rear, thus removing any chance of them attacking the exposed Union left flank. Also the 1st Bde failed their command roll, but at least one unit made an Initiative move. To add insult to injury the shooting only managed to cause 2 hits, with no Disorder or Shaken. Was this the high tide of the Confederacy?
There was little movement on the part of the Union troops. The shooting was very effective with a unit from the Confederate 1st Bde becoming 'Whipped' and one from the 2nd Bde Shaken. Miraculously the 3rd Bde somehow still held on against overwhelming odds.
 |
| The end of Turn 9. |
 |
| The Confederate 1st Bde on the left flank has a unit 'Whipped' and is not in a good position. |
 |
| What remains on the Confederate 2nd Bde and right flank. |
 |
| The Blundered unit far away from the action. |
 |
| The Confederate 3rd 'Stonewall' Cavalry Bde. |
Turn 10
The Confederate 2nd Bde failed their order to brink the Blundered troops back, whilst the 1st Bde rallied of a hit and Shaken status. With no movement as a result, the shooting needed to be very effective to rescue the situation, which is wasn't!
In the Union turn, the 1st Bde Blundered and charged into the heroic 3rd 'Stonewall' Cavalry Bde, only for the result to be a draw. Elsewhere the shooting had little effect.
 |
| The end of Turn 10. |
 |
| The battered Confederate 1st Bde and broken left flank. |
 |
| The Confederate 2nd Bde look on as the Union 1st Bde charge into the 'Stonewall' Bde. |
 |
| The brave 3rd 'Stonewall' Cavalry Bde have held on against all the odds, but their position is untenable. |
End of Game
At this point, with time against us and the Confederate troops in a tricky situation, we brought the game to an end. Looking at how things stood we agreed that the Union troops had won a minor tactical victory, which seemed a fair result.
Post Game Thoughts
Well what a game! A real too and fro battle with both sides having chances to win the game throughout, but never quite managing to get that critical breakthrough. We both sat back and caught our breath as it had been an intense but very enjoyable 2 1/2 hours. This was new territory for us as our previous games had been rather short to say the least. So having collected my thoughts on the game, my usual post game thoughts in no particular order:
- The artillery on both sides was pretty ineffective, which was a bit of a surprise. My artillery on the hill was too far back and I should have moved it forward to support the 2nd Bde on the right flank. The artillery with the 1st Bde on the left flank I deployed on the road and they never got a shot off all game! Dave's artillery on the hill was likewise ineffective and the artillery that bombarded the Confederate 3rd Bde in the village rolled low all night.
- The Confederate 3rd Cavalry Bde in the village were the undisputed stars of the show for the Confederacy, having held out against overwhelming odds and firepower all game. Holding on to their part of the village really allowed kept the Confederates in the game, as the loss of this would have split the two wings of the army. Now known as the 'Stonewall' Bde, Lady Luck was surely with them throughout the game.
- When the Union 3rd Cavalry Bde rolled a '10' whilst in the corn field and thus became 'Disorientated', I had the option to use the Blunder table or to move them in any direction I wished: I chose the latter. Now I could have moved them in front of the Union 1st Bde and therefore blocked their shooting, likewise I could have positioned them in front of the artillery on the hill, all perfectly 'legal' but certainly not in the spirit of the game. Therefore I moved them more or less straight back from their position which felt right and logical. Sadly I have played other gamers who would have used the 'beardy' option mentioned and had no qualms about it.
- The Blunder by the Confederate 2nd Bde which led to a unit moving back two moves could not have come at a worse time, as they were poised to threaten to turn the Union left flank! C'est la guerre.
- We had the case of the Union 1st Bde rolling a Blunder when attempting to make a Rally order. It was not immediately clear as to whether this counted as a failed order and therefore a Blunder. It is something we need to check for future reference.
- The scenario worked better than I could have hoped for as we had lots of initial movement followed by a good old firefight. This played much better than any of our previous games, which as you will know were far too short for enjoyment to be honest. so moving forward my scenario books will be my first port of call for our games.
- For some reason this game really did feel like an ACW one. I can't put my finger on it, but maybe it was due to the inital movement of the Bde's in column of march and then shaking out into line.
- Considering we only had 10 units per side, this felt like a much bigger game and kept us completely involved throughout. So once again it shows that you don't need a large table and loads of units to have a good game.
- The game ebbed and flowed throughout and in the end could have gone the other way, as it was so close for most of the game. As always winning is a bonus but playing in such a game as this is what it's all about.
- We ignored the Broken Brigade rule to try and make sure we had a longer and more challenging game. If we had used it, the game might have been over by Turn 4 or 5. Whilst this rule undoubtedly works for large games with say 5 or more Bdes per side, for our small mid-week games it doesn't and didn't detract from the game at all. Going forward we will continue to ignore this.
- In our games we've started to have an initial plan of action, which we articulate as the opening moves are made. This really adds to the feel of the game as you get the sense of the commanders reacting to the unfolding events. This is something Dave has always done and I've enjoyed using it too.
- Again we used 'vanilla' units and this did not give a boring game. In fact I think it allowed us to focus on what we were doing and our plans rather than stopping to check if this unit was Elite, had a +1 to its shooting etc. These 'upgrades' have their place, but not in our mid-week get togethers.
- The Rally order was something we had not used before but it worked at critical times for both sides. In fact a lot of the time we were in unchartered territory in terms of the rules, but rather than stopping and trying to find the exact wording on a point, we used our common sense appraoch which works for us.
- Having finally been able to play a full game with Black Powder II, I must say we were both very impressed by the game that they gave. Our previous ones have frankly been too short to fully appreciate them, but hats of to Messrs Priestly and Co. for a great set of rules.
Apologies for the long post but I hope you have managed to get here and are still awake! Next week it is more of the same and it will soon be time for me to figure out another scenario. The tricky thing is as to whether I should make the 'Stonewall' Bde Elite from now on? So until next time...


Very nice game, it was of course off to an excellent start with the words “sawmill’ and ‘10 units’ in the opening gambit :-) I do like these Grant type scenarios.
ReplyDeleteAnd it was all very ‘Black Powder’ the blunder by the 2nd Brigade in turn 9, saving the Union left was excellent, how else you get that sort of thing into a game.
I agree about the Broken Brigade rule in smaller games. I keep an element of it by having it that 2 Regiments (or OVER 50%, which is the same thing really) must be lost before the Brigade Breaks, since my Brigades are typically 2 and 3 regiments strong.
Frankly you can't go wrong with the Grant & Asquith scenario books, as they provide plenty of inspiration, but you do need to tweak the OOB to suit a particular period as I've found out. The 10 - 12 units does work a treat and allows one to maintain focus, as anything bigger tends to cause loss of said focus. Bigger games are OK for weekends, but a couple of hours in the week, not a good idea.
DeleteI do love the C&C of the Priestly stable of rules, which also makes it easy to move from one ruleset to another.
In the rules, units that are Shaken count towards the Broken Bde total, hence why we've stopped using them as written. I like your idea of two units being Broken before the Bde breaks.
Well, not only did I make it the end and remain awake but I enjoyed it too!
ReplyDeleteWhile I understand the concept of a "Blunder" move but not familiar with BP (I or II), the result (to me) should reflect more of the situation rather than a "Take That" approach. The whole battle should not be determined by one arbitrary, random act. Norm may disagree but the tail (of the probability distribution) ought not wag the dog. Perhaps the T9 Confederate Blunder could have been converted into a "Halt" or "Attack Stalled" rather than a retreat of two moves?
Anyway, off the soapbox...
I'm glad you kept awake and also enjoyed it Jonathan!
DeleteThe Blunder table has 6 outcomes and I rolled the worst! The outcome reminded me of an instance during the Battle of Chancellorsville where a Union commander on the right flank decided to withdraw his Regiment for no valid reason! It would be very easy to come up with a Blunder table that worked for you, which is something I've done with other rulesets.
Of course, battlefield blunders occurred but I would expect some exogenous shock (like incompetence in your example above) to prompt the response.
DeleteWell I learnt a new word today! Basically the Blunder reflects an order from the Brigadier being misunderstood etc and the unit therefore not acting as ordered.
DeleteBP does acknowledge that 'Blunder' will not be to everyone's taste and that the rule can be ignored.
DeleteI like it not so much for what it is physically doing to the unit, but rather it's impact of loosening player control.
I would have the Colonel shot! That behavior is not tolerated in MY command.
DeleteI have many such order misunderstandings during game play that needed no Blunder Table to conjure up a similar misadventure. Oh, the stories are so numerous!
To err is human and all that Jonathan;)! My poor artillery positioning on the road is an example of my own DIY Blunder...
DeleteHi Norm,
ReplyDeleteas you know I do like the Blunders and for the reason you stated. For intro games I wouldn't use them as they might be too much for some players. Each to their own and all that.
Lovely scenario, well done.
ReplyDeleteThankyou:)
DeleteGreat looking game Steve.
ReplyDeleteThanks Ray!
Delete