For the next game in our narrative campaign, I once again turned to the ever useful 'Scenarios for all Ages' by Mssrs Grant & Asquith. A brief persual led me to chose Scenario 10: The Important Bridge, as it fitted in nicely in terms of a story of the aftermath of the first battle.
Background Fluff
After failing to halt the advancing French troops, the remnants of the Wessex Militia are in retreat, hoping to beat the French to an important crossing of one of the rheins that criss cross the Somerset landscape. The French are hard on their heels, but have become split up, possibly due to enjoying the local cider. As news of the battle has reached Taunton, Colonel Farrage has dispatched troops to try and gain the bridge before the French. So it is a simple case of who can gain control of the bridge over the rhein...
French OOB
Northern Force
3 x Line Infantry
1 x Light Cavalry (Inferior)
1 x Dragoons
1 x Light Artillery
Western Force (Random arrival from start Turn 2)
1 x Light Infantry
3 x Line Infantry
1 x Dragoons
1 x Light Artillery
British OOB
Eastern Force
4 x Line Infantry
2 x Dragoons
1 x Light Artillery
1 x Medium Artillery
Southern Force (Retreating force from game 1)
1 x Light Infantry (Inferior)
1 x Line Infantry
1 x Militia (Inferior)
1 x Light Cavalry (Inferior)
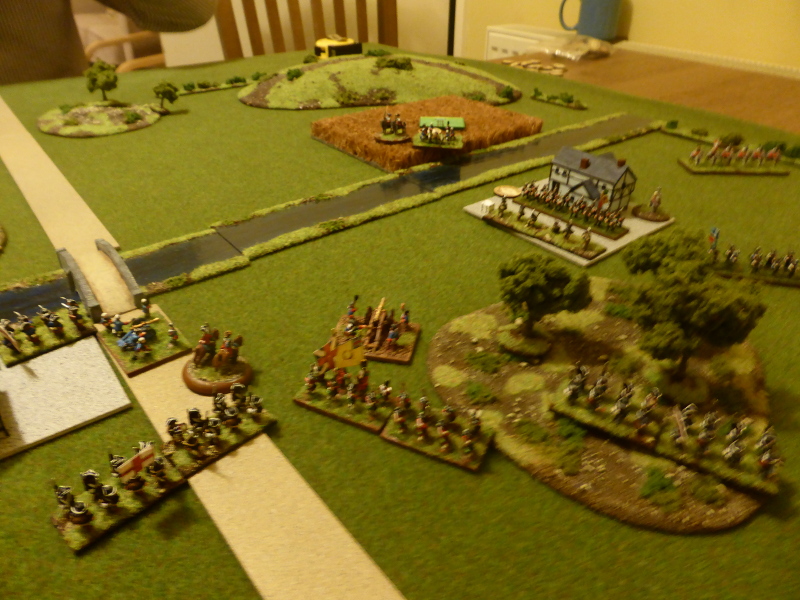
Table Set up
Below can be seen the table set up. The rhien runs downs the centre of the table, with the bridge in the middle. The water levels are low and so the rhein is also fordable 9" either side of the bridge, but not to artillery.
 |
| The hedges mark the table boundary, with North being at the top pf the 'photo. |
 |
| The remnants of the Wessex Militia from game 1. |
 |
| Troops from the Taunton garrison. |
 |
| Rather a lot of French troops awaiting to enter the table. |
Turn 1
The British got to move first, with both brigades moving onto the table. The French faired less well, with some units failing to appear; still drinking cider?
 |
| The end of Turn 1. |
 |
| The Wessex Militia advance, led by a unit of Taunton's Tartars, with Light Infantry taking up the rear. |
 |
| The Taunton Garrison march on as fast as they can. |
 |
| The French arrival is rather tardy, but they have an awful lot of good troops. |
Turn 2
Again, the British won the movement intiative, with the Wessex Militia starting to ford the rhein, to gain protection on its Eastern bank. The French moved a best they could, with their re-inforcements arriving this turn.
 |
| The end of Turn 2. |
 |
| The Wessex Militia cross the rhein, as the Light Infantry cover them. |
 |
| The piecemeal arrival of the French re-inforcements, led by their Dragoons. |
 |
| The French line failed to move, thus blocking the other troops. |
 |
| British Dragoons cover the advance of the Taunton Garrison. |
Turn 3
The British again moved first, rolling a '6' that allowed the Taunton Garrison to gain the bridge. The French advance continued, but despite both sides closing on each other, they were out of range of any shooting.
 |
| The end of Turn 3. |
 |
| The Wessex Militia safely across the rhein, with their Light Infantry in the woods by the bridge. |
 |
| Some of the Taunton Garrison have deployed in and around the bridge. |
 |
| The French skirt around the woods to avoid fire from the British Light Infantry. |
 |
| British Dragoons observe the French across the rhein. |
Turn 4
The French won the movement initiative and started to cross the rhein and to advance as much as possible. The British Light infantry evade out of the woods onto the bridge as the rest of the Taunton Garrison deploys. Both side artillery is now within range, but both fail to hit.
 |
| The end of Turn 4. |
 |
| The Wessex Militia roll a '1', but this still allows them to change formation, forming up along the bank of the rhein. |
 |
| The British Light Infantry on the bridge. |
 |
| The Taunton Garrison control the bridge. |
Turn 5
The French continue their advance, with the British reacting where needed. Once again both sides artillery fail to hit anything.
 |
| The end of Turn 5. |
 |
| The French column advances towards the Wessex Militia. |
 |
| The Taunton Garrison move towards the woods and the fortified manor house. |
 |
| The British troops in a commanding position by the bridge. |
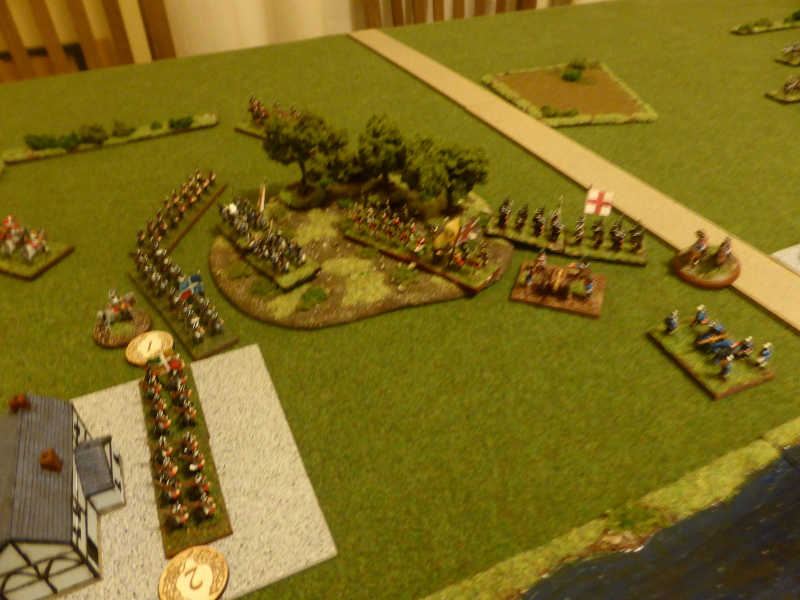
Turn 6
As the French shake out into line, the Taunton Tartars and Dragoons move across to protect the left flank of the Wessex Militia. By the Manor House, the French troops start to move into and around it. Both sides fail to cause any hits with their shooting.
 |
| The end of Turn 6. |
 |
| A view from the French side of their right flank. |
 |
| An overview of the action around the bridge and manor house. |
 |
| The view from the Wessex Militia's position. |
Turn 7
As the French and British contest the manor house, the Fench right flank makes another quick move, allowing them to move up to the rhein. Both sides trade hits from their shooting.
 |
| The end of Turn 7. |
 |
| The Wessex Militia come under fire and respond in kind. However, they lack any supporting artillery. |
 |
| The woods and manor house. |
 |
| A view along the rhein. |
Turn 8
As both sides continue to manouevre to gain an advantage, the Wessex Militia are forced back by musket fire.
 |
| The end of Turn 8. |
 |
| The Wessex Militia are sent reeling by musket fire. Being inferior troops, it will be hard to rally off hits for maybe a Turn or two. |
 |
| Movement around the woods continues, with both sides wary of each other. |
Turn 9
The Wessex Militia start to withdraw as they cannot match the French fire superiority. On the British right flank, they start to come under pressure, with the Light Infantry once again evading back into the woods.
 |
| The nd of Turn 9. |
 |
| The Wessex Militia start an orderly withdrawl, covered by their supporting cavalry. |
 |
| The formidable looking French line. |
 |
| The French start to cross the rhein in pursuit. |
 |
| A view from the French side. |
 |
| Another view of the French forcing the rhein. |
Turn 10
The French gain the upper hand, as they press forward on both flanks, with another unit of the Wessex Militia being forced back by musket and artillery fire.
 |
| The end of Turn 10. |
 |
| The Wessex Militia continue to be forced back and are in a poor state. |
 |
| The French close in on the woods and threaten to turn the British right flank. |
 |
| The French move across the rhein in force. |
 |
| A view of the French positions in the manor house and around the wood. |
End of Game
With the Wessex Militia hors de combat and the right flank under pressure, the British troops wisely decided to quit the field of battle as their position was untenable, with their retreat covered by their cavalry. Although the French had forced the British troops back, they had failed to deliver a knock out blow. Bloodied but unbowed, the British troops would live to fight another day.
Post Game Thoughts
I think that ended up being one of the longest games we had played of Honours of War, with it lasting around 2 1/2 hours. However the time flew by as we were both engrossed in the game and it was quite close until the final turn or two. so as always and in no particular order, some post game thoughts:
- A lot of the game was spent in manouevering troos to try and gain an advantage, so combat occured only quite late in the game. This might sound dull but it certainly wasn't and gave an interesting challenge for both of use.
- With the British gaining the bridge early on, the French had no real choice but to try and force a crossing of the rhein. This they were ultimately able to do, mainly due to having a light artillery piece on their right flank, which the Wessex Militia could do nothing about. In campaign terms, the Wessex Militia are out of the picture for the foreseeable future.
- Both side artillery was largely ineffective for most of the game. This was certainly true around the bridge and manor house, where they couldn't hit a barn door.
- The scenario worked well in terms of our narrative campaign, which is developing a character of its own. We have one more game based in Somerset, before we head up to the Scottish borders to see what Bonnie Prince Charlie has been up to.
- The French and British cavalry had little to do, other than threaten flanks etc, but this felt right. If either side had managed to cause some more casualties earlier on, then they might had had an opportunity to operate on the flanks or in the rear. Maybe next game?
- I've enjoyed actually playing with some of my own figures (Pendraken's superb AWI range) and this has spurred me on to paint more. I hope I can maintain this momentum.
- Our game was played out on a 3 1/2' x 2 1/2' area, which was more than adequate for the forces involved. At this scale, you don't need a large area to have a great game. In fact, I think this smaller games of around 2 brigades a size are perfect for mid-week games.
I have an idea already for our next campaign game, but with it being the 75th anniversary of Operation Market-Garden this week, will be commerating this with a one off game. I need to do a bit of research, but it is more than likely to be based around Hell's Highway. So until next time...


Looks great! I like a game with pre combat manoeuvre, it fits the period.
ReplyDeleteThanks Peter:). It was nice to play a game where neither side was already arrayed for battle, thus allowing pre-combat manouevering as you say.
DeleteIt took a while for the French forces to galvanise (which probably was the instigator of the longer game). I was surprised when you gave the table size, there was so much going on there - another small table success!
ReplyDeleteWell Dave's die rolls slowed him down to start with, which helps explain the French tardiness. We use 40mm x 20mm bases, with two to a unit, which allows us to get 'big' games done in a small space:).
DeleteA fascinating and good looking game. I too was surprised at the tabletop size.
ReplyDeleteGlad you enjoyed it Peter. Others have been surprised by the small table size, so you are not alone. I just wish there was more of this sort of game shown at shows, but sadly there isn't.
DeleteExcellent battle report! I really enjoy HoW and it produces satisfying games in a relatively short time. Glad to see your BatRep using HoW. It is a bloody game, though. A table 3.5' x 2.5' seems small but you managed to pack in a lot of action into that small space. For 10mm, it looked perfectly sized. Our experience is that artillery can be very deadly so am surprised yours was not so effective.
ReplyDeleteTable and troops looks great.
I'm glad you enjoyed it Jonathan. The table would 7' x 5' if played with 28mm figures, so a slightly larger table than the norm these days. With 10mm I simply half the table size, which generally works well.
DeleteAs we only had Light Artillery, their short range meant that they we pretty much having to roll 4-5 on an average die, with all the factors taken into account. I did have a Medium piece, but I couldn't hit a barn door in this game. Also we didn't get the chance to use grapeshot, which is rather deadly...