I had planned to kick off a BKCII campaign set in Normandy this month, but the gaming and painting Muses have simply not been with me, so that put pay to that for the moment. Thinking on what to game, I remembered that I had planned an AVBCW campaign a few years ago, but had never done anything with it, so I dug out my notes and the problem was solved as it were. A few tweaks here and there to the scenario and OOBs and I was ready to go.
Campaign Background
Recent events have seen the Loyal Army of the South take control of Bristol and its surrounding areas. The Army of the Severn Valley cannot afford to lose such an important part of the country, given its important road, rail and sea links. To this end they have come up with a plan to launch a series of co-ordinated attacks to wrestle back control.
The first of these is a dawn landing in and around the village of Aust, with the aim to provide a firm jumping off point from which to push forward towards Thornbury and the old Roman road. This would then allow for other forces to move down from Gloucester towards Bristol. To this end an invasion fleet has been cobbled together at Gloucester docks. The nature of the terrain and the tonnage of the vessels mean that only infantry, cavalry and light vehicles can be safely landed at Aust.
The Loyal Army of the South are well aware that the Army of the Severn Valley want and need to re-take Bristol. To help protect their base, they have set up an advanced guard at Alveston, with some units positioned near the river Severn to watch for enemy activity. It is one of these units that will be engaged when the enemy lands in force...
Army of the Severn Valley OOB
BUF
1 x CO
2 x HQ
1 x FAO
9 x Regular Infantry (3 units with free ATR upgrade)
3 x MG
1 x 3" Mortar
1 x 37mm ATG + tow
1 x 75mm IG + tow
3 x Pz I
3 x Off-board Artillery Units
Severn River Police
1 x HQ
6 x Conscript Infantry
2 x MG
1 x 3" Mortar
1 x Armoured Truck
Italian Expeditionary Force Assault Group
1 x HQ
3 x Cavalry (regulars)
2 x MG (on M/C)
1 x 75mm Mortar (on M/C)
3 x L3/35 Tankettes
Loyal Army of the South
5th Peoples Flying Column
1 x CO
2 x HQ
9 x Regular Infantry (3 with free ATR upgrade)
3 x MG
1 x 3" Mortar
1 x 37mm ATG + tow
1 x 75mm IG + tow
2 x T-26 45mm
Scenario Details
Based upon Scenario 12: Amphibious Assault.
Maximum of 10 Turn.
Attacker has a 2:1 points advantage.
The Defender only deploys around a 1/3 of his force on the table, with the remainder arriving on Turn 4.
No scheduled artillery or air support available.
No field defences may be purchased.
Turn 1&2 uses the Night Rules to simulate early morning mist.
The Old Splott Rhine is depicted by river sections, but is in fact little more than a drainage ditch. This can be crossed by infantry, treating it as a linear obstacle. All other troops have to cross either via the bridge of the 'ford sections' which represent small crossings for the farmers.
Normal 'house rules' apply.
Deployment
The table was layed out based upon the 1919 OS map published by Cassini Maps, plus Google Maps to get a good idea of the terrain, lines-ofsight etc.
 |
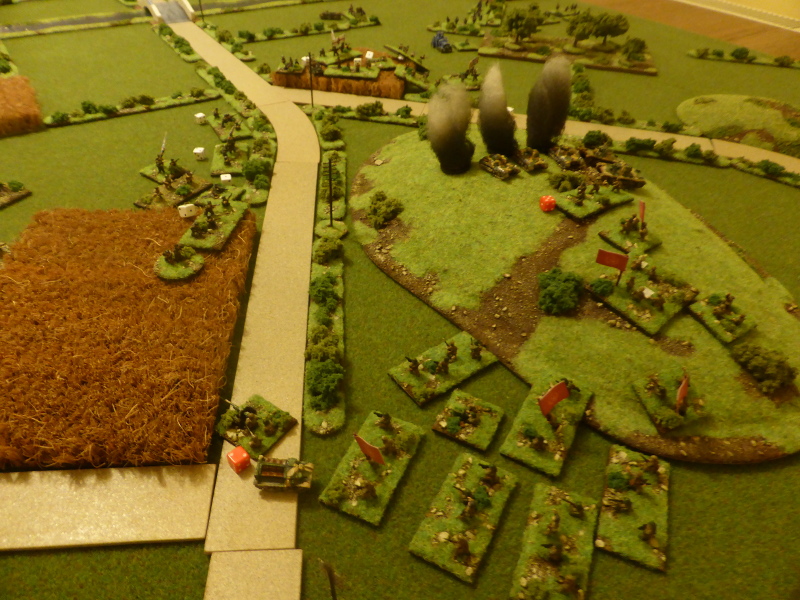
| The LAotS are deployed on and around Red Hill, which is on the right hand side of the table. The AotSV deploy on the left hand side, using the normal amphibious rules form BKCII. The river represents the Old Splott Rhine, with the hedges also marking out other drainage areas that are impassable to vehicles. |
 |
| Deployed on Red Hill in case of any attempted invasion by the enemy. |
 |
| The view from Red Hill towards the outskirts of Aust. |
 |
| The view from Aust towards the dominating feature that is Red Hill. |
Turn 1
The AotSV forces all arrrived and by a quirk of the die rolls, all shifted towards the left. With limited visibilty due to the early morning mist, there was no firing.
 |
| The landings take place. |
 |
| The Italian Assualt Group. |
 |
| The right flank of the BUF. |
 |
| The left flank of the BUF and the Police on the extreme left flank. |
 |
| The 5th PFC stand to as they can here armoured vehicles approaching, but as yet cannot see anything. |
Turn 2
The early morning mist plays havoc with command and control, with only the left flank of the BUF managing to advance.
 |
| Little movement due to the mist. |
 |
| The BUF manages to push some units forward. |
Turn 3
As the mist lifted, pretty much all of the AotSV units pushed on towards their objective of Red Hill. Seeing the enemy, the 5th PFC called for reinforcements as well as putting down suppressing fire on the Italians with their mortars and infantry gun.
 |
| The AotSV sweeps forward. |
 |
| The Italians come under sustained and accurate fire. |
 |
| The right flank of the BUF reach the Old Splott Rhine. |
 |
| The left flank advances. |
 |
| The BUF push forward in the centre, with the PzI's in the vanguard. |
Turn 4
As the AotSV advance on all fronts, the arrival of much needed reinforcements for the 5th PFC move straight into action from their line-of-march, immediately taking the attack to the Italians.
 |
| The right flank as it pushes forward, comes under sustained fire. |
 |
| The L3/35s feel the weight of fire from the newly arrived T-26s. |
 |
| The BUF right flank suppressed by mortar and infantry gun fire. |
 |
| The BUF left flank struggle to get across the Old Splott Rhine. |
 |
| The Police don't seem too keen to get to grips with the enemy. |
 |
| The Pz I's take up position at the road junction and await infantry support. |
Turn 5
The Italians are forced to try and regroup due to the effective fire directed towards them. Elsewhere the Police stay put and the BUF advance and begin to engage with the enemy.
 |
| As the Italians are pushed back, the BUF in the centre close with the enemy. |
 |
| The L3/35's continue to brew up and the infantry are forced back into cover. |
 |
| The BUF take casualties but the 5th PFC have been forced to reveal some units as the BUF close. |
 |
| ATR fire from the 5th PFC sees a Pz I suppressed. |
 |
| Out of sight, the 5th PFC infantry start to move towards Red Hill to meet the threat from the BUF. |
 |
| The developing threat from the BUF in the centre. |
Turn 6
Right across the board the AotSV all push forward, trying to gain a good view of the enemy. The 5th PFC do their best to suppress as many enemy units as they can, but there are too many of them.
 |
| The AotSV close in on the objective. |
 |
| The Italians begin to move forward again. |
 |
| The Police finally move again to try and threaten the 5th PFC's flank whilst the BUF attack in the centre. |
 |
| The BUF struggle to find space for their troops. |
 |
| The 5th PFC try to stem the tide, with the T-26's moving to meet the threat from the Pz I's. |
Turn 7
Finally the FAO has a target and successfully calls in an artillery strike, suppressing the enemy's ATG and Mortar, which is a major success. This allows the Italians to get around the 5th PFC's flank, enabling them to engage the enemy on the hill. The 5th PFC's losses continue to mount, as more enemy units are able to find targets. The Pz I's push onto the hill to try and push the enemy off, only to be taken in the flank and destroyed by the T-26's.
 |
| The end of Turn 7 with the AotSV push towards the hill from all sides. |
 |
| The Italians and BUF attack the 5th PFC's left flank. |
 |
| The BUF in control in the centre. |
 |
| The Police are able to advance unopposed. |
 |
| The 5th PFC struggle to contain the attacks. |
 |
| A Pyrrhic victory as the T-26's destroy the Pz I's on Red Hill. |
End of Game
With time against me and victory inevitable for the AotSV, I called it a day. The game had been great fun and the scenario worked broadly as I had imagined it. Taking stock at the end, the LAotS had caused more casualties than they received, which brought the AotSV Major Victory down to a Minor one. I thought this a fair reflection of the game.
In campaign terms when the die were rolled, the AotSV were to receive 25% extra points on reinforcements, with the LAotS 10%. When we played campaigns before with BKCII, we used to deduct the points lost from the previous game. This did make things a tad more complicated, but stopped you going for all out attacks without having to worry about the consequences. I will have a think on this but will probably go this route again.
The die roll for the next scenario came up with 'Breakthrough Attack', which will make for an interesting game. I need to get my thinking cap on for where and what forces etc, but I enjoy this part and it will also allow me to field some of the 'Big Cats' of Inter-War period. Pretty useless in game terms but they do look great on the table.
Post Game Thoughts
A few days have elapsed since the game, but as always I really enjoyed playing BKCII and especially the AVBCW setting. As usual at the end time to take stock of what worked, what didn't etc:
- Having the Attackers units automatically arriving on the table didn't feel quite right. I think using the standard Mobile Deployment rules alongside would give a better feel of an amphibious landing. In BKCI they have a Blunder table, which did not appear in BKCII, so i may look at that for future games.
- By chance when checking something on BKCI, I noticed they had rules for Reserves and Hidden Units, which I had completely forgotten about. I think I need to re-read both BKCI and CWC to piece together rules which appeal to me for my games.
- For the Defenders I think it would have worked slightly better to have more units deployed on the table at the start of the game, maybe 50% or 2/3. Having less fitted in with my background fluff and the campaign, but game wise it did hamper them a bit when the Attackers really got motoring.
- Using the Night rules to simulate early morning mist worked well and will try and incorporate them in future games when appropriate. For example they could work to replicate the dust caused by massive artillery bombardments or air attacks in the desert or Russia.
- The objectives as written for the scenario make it quite easy for the Attacker to get a Major Victory, as he only has to get 25% of his units into the final 1/3 of the table. This is even easier when playing on a 6' x 4' table. In cases such as this I tend to tweak things so that they feel right to me and fit the overall picture of the battle/campaign.
- For once I actually deployed my mortars and infantry gun so that they could shoot but not be easily spotted and targeted. It's taken me a long time to do this and will I remember next game, God only knows!
- In contrast, the FAO struggled to get a clear view on the enemy to call in his artillery. Some of that may be down to the fact that I might have forgotten to move him on occasion. One of the downsides of the AVBCW is that you get an awful lot of units in a game which, when playing solo, is hard keep track of.
- I liked the background fluff of limiting the armour to Light Tanks only. As has been mentioned before, this then makes the T-26 a rather potent fighting machine, but I can't resist having L3/35 tankettes on the table.
So now it's time to get working on the next instalment of the campaign, which is nice as playing campaigns was one of my objectives for gaming this year. Until next time...


Very good, liked seeing Pz I’s in action. Is 2:1 attacker advantage a typical attack ratio for these rules ?
ReplyDeleteHi Norm,
Deletethe ratio varies according to the scenario, so generally equal points, 50% more or 100% more. This advantage is offset by the Defender having access to Field Defences, such as trenches, pill boxes, minefields etc. I tend to tone these down for the AVBCW, in keeping with the setting.
Enjoyed reading your battle report
ReplyDeletehttps://www.10mm-wargaming.com/
Take care
Andy
Thanks Andy.
DeleteGreat read Steve I forgot how much fun AVBCW is, great collection.
ReplyDeleteCheers
Stu
Thanks Stu. I think the main attraction of the AVBCW is the fact that you so much freedom in the toys you want/can put on the table. Ditto camo schemes etc. A local show used to have some amazing 28mm AVBCW games demoed, that really were full of eye candy and always had plenty of interest.
Delete