Of late I have been mainly focusing on making terrain (more on that in a later post) to the exclusion of painting and gaming. Today however I simply could not summon up the energy nor interest for more of the same. On the spur of the moment I decided to knock up a quick BKCII game using my AVBCW forces. I grabbed my copy of 'Scenarios for Wargames' by CS Grant and, having had a quick flick through, settled upon 'Scenario 38: Rural Encounter ' as the basis for the scenario. Rather than a straight forward AVBCW game, I decided to broadly set it in Germany some time in the 1930's, with a Bavarian Red Brigade being attacked a coalition of Freikorps. The reason for this was I had just been reading Ian Kershaw's 'To Hell and Back', specifically the period of unrest in the 1920s and 1930s.
In terms of actual force composition, I pretty much grabbed what I fancied for each side, with the Freikorps having a large numerical advantage. This was broadly offset by the fact that they had a large area of terrain to cover before they could reach their objective, or at least that was the plan.
Scenario Details
Captain Biggles has crash landed behind enemy lines. The Red Brigade has sent a small force to secure the area and are awaiting reinforcements. To rescue Biggles, the Freikorps have sent a strong Battalion Kampfgruppe to try and break through the Red Brigade lines before reinforcements arrive.
The game will last 8 Turns.
Table Layout
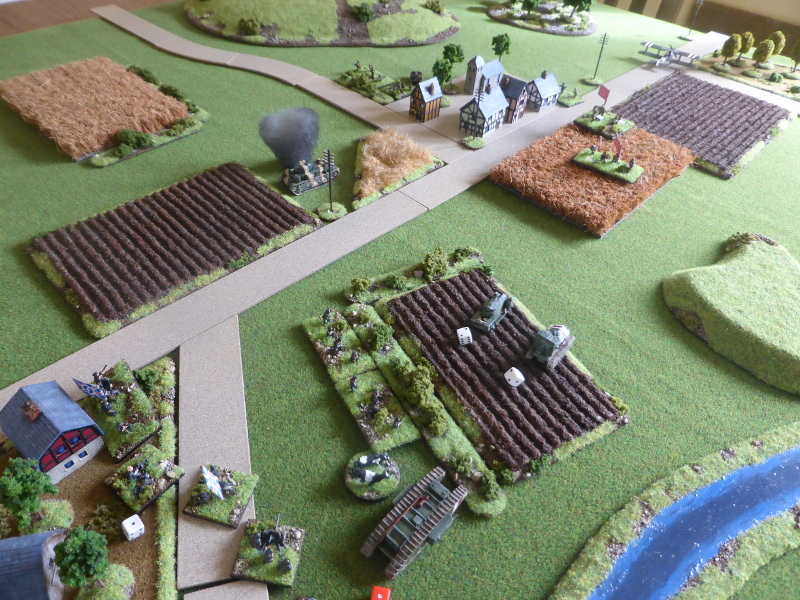
I used the map from 'Scenarios for Wargames' as a basis of the table layout, with the Dollz river running East to West. More details can be found in the notes to the 'photos.
 |
| The Valley of the Dollz river, with the Freikorps on the Western table edge and the Red Brigade in and around the village. |
 |
| The Red Brigade deployed either side of the village. |
 |
| Biggles and his plane stranded behind enemy lines. |
 |
| The Red Brigade holds their T-28 tank in reserve. |
 |
| An 80mm mortar deployed next to the windmill. |
 |
| A 75mm Field Gun deployed by a small farmhouse, with a good view down the Valley of the dollz. |
 |
| The Freikorps at their jumping off points. |
 |
| The French Freikorps Kompanie and their newly acquired Char St Chamond. |
 |
| The British Freikorps Kompanie. |
 |
| The German Freikorps Kompanie. |
Turn 1
Things got off to a funny old start, with the French Kompanie positively flying out of the blocks, only for the rest of their Battalion and the Red Brigade to all fail their command rolls.
 |
| The French Kompanie push forward on the right flank. |
 |
| The Red Brigade field gun decided not to opportunity fire, thinking there would be more targets... |
Turn 2
This time it was the turn of the British Kompanie to rush forward, passing 5 command rolls in a row. There was some shooting from both sides, with some units suppressed, before the Red Brigade once again failed their command roll.
 |
| The Freikorps right flank and centre have pushed forward, but the Germans on the left have yet to play ball. |
 |
| The Fench Kompanie push forward and suppress the Red Brigade's field gun. |
 |
| The British Kompanie have pushed on past the farmhouse with their armour whilst the infantry occupy it. |
 |
| The Germans; well what can one say? |
Turn 3
Finally the Germans get moving, with both sides exchanging fire and suppressing various units. The Red Brigade finally turn up to the game, only for a blunder resulting in their valuable T-28 advancing right out into the open.
 |
| The Freikorps Battalion advances on a broad front, attacking the Red Brigade, right, left and centre. |
 |
| The French Kompanie against the lone field gun. |
 |
| The action really hotting up in the centre, with the Red Brigade's anti-tank guns duelling with the British Kompanie's armour. |
 |
| The German Freikorps finally get going. |
 |
| The Red Brigade's T-28 flanked by some British Kompanie armour and... |
 |
| ... feeling somewhat exposed after the command blunder. |
Turn 4
Despite the French Kompanie failing their command roll, the British and German Kompanie's take a toll on the Red Brigade, who lose their mortar and field gun, which is a severe blow. In response, they take out the German A7V, but this is of little comfort.
 |
| The Freikorps Battlaion starts to gain the upper hand. |
 |
| The French Kompanie have an open flank but are unable to exploit the opportunity. |
 |
| The British Kompanie starting to build up fire superiority. |
 |
| The A7V brews up which is cold comfort to the Red Brigade. |
 |
| Biggles rescue appears to be getting closer... |
Turn 5
Yet another strange turn, with all of the Freikorps Kompanie's failing their command rolls. In desperation the Battalion CO manages to get through to the British Kompanie, which in 2 turns, one of which was a double 6, manage to destroy the Red Brigade's T-28, an anti-tank gun and MG unit. The Red Brigade simply has nothing to reply with at this point.
 |
| The Freikorps Battalion very much in the ascendancy. |
 |
| The open flank. |
 |
| There is little left in the centre to halt the British Kompanie. |
 |
| The A7V is a loss, but... |
 |
| ... not as serious as that of the Red Brigade's T-28. |
 |
| As the Red Brigade wisely withdraw, Biggle's manages to start his plane and make his ecape. |
Post Game Thoughts
Well, for a very quick knock up game, that went well and I very much enjoyed it. It was nice to get the toys back out on the table and especially to 'blood' the Char St Chamond and the Bristol FE2B, although the latter naturally didn't really play any part in the game, other than to look lovely. In terms of the game, some thoughts as always;
- I've played BKCII so many times now that I rarely have to refer to the QRS or the rulebook, which is great. The one thing I do have to check is when units can be seen or not, which is not always clear. From what I've seen, BKCIV should clarify things, or at leasts that's the hope.
- Once again mortars can be real game changers as, when they get going, they can bring down an awful lot of fire against exposed infantry etc. Using the house rule of auto-suppression possibly exacerbates this, but then it does feel realistic from what I've read.
- I tend to use mortars, and infantry guns for that matter, deployed so that they have line-of-sight where possible, but this comes at the expense of them tending to cop lots of fire early on. Maybe next time I will use them much more in an indirect fire mode, assuming I remember that is.
- Both sides really had some poor command rolls, but the Red Brigade failing in the first 2 turns really hurt them.
- In contrast, the British Kompanie managing to get 3 commands in a row in Turn 5 proved to be the game changer. Sometimes the die rolls just do this too you.
Gaming will be more limited than normal in the next few weeks due to relations coming over, but I hope to get back to my Normandy campaign towards the end of the month, all being well. If nothing else it might spur me on to finish off my German armour that I really need for the next few games...


Great report with beautifully painted figures.
ReplyDeleteThanks Will:)
DeleteHooray for a Biggles escape - the only right outcome :-)
ReplyDeleteNice action and lovely to see the AV7 and T28 on the table.
I can see Biggles featuring in future games Norm. I just need to find a suitable adversary, the Red Baron maybe? I must confess a soft spot for WWI and inter-War tanks as they look great and have some wonderful camo schemes.
DeleteHi Steve
ReplyDeleteGood old Biggles! No telling where he might pop up.
For a game you just threw together it is visully impressive, many great details to look at.
I like that Biggles extracted himself in the end, leaving everyone else to wonder why they bothered. ��
Thanks d'Guy:). I'm slowly changing my terrain to be much more 10mm focused and I think it's paying off, as most thinks look right together. More still to do. As for Biggles, we'll have to see what his next adventure is...
DeleteSome lovely bits of kit on display there, Steve!
ReplyDeleteChris
Bloody Big BATTLES!
https://uk.groups.yahoo.com/neo/groups/BBB_wargames/info
Thanks Chris:)
DeleteExcellent battle report
ReplyDeletehttp://www.10mm-wargaming.com/
Take care
Andy
Thanks Andrew:)
DeleteYour welcome
DeleteThis comment has been removed by a blog administrator.
DeleteA wonderful and spectacular report, beautiful terrain and minis, love your stunning collection of vehicles, gorgeous!
ReplyDeleteThanks for the very kind words Phil, much appreciated:)
Delete