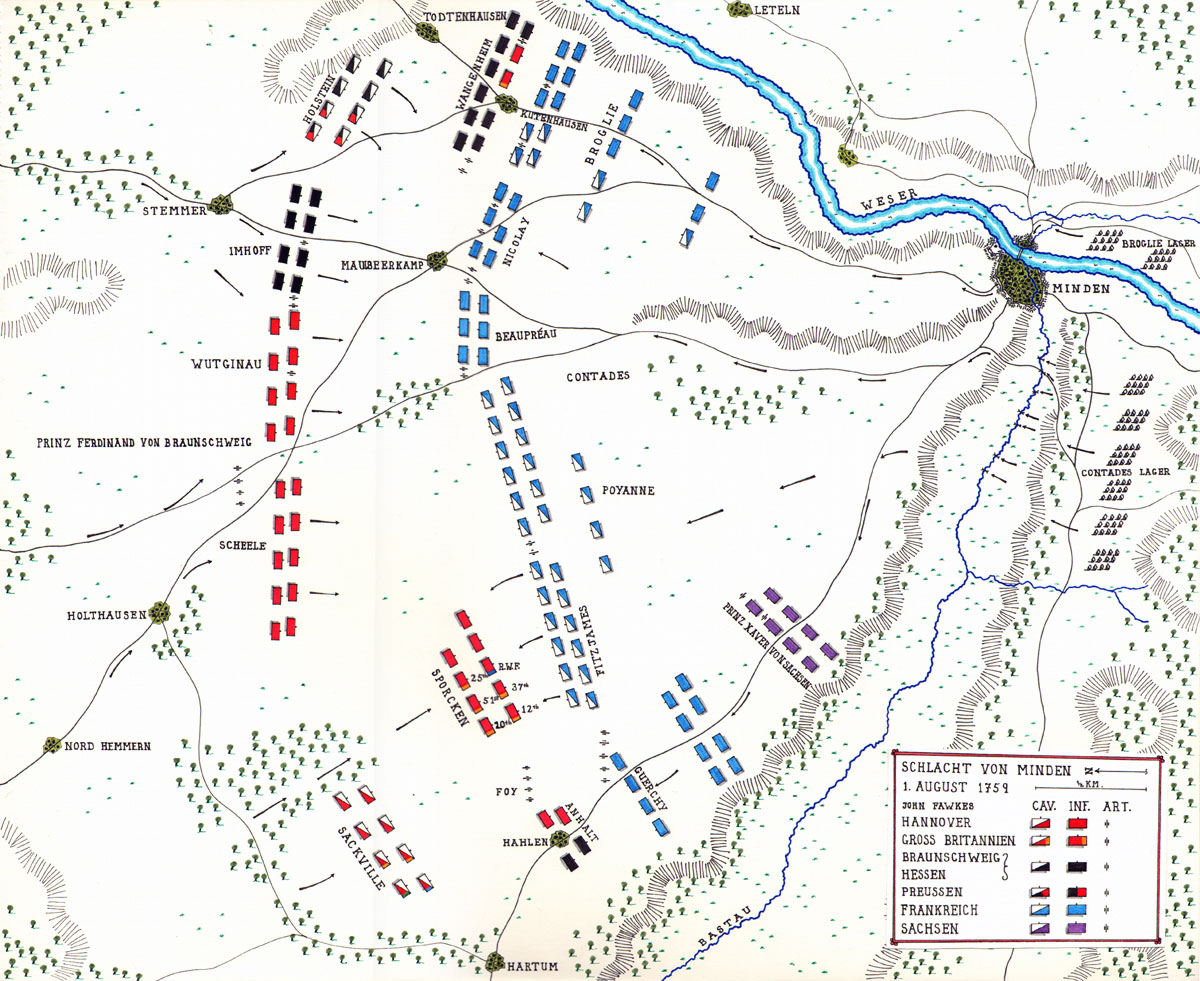
With Dave having recently finished his SYW French, it was only natural that we would have to give them their debut as soon as possible, and naturally it would have to be against the British! So what sort of scenario to use for this august occasion? Well it had to be Minden really, now didn't it? Now given the time, space and forces at our disposal, we simply used this battle as the basis for a game, namely the layout of the battlefield:
Forces
Given the available painted figures, we decided to go with identical forces, with the only difference being in the command ratings of the various Brigade commanders and General, decided by a die roll once deployed as normal for our games. So each side had:
1 x Brigade of Grenadiers (Superior) with artillery support.
2 x Brigades of Line Infantry (Standard) with artillery support.
1 x Independent Cavalry Brigade.
Suprisingly the French rolled well for their commands, with all of them being 'Dependable', which was echoed by the British, but they ended up with a 'Dashing' General.
Deployment
As I was the French, I set out my troops in with the Grenadiers holding the right flank (point of honour) and the cavalry the left, with the rest of the troops in a broad straight line. Dave followed a similar, but mirrored deployment.
 |
| Both sides deployed ready for battle. |
 |
| The view from the French left wing. |
 |
| Looking along the French battle line. |
 |
| A similar view of the British. |
Turn 1
Things got off to a poor start for the British as their Dragoons failed to move twice, despite having a re-roll courtesy of their 'Dashing' General. However the rest of their units moved as required, whilst the French held their line. As both sides opened up with their artillery, the French were truly shocking (being able to hit a barn door sprang to mind) whilst the British inflicted 4 hits on the French cavalry, forcing them back disordered.
 |
| The british get off to a good start, disrupting the French left flank with their artillery fire. |
Turn 2
The French advanced whilst the British dressed their lines and then the artillery continued their exchanges of fire. This time the French Grenadiers caused 4 hits on the British cavalry in a tit-for-tat exchange of fire.
 |
| The French push forward, trying to anchor their flank on the wood, but take hits in the process. |
 |
| As the British artillery moves forward, their infantry also takes hits from the French artillery. |
Turn 3
The neat battle lines start to fragment under the effects of artillery fire and poor command rolls. One French Line battalion is forced back whilst their cavalry moves into a town in prepration of trying to flank the British Grenadiers. The French suffer as one of their Brigade commanders becomes 'hors de combat' after being hit by a stray cannonball, with a 'chinless wonder' (Dithering) taking his place. Whilst the French General moves over to offer words of encouragement, the British General is happily rallying off hits from his troops due to his commanding presence!
 |
| The battlefield fragments. |
 |
| The French lines are somewhat disjointed. |
 |
| A view from the French lines towards the well ordered British ones. |
Turn 4
In a classic moment, I said words to the effect of: "As he's now a Dithering commander, if he rolls a 1, his Brigade will have to retreat." It will come a no suprise that I then proceeded to roll a 1, causing the Brigade to retreat as 'predicted'. Next time keep my mouth shut!
Elsewhere there was widespread movement and shooting right across the table, with the British broadly on the front foot.
 |
| The French very much on the back foot after their 'Feeble' command roll. |
 |
| The French artillery is somewhat exposed after their infantry Brigades have fallen back or become disordered. |
Turn 5
As the British close, both sides left flanks come under pressure and the battle starts to wheel anti-clockwise around the centre.
 |
| The French cavalry in the town are in danger from the British Grenadiers, whilst the French Grenadiers in their turn are pressurising the British left flank. |
 |
| The British Grenadiers in a threatening position. |
 |
| The French have been forced back from the woods. |
 |
| The French Grenadiers face a British Line and Cavalry Brigade, but both a disrupted as a result of artillery and musket fire. |
Turn 6
The battle takes on a distinctly English Civil War feel as the line continues to wheel around the centre. As the fighting intensifies, both side lose units, with the French slightly worse off.
 |
| A very disjointed looking battlefield. |
 |
| The French Dragoons take enough hits to force them off the board. |
 |
| A French Battalion succumbs to the sheer weight of fire thrown against it... |
 |
| ... as does a British one. |
 |
| The British have been pushed back in the centre and their left flank is now under severe pressure. |
 |
| However the French left flank is not looking too good either. |
Turn 7
As the battle raged on, the French left flank collapsed as a result of the weight of fire from the British Grenadiers. The British were under pressure as well, but the next Turn would be telling as to who might win.
 |
| The French left flank disappears. |
 |
| Despite the British lines largely reforming, the French are not in a good position. | |
 |
| The French Grenadiers are in danger from the British Dragoons that are on their flank, ready to charge. |
 |
| The wide open space once occupied by the French left flank. |
Turn 8
As the French desperately tried to dress their lines, the British Dragoons charged in and destroyed the French Grenadiers.
 |
| The 'End is Nigh'. |
 |
| The French right flank about to disappear. |
 |
| The isolated French centre. |
 |
| The British Grenadiers ready to move against the French now that their flank has gone. |
At this point the French, being well and truly beaten, withdrew into Minden to lick their wounds.
Post Game Thoughts
Despite the overwhelming British victory, it was a good game and at one point could have gone the way of the French. Losing out on the Fire Intitiative at crucial times certainly counted against the French. So as always a few thoughts on the game:
- It was nice to be playing a SYW game after our outings set during the '45. Having Standard and Superior troops made for a nice and refreshing change.
- The larger units certainly looked good and with their increased frontage, we used the 20mm ranges etc. This made for quite a bit of movement, more than we've been used to of late, with the longer ranges seeming strange as well.
- For the first 2 or 3 Turns, we forgot the effect that Generals can have on their Brigade commanders. Lesson hopefully learnt but fortunately it did not have a negative effect upon the game.
- Using a historical battle as the basis of the game worked well we thought. Even though the forces were much smaller, the terrain worked well and gace some interesting challenges during the game. For example the central wood effectively split the table into two unequal sectors, with neither sector able to support the other.
- Both sides manhandled their artillery quite a bit during the game, which seemed a bit too 'Napoleonic' at times. The absence of any hills may have accounted for this or the speedy set up of our forces. It is certainly something to think about for future games and I'm going to read Duffy to see if he has anything to say on the subject.
- The Pendraken SYW figures are lovely and if I hadn't already invested in two AWI forces, I would certainly go for these as the colourful nature of the units is very appealing.
- Hindsight is a wonderful thing but I should have deployed my Grenadiers on the left wing so that they could have occupied the town and really anchored that wing. The Dragoons would have been much better on the right wing where they had more room to manouevre.
- Dave deployed his artillery in more effective manner, with two batteries being side-by-side where they could combine their firepower to greater advantage. In contrast mine were too spread out.
So, we are due for another game next week, but I need to look at some of my scenario books or other battles for some inspiration. We may even try some form of hidden deployment to add a bit of 'fog of war' to our games. In the meantime I'm cracking on with my AWI/ImagiNations force so that I hope to be able to field a Battalion in the near future. They are bound to lose due to the curse of the newly painted unit!


What do I see here? 32 figure infantry battalions and 12 figure cavalry regiments? Nice! Interesting to see you guys mixing things up a bit and trying some different organisations. And using real battles as inspiration, even if you can't represent them exactly, is always a good idea. A great read Steve.
ReplyDeleteGlad you enjoyed the AAR Keith. Dave is obviously revealing his inner Catholic tastes with his profligate use of figures on his bases. However the Puritan in me has to admire them when on the table as they do look the 'Poodles Privates'. As for real battles as inspiration, this is definitely something to be used more often.
DeleteVery nice. Will be interested to see what you come up with on the manhandling of guns. I have never really been a fan of manhandling guns in any period, if allowed it can be over-used, just my thoughts with no evidential basis.
ReplyDeleteThanks Norm. I think we may try to limit their mobility to maybe 1-2 moves per game, once deployed. Only testing in the game will tell if it works.
ReplyDelete