As planned Dave and I started our Franco-Prussian War narrative campaign this week. Having played enough games of Bloody Big Battles, we felt confident enough to branch out and tweak historical actions to suit the time and space available to us, as well as developing them as the campaign unfolds.
To kick things off we decided to fight the Battle_of_Wissembourg, using the information contained in Bruce Weigle's '1870' rules as the basis for the OOB, deployment and table layout. The scenario in his book also contains 2 different options for the forces available to the French as well as altered victory conditions for the Germans. In the end we settled upon the following, really just reducing the number of German Corps available from 3 to 2 and giving the French more leeway in terms of where they deployed their units:
To kick things off we decided to fight the Battle_of_Wissembourg, using the information contained in Bruce Weigle's '1870' rules as the basis for the OOB, deployment and table layout. The scenario in his book also contains 2 different options for the forces available to the French as well as altered victory conditions for the Germans. In the end we settled upon the following, really just reducing the number of German Corps available from 3 to 2 and giving the French more leeway in terms of where they deployed their units:
OOB
French 1st Div
1st Regt 5S Trnd LB
2nd Regt 4Trnd LB
2nd Regt 4Trnd LB
3rd (Turcos) Regt 4S Trnd LB (all can skirmish)
RA 2 (includes Corps and Div arty)
Mitrailleuse 1 (combined Corps miltrailleuse)
Cavalry 2 Trnd (can be sperate units or combined together)
2 x German Corps, each as below:
Corps Assets
BLA 2
1st Div
1st Bde 7S Trnd NG
2nd Bde 6 Trnd NG
BLA1
Cav 1 Trnd
2nd Div
1st Bde 6 Trnd NG
2nd Bde 6 Trnd NG
BLA 1
Deployment
The French would deploy all of their units first, up to the line of the Lauter river and in Wissembourg and Altenstadt if they so wished. The Germans would deploy their 1st Corps opposite the stream, with their Divisions coming along on alternate Turns. The German 2nd Corps would randomly toll to see what road they came along on the adjacent table edge. Not only does this give the Germans uncertainty as to when and where their units arrive, but also to the French. After all, historically the French had no idea that they were facing 3 German Corps! the Germans would deploy onto the table as follows:
Victory Conditions
The French simply cannot win this scenario, so they have to delay Germans for as long as possible and if necesary, withdraw from the battle with as many units intact as possible. The Germans have to capture Wissembourg and Altstadt to secure their lines of advance and inflict as many casualties on the French as possible, all within 6 Turns.
The French would deploy all of their units first, up to the line of the Lauter river and in Wissembourg and Altenstadt if they so wished. The Germans would deploy their 1st Corps opposite the stream, with their Divisions coming along on alternate Turns. The German 2nd Corps would randomly toll to see what road they came along on the adjacent table edge. Not only does this give the Germans uncertainty as to when and where their units arrive, but also to the French. After all, historically the French had no idea that they were facing 3 German Corps! the Germans would deploy onto the table as follows:
Turn 1 ... French deployed and German 1st Corps/1st Div deployed.
Turn 2 ... 1st Corps/2nd Div and Corps Arty
Turn 3 ... 2nd Corps/1st Div
Turn 4 ... 2nd Corps/2nd Div and Corps Arty
Victory Conditions
The French simply cannot win this scenario, so they have to delay Germans for as long as possible and if necesary, withdraw from the battle with as many units intact as possible. The Germans have to capture Wissembourg and Altstadt to secure their lines of advance and inflict as many casualties on the French as possible, all within 6 Turns.
Map
The following map from 1871 should give a good idea of how the battle actually developed as well as the general topography, towns and villages. Note: I left the railway off as I simply didn't have enough track to represent it well enough.

The Game
The following map from 1871 should give a good idea of how the battle actually developed as well as the general topography, towns and villages. Note: I left the railway off as I simply didn't have enough track to represent it well enough.
The Game
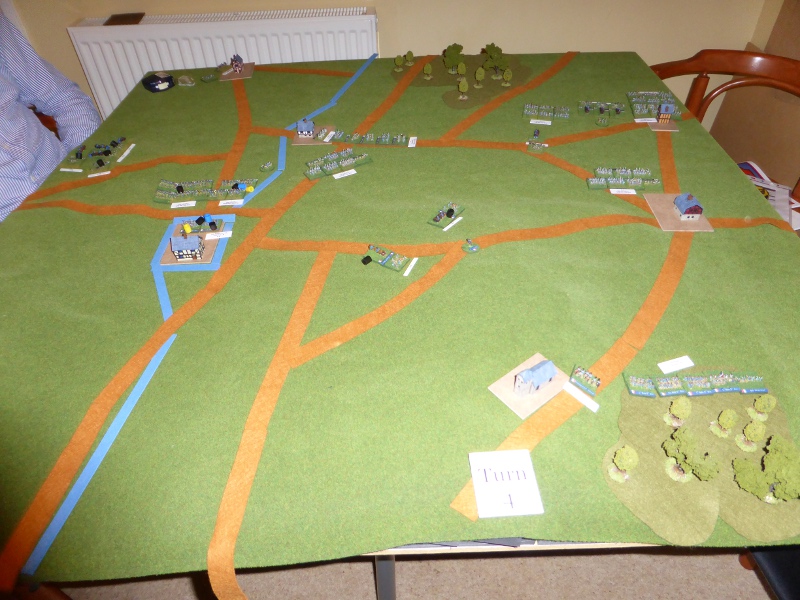
Once again Dave was the Prussian and I the French. I chose to deploy the Turcos Regt in Wissembourg and the 2nd Regt in Altenstadt, supported by the Miltrailleuse. The artillery deployed on the heights to give a good field of fire, with the cavalry on either wing and the 1st Division held in reserve.
 |
| The French deployed with the German 1st Division just arriving. |
 |
| Dave modelling Bruce Weigle's 1870 book and doing something...unusual with his mouth... |
 |
| The Germans advanced towards Altenstadt whilst their artillery deployed on the hills above Wissembourg. |
 |
| The French in Altenstadt fire at the Germans, but immediately go Low on Ammo! the French reserves and one artillery unit advance towards the sound of gunfire. |
 |
| The German 1st Division closes in on Altenstadt and as the firefight develops, the Miltrailleuse is Reduced and Silenced! Not what the French need at this early stage in the battle, especially as the German 2nd Division arrives in support. |
 |
| Seeing the German 2nd Division arrive, the French reserves move back up the hill to try and get away from the Krupp gun line and to wait and see how the attack develops. The French send a Hussar cavalry unit across the Lauter River and up the hill to try and threaten the German gun line. |
 |
| The French 2nd Regt in Altenstadt under a lot of pressure, especially without the Miltrailleuse to support them. |
 |
| The German 1st Division closes in... |
 |
| ...and assaults Altenstadt... |
 |
| ...successfully driving out the remnants of the French 2nd Regt who are now hors de combat. |
 |
| A pivotal moment in the game as the German 2nd Corps arrive on the extreme right of the French flank, effectively unhinging their defensive position. Certainly a Teutonic shift (Dave's phrase)!!! |
 |
| The French Chasseurs a cheval and Miltrailleuse Battery are in an extremely vulnerable position. |
 |
| With Altenstadt in their hands, the Germans move towards Wissembourg and the Turcos garrison. |
 |
| Despite being under pressure, the French are still in a relatively good position at this point. |
 |
| The Turcos form in depth to face the expected German assault. |
 |
| The Miltrailleuse Battery retreats into Oberdorf to try and threaten the German 2nd Corps flank. |
 |
| Combined fire from the Krupp guns and German infantry see the sudden demise of half the Turco force, but at the expense of the Germans all Low on ammo. |
 |
| The French position is now untenable with the loss of half the force in Wissembourg. |
 |
| With the German 2nd Corps pushing forward, the French start an orderly withdrawl of what remains of their force. |
 |
| With Wissembourg soon to fall, the French artillery empties their caissons before preparing to limber up and withdraw. |
 |
| As the German 1st Corps flanks Wissembourg, the French withdraw off the table. |
Post Game Thoughts
Well the French were able to make a good fight of it, right up until the moment that they lost half of the 3rd Turcos Regt. This loss left them with no choice but to withdraw off the table, ready to fight the next battle in the campaign. A great game and one that gave us plenty of things to reflect upon:
Well the French were able to make a good fight of it, right up until the moment that they lost half of the 3rd Turcos Regt. This loss left them with no choice but to withdraw off the table, ready to fight the next battle in the campaign. A great game and one that gave us plenty of things to reflect upon:
- We both thought that the scenario worked well. It was closely fought and although the French have no chance of winning, in campaign terms a good delaying action may have repercussions later on.
- The Germans do not need 3 Corps for this scenario. 2 is more than enough and in the relatively short time frame of the game, they will have no effect upon the result other than looking good on the table.
- The random deployment of the German 2nd Corps worked well as neither off us knew where they would arrive. As it turned out, both Divisions arrived at the same point and the worst one from a French point of view. If they had arrived at the same point that the 1st Corps deployed from, then there is a good chance that the French would have delayed both German Corps long enough to allow the MacMahon's 1st Corps time to form an effective defensive position at a place of their choosing.
- The loss of half the 3rd Turcos Regt put pay to any effective French resistance. Just prior to that we had both said that they were in a good position and could probably hold out for some time! Next time I'll keep my mouth shut...
- As this is part of a campaign, I was very careful how I used my reserve infantry. Initially I advanced them but then, wisely as it turned out, withdrew them to higher ground to await to see how the battle developed. In the end I was able to save the reserves as well as all of the artillery, including the Miltrailleuse Battery and the Chasseurs a cheval.
- My lone hussars cavalry unit did manage to do enough to threaten the Krupp gun line. Dave was forced to turn half of them to face the cavalry, which meant that they were unable to shell Wissembourg. I'm pretty sure that this helped prolong the defence of the townas if they had been able to add their weight of fire, the Turcos would have succumbed to the sheer weight of fire much earlier.
So our first campaign game is out of the way. The Germans didn't suffer many casualties and the French were able to salvage enough of their force for it not to be too detrimental in the next game. The plan is to fight a version of Froeschwiller, with a reduced table (effectively leaving off the top and bottom of the BBB map) and to bathtub the units so that we can hopefully finish the game in an evening. Fingers crossed we will get to play this in the next week or so, subject to work commitments. Personally I can't wait.
Steve, great AAR, and well done for making a fun and challenging scenario out of a historically pretty one-sided affair!
ReplyDeleteChris
Bloody Big BATTLES!
https://uk.groups.yahoo.com/neo/groups/BBB_wargames/info
http://bloodybigbattles.blogspot.co.uk/
Thanks Chris.Glad you liked it.
DeleteAs mentioned in my post, now that we have played enough games of BBB, we feel confident enough to be able to tweak these sort of battles to hopefully give a more challenging game. Otherwise who would want to play this scenario as the French? Only masochists I would venture;).
With it also being part of a campaign changes the dynamics of the game, with the French needing to slow the German hordes but at the sametime not heading Lemming like to certain destruction. For the Germans they have to attack quickly, but not throw their troops away needlessly against the fortified town of Wissembourg.
Another great encounter Steve - Nice to see the campaign taking shape.
ReplyDeleteCheers
Stu
In a strange coincidence, I was checking through some old wargames magazines yesterday and what should I find but issue 5 of an old 'Wargames Journal' (remember that? Started out as an online mag, then went hard copy, then disappeared), with 2 very nice Franco-Prussian War scenarios by Dave Fielder. Then an hour of browsing later, an article on the Battle of Solferino by Dave and 2 other Royal Marines. This was Battlegames, issue 19. Though the picture in Battlegames appeared to be of a much younger man.
ReplyDeleteThis guy has form!