Background
Having finally finished our Dux Bellorum campaign last week, it was time for some 'Black Powder' period gaming, kicking things off with the Seven Years War as planned. Dave provided the scenario, reference sheets and figures, so all I had to do was set the table up. As I'd only dabbled in this period with my gaming chum Keith Flint, we used this first game as a bit of a training exercise in the rules.
Scenario Details
The scenario was quite simple really. The main battle was taking place off table and a small Austrian force was tasked with protecting the baggage train in the village of Holzdorf. The Prussians had sent a flanking force that deployed quickly from the march, with the task of capturing said baggage train. Simples!
Forces
The Austrians had two Battalions of regular infantry and one of Hungarians, who were 'Freshly Raised' plus a unit of Croat skirmishers. In support they had two Battlion guns. Off table they had a unit of Cuirassiers and one of Hussars, that would arrive from the start of Turn 2 on a roll of 6+, on Turn 3 on one of 5+ etc.
The Prussians had a mix of Regulars, Grenadiers and Freikorps, with Battalion guns and two units of cavalry, Cuirassiers and Dragoons. The Prussians outnumbered the Austrians by at least 2:1
Deployment
The Austrians chose to deploy their main units on the hill, with the Battalion guns in the centre and with one unit in reserve. The Croats deployed in the woods on the left flank.
As Dave knew the scenario, he kindly chose to randomly deploy his troops by die roll, to represent a hasty forming up from the line of march. This didn't work out too badly for him, except that the Grenadiers were teamed up with the Freikorps!
The Battle
I didn't make any notes of how the game went, so annotated pictures of the game will hopefully suffice.
 |
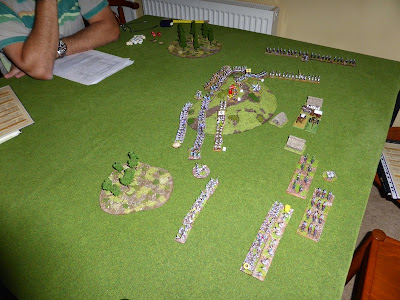
| Both sides deployed for battle. The Prussian cavalry are on their left flank, with the main Prussian force on the right flank. The Austrians are on the ridge line of the hill, with their cavalry still off table. |
 |
| The Prussians advance quickly on both flanks, but the centre is somewhat reluctant to move. Seeing the Prussian cavalry advance, the Austrian right wing redeploys to meet the threat with the reserve moving up in support. |
 |
| The view from the Austrian right flank. |
 |
| The view from the Austrian left flank, with the Croats clearly visible in the wood. |
 |
| Once again the Prussian centre stubbornly refuse to budge, whilst the right flank shakes out into two lines in preparation to assault the Austrian positions. |
 |
| The Croats are involved with Prussian regulars in a firefight from the woods. |
 |
| Fed up with waiting for the Prussian centre to move, Dave moved his C-in-C to command them, promptly getting three moves anfdsuddenly the Prussians had formed a formidable battle line. With the Prussian cavalry threatening their right flank, the Austrian reserves moved to anchor their line, preventing the Prussian cavalry from being able to charge them in the flank. |
 |
| The Croats still held out in the wood, trading shots with the Prussians, whilst both sides artillery shot away, but too little effect. |
 |
| With the Austrian right flank pinned by Prussian cavalry, the Prussina moved forward en masse. The Austrian cavalry had still failed to arrive and their presence on the battle field was keenly anticipated. |
 |
| The Prussians attack the Croats, forcing them back through the woods. |
 |
| Huzzah! The Austrian cavalry finally arrive, randomly appearing on the left flank. The Prussians remorsely move forward, with the Croats somehow still standing toe-to-toe with the Prussians. The Prussian cavalry move to look to get around the Austrian flank and attack the baggage train. |
 |
| The Austrians appear to be hopelessly outnumbered, but will stiff upper lips and waxed moustaches may be enough to carry the day...? |
 |
| The Prussian cavalry are preventing a third of the Austrian line from joining the battle, leaving the freshly raised Hungarians to face the Prussian Freikorps (not too bad) and the Grenadiers (very bad). |
 |
| The Prussian command rolls have been pretty good so far, with a CV of 9 helped by some excellent die rolling by Dave. However he surpassed himself this Turn with two double ones in a row!!! |
 |
| The Austrian position in danger of being swamped by sheer weight of numbers. By some miracle the Croats are still holding out against the Prussians, thus securing the left flank. The Austrian cavalry move towards the baggage train to try and prevent its capture by the Prussians. |
 |
| The Austrians still hold out despite overwhelming odds. |
 |
| The Austrian cavalry charge to try and save the situation... |
 |
| ... as their right flank has collapsed. The Croats, undefeated, were forced off the battlefield whilst the Austrian line infantry on the hill finally fell to the sheer weight of firepower directed at them. The Austrian Hussars try to protect the flank, but the way to the baggage train is open to the Prussians. |
 |
| The Prussians surge up the hill whilst the cavalry battle it out. |
 |
| The Austrian cavalry charge forward, beating back their opponents, but are too late to affect the outcome of the battle. |
The End
With the Austrian right flank gone, the battle was over. However, the Austrians had managed to hold on just long enough for the Prussian victory to be a Pyrrhic one. In the original scenario, developed for Dave's club, the Prussians had to win by 22:15 hours and I had held on until 22:30 hours. So in the distance could be heard the main Austrian force arriving to save the day, or something along those lines.
Post Game Thoughts
Well another cracking game, which is not bad two weeks in a row. So as always a few musings on the game etc:
- Initially the scenario looks very one sided, with the Austrians facing a large and well led Prussian force. However the scenario is nicely balanced as long as the Austrian player remembers that he must protect the baggage train. In the scenario briefing there is a little sentence along the lines of: "If you lose the baggage train you're a Muppet!" This helps focus the mind as one wouldn't want to be Kermit at the end of the night. Despite this at one point I was tempted to use my newly arrived cavalry to charge into the Prussians, but managed to remind myself of my primary (and only) objective.
- The Croats were the absolute stars of the show. Their dogged defence in the wake of repeated Prussian attacks allowed the Austrians to hold on long enough for them to deny the Prussians an overwhelming victory. Hopefully they will be mentioned in dispatches and upgraded to a better quality unit for future games. They deserve it.
- The rules played out nicely and despite few games, I managed to remember enough stuff for it all to flow quite nicely. We had recourse to check the rulebook a few times, but nothing major, which is fairly normal for most games.
- The 'Last Argument of Kings' supplement was used to make sure that the it felt like a SYW battle. I know there has been a lot of criticism of this supplement by SYW players in the past, some of it justified, but it makes a good starting point for this period IMHO. In fact I have just ordered for use with this period and also the Great Northern War.
- During the game we both felt that the Battalion guns didn't feel right, moving too freely around the battlefield like Napoleonic horse artillery and packing too much punch. In future games these will most likely be left out and replaced with Medium games that have greater range but are less manouvreable. I know that this has been an issue with the forthcoming 'Honours of War' rules from Osprey, but won't comment on the solution as you will have to wait until they are published.
- All the figures used are from the Pendraken and are really, really lovely sculpts. Sadly there are no images on their website at present, but they will definitely be a purchase in the future as they have so much character.
- Even though the game was played on a 4'x4' table, with 10mm figures on 40mm x 20mm bases, there was still plenty of room for manouevre and it looked like a big battle. This is a pretty much perfect size for an evenings gaming that can be fought to a conclusion, still leaving time for a good chat.
- The 'Black Powder' rules do provide fun games, whilst allowing for units to be tweaked with the various extra rules to reflect certain periods, battalions etc. They are not to everyones liking (are any rules) but it speaks volumes that the game was played with just the QRS and stat sheet, with us barely needing to check out the book. For me this is what a ruleset should be like, allowing me to concentrate on the game, rather than the rules.
So what next? Well we hope to play a linked scenario next week that carries on from where we left of, but I will have to wait to see what Dave comes up with. We may even try out the same scenario, but with 'Maurice' by Sam Mustafa. Which ever route we take I'm sure it will produce another challenging, fun scenario and game, which is what it is all about at the end of the day.


Very nice looking game, indeed the 10mm on 40x20 bases get it to look like a quite big battle. A very nice AAR Steve !
ReplyDeleteBest regards Michael
Thanks Michael:). 10mm works great for these sort of games, as you don't need a lot of space to get that feel of a large engagement. Also it's very cheap in comparison to 28mm figures.
DeleteNice looking game, the mass effect is really good, love the Prussian advance...
ReplyDeleteYep, 10mm works perfectly for these games (and others IMHO). The Prussian advance didn't look great from my side of the table...;)
DeleteGreat looking game Steve, I've gotta try Black Powder one day!!
ReplyDeleteI find they provide fun games Ray. They are very much a toolbox set of rules, that can be tweaked for the relevant period. So as a result not to everyones taste. I've found the Rebellion! and Last Argument of Kings supplements to be useful, giving that extra background info for relative period novices such as myself.
DeleteKept meaning to comment Steve, and kept forgetting. Well done on getting these armies together. BP do provide a good game, but I had my doubts about the treatment of battalion guns in LAOK. It was a solution I had tried and it didn't work for me.
ReplyDeleteHoping to get a game of HoW with you using these great 10mm armies.
Cheers, Keith.
The armies are Dave Fielder's, sadly not mine:(. However the figures are really, really nice and have gone onto my wish list. At present working on some AWI armies, so must try to focus...
DeleteRe: the battalion guns, we are broadly in agreement. The next game we may ditch them and go with larger guns that won't move once deployed, just counting battalion guns as part of the normal infantry shooting stats. Game due to be played this coming week so watch this space.