Even though Colours is around 4 months away, Craig and I decided a few weeks ago to try and get a game in to start sorting out the scenario for the demo table, as well as the warbands involved. With this in mind we arranged to meet up at mine for a spot of gaming on Saturday morning, and true to form, the weather was absolutely glorious!
We decided to try out the Dawn Attack scenario from the rulebook, with a view to combining it with the Village Raid scenario, as the basis for the demo game. Craig fielded his Welsh Warrior mounted warband, whilst I went with my newly finished Viking Sea Raiders. As I had no mounted units at all, Craig was automatically the Agressor for this scenario.
We also decided to try Craig's Gods cards, an idea borrowed from the Sumer to Sargon Blog. Basically anytime that a warband rolled a double as part of a successful command roll, they drew a card from the deck. This replaced the extra movement when a double one was rolled, but not when a double six was rolled, this still resulted in a loss of 1 Leadership Point as per normal.
Table Layout
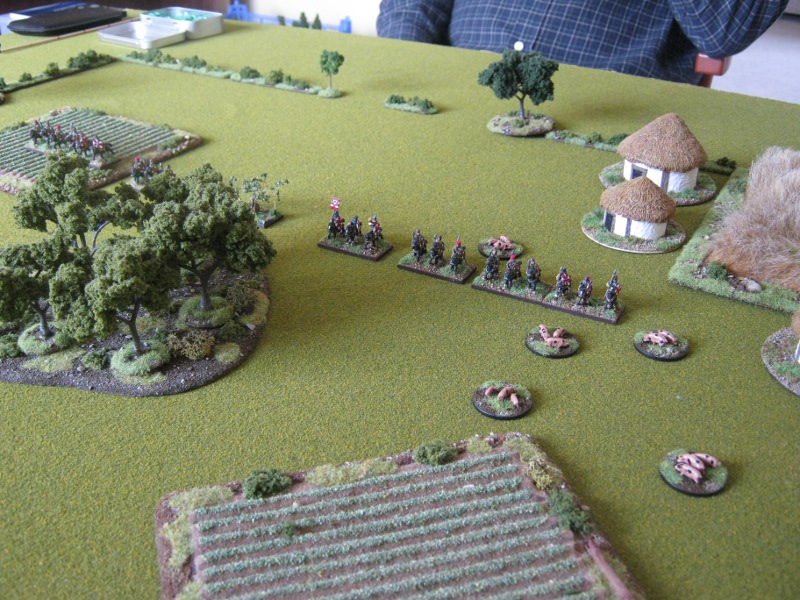
The only downside with the Sea Raider warband is that you only get to place one piece of scenery for the scenario. Facing a largely mounted warband that, by it's very nature is extremely mobile, meant that my warband felt very exposed once the table was laid out. I opted to chose a wood that I placed in the centre of the table, knowing that this would mean Craig would most likely have to split his warband, or concentrate everything on one flank, with the risk of the congestion that might ensue.
With the wood duly placed in the centre, I then used other pieces of scenery to mark out the edge of the table, in this case 30" square, as well as adding a bit of character so that it wasn't billiard table bare. The other pieces of scenery had no bearing on the game, other than as eye candy.
Both sides then deployed as per the scenario as can be seen below.
 |
| An overall view of the table. |
 |
| The Sea Raiders look towards the approaching cavalry. |
 |
| The cavalry are forced to split into two by the wood. |
 |
| The Welsh left flank are lured by the Gloster Old Spots... |
Turn 1
The game started as per the normal turn sequence, with the Welsh skirmishers advancing into the wood. The Sea Raiders then rolled a double and drew a card that slowed the Welsh cavalry down to half pace for the next two turns! Just what the Doctor ordered. Another double saw another card drawn, that allowed the Sea Raiders to ignore all penalties for movement in the wood. Useful but highly unlikely that I would get to use it. The Welsh advanced slowly thanks to the Goddess card and the Sea Raiders attempted to form a battle line to face the oncoming cavalry.
 |
| The cavalry move on both flanks and the Sea Raiders form up to meet the attack. |
 |
| The Welsh left flank. |
 |
| The Welsh right flank. |
Turn 2
The Welsh advance continued to be slow this turn thanks to the Goddess card, whilst the Sea Raiders dressed their lines as best they could.
 |
| The Sea Raiders are slow to get into position. |
 |
| The Welsh skirmishers advance to the edge of the wood. |
 |
| The Sea raiders look on as the enemy slowly advances. |
Turn 3
The first action took place as the Welsh skirmishers shot at the Sea Raiders skirmishers, missing their target, only for the retaliatory bow fire to claim one hit on them. Both sides then continued to manouevre into positions for attack and defence.
 |
| The Welsh start to work towards the flanks. |
Turn 4
The skirmishers once again exchanged shots, only for the Welsh to be hit and finished off, leaving the Welsh down by one Leadership Point. The Sea Raiders obligingly blundered, thereby losing a Leadership Point as well! Another double resulted in the Sea Raiders skirmishers gaining an extra point of agression, something that could be very useful. Both sides were still outside charge range so continued to manouevre as best they could.
 |
| The Welsh threaten the Sea Raiders left flank. |
 |
| Only one unit notices the threat. |
 |
| The Sea Raiders right flank is yet to form up. |
Turn 5
After some ineffective bow shooting, combat was finally joined. On the Sea Raiders right flank some uncontrolled charges resulted in them charging the Welsh cavalry, only for the combats to be drawn. In the centre more uncontrolled charges resulted on the loss of one Welsh cavalry unit. On the Sea Raiders right flank, the Welsh cavalry charges were contained, much to my suprise.
 |
| Battle joined at last. |
 |
| The cavalry and infantry slog it out. |
 |
| The loss of the Welsh cavalry unit leaves the centre open, whilst the right flank manages to repulse on cavalry attack and contain the other. |
Turn 6
There was movement from both sides to take advantage of gaps that appeared as a result of last turns combat. The fights from last turn continued with both sides losing one unit each. The Welsh and the Sea Raiders were now down 3 Leadership Points each, making for some tough decisions next turn. The Welsh rolled a double and the God card allowed him to move one unit outside of the normal turn sequence once per turn for the rest of the game.
 |
| The battlefield really opens up after both sides lose units. |
 |
| The Sea Raider Companions charge the Welsh Mounted Companions. |
 |
| The Welsh cavalry are taking lots of hits, for none in return. |
Turns 7, 8 & 9
With things still finely in the balance, another double sees fate swing firmly in favour of the Sea Raiders, who sacrifice the Bow Skirmish unit in exchange for two extra Leadership Points. Over the next three turns, the Welsh lose more units, forcing them to take morale tests, which they pass two turns in a row. These Welsh are made of tough stuff!
 |
| Pressure mounts on the Welsh from all sides. |
 |
| A very one sided combat. |
 |
| Both sides Companions continue to slug it out. |
Turn 10
The inevitable finally happened with last two Welsh units being destroyed, for the loss of one Sea Raider unit. The Welsh meet a gallant end and one which the Bards will surely immortalise in song.
 |
| With no one left to fight, the Sea Raiders are Lords of all they survey, including the Gloster Old Spots. |
Afterthoughts
Well once again another cracking game of Dux Bellorum. Even though I hadn't played the game for a few months, the rules came back to me allowing me to concentrate on the game, which is a sign of a good ruleset IMHO. The Sea Raiders were everything I had hoped they would be, so now I have to come up with some good background fluff for them. Research is already well under way.
Despite having great fun with the Gods cards, we both felt they were a bit too much for use in the demo game as played. We will still use them, but only for when you roll a double one, which should limit their appearances on the table and not unduly affect game play. For solo games they add another bit of fun to the game, so I for one will be trying them out in the future.
Despite having great fun with the Gods cards, we both felt they were a bit too much for use in the demo game as played. We will still use them, but only for when you roll a double one, which should limit their appearances on the table and not unduly affect game play. For solo games they add another bit of fun to the game, so I for one will be trying them out in the future.
Craig and I both agreed that the Dawn Attack scenario combined with the Village Raid one would make for a good demo game. We had originally planned to have three seperate warbands per side, but after the game decided that it would be better to have two slightly larger ones per side to allow for ease of control and more movement on the table. The plan is to still have plenty of the extras that the warbands can have, to really show of the game in the best light. We are already making plans for the next game so watch this space.
No comments:
Post a Comment