Friday, 19 July 2019

The Battle of Loigny/Poupry 1870 - a Franco-Prussian BBB AAR

For this weeks game we ventured into the territory of the Franco-Prussian War, something we had not gamed for quite some time. A conflict famously (or infamously) dismissed by the authors of Black Powder, but one that has an awful lot to offer, for those adventurous enough to give it a go. The only slight downside of this period is that the games are rather on the large side and so not ideally suited to a mid-week game played by chaps in their mid-50's. 

However the solution can often be found in bathtubbing the forces involved or focussing on only one part of the battle. We chose the former and as always Dave did a great job on coming up with the goods for the Battle of Loigny/Poupry (the latter town being called 'pot-pourri' by us as we are, if nothing else, creative...). As this was a two day battle, we chose to commence hostilities on the morning of the second day, with the French having taken Loigny the day before and the German troops in and around Lumeau, another one of the objectives. Both sides had re-inforcements due at various points in the game, with the Germans due on at the start.

In keeping with recent games, Dave took on the role of commanding the Army of the Loire (a mixed bag French troops of various quality and armaments) whilst I was in command of the Grand Duke of Mecklenburg's Detachment (Bavarians, Holsteiner's and Hessians, again of mixed quality). In hindsight I think I should have been awarded some victory points for having the best sounding force by a country mile.

As this was going to be a tricky old game to play, I didn't bother making any notes, which proved to be a good move as the game ebbed and flowed throughout. As is usual in these cases, hopefully my annotated pics will help give an idea of how the game played out.


The French are in the top left corner, with their left flank anchored on Loigny. The Germans are facing them, split between Lumeau and the Chateau Goury. Poupry can be seen at the bottom to the left of the Turn marker.

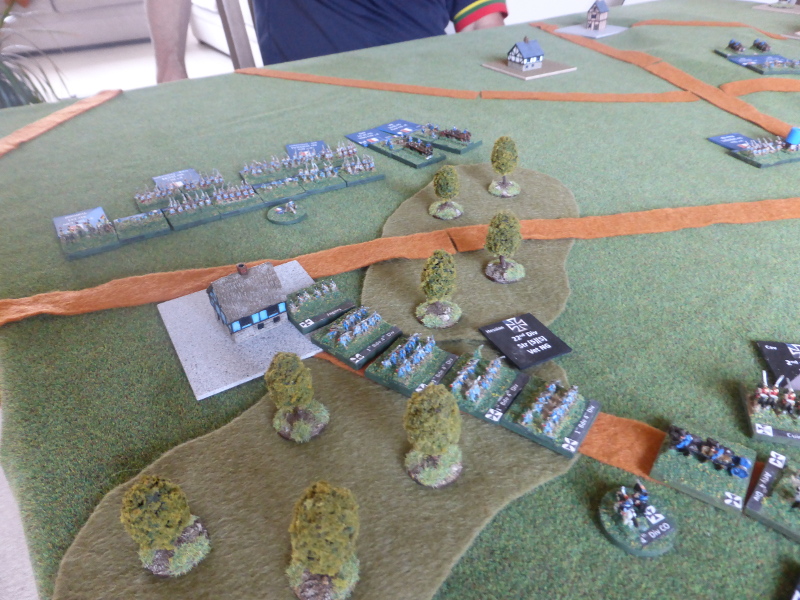
Both sides face each other in the early morning light.

The view from the German side, facing quite a few French troops and guns.

The German re-inforcements at the start of the game.

The German re-inforcements have arrived, with some heading towards Poupry, but don't quite have enough movement to deploy in the town. The others have headed off towards Lumeau, but to be in a position so as to be able to re-inforce other wing.

The French advance aggressively, hoping to be able to push the Germans off the objective by sheer weight of numbers.

A view from of the German re-inforcements.

The French 15th Corps, a real mixed bag of red pantalooned Zouves and Gardes Mobile, due to arrive on the second Turn.

The French rightly feared the German Krupp guns (I know how deadly they can be having been on the receiving end as an Austrian player), which rolled rather well on some already disrupted and shaken troops.

They hit them with full force

This caused two bases to be lost.

With only one base left, they ceased to be (rather like the Norwegian Blue Parrot).

Undeterred by the loss of a whole unit in the centre, the French left attacked the Chateau Goury, with every expectation of being able to evict the Bavarians that were holding it.

Defensive fire disrupted the troops in the way in, but not enought to halt them. Offensive fire failed to do any damage to the Bavarians.

In the ensuing assault, the Bavarians somehow managed to repell the French. So for the first Turn things had been going well for the Germans.

The timely arrival of the French 15th Corps put pressure on the Germans by Poupry, as the other French troops had taken a real pasting from the Bavarians in and around Lumeau.

The French 15th Corps are deployed in depth, ready to assault Poupry. The Germans in column of march are not ideally placed to meet the threat.

A view towards the Bavarians at Lumeau.

The German cavalry, seeing more French troops disrupted and spent, assault into their flank.

Unsurprisingly the French lose the battle and are forced to retreat back, losing a base.

The German cavalry are able to exploit and have tow targets in front of them.

They chose to assault the French gun line that has been causing problems for the Bavariasn in Lumeua.

The French gun is forced back and is disrupted.

The French left is a spent force at this point, but the right is in a very good position.

As the French 15th Corps prepares their assault on Poupry, they disrupt the German troops as well as silencing the supporting German guns.

The Germans have moved up re-inforcements towards Lumeau, when in fact they are needed at Poupry. Mea Culpa.

The German cavalry in position to cuase real problems for the French. However this was not to be as French artillery fire from the 15th Corps saw their demise, thus saving the French left flank.

The French assaults go in on Poupry. Things don't look good for the Germans.

The Germans are pushed back and the French move into Poupry.

Both sides face each other, but it will be hard for the Germans to take back Poupry without artillery support or other troops.

The Germans try and move troops over to Poupry, but it will take time before they are in position to aid an assault.

The French have strengthened their position at Poupry, making it an even harder task than it was.

At Lumeau and Loigny, both sides do not have enough strength left to take offensive operations, especially the Germans who have lost their guns and their cavalry.

The French battered and brusied but still in control of Loigny.


End of Game.
At this point it was obvious that the Germans did not have the strength to take either of the objectives held by the French, certainly without a protracted and potentially bloody assault on Poupry. And this was before more French reinofrcements were due. So looking at how things stood, we called it a day and a French victory.

Post Game Thoughts.
That was an intriguing and fun game, where the action ebbed and flowed, with first the Germans seeming to have the upper hand, only for it to suddenly swing back in favour of the French. So I'll try and sum things up as usual;

Post Game Thoughts.
  • Bath tubbing and reducing the table side did give something that could be played as a mid-week game. Of course it would have been better to have played it as written, but sadly we don't have that luxury. One day it would be nice to replay this as and when time allows. Something for the future that's for certain.
  • The Krupp guns proved to be devastating once again, but Dave wisely chose to target them early on to silence them, which he did rather effectively. I did think about using them against the French gun line early on, but the French troops attacking I took to be a more immediate threat. in hindsight maybe I should have had a go at the French guns, but I might then have lost Lumeau to a combined French assault.
  • The mix of troops quality and armament made for an intriguing game. I didn't know what I was facing, so had to make an informed decision as what to attack (or not) as commanders on the ground would have had to. This fog-of-war really added something to the game. 
  • Prior to the game I went to the rulebook to check something, only to find a few areas we had forgotten about in previous games. Nothing major but re-reading the rules post game did throw up a few points that we had missed. So the old adage of 'read the rules' still holds true!
  • The German cavalry threatening the French flanks and guns could have turned to game, but some poor die rolls for movement and assaults, put pay to this. However it was nice to have the chance to use them, as often they fail to have areas they can exploit during a game.
  • The French Mitrailleuses are nasty. Enough said.
  • Getting units out of towns is damned hard, unless you can get a good numerical advantage over the defenders, supported by guns. Dave did this admirably well with the attack of the 15th Corps on Poupry.
We are sticking with BBB for the moment and a delayed trip to the Crimea is planned, subject to the usual work and family pressures. Not sure on the scenario, but one with some cavalry and a mix of troops is hoped for, so I'll await and see what Dave comes up with. So until next time...


Thursday, 4 July 2019

The Battle of Dioran, July 1913, Second Balkan War - a BBB AAR

As we have been enjoying Bloody Big Battles of late, this week we carried on exploiting this rich vein and decided to have a go with a scenario from the recently publish Bloody Big Balkan Battles by Konstantinos Travlos & Chris Pringle. We chose the Battle of Dioran as it fits perfectly on a 4' x 4' table, has relatively few stands and last 7 Turns.

Greek OOB
X Division
10th Infantry Regt
3rd, 4th, 5th & 6th Evzone Regts
1 x Artillery unit

III Division
6th & 12th Infantry Regt
1 x Artillery unit

Bulgarian OOB
3rd Bde, 3rd Division
41st & 42nd Infantry Regt
1 x Artillery unit 

2nd Bde, 6th Bdinska Division
15th Lomski Regt
35th Vranchiski Regt
3rd Ban Battalions
1 x Artillery unit

Broadly speaking the Bulgarians had better artillery with the Greeks better Infantry. 
 
Deployment
Dave had chosen to play the Greeks, so I as the Bulgarian player deployed first.
 

An overview of the table, with the Bulgarians deployed along the heights, forward of the objectives of Dioran (the village to the right of Turn 1 card) and of Doldzeli (just in shot middle right edge of the photo).

The Greek right flank consisting of the X Division out of sight of the Bulgarians due to the hilly nature of the terrain. In the distance can be seen the Greek III Division.

Another view from the Greek X Division perspective, hopefully showing the hills and valleys of the terrain.


Turn 1
Due to the terrain and some low die rolls, the Greeks struggles to move forward, with the 10th Infantry Regt and the 6th Infantry Regts failing to move at all. With limited targets and being dug-in in rifle pits, only the Bulgarian 3rd Divisonal artillery fired upon their Greek III divisional artillery, destroying it. So first blood to the Bulgarians and a suprise to both of us.

The end of Turn 1.

The Greek right flank struggles with the terrain, steep sided hills and the stream. They are however still out of sight of the Bulgarians.

The remnants of the Greek artillery.

The Bulgarians can scarcely believe their lucky start to the game.


Turn 2
The Greek left flank, scared by the loss of the supporting artillery, failed to move or barely moved 3", again due to poor command rolls and the difficult terrain. The Greek right flank fared little better, with the 3rd Evzones no move, the 4th & 5th 3" only, whilst the 10th Infantry Regt managed a half move.

In response the Bulgarian artillery shot at the Greek 12th Infantry Regt, disrupting it and causing it to lose a base, with the 6th Infantry Regt also disrupted. With no other targets, the Bulgarians stayed in their rifle pits.

The end of Turn 2.

The slow advance of the Greek right flank continues, but they are still out of sight of the Bulgarian troops.

The Bulgarian right flank in the form of the 6th Bdinska Division looks on as the Greek III Division takes losses from artillery fire.


Turn 3
Once again patchy movement for the Greeks, with only half of their left flank able to move, with a similar story on the right. The Bulgarians disrupt the 5th Evzones, but Greek fire then disrupts the Bulgarian 41st Infantry Regt. In the Bulgarian turn they are only able to add some more disruption markers to the Greek infantry, but this can be enough given the difficult terrain being fought over to cause problems for the Greeks.

The end of Turn 3.

The Greek right flank finally crests the rise and starts to attack the Bulgarians.

The Bulgarian right flank still causing problems for the Greek left flank,

A view from the Bulgarian right flank towards the Greek attack on their left.

Turn 4
The Greek left flank continues to suffer, as a bad command roll on the disrupted table led to the 6th Infantry Regt retreating one full move (12"). Bereft of support, the Greek 12th Infantry Regt simply dropped into the valley out of sight of the Bulgarian troops and artillery.

On the Greek right flank, the 5th Evzones moved into assault the Bulgarian 41st infantry Regt. Somehow they survived the assault, becoming Disrupted & Spent, only to roll low in their phase, having to make a full retreat and lose a base!!! At the sametime the Greek 10th Infantry Regt managed to destroy the artillery unit for the Bulgarian left flank.

With things hotting up, the Bulgarian 35th Vranchanski Regt moved forward to attack the Greek 12th Infantry Regt, destroying it with rifle fire. The 15th Lomski Regt also moved forward with the aim to move into a position to help protect the Bulgarian left flank, as the Bulgarian 42nd Infantry Regt was disrupted by Greek defensive fire.

The Greeks manage to destroy the Bulgarian left flank artillery.

The end of Turn 4.

The Greeks suddenly surge forward.

The Bulgarian position is under threat.

The Bulgarian 35th Vrachanski Regt with no targets after destroying the Greek 12th Infantry Regt. The Greek 6th Infantry Regt can be seen in the distance on the road.


Turn 5
The Greek right flank being the only combat effective area managed mainly half moves, but this was enough to bring a huge amount of fire onto the Bulgarian 42nd Regt. anything but a Double 1 would see them in trouble and, you guessed it, Dave rolled a Double 1! Somehow they managed to survive, but became disrupted and spent. There was little action in the Bulgarian Turn due to failed command rolls and lack of targets.

The end of Turn 5.

The Greeks continue to try and press forward, despite the difficult terrain.

The Bulgarian troops have retreated into Dioran to support the weak 3rd Ban Battalions.


Turn 6
With the Greek 6th Infantry Regt effectively out of the fight, all the action was once again on the right flank. As the 5th Evzones assaulted Dioran, the remaining Greek troops finally rolled high, destroying the Bulgarian 42nd Infantry Regt, but at the cost of going low on ammo. The quality of the 5th Evzones showed as they destroyed the Bulgarian 3rd Ban Battalions and then exploited forward, pushing back the remnants of the 41st Infantry Regt. So now the Greeks had one of the two objectives in their control.

In the Bulgarian turn, the 41st Infantry Regt managed to rally and retreated towards the second objective, whilst the 35th Vrachanski Regt moved into a valley out of sight of the Greeks.

The end of Turn 6.

The battle has broken up but the Greeks are in Dioran.

A view from the Greek right flank.

End of Game
With both sides spread out and with around 50% losses in troops, the battle was effectively over, as the Greeks would be unable to reach the second objective in the final Turn. So the game ended in a bloody and hard fought draw.

Post Game Thoughts
Well that was an interesting and very different game from our previous ones using Bloody Big Battles. It took us a Turn or two to get used to the massively increased ranges of the guns, given that we had played a Napoleonic battle only the week before, but we quickly got to grips with the changes and really enjoyed the challenge. So as usual some thoughts in no particular order:
  • In a reply to last weeks game, Chris Pringle mentioned " make sure you don't fight the last war." Very sage advice and post game Dave admitted that he did just that as he advanced his III Division in full view of the Bulgarian troops, only to be decimated by their fire.
  • The longer ranges of both the artillery and the rifles did come as a bit of a surprise, along with their increased firepower. In previous games it has been very hard to amass enough firepower to do any significant damage. In this game Dave was able to quite easily get onto the 20 and 25 columns with devastating effect. Seeing 3 bases disappear on one go is quite a shock believe you me.
  • Artillery. As with all periods, positioning artillery at the start can win or lose a game. Certainly in this period counter battery fire to silence the enemy guns almost becomes paramount due to the potentially destructive nature of it. We saw this in the first Turn as the loss of the Greek III Division artillery made it hard for them to advance without supporting artillery fire.
  • Concentration of force really makes a difference in this scenario as we saw towards the end. Post game we agreed that Dave would have been better moving his III Division closer to the X Division, this making it harder for the Bulgarians as they would have had to leave their rifle pits to face this combined force.
  • The nature of the Terrain which was classed as difficult throughout made it hard for the Greeks to get moving early on. If they had had some better command rolls early on, then the outcome of the game might have been markedly different.
  • The quality of the Greek Evzone troops really showed when they were able to get into the assault. Tought troops to face, especially given the poor quality of the Bulgarian troops.
  • The Bulgarian artillery was effective which helped offset the the Evzones above.

So an interesting and challenging scenario from a campaign that neither of us had gamed or heard of before. I certainly recommend getting the scenario book and giving the battles a go, as they certainly give a very different game from the norm, which is always good. We will certainly try out more of the scenarios at a future date, but our next game is likely to be in the Crimea. The exact details are yet to be sorted but it looks to be fun. So until next time...