Wednesday, 8 July 2015

Escort the Siege Engine - A Hail Caesar AAR

Background
Last week we decided to have a break from Black Powder and chose to give Hail Caesar a run out. Despite having had the rules for over a year, I had never had a game with them, with Dux Bellorum having giving me my 'Ancients' fix. So what forces to go with four our inaugral game? Dave fancied giving his Mongols a run out (or should that be gallop?) against his Brettonians masquerading as Medieval French.

Scenario
This was to be a variation on one that Dave had run at his club before, with the Bretonnians having to escort a siege engine off the table, whilst under Mongol attacks from all sides. The Bretonnians deployed off table in line-of-march, with the Mongols organised into 4 Tumen that would randomly arrive and various points on the table. 

As this was a first game and very much a learning exercise for me, we weren't too worried about details of winning and losing, rather just getting familiar with the game mechanics after all of those Black Powder games.

The Battle
As per recent games, the captioned photos will provide a guide to how the game payed out.

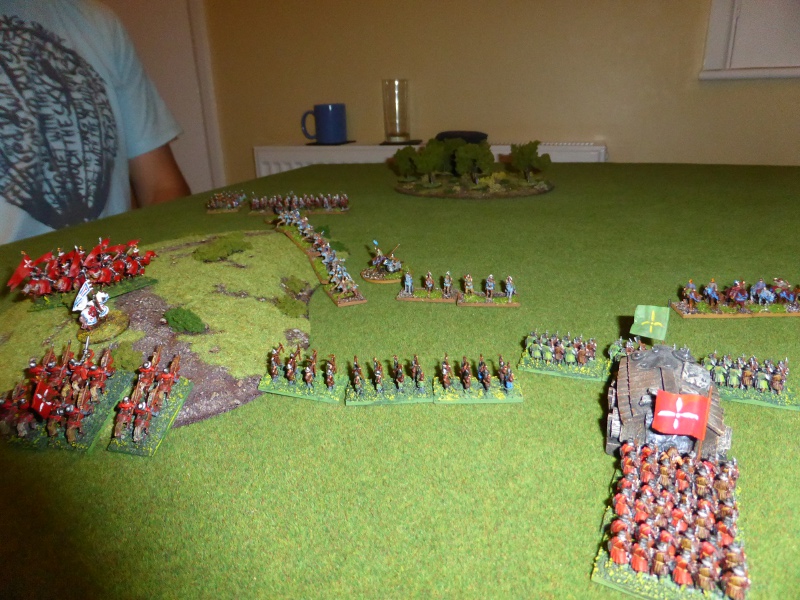
The Bretonnian vanguard arrived on the table with the siege engine closely following behind, escorted by Medium Infantry. The vanguard consisted of two units of archers on either flank and a unit of Sergeants in the centre. From behind the woods appeared the first Mongol Tumen, consisting solely of Horse Archers
The Bretonnians moved slowly onto the table (this siege engine could only move 6cm per Turn) and deployed to face the Mongol threat to their front. The Rearguard arrived in the form of Knights who again deployed on either flank, not knowing if and when further Mongol riders might appear and from what direction. The Mongols advanced slightly to form a blocking positon whilst another Tumen arrived (top left) formed of Heavy Cavalry and Levied Infantry.
As the siege train advanced slowly forward, the Bretonnian Sergeants charged the Horse Archers who evaded whilst shooting with Parthian shots (very annoying). Elswewhere the Bretonnian Archers and Knights advanced forward, but their shooting was rather ineffective. The Mongol Heavy Cavalry just sat there, despite their General urging them to advance.
With the Mongol Tumens all on the table, the Bretonnians deployed as best they could to meet the threat. Once again the Archers shooting was pretty poor whilst the Mongol Horse Archers continued to harass and evade the Kinghts.
Despite having plenty of targets, the Archers couldn't hit a barn door. Maybe if they'd had crossbows it might have helped, as these English weapons were obviously not suiting them!
The Battle descends into a swirling mass of moving cavalry, with the Mongol Horse Archers moving with ease around the Bretonnian units. Once again evades and Parthian shots merely goad the Bretonnian knights.
The Archers continue to suffer hits from the Horse Archers, whilst the Knights attempt to charge home, but to no avail.
The Bretonnians are somewhat spread out by the threat to their flanks and front, but at least one charge was successful, destroying one unit of Horse Archers. Sadly one unit of knights has charged off into the distance, simply unable to catch the Mongol Horse Archers that continued to cock-a-snoop at them.
A disasterous round of shooting by the Mongols coupled with shocking die rolls by myself led to the loss of the Sergeants and Knights on the right flank. With this loss there was nothing to prevent the Mongols from shooting at will into the deployd infantry and archers. Short of Divine intervention, it spelt the end of the Bretonnians.
The Archers and Infantry face the Mongols on their own.
Maybe a last ditch attempt by the Knights to save the day may pay off...
...but despite their initial charge being successful...
...they are caught in the flank by the Mongol Heavy cavalry and are destroyed.
The End
With the loss of the Kinghts it really was game over. We looked at the lie of the land and both agreed that there was no that the Bretonnians could possibly salvage anything from the game and so called it a day.

Post Game Thoughts
So not a bad game but one that was certainly very different from the Black Powder games we had played. So some thoughts on the game and rules:

  • After all the speed and movement of previous weeks, the game felt very slow, which is appropriate for the period. However it did take some getting used to.
  • We found ourselves refering to the rulebook a lot, much more so than Black Powder. Afterall this was my first game and Dave hadn't played for a year, so this was to be expected. However a couple of points did tax us somewhat as the rules in the book and the ones in the Useful rules section appeared to contradict each other. Only by re-reading the relevant sections post game in the cold light of day were we able (hopefully) to clear things up.
  • Early on we got the Evade rules wrong, but later on found out the right way to play them. Again to be expected first time out and they really wouldn't have affected the outcome in anyway.
  • With regards to the Evade rule, we figured out that it would be nigh on impossible for the Bretonnian Knights to ever catch the Mongol Horse Archers, short of a series of failed commands by the Mongols. Whilst historically accurate it was frustrating knowing that they were almost impossible to catch. However if caught they would be automatically destroyed.
  • For a first game the two forces were quite hard to get to grips with in terms of the best tactics to use. Dave certainly handled things much better than myself. As we said post game you would need a good few games to really get to know how best to use the troops at your disposal, but then that is true for any game and period.
So all-in-all another good evenings gaming. Certainly more taxing than Black Powder due to this being my first game. With regards the points raised above, we decided that the next game would be a classic Romans vs Ancient Britons, which hopefully will be easier to come to terms with. Only time will tell...

Thursday, 2 July 2015

The French Cavalry Charge at Waterloo - A Black Powder AAR

Background
I wasn't sure what sort of scenario Dave was going to concoct for our final Nappies game. After last weeks sojourn in the Peninsular War, I was expecting it to be a follow on from that scenario. In fact it was something completely different. 

Basically it was an excuse for Dave to get a lot of rarely used toys on the table and to see how cavalry performed when faced by infantry in formed squares. So the scenario was based upon Ney's cavalry charge when the Allied troops retreated from the ridge at Waterloo, a sort of 'what if' action. 

Scenario
In the face of massed French artillery fire, the Allied troops have moved back from the ridge at Waterloo. Ney believing that the Allies are in retreat, has ordered his cavalry to attack and open up the road to Brussels. In support are the French Young Guard. The Dutch troops hearing the thunder of horses hooves have formed up in Battalion squares to try and block the Brussels road.

The Dutch have formed up with some artillery units in support. The French cavalry and infantry arrive over a period of 6 Turns, to reflect the nature of the French attack. Some of the units have supporting artillery

Forces
The French cavalry is a mix of Dragoons, Lancers and Cuirassiers. The artillery is a mix of horse and foot drawn.  The commanders are rated CV8 but have the bonus of being Reliable and when in Attack Column, thus often rated at CV10.

The Dutch are all standard Line Infantry with a unit of Hussars and their sole commander is also rated CV8.

The Battle
The Dutch deployed behind the ridge line and astride the Brussels road. The French units all begin off table and arrive as specified by the scenario.

The first French cavalry units arrive, Hussars and Lancers, on their right flank, with the aim of moving up into position but shielded from view by the ridge.
As the French first wave advances, Dragoons and Cuirassiers arrive with artillery support. The Dutch try and move an artillery unit to face the threat to their left flank, but fail their command roll .
The French advance with Dave waiting for his commander to do something.
As the French move into position on the right flank, yet more cavalry (fail to) arrive in support, this time astride the road to allow them some room for manouevre (when they appear that is). In response the Dutch Hussars move towards their left flank.
As the French group up for the attack on the right, yet more French cavalry suddenly appear on the left. The cavalry astride the road fail to appear once again, but French artillery deploys in the centre and starts firing at the Dutch squares.
The cavalry in full flow as Dave prepares the next batch of troops to arrive on the table.
The reluctant French cavalry, who are supposed to be the best in Europe.
The Hussars and Lancers charge over the hill into the Dutch Battalion squares.
The initial cavalry charge is easily repulsed, leading to the loss of the Lancers. However, with the artillery deployed, further cavalry units line up to continue the attack.
Disordered and Shaken troops await the next cavalry charge...
...which goes in but it doesn't augur well for one unit. At least the Young Guard have arrived and moved smartly up to support the cavalry. The Dutch lose one infantry unit in the centre, which leaves their artillery gun somewhat exposed
Not a good idea to charge past infantry and a deployed artuillery unit. Rather unsuprisingly this unit failed its morale save.
Mon Dieu! C'est L'Empereur! Well in fact it wasn't (yet) as Le Petit Corporal blundered and delayed his arrival. This was an unexpected re-inforcement as Napoleon arrived with the Middle Guard.
The cavalry continued their attacks on their right flank with those on the left reluctant to meet the fate of their comrades. The Young Guard move towards the road to attack the Dutch centre.
The Dutch and French cavalry meet, with the Dutch coming off second best.
The Dutch are still in a good position whilst the French cavalry are slowy being reduced in numbers, due to repeated charges at the Battalion squares.
The arrival of Napoleon really seems to stir the French into action. The Young Guard move through the gap in the ridge to attack the Dutch centre/left flank, ably supported by yet more cavalry attacks. The Middle Guard move up towards the centre as well whilst a Grand Battery of artillery is in the process of being formed. The exposed Dutch gun is charged in the flank, which sees its demise.
The Young Guard in Attack column.
Napoleon organises the Grand Battery and moves the Middle Guard ready to support the attacks of the Young Guard.
The cavalry overwhelm the unsupported Dutch gun.
The Dutch still stand firm despite pressure on their centre and flanks.
The French attack right across the Dutch front.
The French artillery move up ready to deploy whilst the Young Guard charge in supported by the valiant cavalry.
With no supporting artillery, the Dutch right flank seems a little exposed.
French pressure starts to bear and the Dutch begin to buckle under the weight of the attacks.
The Young Guard shake into Line to fire more effectively at the Dutch infantry in Battalion square.
The Dutch in a last desperate bid to stave off defeat, move into line to face the Young Guard.


The End
Sadly at this point the clock defeated us. We looked at the situation and agreed that after one or two Turns the French would have reduced the Dutch line to a point that the cavalry could have advanced on towards Brussels whilst the Young and Middle Guard mopped up any remants.

Post Game Thoughts
Well once again a very enjoyable game of Black Powder and very different from all the previous games. The scenario was very enjoyable and we weren't sure how the rules would cope with cavalry versus Battalion squares, butwe both agreed that the rules worked very well. So a few post game thoughts.

  • With so much cavalry at my disposal I was not quite sure how best to use it. From previous games I made sure that they had room to manouevre, hence the attacks on either flank. Dave complimented me on my use of the cavalry , which was nice.
  • Dave also pointed out that I tend to be conservative in my use of artillery, deploying it at long range where it is less useful. I will take this on board to try and get them into Medium range and the die and morale benefits that this confers.
  • It was great fun to have played out a part of the Battle of Waterloo, even as bit of a 'what if?' scenario. For Dave it was the first outing for some of his Elite troops, so nice for him to see them on  the table.
  • I must admit that I'm now a Napoleonics convert. This is in large part due to the nice scenarios that Dave has come up with plus the gentlemanly manner in which he plays. Looking back at my club days, the experience would have been somewhat different shall we say. It will be some time before I collect some Napoleonic armies, given the lead mountain that I have. However at least the wooden blocks can be used until such time the proper soldiers can make it onto the field of battle.
So after a brief chat our next foray will be with Hail Caeser! and most likely Teutons versus Mongols. Time to get reading the rulebook but at least the mechanics are the same.

Friday, 26 June 2015

The Peninsular War 1811 - A Black Powder AAR

Background
After a successful first Nappies game last week, we decided to carry on in the same vein, but this time in the Peninsular. Dave once again came up with the scenario, but with reduced forces compared to last week. We agreed that although it was a great game, there were simply too many troops on the table given the amount of time we had at our disposal. Also it is nice to have the time to have a chat before the game and after, to mull over how things went, what to play next etc. 

One thing I did spot in the rules that we got wrong last week was the amount of die that troops in buildings get to roll in close combat, plus that units do not count as supporting them. This may have made the assaults on the farmhouse in my favour, but would not have affected the outcome of the game. Funny how you often stumble across things in the rules post-game, but it is only by playing the game that you learn the rules.

Scenario
The French have been tasked with seizing the bridge over a small Spanish river, that is shallow and fordable at this time of year.  Once again time is of the essence and they must gain the objective as quickly as possible. They start the game with one Divsion on the table, with another in reserve, that arrives after contact has been made with the enemy. 

The Allied troops are deployed on both sides of the river, with a small unit in reserve. They simply have to prevent the French from taking the bridge.

Forces 
The French have two Line Divisions with artillery units in support, but no cavalry. The Allied troops are all Light Infantry, with the 95th Rifles and Portugese Cacadores in the front line. They also have one artillery unit in support and no cavalry.

The Battle
As the game was played out a few nights ago, hopefully I will be able to give a more detailed overview of how the game played out. Apologies for the variable quality of the photos, as i was experimenting with the camera settings to try and reduce the use of the flash all the time. David Bailey certainly hasnothing to fear from me!

The Cacadores deployed in the farmhouse on the right of the river with the 95th at the edge of the fields to the South of the farmhouse. The Allied artillery gun was deployed so that it could cover the advance towards the bridge along the road. The French split their forces either side of the road, with the artillery gun carefully placed so as not to get in the way of or be blocked by the infantry.
The Allies await the French advance in what appears to be a good defensive position.
The French advance en masse and immediately come under fire from the farmhouse.
The firefight at the farmhouse triggers the arrival of the 2nd Division, that advances briskly on the right flank, shielded from view by the hedged fields and farmhouse. The French artillery deploys and combined fire into the farmhouse starts to take its toll on the Cacadores. The French 1st Division doesn't want to play ball as they refuse to move, obviously sulking at not being in attack column.
The Cacadores quickly break under the fire from the French, due to the effects of artillery fire and some unlucky die rolling by Dave. The 2nd Division again carry on their move on the right flank, but the 1st Division continue to sulk. With the loss of the farmhouse, the 95th withdraw to the other side of the field and British re-inforcements arrive on the road and advance towards the bridge until they receive further orders.
The advance of the French past the vacant farmhouse and the deployed foot artillery.
The 1st Division happily advance once in attack column towards the fields and the 95th, whilst on the right flank the 2nd Division continues to make best use of the cover to mask their advance. The artillery splits up to cover the left flank and to move onto the hill to get a good view towards the bridge. The Allies are in a tricky position but there is still a lot of fighting to come before the battle is decided.
The French mass for the attack.
The 1st Division shake out into line to be better able to fire at the 95th, who with the artillery, are taking their toll on one of the units.
The 1st Division face the combined fire of the 95th and the foot artillery.
The 2nd Division prepare for the assault...
... which they execute with perfection. The Allied troops in the field are in a very, very precarious position.
The 95th fall back under the weight of fire and with the loss of the foot artillery, are in an exposed position.
The French advance to administer the coup-de-grace. Outnumbered and outflanked, the Allies wisely choose to leave the battlefield

The End
In the end the sheer weight of the French attacks on their right flank was telling, leaving the Allied troops in a near impossible position. With no chance of holding onto the bridge, Dave wisely  conceded the game, with the French troops just advancing to consolidate their position on the bridge as per their orders.

Post Game Thoughts
Well another cracking game of Black Powder Napoleonics! Once again thanks must go to Dave for a lovely little scenario and the use of his figures. So as usual a few thoughts:
  • Second game in and I think I learnt some of the lessons from last week. I certainly took care to think about the terrain and the movement of my troops before I deployed my 1st Division and its artillery. This nearly went to pot with the 2nd Division, that I initally put on the left flank. After some thought it was obvious to put them on the right flank to make best use of the terrain to advance towards the bridge out of site of the Allied artillery unit. 
  • Dave was very unlucky to lose his Cacadores so early on. They nearly put pay to my artillery unit with the initial exchanges of musketry and rifle fire, but some lucky morale saves kept them on  the table. If I had lost my artillery unit early on, this would have made my task much, much harder. Lesson learnt that artillery is rather fragile to say the least but a must if having to attack troops in buildings.
  • The use of hedged fields gave a very different feel to the game. Certainly much more Spanish and not the billiard tables of Belgium. This does make you think more and as per the first point, deploy your troops with care. As for a game, I like this sort of terrain, so will doe some research into the Peninsular campaign.
  • Having half the number of troops compared to the previous game certainly made it quicker and with a bit more room for manouevre. So broadly speaking a Divison had four Line units and one artillery unit, with the French having two Divisions and the Allies one. Add in a few units of cavalry and I think you have the right balance for an evenings game with time to chat before and after.
I know Black Powder has its detractors (which ruleset doesn't?) but it has provided some great games so far from the SYW into Napoleonics. From a purely gaming point of view it is nice to have one ruleset that, with a few tweaks, is adaptable to very different periods. So for myself as a gamer I can concentrate on the game rather than constantly referring to a rulebook, or as bad confusing one set of rules with another.

So next game up will be a follow on action from this, hopefully next week subject to the usual family commitments etc.