For the next campaign game, the 1st Cavalry & 2nd infantry Division of the Ruthenian forces would be covering the right flank of the Ruthenian 6th Division, that had advanced boldly forward, taking the attack to the enemy. A river seperated the two forces, with the Ruthenian 1st Cav & 2nd Inf tasked with holding the crossing at all costs.
OOB Ruthenian (Blue)
1st Cavalry Regiment less one Squadron that had been lost in the first cavalry clash of the campaign.
2nd Infantry Division with one Brigade at less than full strength after their previous clash with the Prusskian forces. This Brigade would also be missing its artillery that was lost in the aforementioned action.
OOB Prusskian (Red)
6th Cavalry Regiment at full strength.
5th Infantry Division less one Battalion that had been lost in the previous battle.
Deployment
As before I sent off pics of the table with some notes as to where the enmy might appear from, the general orders etc. Dave and Keith then sent me deployment and orders for attack or defense as appropriate.
 |
| An overview of the table. |
 |
| The Ruthenians are covering both lines of attack, with a reserve in the centre and making best use of the hedgerows for cover. |
 |
| The Prusskian left flank and centre. The plan was for the centre and right flank to advance forward and pin the enemy, with the left flank advancing to try and turn the Ruthenians right flank. |
 |
| The Prusskian right flank with the cavalry ready to obeserve or exploit as the opportunities arose. |
Turn 1
Having the campaign initiative, the Prusskians went first and from left to right their troops advanced as best they could, with the artillery moving and unlimbering in the centre. The Cavalry chose not to appear as yet to maintain an element of surprise.
In response the Ruthenians moved their Left Flank towards the Prusskians that had appeared, with the Reserves moving to support the Right Flank. There was some desultory shooting that caused some Disorder on the Prusskian Left Flank.
 |
| The end of Turn 1. |
 |
| The Prusskians have moved their Left Flank forward of the farmhouse to meet the Prusskian threat. The Cavalry and Infantry are still guarding the flank in case of other Prusskian forces appearing there. |
 |
| The Ruthenina Reserves, the Brigade that had been in action previously and carrying one hit at the start to reflect this. |
 |
| The move to counter the Prusskian Right Flank. |
 |
| The Prusskian Left wing and Centre advance. |
 |
| The Right Wing and deployed Artillery. |
Turn 2
Again across the board the Prusskians advanced and formed into firing lines as best they could. The shooting could have been better, but at least they managed to cause some hits and Disorder.
The Ruthenian Left Flank limbered up its artillery to move it towards the farmhouse so that it could add its firepower to the battle. The Cavalry moved forward to offer better protection to the bridge, whilst the Reserves moved slightly to be ready to support either flank as required. The shooting was better with one unit in the Prusskian Centre becoming Shaken & Disordered, whilst there were some hits and Disorder on both flanks.
 |
| The end of Prusskian Turn 2. |
 |
| The end of Ruthenian Turn 2. |
 |
| The Reserves move to support either flank. |
 |
| The Ruthenian Left Flank moves forward of the farmhouse. |
 |
| The Cavalry covering the bridge, supported by Infantry. |
 |
| The Prusskian line beginning to curve for their favourite 'horns' attack. |
 |
| The Prusskian Right Flank supported by Artillery engages the Ruthenian Left Flank. |
Turn 3
The Prusskian line held their positions, whilst the Centre commander managed to Rally off one hit, thus removing the Shaken status from one Battalion. the shooting was poor across the board, with only one hit caused but at least one unit became Shaken.
The Ruthenian turn saw both flanks fail their command rolls, so the Reserves had no choice but to hold their positions. As with the Prusskian shooting, the Ruthenians could have been better, with only the odd Hit & Disorder.
 |
| The end of Turn 3. |
 |
| The stalled Ruthenian lines. |
 |
| The Artillery is stuck and unable to advance and unlimber due to the failed command roll. |
 |
| Despite poor shooting, hits begin to mount on both sides. |
 |
| Likewise on the right flank, the hits begin to mount. |
Turn 4
Again the Prusskians held their positions and engaged in a firefight. The shooting was better, with two units becoming Shaken and/or Disordered, with one managing to pass its Break Test with ease. It could have been worse for the Ruthenians, but they made many Morale Saves.
The Ruthenians held position as well, bar the artillery the managed to unlimber near the farmhouse. The shooting was effective, with two units becoming Shaken & Disordered in the Prusskian Centre.
 |
| The end of Turn 4. |
 |
| The Ruthenian Left Flank 'salient' with the deployed artillery adding their weight of fire to the battle. |
 |
| The Ruthenian Right Flank still in a good position. |
 |
| The Prusskian Left Flank and Centre, with the latter taking a pounding. |
 |
| The battered Prusskian Centre. |
Turn 5
With a stalemate developing the Prusskian Cavarly arrived to observe the enemy. On the Left Flank another successful Rally order was made and elswhere the lines held. the shooting was markeldy more effective, with two Ruthenian units becoming Shaken, with both failing their Break Tests. First blood to the Prusskians!
The Ruthenian Reserves fail their orders so are unable to move to plug the gaps in the line. Likewise their shooting is more effective, with two Prusskian units needing to make Break Tests, one of which is forced to retreat whilst the other Breaks. Almost even stevens on the shooting front this Turn.
 |
| The end of Prusskian Turn 5. |
 |
| A Ruthenian Battalion breaks on their Right Flank. |
 |
| One breaks on the Ruthenian Left Flank. |
 |
| The end of Ruthenian Turn 5. |
 |
| The Reserves fail to move up to plug the gap in the line. |
 |
| Hits are mounting and two unit are Shaken in the Reserves and Left Flank. |
 |
| The Cavalry on both sides watch each other. |
 |
| The Prusskian Left Flank is OK but the Centre is in trouble. |
 |
| The Right Flank is trying to gain fire superiority over the enemy. |
 |
| One unit retreat whilst one breaks in the Prusskian Centre. |
Turn 6
Whilst the Prusskian Right Flank & Centre held, the Left Flank advanced to take advantage of the gap in the Ruthenian Right Flank. The Cavalry Regiment advanced slightly to the the hedgeline to maintain what pressure they could on the Ruthenian Left Flank. The shooting was patchy, but importantly the Ruthenian Artillery by the farmhouse was destroyed by counter battery fire and the Ruthenian Light Infantry were Shaken & Disordered over on the Right Flank.
The Ruthenian Reserves moved up to plug the gaps in the line, whilst the Cavalry Squadron on the Right Flank retired back towards its own lines for better protection. The Left Flank blundered, leading to it having to move slightly to its right. The shooting only managed some Hits & Disorder, but not the devastating volleys required at this juncture of the game.
The Ruthenian Cavalry felt that some action was required given the movement of the Left Flank and so charged at the Prusskain Cavalry, who happily obliged with a counter-charge. In the ensuing melee, both side caused identical Hits & Morale Saves, with each losing one Squadron Broken and the others retreating Shaken & Disordered.
 |
| The end of Prusskian Turn 6. |
 |
| The Prusskian Left Flank advances. |
 |
| The Ruthenian artillery is destroyed and the salient is looking vulnerable. |
 |
| The Cavalry charge at each other... |
 |
| ... leading to MAD... |
 |
| ... and both sides withdraw to regroup. |
 |
| The end of Ruthenian Turn 6. |
 |
| The Ruthenian Right Flank is slowly coming under pressure. |
 |
| The Ruthenian Left Flank and salient is rather vulnerable at present. |
 |
| The Prusskian 'horns' develop but the 'head' is not really there... |
 |
| The Ruthenian Left Flank looks open to attack from the Prusskian point of view. |
Turn 7
The Prusskian Cavalry moves back to re-group and whilst the Left Flank holds and the Centre dresses its lines, the right Flank advances to attack the salient. Shooting leads to two Ruthenian units failing their Break Tests, both on either flank.
With the loss of a unit in the salient, the Ruthenian Left Flank begins to withdraw from the farmhouse to a new defensive line to the South of the road. The Cavalry Squadron from the Right Flank moves to the left to support the remains of the Cavalry Regiment. Shooting leads to the Prusskina Light Infantry become Shaken & Disordered and one unit Breaks in the Prusskian Centre.
 |
| The end of Prusskian Turn 7. |
 |
| The Ruthenian Light infantry breaks. |
 |
| In the salient another Ruthenian unit breaks. |
 |
| The end of Ruthenian Turn 7. |
 |
| The Ruthenian's shorten their lines. |
 |
| The Cavalry moves up in support. |
 |
| The new shorter defensive line. |
 |
| The Ruthenian Right Flan is still holding out, despite intense pressure. |
 |
| The Prusskian Left Flank attempts to turn the Ruthenian flank, whilst the Prusskian Centre is losing units fast. |
 |
| The Prusskian Right Flank has open fieds ahead of it, without any enemy in range. |
 |
| The battered Prusskian Centre. |
Turn 8
Just when they needed to advance, the Prusskian Right Flank failed its command roll. With the Centre, or what was left of it, in such poor shape, they made a Disorderly Retreat to move out of harms way. The Left Flank advanced to close with the enemy and got within Close Range of some units. However the shooting was indifferent with some Hits & Disorder caused on available targets.
The ruthenians had limited options for manouevre, due to either being in a good position or due to Disorder preventing any movement. With opportunities to inflict damage on the Prusskians at Close Range, the Ruthenian shooting was rubbish!
 |
| The end of Prusskian Turn 8. |
 |
| The Prusskian Left Flank gets up close and personal. |
 |
| The end of Ruthenian Turn 8. |
 |
| Despite being under pressure on the right, the Ruthenians are still in a good position. |
 |
| The Prusskian Left Flank is doing all it can to force the Ruthenians to retreat. |
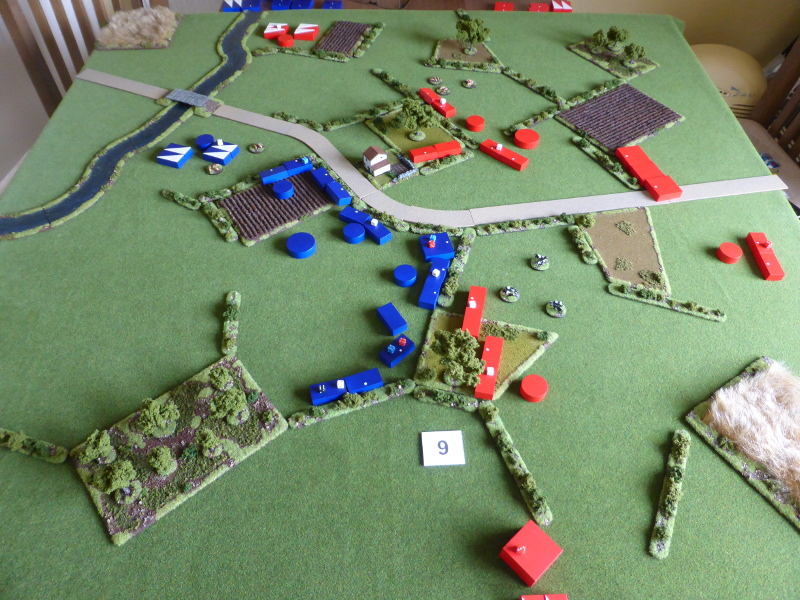
Turn 9
The Prusskian Right Flank advanced and the Left Flank held, whilst the Centre failed its Rally order. The shooting was more effective with an Artillery unit destroyed and one Infantry unit failing its Break Test.
With these losses the game was up for the Ruthenians who started to make a fighting withdrawl, moving and shooting as they went.
 |
| The end of Prusskian Turn 9. |
 |
| The Ruthenian Artillery and Infantry break. |
 |
| The end of Ruthenian Turn 9. |
 |
| The Ruthenians being their successful withdrawl. |
 |
| They are unable to cross the river, so withdraw to the South. |
 |
| The Ruthenian Right Flank. |
 |
| The Prusskian Left Flank in no state to pursue. |
 |
| The Prusskian Right Flank too far away to affect the Ruthenian withdrawl. |
End of Game
Although the Ruthenians had been forced to abandon their position, it had come at some cost to the Prusskians though, who were in no real state or position to pursue. They had secured the the area around the bridge and forced the Ruthenians back, which was good enough for now...
Post Game Thoughts
Well that was certainly a game where it could have gone horribly wrong for either side at various points, but ineffective shooting or good morale saves saved the day as it were. Still a fun game and a nice tactical challenge for both sides. So as always some thoughts on the game and the campaign:
- Losses for both sides were fairly even, with the Ruthenians marginally ahead in losses. More importantly the 2nd Division had now lost all of its Artillery. This will certainly have an impact on future games.
- The terrain in this area certainly suited defense and the Ruthenian deployment made the most of it. Both sides benefited from the protection of the hedgerows, which made the shooting generally less effective than it normally would be.
- The Prusskian Cavalry Regiment was useful in being a threat to the Ruthenian flank for most of the game. They had to leave some units there that would have been more effective in attacking the Prusskian Left Flank. This felt right historically and certainly cavalry is having a nice and subtle effect on the games and the campaign moves.
- Both sides shooting could have been better. At one point I thought the Prusskian Centre was simply going to be blown away, which would have meant game over for them. However the Ruthenians couldn't quite capitalise on their opportunites when they needed it most. On such small things do games turn. Neither sides Artillery was that effective to be honest, but the Prusskian massed Batteries eventaully were able to wear the enemy down.
- For the first time in a game of late the Rally order was useful and certainly helped save the day for one if not two Prusskian units when they were Shaken.
- During the game I was very conscious of the campaign aspect and possible casualties etc and their effect upon the campaign. No Pyhrric victorys here! Also I naturally knew the result from the previous game that was concurrent with this one, but tried to play it as if the result was not known, to be scrupulously fair to both sides. Hopefully I succeeded.
- I'm really enjoying playing Black Powder II and would like to think that I've got a pretty good handle on the rules now. As I'm playing a campaign, I'm ignoring the Brigade morale tests etc and rather looking at thigns from a campaign point of view. This gives a better game IMHO.
So now its a case of taking stock of the last two games and their effects upon the Campaign and what the results of this will be. I've got some ideas but need to mull them over before passing them onto the respective commanders for the next Campaign moves. Plenty to think about so until next time...


Well well. Two defensive failures! I must consider sacking some brigadier generals.
ReplyDeleteYou played that as well or better than I could for the Ruthenian forces. The tactical withdrawal about halfway through was neat and could have produced a win with a few lucky dice rolls (if I read the report correctly).
Thanks for all your work Steve. This is fun - but I sense things might be reaching the end for the Ruthenians...
Give me a lucky General any day, so said Napoleon or something very similar! The Ruthenians came very close to winning and at one point I thought they were going to blow the Prusskian Centre to smithereens! Alas twas not to be.
DeleteI'm glad you're enjoying it but the Ruthenians are on the back foot, but are not out of the fight just yet. They do need a win though...
Very interesting action. With a solid defensive position, interior lines, and piecemeal attacks from Red, Blue had a good shot at victory. I was very surprised to see Blue pull back and withdraw from battle. Red’s center looked spent to me.
ReplyDeleteA good point you make there Jonathan. Looking at the situation at the end of the Prusskian Turn 9, the Ruthenians had lost all of their artillery and were in danger (although slight at this point) of having their right flank turned, thus cutting of one of their lines of retreat. Trying to retreat across the bridge in the face of the enemy, not knowing how the battle was going on the other side was equally problematic. With the Prusskian artillery able to bombard them from safety and them not being able to counter this, this was the deciding factor in the Ruthenian decision to withdraw.
DeleteEnjoyable and hard fought (terrain!) action. I did like seeing a proper withdrawal being played out, one of the good necessities of campaign games.
ReplyDeleteThanks Norm. The terrain was certainly something I would not normally field (excuse the pun) for 19thC Europe, but the campaign map said otherwise.
DeleteRe: the withdrawl, one of the Prusskian 'orders' was to avoid a Pyrrhic victory. As they had most of the Left Flank on two hits at this point, with the Right Flank too far away to provide any reasonable chance of support, they felt it wise to allow the Ruthenians to withdraw, so as too avoid any unnescessary casualties.
Most enjoyable game report. The coloured block armies look most effective on the tabletop.
ReplyDeleteThanks Peter. I do like the look of the blocks and it certainly makes it easier to write an AAR when using the 'photos as reference, as they really stand out. Not everyone's cup of tea for sure, but they work for me.
DeleteWorks for me too! I think the blocks look great.
DeleteI'm glad you like them Jonathan:)
DeleteWonderful stuff Steve, so simple yet it had a real charm to it.
ReplyDeleteGreat write up.
Cheers
Stu
Thanks Stu and glad you enjoyed it!
Delete